09.10.2018 Category: SettingsAuthor: Alexander Viktorovich Radov
The hosts file has been used for decades as a means of blocking malicious sites. It appeared when there was no full-fledged Internet yet. The Windows Firewall, antivirus programs, ad blocking browser plugins, and firewalls were developed much later. The hosts file is often accessed when a PC or mobile device is not fast enough to install several additional applications on it that filter out information and virus “garbage”.
- Preparing Windows to edit the hosts file
Configuring display of system files in Windows folders - How to disable antivirus before editing the hosts file
- Editing hosts using standard Windows applications
Changing the contents of the hosts file in the Command Line
- Working with the hosts file in the Micro Hosts Editor application
- Creating a new hosts file
- Correcting the hosts directory in the registry
What is the hosts file for?
The hosts file is a list of site addresses that is used to convert them into IP addresses when a browser requests a site. The contents of hosts are changed by the user himself, which cannot be said about the database of any of the DNS servers.
For example, when a user visits the Mail.Ru website, the Windows system checks in the hosts file to see if there are any IP addresses in its list that correspond to the web address (URL) https://mail.ru. If there is no such entry in hosts, then through the “DNS Client” component of the built-in service, the Windows system queries the Internet for the nearest DNS website and receives from it the IP address of one of the Mail.Ru servers, for example, 94.100.180.200. The main page of the Mail.Ru portal is loaded from the latter.
If the address https://mail.ru in the hosts file is set, for example, to the IP address 64.208.33.33 (the address of the google.ru website), no access to the DNS website will occur: instead of the main page of the Mail.Ru portal The main page of the Google search engine (https://google.com.ru) will open.
You can find out the site’s IP address for further substitution (or blocking) in hosts, for example, at https://2ip.ru/lookup/.
The hosts file does not contain a name extension. Initially, it is protected from interference by inexperienced Windows users.
You need to change the hosts file without the name extension
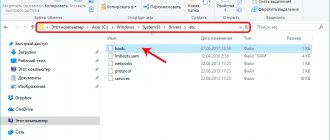
Starting with Windows 2000, it can be found at: C:\Windows\System32\drivers\etc\.
After reinstalling Windows, the hosts file does not contain any valid rules
Windows service files are in text format, despite name extensions different from TXT. When you access the hosts file for the first time after (re)installing Windows, it contains two test rules indicating the format for registering IP addresses and URLs of the sites being opened.
The instructions given in the hosts file clearly show how it is edited. For example, 127.0.0.1 localhost, where 127.0.0.1 is the local IP address of the user’s PC, and https://localhost is the web address that corresponds to it.
Fraudsters often lure access to personal data (mail and social network passwords, bank card numbers and access codes to money in accounts). They send a network “worm” that changes, for example, the vk.com website in the hosts file to a fake IP with a design and functionality on the login page that is no different in appearance from the original.
The hosts file is often used in cases where it is necessary to protect a child from visiting sites with dubious content, and an employee from wasting working time on social networks, during which he could do his job.
Preparing Windows to edit the hosts file
Before editing hosts, check whether file name extensions are displayed, and be sure to disable your antivirus (if any).
Configuring display of system files in Windows folders
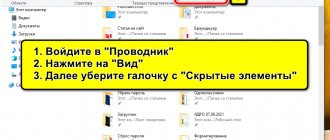
To enable Windows to show hidden files, folders and drives, follow these steps:
- In Windows Explorer, open the View tab and click Options.
Open the "View" tab and click on "Options" - Go to Folder Options and open the View tab.
- Turn off the options “Hide extensions of registered file types” and “Hide protected system files”, enable the “Show hidden files, folders and drives” function, click “OK”.
In the "View" tab, enable the options to show Windows extensions and hidden objects
Restarting Windows is not necessary. Files in all open Windows Explorer windows will immediately show their header extensions.
How to disable antivirus before editing the hosts file
Any antivirus tries to stop a user tampering with the contents of the hosts file. Since the file is a system file, the antivirus tool monitors it, like other files in the C:\Windows folder.
To disable, for example, Avast antivirus, follow these instructions:
- Click on the arrow icon in the notification area of the “Taskbar”. All running interactive applications are displayed in the "Taskbar" notification area
- Right-click on the Avast icon, select "Manage Avast Screens" and click on "Disconnect at...", selecting the time. The "Disable permanently" option is necessary when, for example, you are testing an application that interferes with the operation of other programs.
Disable Avast until you have time to work with other applications
Now start working on the hosts file without fear that your antivirus will interfere with it.
Working with the hosts file
The data in the hosts file is changed both by built-in programs and components of Windows, and by third-party applications.
Editing hosts using standard Windows applications
The main tool for editing the hosts file is the Notepad program.
Changing the contents of the hosts file in the Command Line
To make the necessary changes to the hosts file using the Windows Command Prompt, follow these steps:
- Right-click “Start” and select “Command Prompt (Admin)” from the menu. Without administrator rights, changes to the hosts file will not be saved.
Administrator rights are required to change Windows settings - Enter notepad C:\Windows\System32\drivers\etc\hosts in the Command Prompt.
Enter the line notepad C:\Windows\System32\drivers\etc\hosts - In the Notepad application that opens, edit the hosts file, observing the rule: on the left is the redirection address, on the right is the redirector address. That is, in the left list, IP addresses are entered to which the user will be redirected by the browser by typing the desired address in its address bar. For example, instead of opening the site pornolab.net, the browser will contact one of the vk.com addresses - 87.240.182.224, if opposite pornolab.net in the right column in the same line the web address vk.com is indicated in the left column.
Instead of 127.0.0.1, you can enter the IP of any site obtained from an IP address detector resource - Click on “File” in the upper left corner of the window and select “Save.” Changes to the hosts file will be saved.
After adding the necessary addresses to hosts, changes in the file need to be saved
To test the transition in any browser, go to the site for which the IP address has just been reassigned.
Editing the hosts file directly in Notepad
To directly proceed to editing hosts, follow these steps:
- Open the C:\Windows\System32\drivers\etc\ folder and double-click the left mouse button and try to open the hosts file by selecting the Notepad application.
Windows Notepad is perfect for editing OS service files - Edit the file and save it as described above.
The hosts file will be saved with the new changes. Restart Windows and check the operation of the sites that you have assigned to redirect to other sites from any browser.
Editing the hosts file with third-party applications
Both specialized utilities that make it easier to find and change entries in the hosts file, as well as advanced text editors (Notepad++, AkelPad, etc.) are suitable as editors for Windows service files.
Working with the hosts file in the Micro Hosts Editor application
Micro Hosts Editor is a simple application for easily and quickly changing hosts files. It vaguely resembles Notepad, which has added tools for changing tables.
Network addresses are entered in the same way as in Notepad
To work with the hosts file in the Micro Hosts Editor program:
- Download and run the application with administrator rights using the right-click context menu.
- Using the “File” - “Open” command, find the hosts file.
The hosts file does not have a name extension: the search is performed among all existing files - Make the necessary changes to this file.
- Click the floppy disk button to save.
Changes made to the hosts file will be immediately available. The program is available on the official website of its developers.
Online Solutions Hosts Editor
The OS Hosts Editor application has an advanced wizard for restoring the hosts file in case of incorrect changes, a substitute for IP addresses and ports, and also takes into account the slightest changes in the hosts file with an accuracy of seconds. To change hosts in OS Hosts Editor, follow these steps:
- Launch OS Hosts Editor and use the open folder button to find the hosts file.
- Using the “+” and “-” buttons, add and remove entries in hosts. The button in the form of a magnifying glass will open the record search panel.
OS Hosts Editor searches for entries by both IP and domain name - The “felt pen” button will open the editing panel for the selected line.
OS Hosts Editor will help you fix any entries in seconds - Saving changes to the hosts file is achieved using the floppy or floppy arrow buttons.
After editing the hosts, check the operation of the desired sites in any browser.
Video: how to save the hosts file
Recovery
If for some reason the hosts file was deleted, it can be restored by creating it again in a regular text editor.
Open Explorer and by clicking the area marked with one, expand the “View” panel. Click on the icon indicated by the arrow.
In the applet that opens, also go to the “View” tab. Scroll the entries in the additional parameters window all the way down. Uncheck the line indicated by the arrow, allowing Windows to show the extensions of all files.
In any non-system folder, right-click on an empty space, calling up the context menu. Expand the nested list of actions for the item indicated by a two. Create a new text document.
Give it the name “hosts” and remove the “txt” extension.
We agree with the system warning by clicking the “Yes” button.
Open the created file in Notepad with normal rights and make the necessary entries in it in the order described above. After saving the file, move it to the “etc” system directory. During the copying process, Windows will warn you about writing to a protected folder. Confirm the operation by pressing the button indicated by the frame.
How to restore the hosts file
The correction, as well as the deliberate change of the hosts file, is carried out both by third-party programs and built-in OS tools.
Creating a new hosts file
Restoring the hosts file manually is the easiest option. To do this, follow these steps:
- Return to the already familiar folder where the hosts file is located.
- Rename the existing hosts file, for example, to hosts.old.
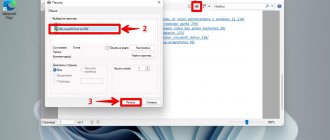
Give any name to the old hosts file so that it does not interfere with the new one - To create a text file, execute the command: right click - “Create” - “Text Document”.
Initially the TXT file will not contain any information - Enter the document name (hosts) without the .txt extension. A new text file will be created.
- Open the newly created hosts file using Notepad and paste the default text.
- Save your changes and restart Windows.
You can also download the original hosts file from any website. When different versions of Windows are installed on a PC, for example, XP, 7 and 10, the hosts file is copied from the partition where it has not changed since the installation of a specific OS version to other folders <drive>\Windows\System32\drivers\etc. For Windows 10, the hosts file from Windows XP is suitable, and for XP - from 10, since these files are the same.
Deleting the hosts file and automatically recreating it
The hosts file cannot be deleted. After the system is restarted, it is recreated in its original form. This solution is suitable when none of the previous methods helped, and there is no point in reinstalling Windows because of a single file that does not disrupt the normal operation of the OS.
Restoring the hosts file using the AVZ application
Antivirus tool AVZ is a full-fledged complex for restoring Windows functionality after a “virus attack”. Its feature is comprehensive work with the hosts file. To fix the hosts file using AVZ, follow these steps:
- Run the AVZ.exe application and go to the operations subsection “Service” - “Hosts File Manager”.
AVZ has a much more advanced version of the hosts editor than Notepad. - Save the edited hosts by clicking the floppy disk button.
The AVZ editor version allows you to easily remove extra (wrong) lines - To “roll back” unwanted changes to the hosts file, run the command “File” - “System Restore”.
The AVZ program will help fix many critical changes in Windows - ABOUT.
By default, the previous contents of the hosts file will be returned
Once you've finished cleaning the hosts file, restart Windows and check how sites that were previously experiencing problems open.
Why clean the hosts file?
Many malware make changes to the hosts file. This can lead to the appearance of advertisements and the installation of unwanted programs, because... When you enter a familiar and verified site name in the address bar of your browser, you run the risk of ending up on a completely different - fraudulent resource, where you will be prompted to install some “useful” program or “update your flash player.” Therefore, after removing viruses, it is necessary to restore hosts to its original state by clearing unnecessary lines. How to do it?
If hosts file changes didn't work
Despite any manipulation of data in the hosts file, changes sometimes do not work.
Correcting the hosts directory in the registry
The location of the hosts file is configured in the Registry Editor. The instructions are suitable for all versions of Windows, starting with XP. To evaluate whether the hosts directory is correct, run the following commands:
- Click Start and type regedit in the Windows main menu search bar. Run the regedit.exe application.
Open Registry Editor by searching in the main OS menu - Move to the registry folder HKEY_LOCAL_MACHINE\SYSTEM\CurrentControlSet\Services\Tcpip\Parameters\.
The location of the hosts file is changed to any location that does not go beyond the C:\Windows folder - Check that the DataBasePath entry points to the C:\Windows\System32\drivers\etc\ directory (the %SystemRoot% variable corresponds to the C:\Windows system folder). If this is not the case, correct it, save the changes by clicking “OK” when closing the windows).
Restart Windows and check the operation of hosts by going to the site included in the file list.
Clearing the DNS cache
Over many months of work on a PC, a cache of saved DNS addresses accumulates. To prevent them from interfering with editing the hosts file, it is advisable to delete them. To clear the DNS cache, run the Command Prompt application with administrator rights, enter the command ipconfig /flushdns and press Enter.
Clearing the DNS cache is unlikely to take more than a few seconds
The DNS cache will be cleared. If clearing it does not work, disable the proxy server.
Deactivating a proxy server
With a proxy server, all browser requests do not request data from the hosts file. Any editing of it will be useless for the browser.
To disable proxy settings using Google Chrome as an example, follow these steps:
- Go to “Menu” - “Settings”.
Open your browser menu and select Settings - Find the proxy server setting (you can use a keyword) and click the corresponding button.
Chrome and IE settings are the same - Go to the "Connections" tab (Internet Explorer network settings), click the "Network settings" button and turn off the local proxy settings option.
Proxy setting is controlled by general Windows LAN settings - Close all Internet Explorer dialog boxes one by one by clicking the “OK” button. The settings will be saved.
The IP address and software port of the proxy server will stop working. The hosts file data will be relevant again.
Unprotecting the hosts file from editing
Windows may have active protection for the hosts file (or the \etc folder containing it) from changes. This interferes with its editing. The instructions are the same for all versions of Windows. To disable this protection, do the following:
- Right-click on the hosts file icon (or its parent folder \etc ) and select the "Properties" menu item.
To edit the hosts file, you need to remove write protection from it - On the General tab, uncheck the Read-Only checkbox and uncheck the Hidden checkbox if the hosts file was initially hidden.
- Click OK to change the attributes.
Edit and save the hosts file using any of the instructions above.
How to edit and how to clean hosts on Windows 10
You can use the command line to edit data. To do this, press the Win+K keys and enter cmd. The command line opens. Next, enter the path to the file location and its name using “/”.
Then we enter the command [/stextbox] – it will allow you to open it automatically through the text editor Notepad. It automatically runs with administrator rights, so when you make changes you can save it without any problems.