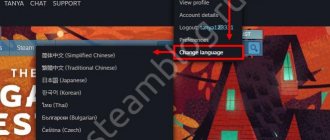
How to switch language on Samsung keyboard?
Samsung smartphones use their own keyboard.
It is quite convenient, but some users do not know how to change the keyboard language: for example, you write in Russian, you need to add a word in English and... And stupor. In fact, everything is very simple. Let's use an example application that requires a keyboard. In our case, this is the browser. Pay attention to the spacebar - two arrows are clearly visible on it.
They indicate that you need to swipe a given key from right to left, or from left to right - and then the keyboard language will be changed. We carry it out and the language has switched (indicated on the space bar).
Agree, simple and convenient.
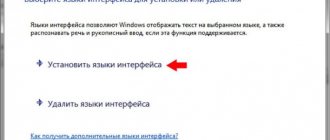
In case you need to change the language, say, English to some other, click on the “Settings” button.
Tap on the line “Languages and types”.
Next - “Language Management”.
Specify the languages you need. For example, we use two languages - Russian and English.
Disable English and enable French instead.
French is used instead of English.
Thus, languages can be changed to any others that are supported by the system. You can even use more than two languages - then the switching will be alternate, for example: Russian, English, French.
Friends! If our site helped you or just liked it, you can help us develop and move on. To do this you can:
Source
Using the Android Menu
It should be noted that by default Google implements support for several dozen languages into its operating system. There is also a Russian among them. A smartphone manufacturer can get rid of certain languages, for example, to reduce the amount of memory that the operating system will occupy. But practice shows that recently large and not very large companies have stopped touching language packs.
It is also impossible not to note the fact that when you first start the smartphone, it should prompt you to select a language. This applies to almost all versions of Android. If he doesn’t offer you to do this, then someone has already launched the device before you. But this is not scary, since you can install the Russian language on Android almost blindly. To do this, do the following:
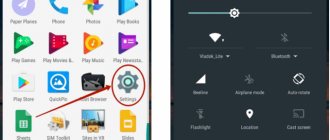
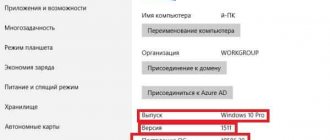
Step 1 : Go to Settings. If you use hieroglyphs instead of English, then focus on the appearance of the icon, which should look like a gear. In the latest versions of the operating system, it can be found not only in the menu, but also in the notification panel, if you pull it out completely.
Step 2. Proceed to the “Language & Input” section. Usually next to its name there is a simple image of the globe.
Step 3. Click on the “Language” item. It's at the very top.
Step 4. You will be offered a list of languages built into the operating system. Select "Russian" from the options.
On more modern smartphones, the procedure will be slightly different. As a rule, the desired parameter is hidden in advanced settings, in other submenus, or simply does not have any identifying marks. It is especially problematic in such a situation to change the system language not from English, but from Chinese (relevant if you ordered a smartphone from Aliexpress). If this is your case, then try the following:
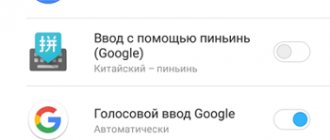
Step 1 . Go to settings (usually a gear icon) and type “yuyan” in the search bar or copy the characters “语言”.
Step 2 . Now find the characters “语言” in the list. Please note that different submenus are displayed during the search. Therefore, choose the line that also ends with the characters “语言” (or simply switch between each line in turn). If you did everything correctly, the language selection menu will open. All you have to do here is find the one you need. In our case it is “Russian”. After this, the system language will be changed.
If the smartphone is in English, then you can change the language in a similar way. Just enter “language” into the search instead of hieroglyphs, and then set the desired parameter.
That's all! However, as we said above, the Russian language may not be on the list if the manufacturer decides to ignore it. Then you need a special program for Russification.
How to change the language on a Samsung phone
Before you start working with your smartphone, you need to set priority input systems. In our country, the Latin and Cyrillic alphabet are most often used. While entering text, the user will switch between them as needed. By default, test input will be carried out on symbols set as system ones.
To select the required types of layouts:
After the changes take effect, all selected characters will be available in the input field in instant messengers and other applications. Of course, they cannot be used at the same time. You will have to switch between available alphabets.
How to change the keyboard (layout) from Russian to English and vice versa
To enter text data, the user may need not only the Russian alphabet, but also the English alphabet. It is where Internet addresses are entered; some symbols and other data are needed. Methods for changing the language on Samsung will depend on the installed on-screen keyboard and the Android OS version:
In the smartphone firmware update field, the usual method of changing may become unavailable. In this case, you need to use the second method. One of these will always do. The reverse switching is performed using the same algorithm.
↑ Activation of Russian localization using a computer
This option can be safely considered an extended version of the previous one, because it will also require the Morelocale 2 utility.
- The first step is to install the Morelocale 2 program on the device.
- The next step is to obtain developer rights in the system. This is done like this: the user needs to go to Settings - About and click on the Build number item several times. After this, the notification “You are now a developer!” should appear.
In this case, a new line Developer options (For developers) will appear in the settings, this is where you need to go and activate the USB Debugging function (usb debugging).
And also create a folder on drive C called adb and unzip the contents of the downloaded file here. We connect the device using a wire to the computer. Make sure USB debugging is enabled (a notification will appear in the status bar). All you have to do is wait for the device to be recognized by the computer. If necessary, we provide access to the device.
Through Start, open the command line, enter the following: cd c: adb The main thing is to ensure that the device is not blocked during all operations with the computer.
Then you need to enter several commands sequentially, waiting each time for the process to complete (just wait a few seconds)
After changing the language, do not forget to install a keyboard with Russian input, otherwise there will be no layout on the device.
Of course, the article does not describe all the ways in which you can translate a smartphone or tablet into Russian. The most radical of the existing ones is changing the firmware on the device. This way, they not only get rid of the problem of lack of localization, but also eliminate unnecessary applications, which Chinese devices are often famous for. However, not all custom firmware is stable and autonomous, so this issue must be approached carefully.
The main convenience of controlling any smartphone lies in the clear and concise arrangement of all elements and menu items. But what if the language settings of the gadget are different from the “great and mighty” one, and to navigate through the menu sub-items, complete Russification of the device is required? Are all the inscriptions displayed in English, or, even worse, in Chinese? No problem! In this instruction we will talk about how to add the Russian language to an Android smartphone from the system menu and third-party localizers, as well as how to add a Russian keyboard layout.
Installing Russian language from the Android menu
In order to set Russian as the system language, on most smartphones you just need to follow a few simple steps. We have attached several screenshots of the same menu items in English and Chinese. They are the ones who will help you get to the right place in the settings.
1. Open Settings and find Language & Input.
If the Russian language is not in the list, you will need to download the localization language from the Google Play app store.
Installing a cracker
1. To install the Russian language on a smartphone whose list of language settings does not include it, download the MoreLocale 2 utility from the Google Play application store.
2. After installing the MoreLocate 2 application, obtain developer access rights. To do this, open the Settings menu - About.
7. Connect your smartphone to a computer running the Windows operating system. Launch the command line and to go to the directory with the application you just downloaded, enter the command: cd c:adb
.
To make sure that the smartphone is detected by the system, enter the following command at the command line: adb devices
and press Enter.
If the device is recognized, its code name will be displayed on the command line.
8. Enter the following command: pm list packages morelocale
, followed by another one:
pm grant jp.co.c_lis.ccl.morelocale android.permission.CHANGE_CONFIGURATION
. The final command line screen should look like this:
Android is a popular system; it is used not only on smartphones, but also on tablets, netbooks, and e-readers; it is used in digital players and game consoles, there are even wristwatches and glasses on this system. In the near future, it will power TVs and cars.
Of course, all these gadgets are much more convenient to use if the interface is Russified.
Changing the language on Android is easy, you just need to select “Languages and keyboards” in the settings and click on the top “Languages” item. In the list that appears, select “Russian (Russia)”.
In the case when Russian is not in the list of available languages, Russification of the Android system is needed. This way you can get both a Russian keyboard layout and an operating system interface in Russian.
The procedure will depend on what version of Android is installed on your smartphone or tablet. The video at the end of the article shows how easy this can be done. Let's take a closer look, if 4.1.x (or lower), then Russification of Android proceeds as follows:
- Download the crack “MoreLocale 2” from Google Play https://play.google.com/store/apps/details? >This is enough for the system to be completely Russified.
For new versions (4.2 and higher) this is not enough; a ban on editing the configuration has been added. Just installing a special crack will not be enough; you need to work with the console.
How to install Russian language on Android using the ADB application? It can be downloaded from the Internet and installed on your computer. Then you can connect a smartphone or tablet to it and get them working.
To Russify Android versions 4.2 and higher, you need:
- cd c:adb – this command will open the folder with the “ADB” program
- adb devices – command to search for connected devices. When the gadget is found, one line should appear below the inscription “List of devices attached”. This is the Android device string.
- adb shell pm grant jp.co.c_lis.ccl.morelocale android.permission.CHANGE_CONFIGURATION – the command gives the MoreLocale2 cracker the rights to edit the configuration of the Android device.
To use the Russian keyboard, you can download any Russian-language keyboard from Google Play and install it.
If you have a Samsung smartphone and the steps above did not help, then try the Locale application https://play.google.com/store/apps/details? >
The ease of use of a phone or tablet largely depends on the availability of Russian localization. The phone may have a different language, and then it is very difficult to use it. You can change the language using standard settings, and if there is no Russian, try adding it using a special application.
The Russian language is pre-installed in most certified devices. Here you simply need to activate it. However, how to find the necessary items if it is, for example, Chinese or Korean. Trying to translate the inscriptions in this case is useless. Fortunately, most modern gadgets have graphical prompts for menu items that will help you find the settings you need.
Let's find out how to change the language on your Android phone or tablet. You need to follow these steps:
In most cases, such settings allow you to change the language to Russian.
In many Chinese phones, you won’t even find Russian in the language settings. It simply isn’t there, and then you won’t be able to change the language. Installing the Russian language on a phone running Android is not a big problem. MoreLocale 2 will help you add Russian.
This is a special application that can Russify almost any device. You can download it from the official Google Play app store or on another website. You must first install the program on your phone. After this, follow these steps:
This app can add a language to virtually any Android device up to version 4.2. Changing the language occurs in a few seconds, but on some devices Russification will be only partial.
Language and keyboard settings on Android
How to change the language on your phone and keyboard? How to change the keyboard? Can I connect it to an external keyboard? How to set up a virtual one? How to change the pointer speed on your phone/tablet? Read the answers to these and other questions in my article.
All settings are relevant for Samsung devices, but are also suitable for other manufacturers.
Let's go to Settings > General settings > Language and input .
Pointer speed
When using a mouse or joystick with a phone/tablet, you can change the pointer speed - just like on a computer.
Summarize . We looked at all the input language settings, how to install and customize the keyboard for yourself; how to work with a virtual keyboard and how to connect an external one to a smartphone/tablet; how to convert text to speech and change the pointer speed if you are using a mouse or joystick.
Samsung is a major manufacturer of household appliances. The company is known for its huge amount of equipment, and, of course, smartphones based on the Android operating system. The trademark was registered by Korean entrepreneur Lee Byung-chul in 1938.
Owners of gadgets from a South Korean company often ask the question: “How is the brand name translated from Korean? Perhaps the founders of the company invested some meaning in the name of the corporation?
Language settings
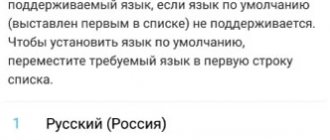
By default, the language that you specified when you turned on your new smartphone for the first time is selected. I have this Russian language, the region is Russia.
Additionally, you can add several more languages. This will allow the application to use the next language in the list if your native language is not supported.
To add a language, click on “+ Add language”. There are more than 100 options available, including Arabic languages.
To set the default language, simply move it to the first position in the list.
To delete a language: long press, select and delete.
What to do if the required language is not available on your mobile phone
In some cases, there is no Russian language in Samsung phones. Typically, such firmware is intended for foreign users. If you try to look into the settings from the previous instructions, you will not find anything in the list of languages.
In this case, we have two ways to solve this problem.
| Methods: | Explanation: |
| Install official firmware with Russian language. | This may require the help of a specialist. |
| Use the application. | You can do it yourself. |
All detailed information on firmware for Samsung mobile devices, as well as the firmware itself, can be found on this forum.
4PDA forum page with firmware from the manufacturer for Samsung
Using the search, find the firmware for the appropriate model and download it. As well as all the necessary programs (flash driver, drivers, etc.). Even if this is your first time deciding to flash your smartphone, instructions for your model can also be found on Youtube. On the forum pages you can ask all your questions. If you have doubts that the process will be successful, take your smartphone to a service center. Firmware with Russian language will be installed for a small fee.
This may be useful: how to remove pop-up ads on Samsung.
How to change the language on the keyboard of a Samsung phone
Samsung Keyboard is a proprietary typing application pre-installed in smartphones of the company of the same name. Unlike its analogues, this keyboard has a rather unusual way of switching languages, which can confuse beginners and those users who have little experience with such solutions. How to change the Samsung keyboard language and type text in the desired layout?
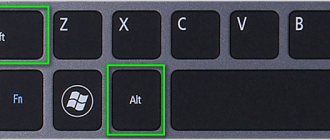
Instructions
To switch the language, call up the keyboard and press the “space” button (the language of the current layout will be written on it).
Without releasing your finger from the screen, move it left or right and depending on which direction you move your finger, the layout language will change. As soon as the desired language appears, release your finger from the screen.
Naturally, this method only works if the language is added to the keyboard (since there are many layouts and switching between them would simply be inconvenient). If the language has not been added, it must be added manually.
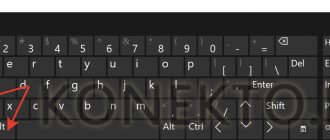
How to add a language on the Samsung keyboard?
On the open keyboard, click on the mode change button (located to the left of the hint words) and among the displayed icons, click on the gear image, thereby calling up the keyboard settings menu.
In the “Languages and types” section, click on the “Manage input languages” button and select the language that is needed (for example, Ukrainian).
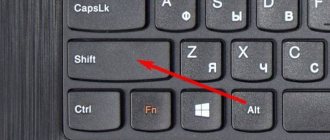
Switching the language on the Android virtual keyboard
It is no longer a secret to anyone that a device can have a virtual and physical (USB) keyboard. Let's start with the sensory one.
1. Go to settings. If you cannot change the English language, then look for Settings.
2. Find “Language and keyboard”; in English this section will be called “Language & keyboard”.
3. Now select your keyboard settings.
4. Rustle inside. You need to detect something like “input language” or “language selection key”. In different devices (and Russification may give different translations).
5. Now select the language you need for the keyboard. After saving, this language will be added to the virtual keyboard (check the box). The "actual" language will be written on a space.
To change the layout you will need to either move your finger left and right along the space bar, or press a special button (most often in the form of a schematic globe). It all depends on the type of keyboard, so the options are different. For example, with Samsung you have to tinker a little longer, because it’s more difficult to find “ticks” on them. However, if you follow the instructions carefully, you will quickly figure it out and add the necessary languages. If necessary, they can be “downloaded” from the network. Of course, in this case, creating a folder on the iPhone is an unnecessary undertaking.