Mobile devices have already become quite an integral part of our lives. Now a person cannot imagine existence without a smartphone or tablet. Devices based on the Android operating system are extremely popular. This OS was developed by Google, and now its market share is incredibly high. Apple's iOS and Windows Phone have a negligible presence in mobile markets compared to Android. However, like all technology, devices on this platform tend to glitch. Various system failures are a hallmark of any operating system. No matter how advanced it may be. Very often devices have to be reflashed. But not everyone knows that it is possible to do without such radical measures. After all, any Android gadget has Android System Recovery 3e. How to use it and what is it even? This is what we will talk about.
What kind of animal is this?
What does Android System Recovery 3e mean? This is a kind of BIOS of a mobile device. Any operating system has its own BIOS - a basic input/output system that can work even if the main OS is damaged. Sometimes the BIOS is different from the standard one (as, for example, in Android devices). It is used to restore the functionality of a smartphone or tablet, apply critical updates or reset to factory settings. The Android System Recovery 3e menu has many items that correspond to one or another action. But the trouble is that the names are written in English. Therefore, many people do not even know how to use recovery correctly.
That is why this article was written. Android System Recovery, the instructions for which are absolutely necessary, is a powerful tool for setting up and resuscitating a smartphone. You need to know everything about how to use this recovery in order not to waste money on specialists. Doing everything yourself is much easier and cheaper. We will analyze each item in the recovery menu and tell you everything we can about it. So let's begin.
How to enter recovery?
This depends on the specific device model. In some devices you need to hold down the power button and the “Volume +” key. But sometimes there are smartphones for which this is not enough. Older models with a mechanical Home button require pressing this button as well. Some devices require simultaneously pressing the power and volume buttons. There are also those who must hold down the power key and both volume buttons. This applies only to original devices from well-known manufacturers.
But there are also frankly “Chinese” gadgets with an incomprehensible operating system and “crooked” translation. Standard methods of logging into recovery may not work in these cases. There are several options here. First: study the smartphone documentation (if available) and find the key combination you are looking for. But this option is not suitable for everyone. Most of these devices either have no documents at all, or the documents do not contain Russian at all. The second option: find the desired combination by pressing all the buttons one by one. Now let's move on to the Android System Recovery 3e menu items.
Features for smartphones from different manufacturers
All actions are carried out with the device turned off (except for the NTS). The combinations to start recovery mode are as follows:
- For Asus: hold down the power and volume up buttons until the Android logo appears in a yellow helmet;
- For Google Nexus/Pixel:
- Press the power and volume down buttons until the menu appears.
- Select Recovery mode using the Power button.
- Wait for the logo to appear
- Hold down the power and volume up button. After 5 seconds, release the volume key,
- For HTC:
- Open “Settings” => “Battery”.
- Uncheck the "Fast loading" box.
- Turn off the gadget and turn it on by holding down the power and volume down buttons.
- Select the Recovery mode line in the menu that appears.
- For LG:
- Hold the power and volume down buttons until the LG logo appears.
- Release the power key for 2-3 seconds and press it again.
- Follow step #3 from the previous method.
You need to hold down the power and volume down buttons.
- For Samsung: Option #1: Press the Power, Volume Up and Home buttons.
- Option number 2: hold down the “Power” and “Home” buttons.”
- Option number 3: hold down the volume up and power keys.
- Option number 1: hold down the volume down and power keys.
- Option number 1: hold down the power and volume up buttons;
To summarize, we can say that recovery is a tool for restoring the phone or installing firmware. It’s easy to launch – on devices of any brand you only need to press a couple of buttons.
Reboot system now
This menu item performs a complete reboot of the device. After selecting this option, the smartphone will load the standard Android operating system without any changes. Typically, this item is used after completing all manipulations in recovery. Or if you loaded into this mode by accident. Although it is unknown how this can be done accidentally. Be that as it may, Android System Recovery 3e, the instruction manual for which is simply vital for the user, has such a clause. And we have to take this into account.
The Reboot system now menu item should be used as a last resort. That is, when all operations are completed, all components are updated, factory settings are reset and firmware is installed. This is the essence of a reboot: to allow the device to apply all the changes made. True, after some of them the smartphone may not boot at all. But that's a completely different story.
Important Feature
Typically a reboot is required when adding any key files to the system or updating libraries.
Previously, you had to reboot even after changing the resolution in Windows. We have already indicated that you should not be afraid of the “reboot system now” message. What to do next depends on the other applications. So, if the answer in the dialog box is positive, the computer will forcibly close all running applications and restart the system. And if, for example, the user had browser pages, office programs or any other similar applications open, then the results of their work will be lost. The solution is simple: when asked about an immediate reboot, you need to answer “No” and after all programs have completed correctly, reboot the computer yourself
In the case when nothing important is running, then you can safely answer “Yes” (Ok)
- https://sdelaicomp.ru/programmy/reboot-system-now-perevod-na-russkij-i-chto-eto-takoe-na-android.html
- https://androfon.ru/article/reboot-system-now
- https://fb.ru/article/173562/nujno-li-boyatsya-soobscheniya-reboot-system-now
Apply Update from External Storage
This menu item allows you to apply the update that is located on the memory card. By the way, new firmware is also installed through this point if the main OS does not boot. There are several sub-items in this Android System Recovery 3e menu. How to flash a new OS? To do this, you need to go to this menu and select the Choose ZIP from SD Card item if the firmware is in ZIP format. If this is just an update file, then you should select Apply Update From SD Card. This is how any device is flashed using recovery. Simply copy the firmware file to the root of the memory card, go into recovery and select the desired item.
Use Assistive Touch for iPhone
Your iPhone has a convenient “Assistive touch” function that will help us reboot the device. Follow the path:
“Settings” – “General” – “Universal Access” – “Assistive Touch”.
We activate the “Assistive Touch” function using the slider.
Activate Assistive Touch
A translucent button will appear on your iPhone screen. Next, click on the “Top-Level Menu”, swipe from the bottom up, and select “Restart” from the list of options at the very bottom. Now click on the menu button in the form of a circle, and our “Restart” option will be there. Confirm the reboot by clicking on it.
Wipe Data. Factory Reset
This is a very important point. This option can restore the functionality of the device without any firmware. This tool resets the gadget's operating system to factory settings. Naturally, everything that was on the smartphone will be deleted: applications, photos, music. In general, everything that was in the internal memory of the phone. Android System Recovery 3e, the operating instructions for which are discussed here, was created precisely in order to revive the device without serious intervention in the firmware. And this option allows you to perform this operation.
This function is also used before installing any firmware. It is necessary to reset the phone to factory settings before flashing the firmware. Otherwise, the new operating system will be unstable. But that's not the worst. If you do not return to the factory settings, the firmware may not be installed at all, and then the user will receive a completely “dead” smartphone. There are no instructions in Russian, but the one that is there clearly states that it is imperative to use the Wipe Data & Factory Reset item before each firmware update of the device.
Custom
Custom recovery includes a much larger number of functions. Most often it is used to install third-party firmware and create a system recovery image (nandroid backup), it is also possible to wipe (clear) individual partitions, for example, data, dalvik cache, return the phone to its original state without losing data, restore the rights of system applications and etc. The most popular are CWM and TWRP.
An example of installing custom recovery on Samsung.
Ratings: 14 , average: 4.14
Wipe Cache Partition
Another useful command in Android System Recovery 3e. The recovery instructions say that you need to use this option in tandem with Wipe Data. If the previous item clears the internal memory of the device, then this one clears its cache. Namely, this is where the working application files are stored. Of course, if this is not done before installing the firmware, then nothing bad will happen. It’s just that in the future, when installing new programs, the device’s cache will grow to incredible sizes. As a result, the smartphone will work very slowly. But this is not so scary, since there are many programs for clearing the Android OS cache. And they work great.
It is also recommended to select this function after a factory reset has been done. This will help the smartphone become even “cleaner,” which will have a positive effect on the performance of the operating system. The instructions in Russian for Android System Recovery 3e recommend performing this procedure after the reset. Before rebooting the device. Then everything will be as it should be.
Wipe Battery Stats
This feature helps you refresh your device's battery. After clicking on this item, the battery cache begins to be cleared, into which the current state of the battery, its nominal capacity and other necessary parameters are recorded. By resetting the battery usage statistics, you can slightly extend its life. And the new firmware will work more adequately with the battery. For some reason, many Android gurus are dismissive of this option. But in fact it is very useful. However, it is not recommended to use it too often. Only before flashing the device.
Mounts. Storage
Here are the controls for the internal and external memory of the smartphone. This item allows you to clear a memory card or built-in memory, format it, or attach it as a drive directly from recovery. This section can be used if you forgot to transfer the firmware file to the memory card, and there is no desire to reboot your smartphone into the operating system. In order to mount the device's memory card as a drive, you need to select Mount USB Storage. As soon as the connection is established, the computer itself will install the necessary drivers for operation.
Once the connection is established, you can do whatever you want with the memory card: format, clear, copy the necessary files, and so on. In order to unmount the flash drive, you should select the Umount USB Storage item on the smartphone screen in recovery. After this, you can move on to other recovery points and carry out further resuscitation of the device on your own.
Printing a document from a computer to a printer
It would seem that printing a document is a fairly simple task. However, beginners are not familiar with this process. And not every experienced user can name more than one way to print files. That is why you need to figure out how this is done.
Method 1: Keyboard shortcut
To consider this issue, the Windows operating system and the Microsoft Office software package will be selected. However, the described method will be relevant not only for this set of software - it also works in other text editors, browsers and programs for various purposes.
- First, you need to open the file you want to print.
- After this, you must simultaneously press the key combination “Ctrl + P”. This action will open a window with settings for printing the file.
In the settings, it is important to check parameters such as the number of printed pages, page orientation and the connected printer. They can be changed according to your own preferences.
After this, you just need to select the number of copies of the document and click “Print”.
The document will print as long as the printer requires. Such characteristics cannot be changed.
Method 2: Quick Access Toolbar
Memorizing a key combination is not always convenient, especially for people who type so rarely that such information simply does not stay in memory for more than a few minutes. In this case, use the quick access panel. Let's take Microsoft Office as an example; in other software the principle and procedure will be similar or completely identical.
- First, click “File”, this will allow us to open a window where the user can save, create or print documents.
Next, find “Print” and make a single click.
Immediately after this, you must carry out all the actions regarding the print settings that were described in the first method. After that, all you have to do is set the number of copies and click “Print”.
This method is quite convenient and does not require much time from the user, which is quite attractive when you need to quickly print a document.
Method 3: Context Menu
This method can only be used in cases where you are completely confident in the print settings and know exactly which printer is connected to the computer
It is important to know whether this device is currently active
- Right-click on the file icon.
- Select the “Print” item.
Printing starts instantly. You can no longer set any settings. The document is transferred to physical media from the first to the last page.
Thus, we have discussed three ways to print a file from a computer to a printer. As it turned out, it is quite simple and even very fast.
Describe what didn't work for you. Our specialists will try to answer as quickly as possible.
Translation into Russian of the phrase “Reboot system now”
Translated into Russian, the phrase “Reboot system now” looks like “Reboot the system now”. Activating this option allows you to restart the Android OS as usual, restoring its standard functionality.
Option "reboot system now" in the recovery menu
The appearance of a menu with the “Reboot” option usually signals that you have entered “Recovery” mode on your gadget. It allows you to reset your phone to factory settings, clear the system cache, and install the necessary updates to the system. This is a convenient tool for restoring the normal functionality of your phone after a failure or various fluctuations in its operation.
How did you get into “Recovery Mode” with the “Reboot system now” option on Android? And what to do if there is no Russian language in the menu? Let's find out below.
Options for applying changes
How to reset windows 8 and windows 10 to factory settings. reset windows 7 to factory settings
After adjusting any settings, the user must confirm them by clicking on the corresponding button in the graphical interface (“Apply” or immediately “OK”). As a result, three applications are possible:
- After clicking, nothing happens externally, but the new settings begin to work. For example, if you select “Properties – Advanced system settings – Environment variables” for the “My Computer” shortcut and change the paths, a reboot is not required. The system will immediately start working with the new variables.
- Once applied, changes are visible immediately. Thus, changing the screen resolution in the latest versions of Windows occurs instantly.
- A reboot is required to use the new settings (that is, reboot system now).
How to get into Recovery Mode on Android and what it is
You can get into the “Recovery” mode either accidentally or by activating the desired key combination. In the first case, the reason may be a normal failure of the device or the owner chaotically pressing the smartphone buttons, activating the transition to the “Recovery” mode.
In another case, the transition to reset mode occurs due to the activation of the following buttons (with the device turned off):
- “Volume down” plus “Power”;
- “Volume up” plus power button;
- Press "Volume Up" plus "Power" button plus "Home" button;
- “Volume down” plus the “Power” button plus the “Home” button;
- You need to press “Volume Up” plus the “Volume Down” button plus the “Power” button.
One of the options for entering “Recovery Mode”
All you have to do is hold down the specified key combination (depending on the phone model), after which the phone will turn on, vibrate, and boot into recovery mode.
Part 2: Boot the system into EMUI reboot system now
It is absolutely true that Huawei EMUI reboot system is now a hidden feature on your Huawei device. This is why many people are not fully aware of this feature and hardly use it. Well, if you fall into this category, do you want to learn how to do it? If yes, then this part is just for you. In this part of our guide, we explain how to perform “Reboot Huawei System Now” in a step-by-step manner. So, keep reading and find out how.
- Step 01: As the first step, you have to press and hold the Power button of the device. In fact, you should do this within 15-20 seconds. As a result, you will see that the corresponding device is completely turned off.
- Step 02: After turning off the device, you must press and hold the Power and Volume Up buttons. Make sure you press these buttons and hold them for a while without leaving any of them instantly.
- Step 03: You will see Huawei log appear on the screen when you hold the above buttons. As you see the logo, just release these buttons.
- Step 04: You can see that there are different options on the screen. You can move from one option to another using the volume button. So, use this button and go to the option called EMUI reboot system now. Once you have selected the option, you must confirm the selection using the Power button.
Here's how to reset your device.
Also, let's learn more about how to recover deleted messages from Huawei or transfer WhatsApp from iPhone to Huawei and how to restore and backup Huawei phone easily.
Functionality of the factory reset menu on Android
After the menu with “Reboot system now” appears at the top, you will have access to the recovery menu functionality. Unfortunately, the menu is not available in Russian, but we will provide a transcript.
Its options are as follows:
- “Reboot system now” - reboot the system;
- “Reboot to bootloader” - restart into bootloader mode, directly boot the OS to gain access to recovery mode;
- “Wipe data/factory reset” - clearing data and resetting to factory settings. Used before receiving the “factory” version of the phone, when unnecessary data has been deleted from it;
- “Wipe cache partition” - cleaning the cache partition;
- “View Recovery Logs” - allows you to view recovery logs;
- “Run Graphics Test” - runs a graphics test.
- “Install zip from sdcard” - installation of a zip archive prepared in advance by us from an SD memory card;
- “Backup and restore” - creating a backup copy of partitions and restoring them from a backup;
- “Mounts and storage” - mounting individual partitions and formatting them;
- “Advanced” - additional options.
One of the recovery mode menu options
Moving the cursor between these options is usually done using the “Volume Up” key, and selecting the desired option using the “Volume Down” key.
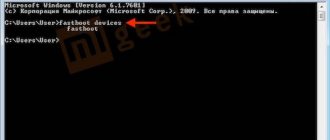
Entering Recovery Mode via Terminal Emulator
Download Android Terminal and type the following command:
Press “Enter”, a request for root access will appear, grant it.
Then enter.
Press “Enter” again and the phone will instantly reboot into Recovery Mode.
Writes “There is no team”: what to do?
If such an inscription appears on the screen and the Android is lying down, try quickly pressing 2 buttons: “ON” and Volume “+”. After this, the Recovery menu should appear.
Every novice user of an Android tablet or phone, traveling through thematic sites and forums, sooner or later comes across a mention of the mysterious, which is especially often mentioned in instructions for firmware, replacing the system kernel and other “hacker” things.
So what is it, what is it intended for, and how to handle it correctly? I will try to answer these questions in this article, which contains complete instructions for working with ClockworkMod Recovery.
In a nutshell, or ClockworkMod
or simply
CWM
is an alternative recovery for Android devices. Instructions for working with ClockworkMod Recovery contain the following sections:
Introduction to alternative recovery ClockworkMod
- this is a much more powerful system recovery utility (menu) compared to the factory one, which allows you to make full backups of the entire system of the device, install software, firmware, kernels and much more on it, which is usually not possible with factory recovery. ClockworkMod is installed in a special system partition of the internal memory of a tablet or phone, in place of the factory recovery menu.
ClockworkMod Recovery can help you out in some seemingly hopeless situations. Even if your tablet or phone cannot boot, in many cases, using CWM you can restore the system with all its settings and applications.
Here is a rough list of what you can do with ClockworkMod Recovery:
Install custom firmware and unofficial kernels
Install factory system updates, add-ons and patches
Connect to a computer via USB in removable storage mode
Connect to a computer via USB to work with the ADB program
Create a complete backup copy of the current firmware and its individual parts (system, settings, applications)
Restore a device from a previously created backup
Reset to factory settings (Wipe – data/factory reset), clear cache (wipe cache), clear Dalvik-cache (wipe Dalvik-cache), clear battery statistics (wipe battery stats)
Create partitions on a memory card and format them
Created by developer Koushik Dutta (also known as Koush), there are versions of CWM for most Android phones and tablets.
Launching ClockworkMod Recovery
There are several ways to boot your tablet or phone into ClockworkMod Recovery.
1.
Using the ROM Manager program, selecting “Load Recovery Mode” from its menu.
2.
By pressing a specific key combination when turning on the device. This combination depends on the device model. On many devices, you can get into recovery by pressing the volume down and power buttons at the same time when turning them on.
If the "Reboot system now" option does not work
If when you try to exit the “Recovery” mode and select “Reboot” this function does not work, then do the following on your Android:
- Try holding down the power button of your gadget for more than 10 seconds;
- Remove the battery from your phone for a few seconds, then put it back in. Try to turn on the phone in the usual way;
- Wait until your gadget's battery drains;
- Connect your gadget to your PC. On the latter, launch the special program “ADB RUN”, and in its menu select “Manual Command”;
Select the "Manual command" option
Next, enter the following command:
adb reboot normal
After this, the gadget can reboot in normal mode.