When you update your operating system again, you may see, instead of a message indicating a successful update, error code 0x80070422. Users of the Windows operating system almost every day have to deal with errors in its operation. The reliability of operating systems has always been a source of criticism. And it is very difficult for the end user to fix OS errors like error 0x80070422 on their own, especially considering that the same problem is sometimes caused by completely different reasons - from ordinary failures in Windows to serious breakdowns in PC hardware. Often it ends with a complete reinstallation of the system.
So, today we would like to look at a failure that does not lead to the need to immediately reinstall Windows, but a user who finds out that the installer has detected error 0x80070422 should, if he does not take timely measures, be prepared for big troubles in the future. What are the reasons for this error? Usually the cause of this error is a failure or stop of a number of services on your OS.
Errors and their cause
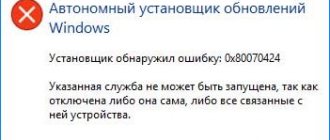
Some programs, such as Internet Explorer, may display the following error when trying to launch:
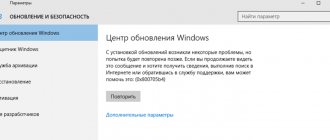
Windows Update Standalone Installer The installer encountered an error: 0x80070422 The specified service cannot start because it is disabled or all devices associated with it are disabled.
The same error can be received when trying to install some Windows component, for example .NET Framework 3.5.
This error may appear if the Windows Update service is disabled (or is currently not running). start this service .
Symptoms of This Error
When you boot up your computer on a Windows Vista/7/8 operating system, you may receive the following error:
Error(s) found: Code 80070003 Windows Update ran into a problem.
When you boot into your Windows XP based system, you may be greeted with the following error message:
A problem preventing is Windows from accurately checking the license for this computer. Error code: 0x80070002.
There may be a number of discrepancies, depending on the severity of the error code 0x80070002 or 0x80070003В and the steps you have already taken in an attempt to fix the problem.
With that said, below I have provided you with a number of solutions, all of which have proven to be effective at tackling this particular error code 0x80070002 or 0x80070003 on all the operating systems users encounter it on.
Bug fix
There are several methods to start the Windows Update service, and here are some of them:
Via GUI
In order to get into the service management console, you need to do the following: press the Win + R buttons, and in the window that appears, type the command services.msc, then click OK.
A console will open with a large list of Windows services, and we need to find the one called “Windows Update”.
To enable it, you need to double-click on it with the left mouse button, or right-click and select “Properties”. In the service properties, the “Startup type” parameter should be changed to “Automatic” (or to “Manual” - both of them will allow you to start the service when it is needed). After changing the “Startup type”, you should not rush and close this window; first you need to click the “Apply” button.
After clicking the “Apply” button, buttons for managing the service state will become available. To start the service, you must click the “Start” button.
After this, a window with the service starting may flash (or may hang for quite a long time). As soon as the Windows Update service properties window displays the status as “Running,” the service is successfully started and running.
Via command line
Open the Start menu and start typing “Command Prompt” in the input field. On the found “Command Prompt” application, right-click and select “Run as administrator”.
Then we execute the following commands in it:
sc config wuauserv start= auto sc start wuauserv
The first command sets the Windows Update service to automatic mode, and the second command starts it.
You can check the service status using the console command:
sc query wuauserv
If the resulting command output says “Running” in the status line, then the service is running.
We scan the computer with Dr. antivirus. Web
In this case, you can use a free utility from the developers of the famous antivirus Dr. Web, which will scan your computer and eliminate detected threats. The instructions for it look like this:
- Go to the official website of the developer and . It does not require installation.
- After the first launch, you will need to accept the license terms by checking the appropriate checkbox and clicking on the “Continue” button.
- Click on the “Start scan” button.
- The scan will take a long time (the exact time depends on the characteristics of your computer and the number of files on the disks). Upon completion, you will have to delete detected threats and suspicious files.
When you remove all threats, try returning to the first instruction and repeating it again. In this case, the error will most likely be completely eliminated.
What to do if the problem is not resolved?
If you have done everything written in the previous paragraph, but error 0x80070422 has not disappeared, then you can try other methods that are described below.
Check the Windows Management Instrumentation service
In the list of Windows services, you need to find the “Windows Management Instrumentation” service and make sure that it is enabled.
After starting this service, you should check whether the error 0x80070422 has disappeared or not.
Restart the Network List Service service
Open the list of Windows services and look for the “Network List Service” service there (in the English version Network List Service). Then select it with the mouse, press the right button and select the “ Restart ” item, as in the screenshot below:
Naturally, this service must be running (the Status line should read Running). After restarting, try installing the required package to make sure that error 0x80070422 disappears. If not, then move on to the next point.
Run "Troubleshoot using Windows Update"
Open the control panel , look for the “ Troubleshooting ” item there and open it.
In the window that appears, you must select “ Troubleshoot using Windows Update ” and run it, then click Next and wait for the results.
Disable use of ipv6
In some cases, disabling the ipv6 protocol in the network settings may help. You can read more about how to do this on different versions of Windows in our article: How to enable and disable IPv6 in Windows
How to Solve Windows Update Error 0x80070422 in Windows 10
- Make sure that Windows Update service is running
- Disable IPv6
- Check EnableFeaturedSoftware Data
- Restart Network List Service
- Run Windows 10's update troubleshooter
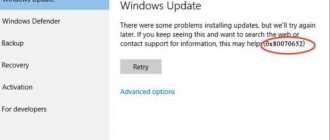
Error 0x80070422 usually occurs when you're trying to update Windows 10 through Windows Update, and this error prevents you completely from downloading Windows updates. This can be a big problem since your system might be vulnerable and you'll miss out on the new features, but fortunately for you, there's a way to fix this.
Solution 1 – Make sure that Windows Update service is running
- Open Control Panel and go to Administrative Tools.
- Find and run Services.
- When Services window opens find Windows Update service and double click it to open its Properties.
- In Windows Update Properties find Startup Type and from the dropdown choose Automatic. Also check the Service status, and if the status isn't set to Running click the Start button in that section to start it.
- Click OK to save your settings and restart your computer.
Solution 2 – Disable IPv6
Some users claim that disabling IPv6 helped them to resolve this issue, so to do that follow these instructions.
- Open Control Panel and go to Network and Sharing Center.
- Find your connection, right click it and choose Properties.
- You should see the list of items. Find Internet Protocol Version 6 (TCP/IPv6) and uncheck it.
- Now click OK to save changes.
- Restart your computer and see if the issue is resolved.
You could also do this by using Registry Editor.
- Type regedit into the Search bar and choose Registry Editor from the list of results.
- Navigate to the following key:
- HKEY_LOCAL_MACHINESYSTEMCurrentControlSetServicesTCPIP6Parameters
- Right click the Parameters on the left pane and choose New > DWORD (32-bit) Value.
- In the name field enter DisabledComponents.
- Right click the new DisabledComponents value and choose Modify.
- Enter ffffffff as Value data and press OK to save changes.
- Close Registry Editor and restart your computer.
- If you want to enable IPv6, just navigate to the same same key like in Step 2 and change the value of DisabledComponents to 0 or just delete DisabledComponents key.
Solution 3 – Check EnableFeaturedSoftware Data
- Go to Start > type “regedit' > hit Enter to launch the Registry Editor
- Located the following key:In HKEY_LOCAL_MACHINE > SOFTWARE > Microsoft > Windows > CurrentVersion >In Windows Update > Auto Update
- Check EnableFeaturedSoftware Data and make sure that its value it set to 1.
Method 1: Using the Media Creation Tool
Media Creation Tool is a proprietary application from Microsoft designed to create bootable media with an operating system for further installation. It will show a second option - “Update this PC now” if it detects missing updates. This will help avoid directly contacting the Update Center and, most likely, will solve the error when installing the latest update.
- Open the official page and download the program by clicking the corresponding button in the block "Create Windows 11 Installation Media".
- Run the resulting executable file.
- Accept the terms of the license agreement and proceed further.
If a menu with a choice of operating mode does not appear on the screen, where there would be an option related to updating the PC, then the program did not find an update, and you should quit it, and then move on to other methods.
Method 5: Reset Windows Update Services
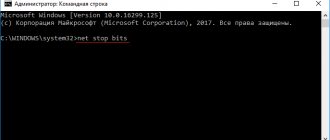
This is a complex method that involves active interaction with the command line. You will need to enter a series of commands to update the state of services and remove temporary files, which can cause problems with installing updates. There is nothing complicated, just launch the console in a way convenient for you and, in turn, enter and apply each command below.
net stop wuauserv net stop cryptSv net stop bits net stop msiserver Ren C:\Windows\SoftwareDistribution SoftwareDistribution.old Ren C:\Windows\System32\catroot2 Catroot2.old net start wuauserv net start cryptSvc net start bits net start msiserver
Method 3: Disable TCP/IPv6 protocol
By default, in Windows 11, both the TCP/IPv4 and IPv6 network protocols are activated, which is necessary for the correct functioning of the Internet. However, the second option is used only in rare cases, so it is often simply not needed. Sometimes errors associated with OS updates lie in this very protocol, and disabling it helps resolve the situation.
- Open "Start" and find "Control Panel".
- In the list of icons, find "Network and Sharing Center".
- Click the link with the connection type that is currently active.
- In the window "State" you are interested in the button "Properties".
- Uncheck the box "IP version 6 (TCP/IPv6)" and press "OK".