Probably every user of a personal computer from time to time has to deal with the need to work with photographs or pictures. Of course, on the PC of advanced users there is probably the famous Photoshop, in which you can do any manipulation with the image. But what should those who do not have this program or who do not know how to use it do? The easiest way out of this situation is to use standard Paint. In some cases, it can successfully replace more professional and complex programs. In this article you will find answers to questions about how to make a transparent background in Paint, remove it or change it to another.
Beginning of work
Before you change the transparent background in Paint Windows 7, you should open the image that you will be adjusting.
This is done by right-clicking on the file and selecting the appropriate item from the drop-down menu (Open with – Paint). Please note that compatible formats include BMP, JPFG and GIF; others will not work. If the image exceeds the screen size, you need to go to the lower left corner and make an 800% increase by clicking on the magnifying glass located on the toolbar and selecting the number 8.
Other applications
Paint and Paint 3D comes installed on Windows 10. In a pinch, they are good enough apps to use. Paint 3D is better than Paint, but if you have a little time, you can learn how to make a background transparent using Paint.net or GIMP. This is quite easy to do since it supports layers. GIMP is a little more difficult to use since its user interface isn't the most intuitive, but you essentially need to add an alpha layer to an image.
In both cases, you have a magic wand tool that allows users to more easily select objects around the subject. GIMP also has a freeform selection tool that allows users to trace a precise/exact path around an object and select it.
If you have Photoshop, you can use it to make the background transparent. The reason we don't recommend using Photoshop is that it's subscription based and a bit difficult to learn. If you already have the app, you can use the selection or magic wand tool to select the element you want to keep and remove the background. The alpha channel is turned on by default, and like Paint, Photoshop also lets you invert a selection.
Selecting a color palette and drawing the outline of the image
On the color palette, you should make a choice of yellow-green (also called lime) color. This is usually chosen because a color contrasting with the rest of the picture is needed, and the selected tone is quite rare in images.
After this, using the Line tool, select the object that will be cut out. If the image is placed on a white background, you can use the “Pencil” to fill in the missing pixels. This will cause a wide green line to appear around the image.
Next, you need to right-click on the lime color and use the Select tool to outline the rectangular areas of the background color. This should be done carefully, trying not to enter the object. There is no need to worry too much about the extra triangles remaining around the outline of the drawing; they are removed later using the Eraser tool. After activating it, you need to select the smallest possible square in the menu that appears.
After all the manipulations, you get an object with a green screen around it. If you are interested in how to change the background in Paint, then you need to zoom out to 100 percent (1 in the zoom menu) and click on the paint bucket in the panel (Color Fill tool). Then select the desired color in the palette and click anywhere on the green background. After this, the background will become different.
How to insert?
You can insert an image into another using Paint as follows:
- Open the picture that will serve as the basis of your image and to which you are going to attach another one.
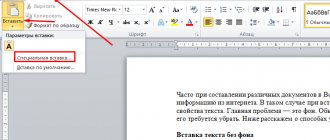
- Click on the arrow under the “Insert” button.
- Select the “Insert from” function, and then select the image for which you made a transparent background.
Since you can remove the background in Paint for several images, this way you can combine a large number of files with each other, and they will fit into each other as organically as possible.
It is often necessary to make the background of a drawing or photograph transparent. Let's find out how to make a transparent background using the free paint.net graphics editor.
You can download the program from the Russian-language website about paint.net.
This resource is quite informative, there are instructions and lessons, and you can download additional effects.
Click the “Download paint.net” button.
A page will open where we see that the editor has a Russian language, below is information about the system requirements.
Click on the button that says “Download current version...”
In the new window that opens, we see the current latest version of paint.net, click on the link and download the archive.
After downloading, unpack the zip archive and run the program installer.
Move an image to a new background
In order to move the image to another background, you need to select white in the palette and use the Fill tool to paint over the entire lime background. After this, press the key combination “Ctrl+A” - and the second (lower) button is activated on the pop-up toolbar. After making sure that the new background has opened in another program window, you need to copy the image (key combination Ctrl+C) and paste it into this second window (key combination Ctrl+V). The work is ready! All that remains is to save it.
Why is this necessary?
It’s worth noting right away that in this case we are not talking about the background of photographs, since it is impossible to make a transparent background for a picture as such. But at the same time, it remains possible to remove the background of photos when inserting them into other images, since it can interfere with their merging, and this is quite simple to do:
- Open the photo that you are going to insert into other images in the future.
- Click the “Select” button at the top of the toolbar.
- Select the “Transparent Selection” item.
- Click on “Select” again and select “Select All”.
The “Select All” button also has its own hotkeys assigned to the “Ctrl+A” combination.
Now you can place the inserted image in the place you want and remove the selection. Since you managed to make the background of the picture transparent Paint before, it will not overlap other images on the working field, which is quite convenient if you want to combine several pictures with each other.
A few nuances
When editing detailed images, it will be much easier to work if you zoom in on the image.
This can be done by selecting the “Scale” sub-item in the “View” menu or simply clicking the “Zoom in” button located on the ribbon. Please note that larger image sizes will require more tracing time. To reduce the size of the picture, press “Ctrl+A” and drag the marker located at the bottom left up. It is important to maintain proportions so that the image does not turn out distorted.
During the work, errors will inevitably occur, and therefore you will have to edit the line. In order to be able to quickly undo previous actions, it is recommended to constantly keep your fingers on the “Ctrl+Z” key combination.
If the image has a curved border, it is advisable to use the Curve tool. To do this, click the corresponding button on the toolbar, draw a straight line from the beginning to the end of the border section, which then needs to be pulled to the left or right, describing a curve.
In order for the greenscreening method to work, in Paint Winwows 7 a transparent background must be set in the settings for inserts. If you do not set this setting, the background will be added from the original image. The Insertion Settings control panel will appear on the left side of the image you are editing, below the main panel, when one of the selection tools is used.
Summarizing
The Paint.net graphic editor is free software that allows you to perform amateur photo editing tasks, without prior comprehensive study of the program, with the ability to obtain a result that is decent in terms of quality characteristics.
The described background decolorization methods will allow you to add new meaning to your photos and interesting pictures through simple manipulations, giving them new life. It is noteworthy that even children can work with this application, and the final result, with a creative and principled approach to completing tasks, can be absolutely equal and even compete in efficiency with photos processed in more powerful graphic editors.
Removing the background
If there is a need to transfer an object to another background, then you inevitably have to face the question of how to remove the background in Paint. This is done quite simply:
- using the “Magic Wand” tool, the background is selected;
- the selected part is deleted using the Delete button or the “Clear Selection” command from the “Edit” menu, as a result of which a background in the form of a “chessboard” appears, conditionally showing transparency;
- The resulting image is saved (preferably in PNG or GIF format), which can later be used at your discretion.
How to save a picture without a background in Paint 3D?
On a white background, you should display some kind of picture. Next, in the tools on the right, turn on the Transparent Canvas option. After which, the picture will be displayed without a background, that is, it will become transparent. All is ready!
Interesting materials:
How to change skin color in Pixart? How to change the color of foliage? How to change highlighter color in Adobe Reader? How to change menu color on Samsung? How to change color on YouTube? How to change taskbar color in Windows 10 Home? How to change print color in Epson printer? How to change the keyboard backlight color on an ASUS TUF laptop? How to change the keyboard backlight color? How to change the color of a note in Excel?
Step-by-step instructions in Paint: how to make a transparent background
Step one. In the “File” menu, select “Open” and click “Browse” to open the desired image.
Step two. Before you make a transparent background in Paint, you need to select the “Magic Wand” in the toolbar and set its sensitivity to 50 percent. For complex backgrounds, sensitivity should be set at 25-40 percent.
Step three. You need to click the “Magic Wand” on the white background, which then turns into pale blue.
Step four. It is necessary to delete the background selected in this way using the Delete key on the keyboard or through the “Edit” menu - the “Clear selection” item.
As a result, the background will become transparent, although in Paint it will have a checkerboard coloring.
However, the work on how to make a transparent background in Paint does not end there. Step five.
After all the above manipulations, some areas in the picture will still remain white. In order to make them transparent, you need to repeat the previous steps for them as well. Step six. The resulting image with a transparent background must be saved by selecting “Save” in the “File” menu and specifying the file name, and selecting the required format (PNG or GIF) in the drop-down list.
Changing the background of a picture in the Paint.net editor
To work with images, pictures, photographs, it is recommended to use the free Paint.net utility, which is not included in the Windows OS applications, by downloading it here. By installing a free application on a computer device, the user will be able to work with images and perform complex tasks using a simple and understandable tool.
Making a transparent picture background
Due to its versatility, Paint.net allows you to work with images, change the background of pictures, and eliminate defects. Often users set themselves the task of changing the background of an image. Such tasks allow you to place a specific logo on a colorful base, or your photo, an image of a pet or a flower arrangement not against the background of a table or window, but with an interesting and spectacular landscape as a background.
This task can be accomplished quite easily by uploading two photos into the application: the main one, with a colorless background, and the secondary one, which will serve as the basis for a new picture. To combine photographs, you will need to initially go into the parameters of each of them, making them similar in size, which is the basic condition for the possibility of combining them: it is important to set identical canvas sizes, putting the same values in the “Height” and “Width” sections of the image.
Next, creating a complex image is done like this:
- Open the image you want to change the background on a transparent background, transfer it to a new background by sequentially performing the following manipulations: by simultaneously pressing Ctrl and A, select it, copy it by holding down the key combination Ctrl and C, and after switching to the background image, paste it with the Ctrl+V command.
- After this, if the graphic image does not appear in the background, you will need to activate it by moving it to the front.
- Save a new photo: in the “File” item, select the “Save As” command, assign a name to the created illustration and select the preferred format.
At this point, the work can be considered completed, but the stumbling block in the procedure is the moment of creating a photo with a transparent background.
Making a transparent background in the picture
Open the Paint 3d program and create a new document. By default, we will have a canvas in the form of a white rectangle. If you want to draw something on a transparent background, then to do this you need to perform one simple action: on the toolbar, click on Canvas, and in the menu that appears on the left, move the slider under “Transparent Canvas” to the On position.
That's it, now our canvas has become invisible, and its borders are marked with a thin frame - so that when drawing you do not go beyond its boundaries. After the drawing is drawn, it must be saved in JPG or PNG . In any other format, a white background will appear instead of transparent. To do this, go to Menu – Save As – Image and select JPG or PNG format.
As you can see, there is nothing complicated in creating a transparent canvas using the Paint 3d program. However, you don’t always have to paint on a ready-made canvas; sometimes you need to remove the background from a ready-made image. And here simply clicking on “Transparent background” will not help the matter, but the Paint 3d program has a solution for this case too.
Replacing the background
This function allows you to replace the background or even make it transparent. Detailed instructions for its use:
- Open the picture and remove the lock.
- On the work panel select "quick selection" and adjust its size. The size can be adjusted using the brace keys on the keyboard, the left key decreases and the right increases the size of the brush.
- After that just carry out the tool on an unnecessary image, and it is automatically highlighted. Selection works on the principle of finding pixels that are similar in color and adjacent to pixels in the brush area.
- To remove the background in the best possible way, you should use the function clarify edge. To do this, select any selection tool and click on the button in the upper right quarter of the screen " clarify edge", however, if the background image was selected before, then use the keyboard shortcut shift+ctrl+I, an inversion will occur and the image will be selected, the edges of which need to be refined. This will open a panel where you can choose a contrasting background And configure anti-aliasing, feathering, contrast and edge position. The most commonly used function is the anti-aliasing function, which will visually make all transitions between pixels smoother.
- Then you can press the delete and everything selected will be deleted. The selected part can be removed using a regular eraser by simply starting to move it over the selected area (only the background image will be erased).
- You can also not only erase the background, but also copy it and paste it into another photo or text editor. To do this, you need to copy and paste the selected background in another program, or perhaps copy the illustration by using inversion and pressing ctrl+c.