02/23/2017 windows | for beginners | laptops
If you need to connect two monitors to a computer or a second monitor to a laptop, this is usually not difficult at all, except in rare cases (when you have a PC with an integrated video adapter and a single monitor output).
This manual contains details about connecting two monitors to a computer with Windows 10, 8 and Windows 7, setting up their operation and possible nuances that you may encounter when connecting. See also: How to connect a TV to a computer, How to connect a laptop to a TV.
How to connect 2 monitors
First you need to determine which cable is suitable for your monitor. For this purpose, check the connector that is inserted into the computer. Most models use an HDMI connector, but VGA is also available.
Advice! The cable type is written on the connector, but if this is not the case, then you will need to google the information based on the manufacturer and model.
Then you should study what types of connectors are on the monitor; this determines whether it is compatible with Windows. If there is no suitable connector, you will need to additionally purchase an adapter. It is selected taking into account these requirements.
Before connecting a second monitor to your computer, it is worth looking at what connectors are available for this. If there are several of them, then you should choose the one that supports the best quality and guarantees a high frame rate. For example, on Apple equipment via HDMI it is impossible to display a picture on a second screen in 4K resolution. This is only possible when using DisplayPort.
Why do you need a second monitor?
Connecting two monitors to one computer occurs for several reasons:
- At the same time, tabs in the browser and programs for work become visible;
- when using a compact laptop on Windows 10, sometimes you want to connect a larger screen to perform some tasks;
- displaying information on 2 screens is convenient when editing sound, video, working with drawings or trading programs;
- On one computer you don't feel as immersed in the game as when using several large screens at once.
When dealing with work issues, personal planning, or analyzing information in a browser, it is difficult to do without a second monitor connected to a PC.
Video instruction
Also, on a similar topic, you might find the article How to Split Screen on Android useful.
And maybe this will be interesting:
Why not subscribe?
Distribution of new, sometimes interesting and useful, materials from the site remontka.pro. No advertising and free computer help for subscribers from the author. Other subscription methods (VK, Odnoklassniki, Telegram, Facebook, Twitter, Youtube, Yandex.Zen)
Everything is bad! My TV is connected to HDMI. And I need this stretching of the windows not to touch the TV and a movie is shown there across the entire window. The Melkosovites do everything very unthoughtfully, it feels like the top ten is done by those who tore off the wings of flies in childhood. So that everyone suffers.
Source
Rearranging displays
When you connect a second monitor to your computer, there is a risk that they will start working in the wrong order. Even in this case, data transmission will not be disrupted, but discomfort will arise. To get rid of it, when connecting a second monitor, you will have to specify the display order in the settings:
- You need to go to the settings section to specify the display parameters for the second monitor on Windows 10. To do this, press the start button and click on the gears.
- Go to the section with system parameters.
- In the sidebar on the left side of the screen, find the tab where display parameters are indicated.
- Click on the section with changing the screen layout and drag the icon to the desired location.
- Click the button at the bottom of the screen to save changes.
The information in this section is displayed only if there are already 2 monitors running on one computer.
What is Snap Assist tool?
The Snap feature has its roots in Windows 7. It allowed the user to distribute windows of running programs across the entire screen and pin them there so that they were equivalent. When there is a need to work simultaneously with many windows, but there is only one monitor, this greatly helps to use the desktop space much more rationally. You can divide the monitor into two windows vertically, or you can separate each window into the corners of the window, and the table will be divided into quarters, in each corner a separate, specifically attached application will work (actively). The user receives information from several programs at once, optimizing and making their work more efficient.
Adjusting the image scale
When you connect a second monitor to your computer, Windows classifies the device and determines the parameters for its use. If the user wants to change them, he will have to do it manually.
Zoom scale
This feature works on two monitors, it allows you to improve the quality of text, graphics and design of running applications. This setting is required when using high resolution graphics.
- You need to go to the settings: click on the main Windows button and click on the gear icon.
- Go to the first tab, which is marked in the image.
- Find the sidebar (it's on the left), open the system settings tab and select the section labeled “Display”.
- Click on the screen that requires zoom settings.
- Go to the tab with the scale and select the item to change display parameters.
Changing Custom Scaling
In this case, changes are made that apply to two connected screens rather than one device.
- Right-click on the desktop to immediately go to the desired settings section.
- Find the zoom section, accessible through the sidebar. Click on the link to specify additional parameters.
- Find the option with custom scaling, there is a field for changing the values.
- After increasing the range, save the changes.
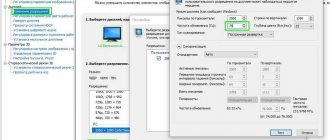
Screen resolution
This parameter is also usually thought about before setting up two monitors, since the OS automatically sets the indicators.
Important! Image quality depends on the number of pixels per unit area of the monitor, so the higher this value, the better the image.
- You need to open the settings by first clicking on the taskbar.
- Click on the first tab with system settings for screen, power and sound.
- Go to the section with changing parameters for the display.
- Scroll the sidebar on the left side of the screen and find the section with its layout.
- Click on the resolution tab.
- Click on the required field and select the appropriate criterion.
Display orientation
The OS has two orientation methods: portrait and landscape; you can choose between them depending on the use of the monitor and its characteristics. When connecting the screen, landscape orientation is used, but if desired, it can be changed to portrait. In the second case, the image is rotated 90 degrees, but the settings are not limited to this, since there you can also specify the angle of rotation of the image on a personal computer.
To set these parameters you will need:
- Go to Settings via the taskbar.
- Enter the system information section.
- Click on the display tab.
- Select one of the 2 monitors and click on the tab to change its location.
- Scroll through the menu that opens and click on the markup.
- Find the orientation tab and select one of the options presented.
How to split the screen into 4 parts using the keyboard in Windows 10
If you have a large display and need to access more than two windows, you can use the Corner Snap feature to fit 3 or 4 pieces (windows) on the screen at the same time. If you prefer keyboard shortcuts, it's easiest to first split the screen into two, as shown in the previous section, before using the Corner Snap feature. Select one of the two docked windows and use the Win + Arrow key combination, Up Arrow to move it to the top corner of its half of the screen, or Down Arrow to move it to the bottom corner of the screen.
Once the window has moved, Snap Assist will appear, prompting you to select one of the other open windows to fill the empty part of the screen. Use the arrows to move between the previews and press Enter to select a third window to display on the screen. To show four apps, you can select a window that takes up half the screen and repeat the process. You now have four application windows displayed on your screen simultaneously.
Selecting a viewing mode
When using multiple devices, users are confused about how to switch between monitors and set the viewing mode there. In fact, to do this, just go to the same section with changing display settings and enter the section with parameters for multiple screens.
Next, you will need to use the mouse wheel to determine one of the viewing modes: duplicating, expanding, or displaying the image on only one monitor.
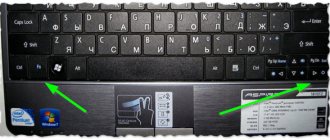
Projection function
This tool also offers you to select a viewing mode. To open it, press the Windows + P keys. After this, a side panel opens, where the same criteria are displayed.
Vertical fixation
Windows can be fixed not only on the sides, but also at the top and bottom. One program will occupy the top half of the screen, the other will occupy the bottom. This can be done with hot keys, only the arrow is not left/right, but up/down. Pressing the arrows again will minimize one of the programs to the tray. This type of fastening does not work by dragging. It is worth remembering that not all programs have sufficient flexibility and adaptability; the windows of some programs may behave or display incorrectly
Advanced settings
When using an external monitor, it is better not to go into the section with advanced settings, since a person without specialized education can specify parameters that turn out to be incompatible. In this case, the computer will have to be taken in for repair.
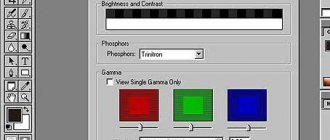
Color profile
It is changed to improve image quality. In this case, you need to go to the display settings and open the tab with additional parameters.
Then the user will have to select the monitor number and go to the properties tab.
A color management panel will open there, where the main parameters are indicated.
Command line
To avoid changing the settings manually each time, you can use the free NirCmd utility from NirSoft (). This is a console program that allows you to change the main monitor via the command line. To use this method, download NirCmd and unpack it to any folder.
After that, open a command prompt in the program folder and run the command below. In this command, “1” is the number of the monitor that needs to be made the main one.
nircmdc setprimarydisplay 1
Using this command, you can create a BAT file and use it to switch the main monitor in literally 1 click.
Frequency setting
By default, the Windows 10 operating system is set to 60 or 75 Hz. The refresh rate of the image depends on this indicator. If the user is not satisfied with this criterion, then you will need to go to the properties of the video adapter, which are located in the section with screen settings.
If you click on the parameters, a panel will appear showing the available frequency.