Now I will tell you where photos are stored on your Android phone, what problems you may encounter while using photos on your phone, and how to solve these problems.
This article is suitable for all brands that produce phones on Android 11/10/9/8: Samsung, HTC, Lenovo, LG, Sony, ZTE, Huawei, Meizu, Fly, Alcatel, Xiaomi, Nokia and others. We are not responsible for your actions.
Attention! You can ask your question to a specialist at the end of the article.
Where are images stored on Android?
Photos taken with the Camera (standard Android application) are stored on the memory card or internal memory of the phone, depending on the application settings.
All further steps are relevant for Samsung Galaxy S8 and S21 (the models I tested on), and these instructions are suitable for other more or less modern smartphones.
The location of the photos is always the same - the DCIM\Camera folder. The full path looks like this:
- /storage/emmc/DCIM - if in phone memory
- /storage/sdcard0/DCIM - if on a memory card
By the way ! If you found the DCIM folder at a different address, please write in the comments, viewers will also find this information useful.
Advice . How to quickly find folders on Android? Install a file manager (for example, ES Explorer or Total Commander, mobile version). The built-in utilities of the mobile OS are inconvenient, navigation is difficult, and there are limitations in file operations.
Usage
Quite often, pre-installed applications on smartphones have very poor functionality. This cannot be said about all programs implemented by developers of “add-ons” for Android, but galleries and explorers “suffer” most often.
This application will be an excellent alternative to the standard one - using it, you will get many more functions than are provided in the basic version. For those looking for a more functional file manager, we can recommend ES Explorer.
Sometimes on Android smartphones you may encounter a problem: you open the “Gallery”, but all the images from it are gone. We want to tell you what to do in such cases.
How to restore a gallery on Android
Contents - How to restore a gallery on Android :
Causes and solutions to the problem
The reasons for such a failure can be divided into two groups: software and hardware. The first includes damage to the “ Gallery ” cache, the action of malicious applications, and violation of the file system of a memory card or internal storage. The second is damage to memory devices.
The first thing you need to find out is whether there are photos on the memory card or internal storage. To do this, you need to connect either a memory card to the computer (for example, through a special card reader), or a phone if the images from the built-in storage have disappeared. If the photos are recognized on your computer, then you are most likely experiencing a software glitch. If there are no pictures or problems occur during connection (for example, Windows suggests formatting the drive), then the problem is hardware. Luckily, in most cases you will be able to get your images back.
Instructions on how to find recently saved files
1. Total Commander.
2. Open the application, select Device memory or memory card (by disk name, in my case SG-SDR).
3. In the field with an asterisk ( Search ), enter *.jpg. Thus, all files of this extension will be included in the search.
4. Check the Not older and set the age, for example, 1 month .
5. Size – more than 650 k (kilobytes). This will filter out sketches and other garbage that we don’t need.
6. To start, click on the Search .
7. The results will display all sources where jpg files can be stored (and are actually stored).
A universal algorithm for returning files
In order to recover both photos and other user data through applications, you will need:
- Connect the phone to the PC using an adapter;
- Enable the program, which should display all connected drives, which also include the smartphone. However, if the storage is not visible, you must put the device into the appropriate “ USB debugging ” mode. To do this, you should find a separate function in the phone settings; if it is missing, you need to use the “ for developers ” section. The latter is activated through the “ About device ” item, where you need to find the build number. By clicking on the last option several times you can access the required menu. As a rule, you need to make seven clicks, but the system will independently countdown until the launch of a separate “ developer ” mode;
- Select the desired drive and file format to be found;
- Start searching;
- Based on the results of the presented images, you need to mark those options that you want to move to your PC, and then transport the pictures from the computer to your mobile device.
Where are photos from VK and other social networks saved?
In addition to photographs from the Camera, many media files are received on the phone from social networks and instant messengers.
On Android, in this regard, everything is clear. Downloaded photos are placed in the Downloads folder. True, the location of the files may differ if the user specified the save path independently when downloading the file.
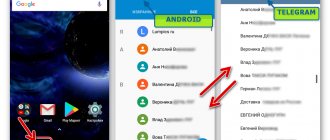
If you don’t remember exactly where you downloaded images from VKontakte, Facebook or other social networks, searching through a file manager will help you. Specify the time range as the search criterion - if you remember when you downloaded this data.
Functional
This mobile client is aimed at those users for whom the basic functionality of the standard Android Gallery is not enough. This option offers slightly more convenient settings and functions, making cataloging and editing photos an easy and enjoyable process.
The gallery can sort images according to several parameters - from the most recently added to the earlier ones, by volume or alphabetically. By default, the application displays the number of columns that “fit” the screen size of the portable device. But you can change these parameters, making the icons larger by reducing the number of columns, or, conversely, reducing them by adding another column.
Any of the files can not only be viewed and deleted, but also copied and moved without going to Explorer. This feature is often missing in standard solutions. The Gallery also offers tools for cropping and rotating files and will help you quickly set them as wallpaper for your home screen. The most interesting feature of the program is that the user can prohibit the display of a single image or an entire folder in the gallery.
How to delete thumbnail cache?
Often, thumbnail files “eat up” too much space on the phone: the count goes into gigabytes. It is useful, and sometimes necessary, to empty the contents of the thumbnails folder. In this case, you do not lose anything; the necessary files will be recreated as needed.
There are two ways to clear thumbnail files.
Method 1 (manual):
- Install a file manager on Android
- Enable viewing hidden files on your phone
- Go to the thumbnails folder
- Delete its contents by selecting all files
Method 2 (automatic):
- Download and install the CCleaner application for Android
- Go to the “Clear cache” and memory section and click “Analyze”
- In the results, select the “Thumbnail Cache” checkbox and click “Clear”
Services for returning photos
RS Photo Recovery - Using effective detection parameters, the application allows you to recover data lost after formatting or wiping certain drives. It is important to note that the system can restore full images even after physical damage to the media and transfer them to new storage.
PhotoRec is a program with a key purpose in returning user files that have been lost from memory, while many of the most popular image formats are available, which include JPEG, as well as MP3 audio components or archived documents.
Recuva - despite the free distribution of the application, there is also a paid variation, and this implies the distribution of an effective solution for recreating information that could have been lost as a result of system errors or manual elimination. The program was developed by Piriform Limited in Britain, so we should also highlight another popular program - CCleaner, which is used to rid the computer of unnecessary data.
You should assume that you have found out where deleted photos are stored using the example of the Android mobile operating system; in addition, you can either completely eliminate any traces of data or restore cleared ones.
Andrey Podkin
When using applications for Android, sometimes questions arise: “Where does the application store the created files?”, “Is it possible to reach them?” and “Will the files be deleted when I uninstall the application?” Let's try to see where an application can store its data and what consequences this has for the user.
Internal data storage
The meaning follows directly from the name. Internal storage is always located in the smartphone’s memory, regardless of whether it is possible to install a memory card (and even more so, whether it is inserted). This memory area is protected. Located in the /data system partition. By default, all files located there are accessible only to the application that created them. Of course, you can make files available to other applications, but this must be done specifically. If the application does not open files for external access, you can only access them by becoming root.
The purpose of the storage is clear: internal protected data to which there should be no unregulated access. Problems (from the user's point of view) may occur in the following cases:
- Unreasonably large amount of data. I would like to transfer the data to a memory card to save internal space for other needs, but the application does not allow it.
- According to the user, the rules for accessing data should be different from what the application suggests.
Example: application “Lectures on the history of Russia”. The application has good content (both in content and sound quality). But it is saved in internal memory. On budget devices, where this memory is small, it becomes difficult to download many lectures in advance, and then, disconnecting from the Internet, listen to them. The second problem is the actual data access regulations. Even if we limit ourselves to the topic of the story, I have audio files obtained from three sources: this application, podcasts and audio versions of videos from YouTube. I would like to take and unite them all forever in their earthly vale under the dominion of the all-powerful Lord of Mordor into a single playlist, and listen to it with one audio player. But this cannot be done on a smartphone without root.
The dcim folder is empty - what should I do?
Description of the problem: you connect your phone to your PC via a USB cable. There is nothing in the DCIM folder, but the photos are still displayed through the Gallery. How to solve a problem?
Method 1 . Check both locations - on the memory card and in the memory of the Android device (you may need to move the files from one DCIM folder to another).
Method 2 . Delete the External Storage and Media Storage application cache.
Note : On Android 11 you will not find the line External Storage and Media Storage in the list of applications. Try deleting your Gallery cache instead.
How to do it:
- Go to Settings -> Applications -> Three dot menu.
- From the menu, select Show system applications -> External Storage and Media storage.
- Click on the “Delete data and cache” button.
- Reboot your phone.
I hope the information was useful. If something is unclear, ask in the comments, I periodically answer questions there. I look forward to your feedback!
FAQ
Why is the folder called DCIM?
The abbreviation DCIM stands for Digital Camera Images. For digital cameras, this name is a kind of standard.
iOS and Android devices support the DCF specification, within which the name DCIM is adopted. Therefore, desktop and mobile applications open this folder without any problems.
I accidentally deleted photos from the Camera folder to free up space. Accidentally selected DCIM to erase. Can I recover a photo? This happened 5 days ago.
Thumbnails from the DCIM folder can be restored even without root, but to obtain the original photos it is necessary. We have already talked about similar cases here, study the cases of other users.
About copying data
Now it’s clear where the contacts are stored in the corresponding document, which is usually needed to copy the phone book. easier than it seems. Especially when it comes to using the same OS builds.
As a rule, you can copy the phone book to a SIM card or Flash card as follows:
- Go to the “Contacts” menu on your mobile device.
- Open settings. In some phone models, you need to select the “Advanced” menu item.
- Select the “Import/Export” option. Click on the line responsible for a particular operation.
- Specify the location to import or export data. As a rule, we are talking about a SIM card or a memory card.
This is the simplest solution. Knowing where contacts are stored in Android, you can copy this phone book file using a PC and transfer it to the desired directory on the new device. In addition, there are various programs and applications for transferring contacts. But among modern users, data synchronization with Google is often used. This technique will help you not to think about where your contacts are stored in Android. If you have mail on Google, you can synchronize data without root rights or searching the phone book on your mobile device.
The actions in this case come down to the following algorithm:
- On an old Android phone, in the “Settings” - “Accounts” menu, log in to Google. Check the “Contacts” section when entering your mail in the “Synchronization” section.
- Log in to Google on your new phone. This will automatically synchronize your contacts.
- home
- Programs
- Where is the gallery stored in android. Where are photos saved on Android?
“>
Post Views: 390
Differences between the Linux/Android family and Windows
First, let's go through the base. Linux users and those who like to get smart, please skip this section and move on, here we present the material as simplified as possible.
Almost all of us use personal computers with one version or another of the Windows operating system. In it, information is distributed across disks. Typically, C is the system partition, D is for data storage, and directories E to Z are removable media.
Things look a little different in the Linux family. There, the file structure is specified by a tree architecture. If you have at least once accessed the directory of your Android device using a file manager, then you have an absolutely clear idea of what this thing looks like.
Reasons for missing photos from the “Gallery”
- Formatting an SD card . If you had photos stored on removable media used in your smartphone, and you accidentally formatted it, then all the images were deleted. Users often forget that most of their information is stored on a flash drive, and they delete everything at once;
- SD card damage . Another reason related to the removable drive. It is quite possible that the flash drive is broken if your phone does not read it, and on another smartphone too (we recommend checking it). Again, this reason is only relevant if, by default, all images were stored on a removable drive;
- Rewrite . Not the most common reason, but also possible. This can be done either manually or using third-party applications. If you had photos stored on a flash drive, and at the same time you somehow managed to overwrite them with other information, then in this case only recovery will help you.
Directory Search
All that remains to be done is to find the folder with the corresponding data on your mobile device. Where are contacts stored in Android? They will be located in the contacts.db or contacts2.db document. These are the ones you will have to look for on your mobile device.
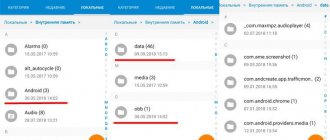
Where are contacts stored in Android? In order to copy the phone book from the device, you need to find the previously mentioned document. It is located in the data directory. You need to open the following chain of folders:
- data(2 times);
- com.android.providers.contacts;
- databases.
After this, in the last folder you need to find contacts/contacts2. This is the phone book. It can be copied, deleted or transferred to another device. Typically, this will require root rights. For example, using specialized programs. Among them are iRoot and KingRoot.
Why won't my phone connect to my computer?
How to connect your smartphone to your computer without problems Check: it may be a faulty USB cable. Try connecting a different cable to your smartphone if you have one. Third-party cables are often to blame for the error. Also check if the USB port of the computer
.
Interesting materials:
How much does iPhone 12 cost in Belarusian rubles? How much does iPhone 12 cost in euros? How much does iPhone 12 cost in Kyiv? How much does iPhone 12 cost in Krasnodar? How much does an iPhone 12 cost in London? How much does iPhone 12 cost in tenge? How much does an iPhone 5 with gold cost? How much does iPhone 5se cost? How much does an iPhone 6 cost 16GB? How much does a 32 gig iPhone 6 cost?