FTP (File Transfer Protocol) is a remote file transfer protocol. With its help, you can upload and download data of any type and size to the server, create or delete files and folders.
In Windows, Linux and macOS, you can connect to an FTP server using built-in tools and third-party programs for various purposes. Full work with all tools is possible only through special applications called FTP clients. Now let's talk in more detail about all these methods.
FTP server access data
When connecting to an FTP server, it is very important to enter the correct information. Let's take Timeweb as an example. After registration, two letters are sent to your email. The letter with the data looks like this:
Now about what data you need to have on hand:
- login,
- password,
- link to the FTP server (indicated in the same letter),
- port (default value is 21).
Option 3 – FileZilla
If the first two options can be considered hackily simple, then this one can already be considered “professional”. Yes, it’s a third-party program, but I personally used it when I uploaded my very first sites to the server in the woolly years. For those who use FTP frequently and use all sorts of different encryption protocols, this is what you need.
Since the solution is already third-party, I offer brief instructions:
- Go to the official website and download the current version of the application. Let's launch.
- Click on the “Site Manager” icon and add a new site:
- We give any random name (for example, “My router” or what have you), and then enter all the necessary connection parameters: host name (IP), port (21 by default), login and password. If you wish, you can play around with the encryption and login type (if suddenly you have a special FTP, which most likely you should know, in my case, the “Anonymous” connection type was suitable for connecting without a password). When finished, click “Connect”.
- We agree with any warnings and are happy to connect. Now you can fully use our FTP:
This method is very convenient because it allows you to remember previously created connections. When FTP was quite a fashionable way to connect to servers, I had about a dozen stored connections here - go in, connect, use it.
How to connect to FTP through Windows Explorer
First, let's look at how to connect to an FTP server through the Explorer program in Windows 10. There is no need to install anything additional here, just open the system file manager. In the left panel, find the “This PC” icon and right-click on it to display the context menu. In the list, select the item “Add a new element to the network environment.”
This will open the Add Network Location Wizard window. In the initial window, simply click “Next”.
Next we need to select its further location, but in this window only one option is available to us. To continue, click on the “Next” button again.
In this window you will need to specify a link to the network resource to which you plan to connect. It is important to follow the prescribed format (there are some examples below). Enter the address/link in the field and move on again.
Now you will need to enter your username in the field. There is no need to enter a password in advance; it will only be requested when connecting. If your host has such an option, you can log in anonymously by checking the appropriate box.
At the very end, we give the new network environment a name.
This completes the setup. If necessary, you can check the box so that immediately after clicking on the “Finish” button, open the specified server and start working.
The new connection is now located in Network Locations under This PC.
Now let's connect - open the newly created connection. A small window opens where we enter the password, then click on the “Login” button.
If all data is entered successfully, the server folder will open. You can start working.
FAR
To use the FAR program, you need to configure it by following the following steps, illustrated with images.
1. Launch the FAR program. Determine in which panel you want to make an FTP connection. Let's say on the right. Then press Alt F2 and select the FTP line in the window that appears.
2. Press Shift+F4, a window for entering connection parameters will appear.
3. Fill in the required fields. In the Descripton , you can give any name to the custom ftp connection; check the Passive mode .
4. After that, click the Save .
5. On the panel of the FAR program you have selected, for us it is the right one, a line will appear with the newly created name of the ftp connection. While on this line, press Enter.
6. A connection to the server will occur and you can work in the usual mode of a two-panel file manager.
Connecting via the Windows command line
Now I’ll tell you how to connect to an FTP server on Windows using the command line. This method may not seem very convenient to many, because you will have to manually enter commands to upload documents, open folders and download them. To enter, follow the sequence below.
- Enter the ftp command and press Enter to confirm.
- Set the command open name_ftp_host.
- Enter the user login. You can log in anonymously by simply entering Anonymous.
- Enter the password. In the case of an anonymous person, leave this field empty and press Enter again.
Now in more detail on the commands:
- dir – view the server contents.
- cd “folder_name” – opens the specified folder.
- put “path_to_file” – uploads this document from the computer to the server.
- get “file_name.format” – download from the host to the computer.
- quit – disconnect from the FTP server.
Reducing the number of simultaneous connections for incorrectly configured servers
If you receive the error message “421 Too many connections for IP”, then the FTP server has limited the number of connections. There are servers that allow only one connection at a time.
The preferred solution is to contact the server administrator and ask them to configure the server accordingly (FTP uses more than one connection per protocol specification). But if you need access right now, there is a workaround:
1. Open the site manager (File -> Site Manager... or the first button on the toolbar).
2. Create an entry for this server, enter all the parameters that you know, the more the better.
3. Open the 'Transfer Settings' tab
4. O
5. Enter the desired limit in the 'Maximum number of connections' field
After this, when connecting through a site manager entry, the number of simultaneous connections will be limited.
Note: If you leave only one connection, you will not be able to view the server content at the same time as transferring data.
FTP connection via any browser
You can also connect to the FTP server through a browser on any operating system. In this case, only part of the functions will be available. You must enter the IP address of the host in the address bar, only adding the prefix “ftp://”. Press the Enter key. Next you will need to enter your username and password, and then click on the “Login” button.
What is FTP and what is it for?
File Transfer Protocol
comes from English
File Transfer Protocol
or
Ftp
can be defined as a network protocol for transferring files between systems connected to a TCP network and is based on a client-server model. This means that we will have a server that will provide services to all clients and we will have one or more clients that can connect to this FTP server at the same time to upload or download files and folders.
The purpose of setting up an FTP server is that client computers can connect to share files either in an insecure way (if we are using FTP) or also in a secure way (if we are using the FTPES protocol). The FTP protocol is widely used and compatible with all operating systems, but recently web browsers have stopped supporting this protocol.
The ports that are typically used on an FTP server are ports 20 for data and 21 for management, this is in active mode, however to avoid NAT issues, port 21 is typically used for management and port range 60000-65000 for passive ports or FTP PASV. One of the disadvantages of the FTP protocol is that it is not designed to provide security since the process of authentication and communication with the server is done in plain text without any encryption. This way, a possible cybercriminal can intercept the traffic, gain access to the server, and even receive those sent files.
As a general rule, FTP servers are not usually installed on personal computers because, for example, when we disable them, we will no longer have access to them. One of the most common uses is usually web hosting as a backup of important company files, to access NAS server files and folders and other very common users. It should also be noted that in recent years, home routers, due to the improvement of their RAM and memory, allow you to create an FTP server to access your resources locally and remotely.
How to connect to FTP using FileZilla
FileZilla is the most popular and recommended FTP client, free and easy to use. You can connect to an FTP server via FileZilla regardless of the operating system installed on your computer.
First you need to download the application from the official website. There are versions for Linux, Windows (portable and installation) and macOS. Simply select the desired option and click on it to start downloading.
Install the application and open it. In the top panel enter the following information:
- Host. This could be an IP address or a link.
- User login, previously sent by email by the service.
- Password.
- Port. Leave it blank or set the value to 21.
After all the required fields have been filled in, click on the “Quick connection” button.
After opening the catalog, you can begin uploading and downloading the necessary data. In order not to enter connection data each time, you should use the site manager, which is available in the “File” menu.
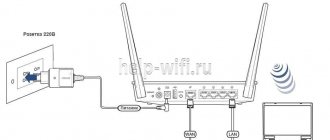
Creating port forwarding rules on the router
Since FTP requires two types of ports: for transmitting control signals and for exchanging data, then two forwarding rules are needed:
- forwarding an external 21 port to the same computer port to transmit a control signal;
- forwarding a range of external ports to the same ports on the PC that the file system uses as a separate channel.
To configure these rules on the router, you need to enter the settings through the browser’s web interface and open the port forwarding section. Each router model has its own settings. In the Dlink DIR-300 router, to do this, open the “Advanced” tab and select “Port Forwarding”.
That's all you need to install filezilla server and configure an ftp server through your router.
Connect using Total Commander
You will need to download and install the Total Commander application. We recommend doing this from the official website. After installation is complete, open the application. Go to the “Network” tab and select “Connect to FTP server” there. For this action, by the way, there is a hotkey combination – Ctrl + F.
In the new window, click on the “Add” button. Next, enter the name of the new connection, host address, account and password. Click on the OK button to save all entered information.
The new connection will appear in the list. All that remains is to connect to the server by clicking on the appropriate button.
iWeb
After creating the site, the iWeb program window will appear on the screen with the contents of your site.
On the left side of the window, click on the name of the site you want to publish. In this example, the site is called My Site .
On the page that opens, enter the parameters required for publication. In the Publishing : Publish to: FTP Site name: Name of your site Contact email: your email
In the FTP server settings : Server address: ftp.your_login.nichost.ru User: user_name (usually your_ftp_login) Password: your_password Directory/path: your_site/docs Protocol: FTP Port: 21
For the URL, enter your website address.
Next, click the Test connection . If the connection is successful, a message will appear: “Testing completed successfully.” You can now publish your site to the selected FTP server.
If unsuccessful, check again that the entered parameters are correct. After testing is successfully completed, click the Publish site .
If the publication is successful, a message will appear: “Your site has been published.”
Important: By default, iWeb uses UTF-8 text encoding. Our hosting uses Windows-1251 encoding by default. To display your site correctly, you need to go to your hosting control panel, section Web server → Sites → your_site and select UTF-8 encoding Site encoding .
How to Connect to FTP Server via Linux Terminal
On Linux, you can connect to FTP through the Terminal system application. This is very similar to using the command line in Windows. The sequence is absolutely the same - type the ftp and activate it by pressing the Enter button. Then we write open link_to_host. Don't forget that you then need to specify your login and password.
Here are examples of available options:
- Is – displays a list of files and folders.
- get – download a file.
- mget – download documents of a specific format. For example, mget * – all data in the directory, mget *, php – files in php format.
- put – uploading a file to a resource.
- mput – uploading multiple documents of a single format.
- mkdir – creates a new directory.
- rmdir – deleting a directory.
- delete – deleting a file.
- bye – shutdown.
- close – exits the current session and returns to the FTP command line context.
- status – displays the status of the FTP client.
Linux provides another option for connecting to FTP.
First you need to install the required package by giving the following request: sudo apt-get install curlftpfs
Next you need to grant rights to a specific folder:
sudo chmod 777 ~/ftp
Now the ftp directory is mounted:
sudo curlftpfs -o allow_other ftp://user /home /virtdiver/ftp/
If you need to work as a user, then enter the following option:
-o allow_other
To unmount the FTP folder, use the following command:
sudo umount ~/ftp
FTP setup
First of all, you should gain access from the FTP server, which can be done in the hosting settings. Using Timeweb as an example, in the control panel you will need to go to the “PU/FTP Users” tab.
Click on “Add new user”.
- How to find saved passwords in FileZilla?
In the window that appears, fill in:
- Login. The login prefix is issued immediately, you should complete it;
- Password;
- A comment. Allows you to write to whom access has been granted;
- Setting up permissions Here you will need to select the required access rights.
In order to connect your computer to remote control, just download FileZilla Server by following the link https://filezilla-project.org/download.php?type=server.
Next, the software is installed and the settings are already made:
- Server Address. Here you should enter the IP address of the desired server;
- Port. Typically issued when creating access for remote control.
- Administration password. Password for this PC.
- Check the “Always connect to this server” setting. Allows you to immediately connect to the selected device immediately upon starting the program.
After this, you can get full access to file management.
Connecting to FTP via hosting site
In this case, you just need to log into the hosting website and go to the appropriate section. I’ll show you using Timeweb as an example.
There is a control panel on the right side of the window. Find the “File Manager” item in it and click on it. We will see the web interface of the FTP server. It is very easy to work with; you can transfer files using drag-n-drop.
Definition
First, let's figure out what an FTP server is. FTP (file transfer protocol) is a protocol that provides remote data transfer over the Internet. It is built on a client-server architecture and uses different channels to exchange commands and data. In this case, one connection is used for transmission, which is usually established through 21 TCP ports.
There can be several channels for data exchange, so during one session you can simultaneously transfer and receive files. A separate TCP port is opened for each channel used for data exchange.
How to create an additional FTP account
The number of possible additional FTP accounts is equal to the maximum number of domains on the tariff plan minus the main login for the hosting service (u1234567)
, which is also an FTP account.
Number of additional FTP hosting accounts:
| Tariff plan | Number of additional FTP accounts |
| Host-0 | 6 |
| Host-1 | 14 |
| Host-2 (archive tariff)* | 19 |
| Host-3 | 29 |
| Host-Pro (archive plan)* | 29 |
| Host-Unlim (archive tariff)* | unlimited |
| Host-Lite | 14 |
| Host-A | 9 |
| Host-B | 9 |
| VIP-1 | 29 |
| VIP-2 | 49 |
| VIP-3 | 69 |
| VIP-4 | 99 |
*Ordering this tariff is not possible due to changes in the tariff line (from the end of April 2022).
An additional FTP account is created in the hosting control panel. The login for the additional FTP account should look like: u1234567_arbitrary name
(where u1234567 is the hosting service login).
For example: u1234567_user
.
When creating an FTP account, you can limit its visibility to a specific directory. REG.RU servers have a password complexity check. The password cannot be shorter than 6 characters and must contain special characters (for example: !,@,#,$,%,&,?,_), Latin letters: az, numbers: 0-9. If the password you enter does not meet these requirements, a warning will appear.
How to change or recover your FTP password
The password for accessing FTP is sent in an information letter to the contact e-mail after ordering hosting services, and is also indicated in your Personal Account. More details in the instructions.
Recovering the password for the main login u1234567
In your Personal Account you can reset the FTP access password for your main hosting login u1234567.
When you change the FTP access password, the access password to the hosting control panel also changes!
- 1.Go to your Personal Account.
- 2.
Select the hosting on which you want to change the access password from the list of services and go to the “Accesses” tab. Click Reset the password:
- 3.
Click Yes.
Done, you will be sent an email with a new password. The password will also be updated on the “Access” tab.
If you ordered the service through a partner If you ordered the hosting service through one of our partners, please contact the partner to restore access.
Changing the password for the main login u1234567
Changing the FTP password for the main account “u1234567” is done in the hosting control panel.
Changing the FTP password for an additional account
You can recover or change the password for an additional FTP account in your hosting control panel.
8 —>