“Advanced” users of personal computers and laptops sometimes need to transfer some data from the first device to the second. Of course, it is possible to find some kind of software output. For example, uploading a large number of files to the cloud, and then taking a long and tedious time to download them from it to the laptop. Or try the old-fashioned way to upload information to a removable storage device and also transfer it for a long time to another device. Long, uncomfortable and boring, right?
As you know, operations are performed much faster within the hardware of a laptop computer than with externally connected devices. What if you remove the HDD from your computer and connect the hard drive to your laptop? You can really handle this task yourself, but you should read the instructions on how to do this correctly and without damaging your devices.
Scheme for disconnecting the hard drive from the PC
You don't need to be an experienced system administrator to understand that to connect an external hard drive to a laptop, you need to remove it from your desktop computer. But the question is: how to do this still requires some knowledge.
A detailed guide on how to remove the hard drive itself from your computer:
- Turn off the personal computer completely and remove the plug from the socket.
- We remove the cover of the system unit, which gives us full access to its filling.
- We find the HDD (If you don’t know what it looks like, we recommend searching for this information on the Internet first) and disconnect every single wire from the connectors.
- As a rule, the disk itself is mounted either on grooves or on mounting bolts that must be unscrewed. After freeing, remove the HDD out.
There is nothing complicated in this procedure at first glance, but it was mentioned above that knowledge of computer circuits will be additionally useful here. This is not to remove the element, but on the contrary, to put it in place and it will work again.
If such knowledge is absent, then do not despair. You can simply take a photo of the correct diagram before turning it off or write it down in a language you can understand in a notepad.
Replacing HDD on a laptop
If in a stationary device, in order to remove the hard drive, you need to unscrew the cover, remove the connection cables and unscrew the screws at the fastening points, then here the situation is a little different. Next, let's look at a simple HDD replacement, provided that you have a 2.5 hard drive.
- Turn the laptop over and you will see a large plastic cover with bolts, sometimes there are several of them, then remove each one until you find the disk, usually under the last part;
- Unscrew the screws holding the device; sometimes special grooves are used instead;
- Pull the disk back, grasping the side where the contacts connect;
- Lifting up you can get the HDD;
- Install another hard drive in the same way.
Connecting to a computer via USB
For uninformed readers, this point should be clarified: the hard drive of a laptop and a computer are significantly different in size. It is obvious that a large hard drive from a PC cannot be installed in place of a small laptop device.
Naturally, technology does not stand still and a special Box was invented for this case. They come in several types:
- 3.5 IDE on USB 3.0 – for IDE interfaces with increased speed via USB 3.0;
- 3.5 Sata to USB 3.0 – for a SATA interface with a similar speed.
As for unfamiliar words such as SATA and IDE, these are subtypes of hard drives. Before purchasing a contact box, you need to know the type of hard drive being connected. It is possible to find out what kind of hard drive was installed on a desktop computer by inspecting it. This is written on a sticker with technical information, which is located on the body of the filling element.
Let's return to the connection. Connecting a second hard drive to a laptop is only possible through a special box. This container itself looks like a black box that the original hard drive should fit into. For SATA drives it is slightly less than for IDE. There are also universal containers, but their prices are much higher.
So, having such a box available, we insert the hard drive into it and connect the other end of the wire to the USB port. If it has a power supply, then we plug it into the network accordingly.
If everything went well, then the laptop should see the new connected device according to the standard procedure. But what to do if the laptop’s operating system did not detect it? In this case, you need to perform the usual double-check of the paired device in the device manager. Having found it in the start menu, you should open the “HID Devices” section and look in the list for a name similar to the name of the box. Most often this is a problem with the included software (drivers). If the icon shows a sign with a yellow exclamation mark, then you need to right-click on this device and click “update drivers”.
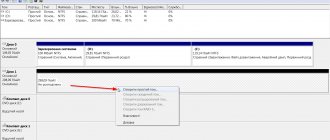
It happens that the problem of connecting a hard drive from a computer to a laptop via a box lies in the system name of the HDD. Here you need to go to “Disk Management” and look at the list of new connected devices. Some existing disk partitions in a laptop may be named like the disk itself and they begin to conflict with each other. In this case, you need to rename either the old hard drive or the new attached device.
This method is considered the easiest, but requires a box container.
Connecting an “old” drive in Windows
If the hard drive has already been used in Windows before connecting it, then it has already been formatted. In this case, when connected, it will automatically be assigned a letter in the system, and it will appear in Windows Explorer, ready for use.
If the disk does not appear in the system, you may need to install a driver for the hard disk enclosure.
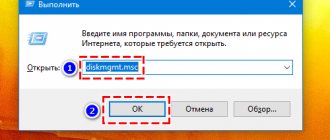
Step 1. Press the “Win + R” keys on the keyboard. In the “Run” window that opens, type “devmgmt.msc” and click “OK”.
Step 2: Device Manager will launch. View the dispatcher for the presence of devices with exclamation marks. If there is such a device, right-click on it and select “Update drivers” from the menu with the left button.
Step 3. In the window that opens, click on “Automatically search for updated drivers.”
After the system finds the required driver, the exclamation mark from the device in the “Dispatcher” will disappear. You may need to restart your PC.
If the hard drive does not appear in the system, and a CD with drivers is included with the HDD enclosure, then you need to:
Step 1: Insert this disc into your laptop's optical drive by pressing the button to open it and snapping it back in after inserting the CD.
Step 2. On the desktop, double-click on the “This PC” icon with the left mouse button.
Step 3. A list of Windows OS drives and devices will open. Double-click to open the CD drive.
Step 4. Find the “Run” or “Setup” file to be launched in the folders by double-clicking on it with the left mouse button.
Step 5. Install the required software in accordance with the suggested procedure. The HDD will appear in the system.
How to connect a hard drive to a laptop via the motherboard
Another option for connecting a hard drive, but more “hard”. Here we will have to deal directly with the laptop motherboard, and for this we first need to get to it. There is nothing to worry about, you just need to adhere to a certain algorithm of actions.
First, you should completely turn off the power to the laptop and wait until the operating system is completely turned off. It is advisable that the system be turned off not in an emergency way, but through the shutdown button in the “start” menu. Next, open the battery cell, pull it out and put it aside. Now we must unscrew all the screws that secure the main cover of the bottom panel of the device and, when finished, remove this cover.
A view will open of all installed hard drives in the laptop (one or two). They have the usual appearance of a stationary HDD, but in a small case. To remove it, you need to unscrew all the screws on the top cover and on it. If everything is done, then we disconnect the connected cables and carefully, with a sense of proportion, remove the internal board from it.
Let's move on to connecting the hard drive through the motherboard. Having previously prepared an additional SATA cable, we connect one end of it to the hard drive, and the other end to the output in the HDD bay in the laptop. If it is important to have one native drive on the laptop and you need to connect another one, then it may be possible to perform this operation only through an additional cell.
Installing the second hard drive follows the same instructions as installing the first. Only after all components are fully connected should you supply power to the device and turn it on.
The procedure for connecting a hard drive to a laptop without a container should involve specialists who, at a minimum, have repaired desktop computers, not to mention laptops.
Connecting an “old” drive in Windows
If the hard drive has already been used in Windows before connecting it, then it has already been formatted. In this case, when connected, it will automatically be assigned a letter in the system, and it will appear in Windows Explorer, ready for use.
If the disk does not appear in the system, you may need to install a driver for the hard disk enclosure.
Step 1. Press the “Win + R” keys on the keyboard. In the “Run” window that opens, type “devmgmt.msc” and click “OK”.
Step 2: Device Manager will launch. View the dispatcher for the presence of devices with exclamation marks. If there is such a device, right-click on it and select “Update drivers” from the menu with the left button.
Step 3. In the window that opens, click on “Automatically search for updated drivers.”
After the system finds the required driver, the exclamation mark from the device in the “Dispatcher” will disappear. You may need to restart your PC.
If the hard drive does not appear in the system, and a CD with drivers is included with the HDD enclosure, then you need to:
Step 1: Insert this disc into your laptop's optical drive by pressing the button to open it and snapping it back in after inserting the CD.
Step 2. On the desktop, double-click on the “This PC” icon with the left mouse button.
Step 3. A list of Windows OS drives and devices will open. Double-click to open the CD drive.
Step 4. Find the “Run” or “Setup” file to be launched in the folders by double-clicking on it with the left mouse button.
Step 5. Install the required software in accordance with the suggested procedure. The HDD will appear in the system.
Option 1: Adapter
The most budget-friendly connection method is a cable with a pair of suitable slots.
At one end there is a standard USB plug, at the other there is a socket for connecting power and a SATA interface for data exchange + additional power.
There are still universal adapters to which you can connect both a modern SATA hard drive and an already obsolete IDE.
Option 2: “Pocket”
Actually, this thing is also called an adapter, and “pocket” is computer slang.
It differs from a regular wire in the presence of a housing where the hard drive is mounted. The advantage is that with the help of a pocket you can convert the internal drive into a full-fledged external one.
It will be reliably protected inside the case. Naturally, you shouldn’t drop it - no HDD will survive such treatment.
Adapter or box
As in the case of the adapter, the box is selected based on the HDD (SATA/IDE) and computer interfaces (USB version 2 or 3). The adapter looks like a box that holds a hard drive, but it is equipped with an electronic board and a number of interfaces for connecting devices. When choosing, you need to take care of additional power, since the standard one in almost all boxes is not enough to start the plates or provide them with the necessary speed for operation.
If everything is connected and Windows does not detect the device, try restarting the OS, use a different USB port, reinstall the drivers for the HDD, or check the adapter on a different laptop. The device may not work with your drive.