Prices for mobile Internet in 3G and 4G networks have almost come down to earth from sky-high heights and will soon be expected to equal the cost of traditional cable communications. And then, you see, they will completely supplant it, because using the Internet, which you always have with you (in your cell phone), is much more convenient than being tied to its stationary source.
Switching from landline Internet to 3G/4G is a matter of a couple of minutes. It is enough to have an agreement with a cellular operator (access to the global web is included in almost any tariff plan today) and a certain amount on your balance. Well, the mobile phone itself, which will be the connection point.
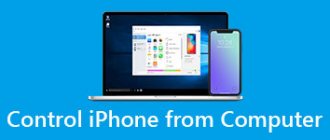
Let's talk about how to connect the Internet to a computer using an Android smartphone as a modem.
When do you need to connect the Internet to your computer via Android?
Problems often arise with cable Internet, ADSL or USB modem. In addition, in many areas there is a complete lack of regular communications. In these cases, a mobile phone based on Android OS will come to your aid, with which you can distribute traffic to your PC in three ways.
This allows you to access various resources. For example, use government services, study or work remotely. In addition, the global web allows you to communicate daily with relatives who live in other cities or countries. Thanks to this, you can also expand your social circle. Internet access also allows you to update drivers, operating system and installed software, so your computer will work better. However, before connecting, you need to make sure that your tariff has enough traffic, since many of them provide packages of a certain volume. Therefore, it is advisable to have unlimited data, since big brother pumps a lot of information per day.
What you need to connect
In the process of developing mobile network standards, 2G and 3G have become the most popular. The most modern is the 4G standard, which is slowly beginning to take part of the market. But still, due to the low level of coverage of the territory with appropriate equipment, most users work with 3G, within which it is customary to distinguish networks:
- CDMA2000 1xEV-DV (CDMA2000 1xEvolution Data and Voice);
- GPRS (General Packed Radio Services);
- WCDMA (Wideband Code Division Multiple Access);
- EDGE (Enhanced Data rates for Global Evolution);
- HSDPA (High-Speed Downlink Packet Access);
- UMTS
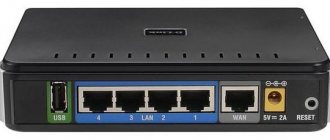
Moreover, to connect to the Internet you do not need separate wires and modems, you only need a SIM card with a positive balance or paid traffic. To improve the quality of communication, you can use an ExpressCard modem, a USB modem, and a PCMCIA modem.
Let's now consider several options - you have an Android device or a regular mobile phone. In the first case, it is customary to distinguish several methods.
We distribute WiFi from the phone to the computer
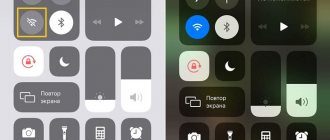
If you don’t have a USB cable or router at hand and your PC has a WI-FI module, then you can use your smartphone as a router. You just need to configure it correctly and connect your computer to the created access point. The main thing is not to forget to set a strong password so that attackers do not hack your network (it is advisable to change it regularly).
Setting up the phone
To use your smartphone as a router, you must:
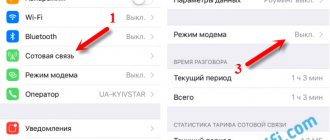
- First of all, turn on data transfer on your phone.
- Open the settings in the device, and then select “More...” or “Modem and access point” (the name depends on the system version and model of the mobile device).
- Next, select the “Modem Mode” tab from the list provided.
- Then move the slider next to “Access Point” to the active position.
- Then it is best to configure the wireless connection settings. To do this, click on the “Access Point” tab. Then select the line “Setting up a Wi-Fi access point” in the proposed list, then specify the appropriate network name, the optimal type of wireless network security and a strong password for it.
At this point, the setup of the smartphone can be considered complete, after which you can connect a PC to it to access the global network.
On different versions of Android OS, the sequence of actions and the names of menu items may differ slightly, but in general, these instructions are suitable for all devices.
Setting up the computer
To receive a Wi-Fi signal, the PC must be equipped with an internal or external Wi-Fi module. In addition, you need to install the appropriate driver for it. It is best to download software for the adapter from the official website of the equipment manufacturer. You can also use special software that automatically searches for missing drivers and updates outdated software to newer ones.
After connecting the device to the computer and installing the necessary software, you need to:
- Click the network icon in the notification area on the notification panel, which is located in the lower right corner of the monitor.
- Select the required Wi-Fi network to connect to, which was previously created on the phone.
- Enter the password for the network if it is secure.
- Next, the PC will connect to the wireless network, after which it will have access to the smartphone’s mobile Internet. Subsequently, it will automatically connect with it when the gadget is in sight.
Pros:
- high data transfer speed;
- You can move around your apartment or private house with your phone, the main thing is that it does not disappear from visibility;
- quick setup;
- Quite a long range.
Flaws:
- rapid discharge of the device battery;
- network hacking is possible;
- drop in traffic speed when several devices are connected simultaneously.
When using a mobile phone as a PC modem, you need to install a higher-speed 3G or 4 G network type on it. You need to test which network mode has the highest speed, and then set it as a priority on your smartphone.
After creating the connection
The connection setup is complete. Now to connect to the Internet all you need to do is:
1. Connect your phone to your computer.
2. Open the created connection.
To do this, double-click with the left mouse button on the connection icon, which is located in the “Network Connections” folder. You can get to the specified folder through the Start menu (the path depends on the version of Windows) or in the following way:
• on the keyboard, press the key combination Win + R (that is, first press the Win button, indicated by the Windows logo and located in the near left part of the keyboard between the Ctrl and Alt buttons, and without releasing it, press the R button. Then release both buttons) ;
• in the window that opens, type or copy the word ncpa.cpl from this page
• press the Enter button.
3. In the connection window, click the “Call” button and wait for connection.
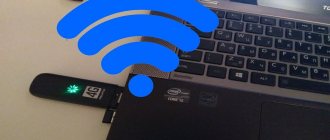
Using your phone as a USB modem
For long-term Internet distribution from a smartphone, it is best to connect it to a PC using a USB cable, since in this case it will be charged. Wi-Fi is a convenient and practical thing, but it consumes a lot of electricity, so the battery charge will not last long. True, today some gadgets are equipped with quite powerful batteries that last for many hours of continuous operation.
Setting up the phone
To distribute the Internet from an Android phone to a PC via a USB cable, you need to:
- Enable “Mobile data” on your smartphone.
- Connect the gadget to the PC using a USB cable. Usually, after this, a window pops up on the phone with options for connecting it: only for charging or for working with files. You must select the connection type “File Transfer” (on some gadgets the Internet is not distributed because of this).
- Go to the phone settings, select the “Modem and access point” or “More...” section there.
- Then click the “Modem Mode” tab and check the “USB modem” function.
- Then a message should appear in the driver installation window - the “Remote NDIS based Internet Sharing Device” device is ready for use. At the same time, the network icon in the Windows tray will become active, and its status will change to “Connected”.
Setting up the computer
To connect your phone as a USB modem, you often need to install a special driver on your PC. For many models of Android gadgets, the Universal ADB Driver is suitable, which can be easily downloaded on the Internet. To do this, just use the browser search engine.
Pros:
- phone charging;
- good data transfer speed.
Flaws:
- attachment of the device to the cord.
To connect your phone to your computer, it is advisable to use an original USB cable, because otherwise problems with the connection and data transfer speed may occur.
Checking the Internet and solving problems
If you did everything correctly, and the Internet is already on your computer or laptop, then in the lower right corner of the screen in the tray you should see a clear connection. You can also test your connection using any browser - just go to any website. But more often than not, some difficulties arise. Companies such as MTS, Beeline, Yota block Internet distribution.
That is, if you enable modem mode on your smartphone, you will be asked to pay for it. Some operators have the opportunity to use the Internet for free for some time and at a reduced speed. There is no need to despair, and this blocking is quite easy to bypass. See the following instructions:
- MTS.
- YOTA
- Beeline
- Megaphone
- Tele 2
We use Bluetooth
If the Wi-Fi module does not work on your phone or you don’t have a USB cable at hand, you can distribute the Internet from it to your PC via a Bluetooth channel. This method is suitable for a temporary connection, because it is not very pleasant to work with a slow Internet.
Setting up the phone
- You must enable data transfer on your smartphone.
- Then open the phone settings, and then select the line “Modem and access point” or “More...”.
- Next, you need to sequentially click on the line “Modem mode” → “Bluetooth modem” and activate this function. To do this, you just need to check the box.
- Then you need to enable “Gadget Detection” or “Visibility Timeout” (it is best to select without timeout) on the device. This will allow other devices to find it to pair with.
Setting up the computer
For normal operation of the Bluetooth module, you must install the appropriate driver on your PC. Most often, manufacturers complete them with disks with drivers and other useful software. The driver built into the operating system may also work. As a last resort, you can download it from the official website of the PC or Bluetooth board manufacturer.
After installing the necessary software, you need to pair your PC with your phone.
This requires:
- Click the blue tooth icon in the notification panel.
- Select “Add device” there.
- Then select the desired gadget in the small window that appears.
- Next, a window with a pairing code will appear on the PC and phone; you need to check it, and then click “Next”. This prevents unauthorized connection of other devices. After this, the phone will appear in the list of connected devices for quick connection.
- To connect to a gadget, you need to find it in the list of connected devices, right-click on its icon and select “Connect via” → “Access Point” in the proposed menu. Then a successful connection message should appear on the display and the network icon in the notification area will become active.
If the pairing request comes from the phone, then additionally you need to enable “Detection” on the computer. To do this, click the “Bluetooth” icon in the tray, and then select the “Open settings” item. Next, check the box next to the “Allow devices to see this PC” option.
Pros:
- the presence of the module on almost all phones.
- You don’t need to keep your phone near your computer all the time.
Flaws:
- low data transfer speed;
- small range of action.
Attention! If older versions of Bluetooth are installed on your PC, the data transfer speed will be low, although it may be enough for simple surfing. For example, for communicating in instant messengers, browsing websites, working with mail, etc. To download large files, it is advisable to use a different type of connection.
Internet distribution using third-party software
You can also distribute traffic from your phone using special software. It can be downloaded for free from Google Play. For example, you can use the utilities FoxFi, NetShare and Free Wifi Hotspot. However, you need to take into account that to use some programs of this type, Root rights are required. In addition, third-party applications allow you to get rid of some restrictions that are provided by Android OS in “Modem Mode”.
Using the FoxFi program
To distribute the Internet via Wi-Fi using this program you need:
- Download and install it from the Play Market.
- Launch the utility.
- Activate “Wi-Fi Hotspot” in the application menu.
- Leave or change the wireless network name.
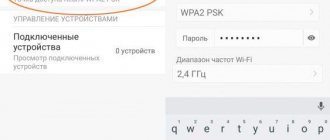
- After which it is advisable to set a WPA2 password, otherwise the network will be unsecured, so anyone can connect to it.
Using the NetShare utility
To share the Internet on a smartphone using the NetShare utility, you need:
- Install this program from the Play Market.
- Launch it.
- Activate the WiFi Hotspot checkbox and password to protect the network.
Internet distribution using the Free Wifi Hotspot application
Using this program, traffic is distributed like this:
- The application is installed on the device from Google Play.
- Then the utility starts.
- Then you can change the “Network name” and “Password” for it.
- Next, you need to click the network icon at the bottom of the main program window to launch the access point.
Applications simplify working with the device and expand its capabilities.
These programs require Root on the cell phone, otherwise it will not distribute traffic. The application interface is quite clear, so even an inexperienced user can figure it out on his own and quickly.
How to set up router protection via phone
To carry out the operation, the equipment is restarted, the entrance goes through the new network name and the old code (taken from the sticker). Then the necessary parameters are set:
- from the main menu, go to “wireless protection”;
- select the security type - preference is given to WPA2-PSK;
- the encryption algorithm is installed - AES;
- the cipher for PSK, originally specified for the virtual line, is prescribed;
- After saving the changes, the machine is disconnected from the network connection.
Basic protection
In the device you need to enter the wireless line menu and find your network there. After clicking on the shortcut, a new security code is registered. If the procedure does not work, then debugging is performed:
- the old network is deleted using the “forget” value;
- it is searched again, then a new identifier must be installed in it;
- All you have to do is press the “connect” button.
The process ends with checking the functionality of the Internet.
Change or delete