- 25shared
- 0Facebook
- 25Twitter
- 0VKontakte
- 0Odnoklassniki
All modern computers are equipped with an analog audio input or simply a connector for connecting a recording device - a microphone. Laptops usually have built-in microphones, which, however, does not prevent you from connecting additional external recording devices to them. Most microphone models in the low and mid-price segment (we do not take into account studio equipment with built-in noise reduction technologies) do not provide very high sound quality, however, by applying the right settings or using special software, you can achieve a significant improvement in sound.
In this article, we will tell you how to set up a regular microphone on a Windows 10 computer, getting the most out of it. To do this, we will use both standard tools of the operating system itself and third-party programs.
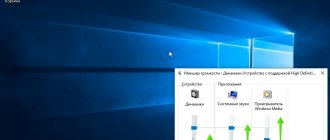
How to enable microphone via Control Panel
See also: “How to disable keylogger in Windows 10”
Many users who encounter a non-working microphone for the first time think that their laptop does not have one at all. In fact, this is not true. Every laptop has a microphone, but sometimes it is disabled by default. To enable it, you need to do the following:
- Open the Control Panel, for example, through the search bar by entering the desired phrase on the keyboard.
- In the “icons” view mode, find the “Sound” section and click on it.
- A window with sound properties will open. Go to the “Recording” tab. We find a recording device called “Microphone”.
- Right-click on the microphone and select “Properties”.
- In the first tab called “General” at the very bottom of the microphone properties window we find the inscription “Use of device” and in the drop-down list select “Use this device (on)”.
- Click the “Apply” button, but do not click the “OK” button yet.
- Now let's start setting up the microphone itself. To do this, go to the “Levels” tab and move the sliders as follows:
- the first of them is responsible for volume. Usually the value is set in the range from 80 to 10, but this is a subjective setting, and the user can choose the value at his own discretion.
- the second is microphone gain. As a rule, it is set at +10.0 dB or +12.0 dB.
- You can now click OK to save the settings and exit the microphone properties. You should also close any remaining windows that were opened during the steps above.
Enabling the microphone through Device Manager
Sometimes a situation arises when a microphone is not displayed in the list of audio equipment. In this case, you need to check whether the necessary driver is installed on your computer. Without such a driver, the operating system simply will not see the microphone.
It is also likely that the source of the problem was the device being disabled in the task manager, or, if you are working with a desktop computer, an incorrect connection through the connector in the system unit case.
First, let's check the availability of the required driver for the sound card.
- Open Device Manager. The easiest way to do this is by right-clicking on Start and selecting the appropriate item from the context menu.
- We look for the section “Sound, gaming and audio devices” and expand it.
- Now you need to find the sound card. Most likely, it comes first on the list and has a long name in English (in our case, this is the only equipment called “Realtek High Definition Audio”).
Note: If there is nothing like this, or there is a yellow triangle with an exclamation mark next to it, the problem is in the driver. And before proceeding to the next step, you need to understand the driver; it may need to be reinstalled or updated. - After we have made sure that everything is in order with our audio equipment, we move a little higher to the section called “Audio inputs and audio outputs”. Open it and find your microphone in the list.
- If the microphone does not work, it is most likely turned on, as indicated by the down arrow icon. Right-click on the line with the microphone and select “Enable device” in the context menu.
Testing your microphone using the Voice Recorder app
In older versions of Windows, you often used the Sound Recorder program to test your microphone, but this program is no longer available in Windows 10. Instead, the operating system now includes the “Voice Recorder” application (in the Russian version, this application may be called “Voice Recording”).
This application can also be used to test your microphone. To do this, open the Start menu, search for “Voice Recorder” (or “Voice Recording”) and launch the found application.
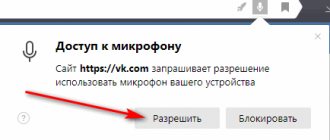
After launching the application, click on the large button in the center and allow access to the microphone (if such a request appears).
After that, say something into the microphone to check and end the recording.
After this, the entry you created will appear in the application. To listen to the created recording, simply click on it directly in the application.
This way you can quickly check the microphone on Windows 10 without installing third-party programs.
How to set microphone as default device
In some cases, problems may occur if the microphone is not set as the default device in the operating system. To fix this, perform the following steps.
- Right-click on the “Speakers” icon on the taskbar to the left of the language change icon.
- Click on the “Sounds” section, which opens the same window with sound properties as the “Sound” section in the Control Panel.
- If the microphone is installed by default, there will be a corresponding check mark in a green circle at the bottom right edge of its icon. Otherwise, right-click on the microphone and select “Set as default”.
Voice recording
A good way to test the real capabilities of a microphone is to record your voice and hear from the outside how well the device does it.
We look for the “Voice Recording” application in the search and go into it.
Allow the application to access the microphone.
Click on the blue icon to start recording (or use the Ctrl+R keys). We speak some clear text so that we can find out the real capabilities of the microphone.
To completely stop recording, click on the blue circle with a white square in the middle. To pause recording, click on the pause icon just below. The checkbox icon next to the pause allows you to add a mark to the recording, noting important points.
The recording will be saved and you can listen to it by clicking on the play icon.
The application is very helpful in adequately assessing the condition of the microphone.
What to do if there is no sound or it is very weak
Sometimes it happens that the microphone is detected and works, but it sounds very quiet or there is no sound at all. Usually, the root of the problem is that when assigning the microphone as a default device, the audio settings were set too weak.
- Open your audio hardware as described earlier. In the microphone properties, go to the “Levels” tab.
- Set the volume to an acceptable level and click the “Apply” button. If the sound is too quiet, add amplification. And make sure that the sound button to the right of the microphone slider is not disabled; this is often where the problem lies.
- To check the microphone’s operation, go to the “Listen” tab. We check the box next to the “Listen from this device” option and start saying something to evaluate the quality of the settings made and, possibly, make adjustments.
Increase microphone volume in Windows 10
Since the microphone can be used for different purposes, we would like to talk about accomplishing the task at hand not only in system settings, but in various software. Let's look at all the available methods to increase the volume level.
Method 1: Sound recording programs
Sometimes you need to record an audio track through a microphone. Of course, this can be done using standard Windows tools, but special software provides more extensive functionality and settings. Using the UV SoundRecorder as an example, increasing the volume looks like this:
Eliminating extraneous noise
Problems with sound quality include excessive noise and crackling. To get rid of them, you need to do the following:
- In the same microphone properties, in the “Levels” tab, you need to remove the gain by setting it to zero. Next, click “Apply”.
- Then we go to the “Advanced” tab, here we try different formats offered by the system.
You can also use the troubleshooting feature , which can help improve your audio quality.
- Go to the Control Panel and click on the “Troubleshooting” section.
- In the “Hardware and Sound” section, select the “Troubleshooting audio recording” sub-item.
- The audio recording diagnostic window will open. Click the “Next” button.
- Select the device you want to check and click “Next” again.
- At the end of the test, the system should automatically eliminate faults, and if they are absent, issue a corresponding message.
Checking your privacy settings
You should check your privacy settings from the very beginning, as a common reason is that the use of a microphone is prohibited. To remove it, you need to do the following:
- Click on the start button, then select “Settings” in the menu on the left;
- Go to “Confidentiality”;
- Select “Microphone”;
Move the slider under “Allow applications to use the microphone” to the On position. Also see if the microphone is activated for the applications you want to use it with.After that, restart the program and check if the microphone works. If not, use the tips below.