The Sony PlayStation 3 gaming console is one of the most famous gaming consoles that has ever existed. It has advanced functionality and, in addition to the game itself, can be used to play music and movies. The only difficulty is that it requires an external monitor to work. The best way out of the situation would be to purchase a modern TV. But this is not always advisable for various reasons. An obstacle to its purchase may be the high cost, lack of space for installation, as well as the need to frequently move from place to place. The last problem is especially relevant for students who rarely sit in one place.
In addition to a TV, you can use a computer or laptop as a monitor, since in each of them the monitor is almost the main component. We wrote about connecting to a computer in a previous article, and today we will write about possible options for connecting to a laptop.
Can you connect your PS3 to your laptop as easily as you can with a desktop computer? What options are available for connection? We will provide answers to these questions in today's material.
Connecting PlayStation 3 to laptop
The Sony PlayStation 3 gaming console is one of the most famous gaming consoles that has ever existed.
It has advanced functionality and, in addition to the game itself, can be used to play music and movies. The only difficulty is that it requires an external monitor to work. The best way out of the situation would be to purchase a modern TV. But this is not always advisable for various reasons. An obstacle to its purchase may be the high cost, lack of space for installation, as well as the need to frequently move from place to place. The last problem is especially relevant for students who rarely sit in one place. In addition to a TV, you can use a computer or laptop as a monitor, since in each of them the monitor is almost the main component. We wrote about connecting to a computer in a previous article, and today we will write about possible options for connecting to a laptop.
Can you connect your PS3 to your laptop as easily as you can with a desktop computer? What options are available for connection? We will provide answers to these questions in today's material.
Advantages and disadvantages of the Satellite Plus glucometer
People suffering from type 1 or 2 diabetes mellitus are forced to constantly monitor their blood glucose levels. To perform research at home, it is enough to have a special device - a glucometer.
Manufacturers of medical equipment offer various types of models, which differ in cost and functional features. One of the popular devices is Satellite Plus.
Equipment and technical characteristics
The glucometer is made in Russia.
The device comes with:
- code tape;
- test strips in the amount of 10 pieces;
- lancets (25 pieces);
- device for performing punctures;
- a case in which it is convenient to transport the device;
- instructions for using the device;
- manufacturer's warranty.
Device characteristics:
- The device allows you to determine your sugar level in 20 seconds;
- The device's memory is designed to store 60 measurements;
- calibration is performed using whole blood;
- the device performs analysis based on the electrochemical method;
- To perform the study, 2 μl of blood is required;
- measurement range is from 1.1 to 33.3 mmol/l;
- CR2032 battery - the operating period of the battery depends on the frequency of measurements.
Storage conditions:
- Temperature from -10 to 30 degrees.
- Avoid exposure of the device to direct sunlight.
- The room should be well ventilated.
- Air humidity – no more than 90%.
- The device is designed to be tested continuously throughout the day, so if it has not been used for about 3 months, it should be checked for accuracy before use. This will make it possible to identify possible errors and verify the accuracy of the readings.
Functional Features
The glucometer performs a test through electrochemical analysis. This method is rarely used in devices of this type.
The device should not be used by patients in cases where:
- the material intended for research was stored for some time before testing;
- the sugar value must be determined in serum or venous blood;
- severe infectious pathologies were detected;
- there is massive swelling;
- malignant tumors have been identified;
- more than 1 g of ascorbic acid was taken;
- with a hematocrit level outside the range of 20-55%.
Before starting work, the device should be calibrated using the special test plate included in the kit with strips. This procedure is straightforward and can be easily performed by any user.
Advantages and disadvantages of the device
The Satellite Plus device is actively used to control glycemia among patients due to the low cost of consumables. In addition, in almost all clinics, people with diabetes who are registered with an endocrinologist receive test strips for the device free of charge.
Based on the opinions of users of the device, it is possible to highlight the pros and cons of its use.
Advantages:
Flaws:
- low quality of materials used in the manufacture of the device;
- There is no automatic device shutdown function;
- the device does not provide the ability to mark measurements by date and time;
- long waiting time for measurement results;
- fragile packaging for storing test strips.
The listed disadvantages of the Satellite Plus model are insignificant for the budget range of glucometers.
User opinions
From the reviews of the Satellite Plus glucometer, we can conclude that the device quite normally performs its main function - measuring blood sugar. The low price of test strips is also noted. The disadvantage, as many believe, is the long measurement time.
I have been using the Satellite Plus glucometer for about a year. I can say that it is better to use it for routine measurements. When you need to quickly find out your glucose level, this glucometer is not suitable due to the long time it takes to display the result on the display. I chose this device only because of the low price of test strips compared to other devices.
Olga, 45 years old
I bought a Satellite Plus glucometer for my grandmother. The model is very convenient for use by older people: it is controlled with just one button, and the measurement readings are clearly visible. The glucometer did not disappoint.
Oksana, 26 years old
The cost of a glucometer is about 1000 rubles. Test strips are available in quantities of 25 or 50 pieces. The price for them ranges from 250 to 500 rubles per package, depending on the number of plates in it. Lancets can be purchased for about 150 rubles (for 25 pieces).
Difficulties connecting PS3 to laptop
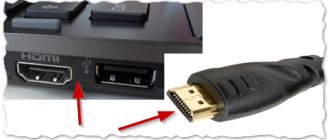
First, let's remember how a video signal is output to a monitor. The set-top box has an HDMI output. After connecting the cable to it, you need to plug the other end of the cable into the HDMI input on your TV or monitor. In technical terms, a computer monitor is not much different from a regular TV, that is, it has the necessary interfaces, namely an HDMI input. If there is no input, the signal simply cannot arrive.
How is the situation with the laptop? Since the monitor is built-in, an external connector for the incoming HDMI signal is largely unnecessary. It is there, but it is located inside the laptop and is constantly occupied by the built-in monitor. But the laptop has an interface connector, you say. Yes, this is true, but almost 99% of laptops only have an HDMI output and no input. That is, almost all laptops are designed for the HDMI interface built into them to be used for transmitting a video signal, but not for receiving it. A very limited number of models are equipped with an HDMI input. The most famous representatives are Dell's Alienware series laptops. They cost about several thousand dollars and are not available to everyone.
Due to the peculiarities of the functioning of laptops, we will consider possible options for connecting the Sony PlayStation 3 game console to them. In addition to how to use a laptop computer to play an external video signal, we will learn how to connect to the console via the Internet to work with the file system.
Application
The plant is widely used in medicine as a strong hemostatic, diuretic, antispasmodic and choleretic agent. I propose to talk about the most common uses of corn silk.
Surprisingly, corn cobs and cereals are strictly prohibited for pancreatitis, being considered heavy food. But the stigmas significantly alleviate the course of the disease.
How to brew
As a rule, the hairs are crushed and poured with boiling water, 1 tablespoon at a time. per cup of water, boil for 5-6 minutes. and leave for another hour, then strain and drink 1/3 tbsp. 3 r. for a day.
A combination with corn silk, mint, calendula, plantain and chamomile is also effective for prolonging remission, that is, you should drink it not in acute form, but when the pain has subsided a little. In this case, all herbs must be mixed in equal proportions and brewed at the rate of 1 tbsp. per glass of water.
The decoction can be made immediately for 2-3 days, keeping it in the refrigerator. For one dose, you need ¼ cup of decoction 15 minutes before meals.
Often, those seeking to regain excellent shape seek salvation in traditional medicine, and here stigmas offer comprehensive assistance in losing weight, since they:
- dulls appetite, allows you to eat less and less often;
- accelerate the removal of excess fluid from the body;
- relieve swelling;
- speed up metabolism;
- help remove the hated cellulite, which is a pleasant bonus for weight loss!
As a rule, it is recommended to make an infusion by pouring 4 tbsp. hairs with a cup of boiling water in a thermos and leave for 3-4 hours or overnight. Next, strain the liquid and drink 1 tbsp. three times a day for 30-35 minutes. before the next meal.
This will help relieve the feeling of hunger and fill you up with smaller portions, which will subsequently reduce the volume of your stomach and in the future, after a course of treatment, you will not gain back the lost kilograms - such a prolonged effect!
My friend gained more than five kilograms over the New Year holidays, and then she froze, developing cystitis. On my advice, she started drinking corn silk, and after a week of taking it, she was surprised to notice that she had easily lost 1.5 kg!
Having pleased me with this news, she continued to drink decoctions to consolidate the effect, and in the three weeks prescribed for taking the medicine, she managed to lose 3 kilograms, without going on complex and debilitating diets.
There are also benefits during pregnancy. In an interesting situation, corn helps:
- in the first trimester get rid of toxicosis;
- replenish your supply of vitamins;
- stabilize urination.
True, before using it, you should talk to your doctor about this topic, since sometimes taking such decoctions can negatively affect the baby’s condition, but we don’t want that, do we?
Our grandmothers and great-grandmothers have long known that this product is good for hair, preserving the beauty of their curls without newfangled balms, sprays, conditioners and masks.
It has been proven that corn, when applied externally, nourishes hair follicles with vitamins, revitalizes them, makes thin hair stronger, thicker, stronger, and stimulates its growth.
Proportions
It is necessary to brew the product at the rate of 3-4 tbsp. per liter of water before washing your hair and after cleansing your curls, simply rinse them with the strained broth.
The effect will be greater if you combine the stigmas with nettle or birch leaf, Canadian small petal, burdock root, or you can make a real complex collection - if you wish!
Corn decoctions are indicated for diabetes as part of complex therapy. Such a drink stabilizes the patient’s condition well, helps to gradually reduce sugar levels and prevent the occurrence of this insidious disease.
Recipe
To do this, use 2 tbsp. you will need 0.5 liters. water, let the herb simmer over low heat for five minutes, let cool and strain, drink 1 tbsp. before eating.
It’s even easier to use a ready-made pharmaceutical extract; all you need to do is dilute 15-20 drops in water and drink before meals.
As usual, the course is 3 weeks, no more than a month, after which you should rest for 14 days, and then start treatment again. On average, it takes about six months to get obvious effects.
Connection methods
Direct via HDMI
If you're the proud owner of a Dell Alienware laptop with a built-in HDMI input, connecting your PS3 via HDMI to it will take just a few seconds. All you need is a connecting cable.
- Connect one end of the HDMI cable to the output of your PS3 console and the other to the input on your laptop.
- Typically, a Dell Alienware laptop comes with a special disk with proprietary software, including one for managing various connectors. Launch the proprietary utility and select the HDMI input as the video source.
- Within a few seconds you will see the PS3 menu.
Via external video capture device
In 99% of cases, you will have to fork out for an additional device called a digital video capture device, for example, Evromedia Pro Gamer HD. What is it?
Most often this is a small box with a certain set of inputs and outputs. You can connect various devices that are sources of video signals to it. To connect PlayStation 3 to a laptop, you can use the following circuit:
- Connect the HDMI output of the console to a similar input of the video capture device;
Connecting via HDMI cable
For the most part, this is simply the only accessible and working option. Yes, such an accessory may cost several thousand rubles, but a TV will cost significantly more, and it takes up more space in the apartment. Therefore, if the need to seamlessly connect your PS3 to your laptop is important to you, consider purchasing this accessory.
Via Internet via FTP
This option for connecting the PS3 console to a laptop is useful if you want to remotely manage the file system of the game console. For example, you want to transfer a file with a new game or later record music or movies on it.
- Install the necessary software on your console and computer. The console requires a special FTP server, by activating which you can gain remote access to the device. You need to install an FTP client on your computer to access files remotely. The best choice would be FileZilla or Total Commander with a built-in FTP plugin.
- Set up your PS3 to access the Internet. To do this, go to “Settings” - “Network Settings” - “Internet Connection” - “Internet Connection Settings” - “Simple” - select the type of connection: wired or wireless - “Scan” to search for available networks (if using a wired connection, this the step will be automatically skipped) - connect to your wireless access point, enter the password - press the cross on the joystick - “Test connection”. From this moment on, the router will automatically assign an IP address to the game console.
- Check what parameters have been assigned to the PS3. This data is necessary in order to make a remote connection via an FTP client. In the “List of settings and connection states” section, rewrite the IP address, mask, gateway and DNS server. Do not forget that the IP address may change from time to time, especially when several devices use the router.
- On the set-top box, open the application that activates the launch of the FTP server.
Method No. 5. How to remove the title page
For Word 2013, the problem is solved simply - you can remove the old cover page by installing a new one. Replacement occurs automatically.
If you use Word 2007, you will have to delete the title page manually and only then insert a new one in its place.
Removal is performed as follows:
- Select the “Insert” tab;
- Then the “Pages” group;
- In the “Cover Pages” menu, select delete.
Removing a cover page
When using even older versions, the cover page does not need to be deleted separately, since it is no different from the rest.
Connecting PlayStation 3 to PC via HDMI
If your display is more or less modern, it is probably equipped with an HDMI connector. It will allow you to connect the console to the monitor in two simple steps:
- Insert one end of the appropriate HDMI cable into the display.
- Insert the second end of the cord into the console.
How to connect a Sony PlayStation 3 to a computer if the monitor does not have an HDMI input? It is suggested to use special adapters. You can find out more about this in the video instructions:
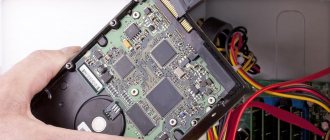
Connecting PS3 to computer via FTP
It is also possible to connect the PS3 to a personal computer to gain access to files and other components of the hard drive. To do this, you need an Ethernet cable, and you also need to install the PS3 FTP Server program on the console (usually it appears in the games folder):
You can connect your PS3 and PC using an FTP and WiFi connection according to the instructions in the video:
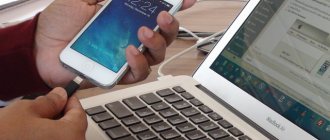
What is DualShock and how to connect it
This technology supports working with Windows out of the box, meaning you don’t need to purchase anything additional to connect the joystick to your computer. The kit will include a USB cable for connecting to a computer. Drivers will also be installed automatically in most cases.
Option 1: MotionJoy
If the game does not support DirectInput technology, then it will be very difficult to play it normally using a gamepad. It is in such cases that it is recommended to download and install special emulators on your computer that are designed to solve the problem. If you are using a DualShock type connection, then it is best to choose the MotionJoy emulator.
The order of interaction with it is as follows:
Launch MotionJoy from the Windows interface. During unpacking, you can change the installation path of the emulator, create or not create shortcuts for quick access. We will not dwell in detail on installing the emulator; the process here looks very standard.
After installation, launch the program and also connect the controller to the computer via USB. First you need to install all the required drivers. Typically, Windows already installs them by default, but there are exceptions, so it would be a good idea to perform this action. Expand the "Driver Manager" tab. Here you need to click on the “Install all” button
Wait for the message “Install completed” to appear on the screen.
Now switch to the “Profiles” tab. Pay attention to the heading “Select one mode”. Here, the choice of connection option depends on what games the joystick will be used in
If we are talking about old games, then it is better to choose “Custom-Default”. If you need to launch games that are available for PS3, then you can leave o. Provided that you are running games that were also released for Xbox, but not for PS3, then use the “XInput-Default” mode. After setting the settings, click on the “Enable” button.
To check the functionality of the gamepad, click on the “Vibration Testing” button. If everything is fine, then the joystick should vibrate.
When you need to disconnect the joystick, use the “Disconnect” button. It is also located in the “Profiles” tab.
Option 2: SCP Toolkit
This program is hosted on the GitHub service and is open source, plus it is distributed completely free of charge. With its help, you can emulate a joystick from a PS3, thanks to which the computer sees it as a gamepad from an Xbox. This improves the Windows experience and reduces the likelihood of crashes. Also, this program can work not only with USB connections, but also with Bluetooth wireless connections.
The setup procedure is as follows:
- Download the program from GitHub. At the output you will receive an archive with files. You need to get and run the file called “ScpToolkit_Setup.exe”.
- This file launches the program installer, where you need to select the path to the location to install it. You can leave it as default. The rest of the installation process does not take much time and does not require any action from the user.
- Once the installation is complete, click on the “Run Driver Installer” button. This button is responsible for starting the search and installing the necessary drivers on the computer.
- Connect the controller via USB and wait for it to be displayed in a special window. When it appears there, click on “Next”.
- Confirm all necessary actions and wait for the software to install. After this, you can launch the game and try to play using the joystick.
This solution has a serious drawback - it is too impractical to use for old games. Sometimes it may not work at all, but this problem usually only affects older games. If you need to be able to play both new and old games, then go with the first option.
The PS3 controller can be run on a computer via USB or Bluetooth connections. However, problems may arise when launching both old and new games, so it is recommended to use various emulators that solve these problems.
Connecting PS3 to PC via switch
A network switch, popularly known as a switch, also makes it possible to connect a Sony console to a computer. This procedure is really complicated and is designed for people with an average level of knowledge in this matter. To connect you need:
- On your PC, open the network connections folder. For Windows 7, the path will be like this: Control Panel => Network Control Center => Change adapter settings.
- Select the adapter, turn it off (RMB, turn it off) and then go to its “Properties”.
- Find “Internet Protocol Version 4 (TCP/IPv4)” in the list.
- Click on the protocol properties, after which the IP addressing window will pop up.
- Specify the IP and subnet mask, DNS server and default gateway.
- Save all settings and enable the adapter.
- Connect the devices using a PatchCord cable via RJ45.
- Launch PlayStation 3 and immediately go to settings.
- Click on “Network Settings”, “...Internet Connection” and select a special setup method, wired connection method and manual setup mode.
- Set “Speed and duplex” to “Detect automatically”.
- Enter IP addresses manually (if 192.168.0.1 is displayed on the computer, then enter 192.168.0.2 on the set-top box).
- The subnet mask must match the same setting on the PC.
- The main gateway is your computer's IP.
- Copy the DNS server from the settings of your personal computer.
- MTU - “Automatic”, in “Proxy server” - do not use, and then connect UPnP.
- The setup has been successfully completed and you can start working.
[PS3] Setting up a network connection with a PC
In this material I will talk about the three main ways to connect a PS3 to a PC for data exchange and describe the setup process in as much detail as possible
1. Wired: PC-(Switch)-PS3
2. Wired: PC-Router-PS3
3. Wireless (WiFi): PC-Router/Hotspot-PS3
Wired: PC-(Switch)-PS3
1. On your computer, open the Network Connections folder:
A. Windows XP: Control Panel -> Network Connections
b. Windows 7: Control Panel -> Network and Sharing Center -> Change adapter settings
2. Select the adapter that will participate in the connection with the PS3 (the number of adapters will match the number of network cards installed in the PC), right-click on it, disable it if enabled, then RMB -> Properties
3. Select Internet Protocol Version 4 (TCP/IPv4) :
4. Click the Properties of this Internet protocol button, the IP addressing settings window will open:
Here, you need to specify the unique IP address of your PC. If there are other devices on the network besides the PC and PS3 (network via a switch), then IP addresses can be given to them later. For now we are setting up the PC:
* IP address: 192.168.0.1
* Subnet masks: 255.255.255.0.
* Default Gateway : Leave blank
* DNS servers are not important, you can leave the ones you have or leave them blank
* Save all settings, enable the adapter (RMB -> Enable)
PC setup is complete
5. We connect PS3 and PC with a PatchCord network cable via an RJ45 connector
6. On PS3, set up a connection:
Settings -> Network settings -> Internet connection settings:
* Setting method : Special
* Connection method : Wired connection
* Operating mode : Manual settings
* Speed and duplex : 1000BASE-T duplex, if on the PC the network adapter supports a speed of 1Gbit and the switch (if available) also supports 1Gbit. If we don’t know for sure, we can install Detect automatically
* IP address setting : Manual
— Enter the next free IP address, if 192.168.0.1 was selected on the PC, then on PS3 select 192.168.0.2
— Subnet mask is the same as on a PC, i.e. 255.255.255.0
— As the “default router” (meaning the main gateway), write down the IP of the PC (192.168.0.1)
— Configure the DNS server as on a PC, if there are none, then write down the PC address (192.168.0.1)
* MTU Settings : select Automatic
* Proxy server : Do not use
* UPnP : Disable
* You can refuse the test connection
PS3 setup complete
Wired: PC-Router-PS3
1. Connect the PS3 to the router (router) with a network cable
2. Enable DHCP on the router , if it was not previously enabled - this will allow you to assign an address, mask and gateway to the set-top box automatically
3. On PS3, set up a connection:
Settings -> Network settings -> Internet connection settings:
* Setting method : Special
* Connection method : Wired connection
* Operating mode : Manual settings
* Speed and duplex : 1000BASE-T duplex, if on the PC the network adapter supports a speed of 1Gbit and the switch (if available) also supports 1Gbit. If we don’t know for sure, we can install Detect automatically
* IP address setting : Automatic
* DHCP : Do not install
* DNS Settings : Automatic
* MTU settings : You can select it automatically, but it’s better to look at what value is in the router and set the same manually
* Proxy server : Do not use
* UPnP : Enable if the router is also enabled
* You can refuse the test connection
Wireless (Wi-Fi): PC-Router/Hotspot-PS3
1. Enable Wi-Fi in the router/access point, set up encryption (WPA Personal with a TKIP key will be enough), set a password
2. On PS3, set up a connection:
3. Settings -> Network settings -> Internet connection settings:
* Setting method : Special
* Connection method : Wireless
* WLAN Settings : Scan
— After identifying the networks, select your Wi-Fi network and press X
— In the WLAN security settings, the encryption method configured in the router should already be selected, make sure and scroll further
* IP address setting : Automatic
* DHCP : Do not install
* DNS Settings : Automatic
* MTU settings: You can select it automatically, but it’s better to look at what value is in the router and set the same manually
* Proxy server : Do not use
* UPnP : Enable if the router is also enabled
* You can refuse the test connection
© Copying of material is permitted only with the permission of the author with a mandatory indication of a link to the source
How to connect Sony PlayStation 3 to TV via HDMI
If your TV is equipped with an HDMI connector and there is a corresponding cable at home, then you have at your disposal everything you need for comfortable gaming.
What you will need to do is: connect the console and TV, and then reset the PS3 settings so that there are no sound delays and the picture looks as good as possible. For this:
- Turn off the set-top box;
- Wait about 10-15 seconds;
- Press and hold the power button until the second beep sounds;
- Specify audio and video output options.
If the image does not appear , check which of the possible HDMI channels is currently selected.
PlayStation 3 repairs are carried out in our workshops . You can confidently trust the many years of experience of our specialists. Call and make an appointment!
When setting up a TV for PS3: choosing brightness, saturation, etc. — you can enable game mode (if supported). This will increase the smoothness of the picture and also slightly improve its quality.
There are practically no image settings on the PS3 itself. You can select the screen display area as well as some additional options. Everything else is regulated on TV.
Connecting PS3 to TV with tulips
Now let's consider a situation where an HDMI connection is not available, for example, if you have a not very modern TV model at your disposal.
A standard RCA AV cable will help you connect your PS3 to a TV without HDMI
If you correctly navigate the color of the plugs and connectors, there should be no difficulties. The colored ends need to be inserted into the TV, and then turn on the corresponding channel . The reverse side of the cord is inserted into the console.
For the first time, it is better to reset the settings.
This method has one drawback - the image quality will not be higher than 576p .
Connecting PS3 to TV via SCART
In this case, you will need an RCA cable, as well as a special adapter , which serves as a conductor between the console and the TV screen. You can buy it at most electronics stores.
When connecting the PS3 to an old TV via SCART, the image quality will be less than 720p , but for those who do not have the opportunity to use more modern equipment, this will be almost the only option.
If you encounter any difficulties, do not forget to reset the settings.
Benefits of flashing PS3
You have figured out the basic rules for connecting a console to a computer and laptop.
And now it’s worth mentioning the advantages of a service called flashing consoles:
- you will have the opportunity to record any games to the internal disk. To start the game, you will not need to insert a disc into the console;
- you will be able to run games that are saved on the flash drive. It doesn’t matter where you got them: installed a licensed disc or downloaded them from the Internet;
- You can use applications that are not official. They make it possible to improve image and sound quality, as well as launch games even faster.
Now you don't have to buy games at all, so you'll save a lot of money. The drive resource is also saved, because you will practically not use this element.
These are the main points about using the PS3. If you buy such a console, you will be able to enjoy perfect sound and image, and the game process itself will bring you a lot of pleasure.
Connect PS3 to computer:
How to connect PS3 to laptop?
Many people who own game consoles often ask questions about whether it is possible to connect the PlayStation Three to a laptop, so as not to take a TV specifically just for games.
At a theoretical level this may be true, but in practice it does not seem likely to solve this issue perfectly with the vast majority of laptops.
How to connect PS3 to a monitor with HDMI
Some modern computer monitors have an HDMI input and built-in speakers for audio output. If you have just such an instance, then you are incredibly lucky, because you don’t have to do anything other than connect the console and the image output device with the appropriate cable.
Please note that you cannot connect a PS3 and a laptop ! Yes, the laptop has a screen and HDMI, which would seem to be great for realizing your idea, but not everything is so simple. The fact is that laptops only have an HDMI output, that is, it itself can be connected to a TV and monitor, but other devices are not suitable for it.
Important nuance
In words it sounds like connecting the set-top box to a laptop is not at all difficult, and this is true. But there is an important nuance: not all laptops have a video input with the ability of the HDMI connector to receive a signal, and not just send it out. Manufacturers do not equip all models with this feature.
If you have an inexpensive laptop, then most likely you do not have such a function. For example, the expensive Dell Alienware “device” has an HDMI connector for signal input, but it is very expensive. So copy the full name of your laptop and look for its full description.
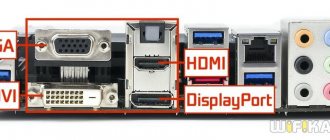
How to connect PS3 to a VGA monitor
There may be some difficulties when trying to connect your PS3 to your computer monitor. In particular, there may be a VGA connector , which does not “communicate” with the console using standard methods.
In this case, you will need to buy a special converter, the cost of which is approximately 500-700 rubles. This device will be a great help in this situation, and now we’ll tell you why.
It is worth considering that VGA can only transmit images , which means you will not hear sound. However, the converter we talked about earlier has AUX, which allows you to connect external speakers or headphones.
For reference. Converters come in two types: with additional power from USB and without. Any of them is suitable for PS3, but for PS4 only the first option.
the HDMI-VGA converter itself , work.
Some monitors may report that the input signal is outside a certain range. This means that they do not support 1080p or 1080i images. When resetting, you need to set it to 720p or less. The picture quality will be lower, but this is the only way out of the situation .