The operating system is loading, there are sounds, the computer is working, but instead of a desktop there is a black screen. What to do in this case? Usually the problem occurs after updating the "ten" or installing a new system. Sometimes this situation is typical for a computer infected with viruses or after they have been removed.
A black screen may appear with a cursor (viruses), but often it is missing (video card and drivers). The “non-desktop” appears mainly after a reboot, but there are cases of crashes after turning the PC on and off, sleeping mode or hibernation.
Quick solutions
Before moving on to “serious” solutions to the problem, let's look at a few quick troubleshooting options:
- Often users turn off the computer during updates, not paying attention to the “Do not turn off...” message. A black screen may indicate that the operating system is being updated. The way to check this is to look in the Task Manager (more details here) for the presence of the Windows Modules Installer Worker process. If it takes up too much processor (CPU) resources, then the OS is actually being updated;
- the problem may lie in the second connected monitor (we recently wrote about its connection and settings). Turn off the second display and see if the situation changes;
How to fix black screen in safe mode
In case there is a software related issue and you do not have access to the desktop, you will need to boot your computer in Safe Mode to troubleshoot and fix the black screen issue.
Extended loading after three unsuccessful attempts
To launch advanced startup options, follow these steps:
- Turn on your computer.
- As soon as the Windows logo appears on the screen, press the Power to abort the boot.
- Repeat steps 1 and 2 two more times.
After the third interruption, Windows 10 will open in the Advanced Startup , and then you can continue by following the steps below to boot into Safe Mode.
Advanced startup using bootable media
Alternatively, you can use the USB installation media to get to the Advanced Launch Options environment by following these steps:
- Boot your computer from the USB installation media.
Tip: If your device won't boot from a USB flash drive, you'll need to change your system's BIOS settings to make sure it can boot from USB. You can usually access the BIOS by turning on your device and pressing one of the function keys, Delete or ESC, but be sure to check your manufacturer's support site for more details. - Click Next, then the Restore your computer link in the lower right corner.
Once you have completed the steps, continue with the Safe Mode instructions.
Boot in Safe Mode
To boot Windows 10 in Safe Mode, follow these steps:
- Click the Troubleshoot .
- Click the More Options .
- Click Launch Options .
- Click the Reboot button.
- While in Startup Settings, press the 5 or F5 key to select Safe Mode with Networking.
Once your device enters Safe Mode, there are several troubleshooting steps that can help you resolve the black screen issue, such as reinstalling the graphics driver, uninstalling buggy updates, changing system settings, and more (as shown below).
Perform a clean boot
When your device starts up normally, Windows 10 loads a lot of services, drivers and apps that continue to run in the background, if one or more of them are causing problems, you might end up with a black screen.
Using a clean boot allows you to configure Windows 10 to start with only a minimum set of services, drivers, and applications, which can help you figure out if something running in the background is causing the screen to turn black.
Clean Boot is similar to Safe Mode, but allows you to reactivate one service or software at a time, which can help you more accurately pinpoint the problem.
To perform a clean boot, use these steps:
- In the system search window, type msconfig , click the System Configuration result to open the interface.
- Go to the Services tab.
- Select the Hide Microsoft services check box.
- Click the Disable All button.
- Click the Apply button.
- Open "Task Manager" through the Startup tab.
- Click the Startup tab in Task Manager.
- Select each application and click the Disable button in the lower right corner.
- Close Task Manager .
- Click OK in the System Configuration section.
- Restart your computer.
While this process will not solve the problem, it will give you an idea of where to start looking for a solution to the problem.
If you no longer see the black screen after restarting your computer, you now know there is a problem with a background process.
Troubleshooting black screen issues using a clean boot
In this case, follow these steps to re-enable the items (one at a time) and reboot your device to see which one is causing the black screen:
- Open the System Configuration tool again.
- Go to the Services tab.
- Select the Hide Microsoft services check box.
- Enable one of the services and click Apply and OK.
- Restart your computer.
Once you have completed the steps, repeat the steps for each item until you can identify the item that is causing the problem.
If neither service is the problem, use these steps to re-enable startup items:
- Open Task Manager.
- Click the Startup tab.
- Select an application and click the Enable button in the lower right corner.
- Close Task Manager .
- Restart your computer.
After completing the steps, repeat the steps for each item until you find the app that is causing the black screen.
If you do not find problems with this method, do not forget to re-enable all services and applications from startup.
Reinstalling or rolling back the graphics driver
Usually the computer black screen appears due to a bug or compatibility issue with the graphics driver that you may have installed manually or through Windows Update.
In other cases, updating the video driver may not be a problem, but the one installed on your device may be damaged and as a result, you may see a black screen.
To reinstall a graphics driver while in Safe Mode, you can uninstall it and then allow Windows 10 to automatically reinstall it by following these steps:
- Open Device Manager.
- Expand the Video adapters .
- Right-click the video adapter and select the Uninstall device option.
Advice. Additionally, you can also select the Uninstall driver for this device option to remove the driver from your device. This is sometimes recommended, but if Windows 10 can't find the driver online, you'll need to download the driver from the manufacturer's support website manually.
- Click OK and restart your computer.
Once the device restarts, Windows 10 should automatically reinstall the graphics driver and hopefully the black screen will go away.
If you see a black screen after upgrading to a new version of Windows, you may need to download the latest compatible driver from your device or your manufacturer's support website to resolve the issue.
Rolling back the graphics driver
Additionally, if you recently installed an update, you can roll back to the previous version by following these steps:
To roll back a device driver to an earlier version in Windows 10, follow these steps:
- Open Device Manager
- Expand the Video adapters .
- Right-click your graphics card and select the Properties option.
- Click the Driver tab.
- Click the Rollback button.
- Select the reason why you are rolling back (select any option).
- Click Yes to confirm.
- Restart your computer.
After completing the steps, Windows 10 will remove the driver and the previous driver will be restored.
If the Roll Back Driver button is not available, then Windows 10 does not have a previous driver to roll back. If you know that the previous driver worked without the black screen issue, you can find and download the older version of the driver from your manufacturer's support website and use their instructions to install.
Disabling Fast Startup
Sometimes the black screen appears because the Fast Startup feature is enabled on your computer.
Fast Startup is simply a feature that allows Windows 10 to boot faster, but if it's causing problems, you can disable it by following these steps:
- Open Control Panel.
- Click on System and Security.
- Click on Customize Power Button Functions under Power Options.
- Click the Change settings that are currently unavailable link.
- Uncheck Enable Fast Startup (recommended).
Note. This feature is not available in every installation as it depends on your hardware configuration. - Click Save Changes and restart your computer.
If the problem was with fast startup, after restarting the device you will no longer see the black screen.
Disable High Contrast
If you are using the high contrast feature, there is a chance that this could be the reason why you are getting a black screen.
To disable High Contrast while in Safe Mode, follow these steps:
- Open "Options" (Ctrl + I).
- Click on Accessibility .
- Click on High Contrast.
- Turn off the high contrast mode switch.
After you complete these steps, reboot your device to see if disabling features helped resolve the black screen issue.
Stopping the RunOnce Process
RunOnce allows you to specify commands that Windows 10 should run once and then remove, but this can also result in a black screen on your device.
To stop the RunOnce process , follow these steps:
- Open Task Manager.
- Click the Processes tab.
- Select the RunOnce and click End Task (if applicable)
- Go to the Services tab (if the process was not on the Processes tab).
- Right-click RunOnce and select the Stop button.
- Restart your computer.
If the problem is caused by the RunOnce process, you should be able to use your device normally.
Uninstalling updates
There have been a lot of cumulative updates lately with bugs and other compatibility issues.
If you recently updated your system and you are experiencing a black screen, then uninstalling the update may solve the problem.
To remove a cumulative update:
- Open Control Panel.
- Under Programs, select Programs and Features.
- Select the View installed updates option in the left pane.
- Select the most recent update.
- Click the Uninstall button and restart your computer.
If these steps resolve the issue, you can temporarily block the update from installing until a new fix is released.
Uninstalling Security Software
Although security software is designed to protect your device and data, it can also cause problems such as black screens.
If you are using a third-party antivirus or other software to protect your computer, you may want to uninstall it to determine if the application is causing the problem.
If you no longer see the black screen on Windows 10, you can reinstall it again, but if the problem appears again, uninstall it again and check your software provider's support website for an updated version or more help.
Create a new account
An issue with your account could also be causing the black screen.
To determine if your account is causing problems while in Safe Mode, you can create a new local account, and if it works, you should consider switching to a new account.
You can quickly create a new account in Safe Mode by following these steps:
- Open Command Prompt as Administrator.
- Type the following command to create a new account and press Enter: net user tempuser /add
In the command, be sure to change “tempuser” to the name of the account you want to create. - Type the following command to change the account type to Administrator and press Enter: net localgroup administrators tempuser /add
- Restart your computer.
- Sign in with your new user account.
If your device no longer has a black screen, the problem is related to your old account. Instead of wasting valuable time troubleshooting your old account, you should move your files to your new one, link your user profile to your Microsoft account, and delete your old account.
The reason is viruses
At the beginning, we said that the reason for the appearance of a black screen with a cursor could be viruses. Even after removing them, this problem occurs. Some malware makes not very good adjustments to the registry key. And often exactly in the section that is responsible for turning on the desktop.
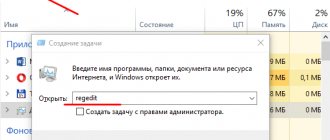
Launch the Task Manager using the Ctrl+Alt+Del key combination (select it from the pop-up menu). In the window, click on the “File” tab, then “Run a new task” - and enter regedit in the execution line.
In the Registry Editor that opens, follow the path indicated at the top of the following screenshot. In the last Wingolon folder we are interested in two parameters. The first is Shell, whose value should be explorer.exe. If it is different, set the correct one (click on the parameter twice with the left mouse button and enter a new one). If Shell is missing at all, create it with the desired value (top tab Edit - New - String parameter).
The second parameter is Userinit. Its value (path) must match that shown in the screenshot.
Another important point. Follow the same path, only first select the HKEY_CURRENT_USER section. Make sure that the settings described above are not present in the Wingolon folder. If they are there, delete them.
The black screen loading situation should improve. Otherwise, try the methods we describe below, or check your system again for threats. You can choose a good antivirus program here.
If the desktop does not start
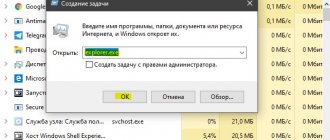
In cases when the desktop does not load at all and even the “Start” button does not appear, you need to do what is described above, and if that does not help, then something else. Try launching the desktop through the task manager using the method described above. If you don’t have the AVZ program at hand, you’ll have to go into the registry. But I simplified the task for you and prepared a ready-made solution.
Download and run the shell.reg file. It adds the necessary parameters to the registry and removes the unnecessary ones. To launch it from the task manager, simply enter in the menu “File -> New task” in the input field: <path>\shell.reg, where path is the location where the file is located. For example: "C:\Downloads\shell.reg". If the task manager does not start, it says that the file is missing or you do not have enough access rights, then you first need to enable it.
Reboot and fast start Windows 10
Disabling fast OS startup is a method that often helps owners of computers with an AMD (ATI) Radeon video card installed.
But first, we will need to reboot it to make sure this is the cause of the malfunction. As we understand, we will reboot the computer blindly.
Method number 1. Log in to your account by entering your password or PIN code. First, it is better to press the Backspace key several times to remove unnecessary characters. Press the Win+R keys. A Run window will appear, which we will not see. Type the command shutdown /r and press the Enter key. It is important that you have the correct English-language keyboard layout. We wait a few seconds, then click Enter again. The computer should start to reboot, so we wait again.
Method number 2. Reboot via login screen. We also press Backspace several times. Then we need to get to the shutdown button, which we showed in the very first screenshot. Press the Tab key 5 times (five is important). Click Enter, then the up arrow and Enter again. The computer will restart.
Another way to restart the computer is to turn it off and on again using the power button (pressed for a long time). But the method is dangerous both for the PC itself and for the operating system.
So, if after a blind reboot you finally see the long-awaited desktop, it’s really a matter of the Radeon video card and the quick launch of the OS. Let's turn it off.
Let’s go to the Control Panel (more details on how to do this here) and select the “Power Options” section. Here we need the “Button Actions” tab.
First, click on “Change settings...” to unlock the desired settings.
Then scroll down and remove the marker from “Quick Launch”. Save the changes.
If your desktop freezes too often
This usually happens after installing some new program. Remember after what actions this started and try to remove the most recently installed programs. If it doesn't help, roll back to an earlier restore point. Viruses may well be to blame. In this case, let's try to cure the desktop, and for this we need:
- Download the AVZ program. I talked about this program in this article
- Go to “File -> System Restore”, check the boxes No. “5. Desktop recovery", "16. Recovering the Explorer launch key" and "9. Removing system process debuggers"
- Click the “Perform marked operations” button and reboot.
Video card drivers
We will again have to act blindly to remove and reinstall the video card drivers. There will also be two methods here.
Method number 1. In the Windows login window, in the lower right corner we find the on/off icon. First, delete the excess with the Backspace key, press Tab five times, then Enter and the up arrow. While holding down the Shift key, press Enter. We wait a few minutes for the recovery menu to load. We most likely won't see him.
Next we perform the following steps:
- Click on the down arrow three times, press Enter, down again twice, Enter again and the left arrow twice;
- the next step depends on the type of BIOS: for MBR - down arrow once and Enter, for UEFI computers - down arrow twice and Enter;
- final action - key
The computer will restart and the following menu will appear.
We need one of two boot types - low-resolution video mode (F3) or safe mode with network drivers (F5). After running one of them, try restoring the system or removing the drivers and installing them again.
Method number 2. Let's try the second option of reinstalling the drivers. After starting the computer, in the login menu (we don’t see it), we log into the system using a password or PIN code. Hold down the Win+X combination and click the up arrow 8 times. Press Enter.
Thus, we launched the command line as administrator. Enter the command bcdedit /set {default} safeboot network and press Enter. It is important that the layout is in English. Next, enter the command shutdown /r and press Enter again. After a few seconds (about 20, if there is a beep - after it) Enter again and wait for the operating system to boot into safe mode.
In this mode we will be able to configure our drivers - remove them and install new ones. By the way, to then return from safe mode to normal Windows boot, you need to enter another command on the command line - bcdedit /deletevalue {default} safeboot.
Integrated Video
Another possible solution for owners of desktop computers is to connect to an integrated video card. Of course, if it is available on the motherboard.
Turn off the computer and connect the monitor input to the output of the integrated card. If the desktop boots normally, you can reinstall the drivers for your discrete device.
Black screen when there are connection problems
When you encounter a black screen, there could be many reasons for it, including hardware issues, software issues, or a combination of both.
The instructions below will provide you with troubleshooting steps to help you resolve this issue.
Checking connection problems
If your device shows a black screen before you can even log into your account, it could be a connection problem between the display and your computer .
In this situation, recheck the connection and ensure that both ends of the signal cable are connected correctly and the monitor is receiving power and using the correct input. (You can check the manufacturer's support website for more details.)
If you have multiple video outputs, try switching the connection to a different port. Often, a driver update may include changes that - for unknown reasons - may send the video signal to the wrong port (DisplayPort, HDMI, DVI, Thunderbolt, VGA).
Additionally, if you are working with a system that includes both a discrete and integrated video card, you can switch to the integrated video processor to see if the problem is with the discrete card.
Another troubleshooting step you can try involves connecting the monitor to another computer to see if you're dealing with a faulty display.
Display detection
In many cases, you will see a black screen on your device because Windows 10 has lost communication with the display. When this happens, you can use the Win + Ctrl + Shift + B keyboard shortcut, which restarts the video driver and refreshes the connection to the monitor.
On tablets (such as Surface Pro or Surface Go), you can reset the screen by pressing the Volume Up and Volume Down three times at the same time.
Alternatively, you can use the Win + P shortcut to bring up the Project menu, then press the P key and Enter key to switch between different display modes and see if the black screen goes away. Repeat the steps four times to scroll through all the settings.
Disabling unnecessary devices
Peripherals connected to your computer may be causing a black desktop or black screen with spinning dots to appear during startup.
If you experience something similar, disconnect all peripheral devices (such as printers, cameras, removable drives, Bluetooth, and other USB devices) from your computer.
Start your computer again, and if everything works fine, you have a problem with one of your peripherals. You can find out which one is causing the problem by connecting one peripheral at a time until you hit the one that's causing the conflict.
Once you recognize the device causing the problem, turn it off, restart your computer, and then search the Internet to see if there is a fix or contact your device manufacturer for help.
Replacing damaged "explorer.exe".
If it turns out that “explorer.exe” does not work, that is, it is damaged, you need to copy it from the system distribution. To do this, prepare a system image on a flash drive or disk. The information that will be needed for recovery has the extension “.wim”. To open it, you will need the 7-Zip archiver. Install it on your computer. When downloading it from the network, take into account the bit depth of your system, since this program can be released in different versions - 32 or 64 bit.
Restoration procedure:
- Install the distribution kit with the system on your computer.
- Go to the root directory of the disk and find the “sources” folder there.
- From there, copy the “install.wim” file to your computer.
- Launch "7-Zip".
- Using this program, go to the folder where you saved the copied “install.wim” file.
- Give the "Extract" command.
- Find “explorer.exe” in the extracted files and transfer it to a flash drive inserted into the computer.
- Restart your PC.
- A selection of system installation options will open.
- Click "System Restore".
- In the next window, select Command Prompt.
- You need to write “notepad” in the command line.
- Notepad will open.
- Using notepad, you need to go to the flash drive and copy the “explorer.exe” file from there.
- Then you need to go to the system disk, defining it by volume, since the letters at this stage will be different for all disks.
- Having found the “Windows” folder on the system disk, you need to copy “explorer.exe” into it, replacing the file with the same name located there.
If everything is done correctly, the desktop will be restored.
Restoring the executive process
Desktop activity is provided by a process called explorer.exe . You can determine whether it is active or not in the task manager:
- By typing the button combination Ctrl+Alt+Delete , you will need to select it from the list.
- In the list of active processes you will need to find Explorer e.
- Right-click on it and click “Restart”. .
Registry
If the Windows 10 desktop does not work even after completing the previous step, then you will need to enter the registry:
- Press the Win+R key combination, enter the command “regedit” and press the enter button.
- In the window that opens, you will need to follow the path HKEY_LOCAL_MACHINE\SOFTWARE\Microsoft\Windows NT\CurrentVersion\Winlogon.
- The final folder will contain, among many others, a line called Shell . Opposite it should be written explorer.exe . It is also necessary to find in the same section a line called Userinit . Opposite it should also appear the inscription C:\Windows\system32\userinit.exe.
- If these parameters differ or are completely absent from the list, they will need to be corrected or entered manually. The guide is simple: hover over the file, call up the context menu and click on the “Edit” .
System Restore
This method helps when the desktop does not open in Windows 10. The user creates the rstrui.exe task in the task manager. Next you need to press Enter . The system will offer to roll back to the point in time when it worked stably. All that remains is to choose a suitable date from several offered.
Sfc/scannow
Another method is to check the integrity of system files:
- Win+R key combination, Run console .
- Write cmd and press Enter .
- At the command prompt, type Sfc /scannow and press Enter .
- The utility will check the integrity of the files, and if something is wrong, it will restore them.
— My computer turns off on its own... what should I do?
— Do you have a system unit downstairs?
- Change your socks... he's losing consciousness.
Source