Users are often faced with the need to transfer some information to another device. Import and export functions are provided for the convenience of people. However, there is a difference between these two procedures. Let's figure out what import and export are, how they differ from each other and how to perform operations with their help.
Importing (Exporting) contacts
Let's look at an example of importing contacts from a SIM card. Contacts from a memory card are imported in the same way.
- In the Contacts app, select Manage Contacts from the top menu.
- Select “Import and export contacts” -> “Import from SIM card”.
- Select the location where you want to move your contacts (phone, Google account, or Exchange Active Sync).
- In the list of contacts that appears, select those (check the boxes next to them) that you want to import and click “Save”. If you want to import all contacts, select “Select All” in the top bar.
Exporting contacts (the reverse procedure of importing) to a SIM card or phone memory is performed in the same way (from the “Manage contacts” menu -> “Import and export contacts” -> “Export contacts to ...”).
Transferring contacts through the phone functionality
There are several alternative ways to import contacts. The most commonly used options are:
- Use your Google or Apple account to synchronize your database across multiple devices. To do this, you need to go to your phone's mail and use the import function in the application menu. The phone book will be copied to the account database. After connecting a new device through the account management manager, you can synchronize data in its user database.
- Sending by email. You can simply send yourself a file with your contact database in CSV format, and then access this mailbox from another device. After downloading the information, update it on your new phone.
- Using bluetooth. You need to turn on both devices, go to the bluetooth menu, find the device of interest in the list and distribute a file with the necessary information to it. After that, export the phone book using the received data.
If other methods do not work, you can try saving the user list to your phone's SIM card, and then insert it into a new device and synchronize the information. If there is a lot of data, this procedure will have to be performed several times, sequentially saving blocks of transferred data to the card. In a similar way, you can use an SD card for this procedure, selecting its memory as storage.
We only use the phone
Accessories for electronic books. . The following applications are available. Set an alarm with the following options. To create a new alarm, select New Alarm from the alarm app. If you skip this option, unless you select a day, the alarm will ring every day. Save the alarm by selecting "Save Alarm." Once you select a specific saved alarm, you can edit or delete it. When the alarm sounds, you have the following options: Long touch with one or two fingers to turn off the alarm. Read the time with a short tap of two fingers.
- Fill in the Alarm Time field to enter four digits.
- The first pair of digits marks the hours and the second pair of minutes.
- Select the days on which the alarm will ring in snooze mode.
Today, any state is an active participant in global trade. Every day, millions of tons of cargo cross borders. In these transactions, one party acts as a seller, the other as a buyer. Knowing what imports and exports are for a particular country can say a lot about its welfare.
Copying contacts
- In the Contacts app -> Manage Contacts, select Copy Contacts.
- Select a location (phone or account) from which you want to copy the contacts.
- Then (in the menu that appears) select the location where you want to copy them.
- In the window that appears, confirm the copying procedure by clicking “OK”.
If you are using an Andro smartphone >
Importing contacts means adding contacts from another device or the internal memory of a smartphone, and exporting means transferring existing contacts to the device’s memory or somewhere else. Not quite clear? Then it’s a little simpler: using import, you enter into the memory of your device or link to your Google account the telephone numbers available, say, in the memory of your smartphone (they can be “packed” into one file for convenience), and using export you can transfer numbers or create file to transfer to another device. Escorting contacts can be compared to a backup: transfer the file to another file and, in case of problems, restore a copy from it.
The section for importing/exporting contacts can be found on any Android smartphone. Let's take Xiaomi as an example. To find the required item in the menu, you first need to open the contacts section; this can also be done using the “Phone” application.
Next, click on the three dots at the top of the screen.
Select “Import and Export” from the menu.
Choose to import or export contacts depending on your needs.
Pay attention to the “Send contacts” item - it allows you to share them using various services.
But whether there is a need for this is a moot point.
After purchasing a new mobile gadget, it becomes necessary to transfer important information from the old device. And if the necessary applications can be reinstalled, then lost contacts are quite difficult to recover. Especially if there are more than a hundred of the latter.
Of course, you can transfer contacts from Android to Android manually, but this process is quite labor-intensive and unpleasant. It is much more effective to attract third-party services, utilities and other tools to this enterprise.
Part 2. How to Import CSV Contacts to Android
It's not without thought for importing CSV into Android.
All you need is a Gmail account. Simply download the CSV file to your Gmail account and then sync the account to your Android phone. How easy it is. Below is a step-by-step guide. Follow him. Step 1. Open Browser on your computer and land in Gmail. Sign in to your Gmail account. Step 2: Go to the left column and click on Gmail
.
From the drop-down menu, select Contacts
.
Step 3: Click the More...
From the drop-down menu, select
Import
Step 4: This will bring up a dialog box. Click select file
.
In the pop-up file browser window, navigate to the location where the CSV file is saved. Select it and click Open
>
Import
to download the CSV file to your Gmail account. Step 5: Now all the contacts in the CSV file are downloaded to your Gmail account.
Step 6: Sign in to your Google account on your Android phone. Then go to settings
>
accounts and synchronization
.
Find your Google account and click on it. Next, check the Sync contacts
>
Sync now
. Once completed, all contacts CSV will be on your Android phone.
Step 7
It doesn't matter if you don't have a google account on your Android phone. You can still import Android contacts from a CSV file
Just skip step 6 and click More details...
>
export...
Select the group in which all CSV contacts are saved.
Then select Save as vCard Format
.
Click the Export
to download the vCard file to your computer.
Step 8: Connect your phone as an external hard drive. Once detected successfully, go to your computer and find your Android phone.
Step 9: Open your Android phone. All folders and files saved on the SD card are displayed in front of you. Just copy and paste the vCard file here.
Step 10: On your Android phone, tap the Contacts icon next to the Contacts
categories and press the virtual button on the left of the main button to show the menu.
Select Import/Export
>
Import from USB Drives
>
Import from SD Card
(this means external SD card).
Step 11. A dialog box appears asking you to save contacts to your phone or your accounts. Select one and your phone starts searching for the vCard file. When done, select Import vCard File
>
OK
. Then all the contacts in the vCard file will be imported to your Android phone.
Previously, it was impossible to transfer contacts from one phone to another. When purchasing a new device, you had to enter all the phone numbers again, which many people did not like at all. Everything changed only with the advent of smartphones. And if on Symbian transferring contacts still caused certain problems, then on Android this process takes a matter of minutes.
If you are afraid of losing your smartphone, then be sure to synchronize your phone book. In this case, when you buy a new device, you will not need the old one - all your contacts will be displayed immediately after you log in. To synchronize with Google servers you need to do the following:
Step 1.
Go to the “
Settings
” section.
Step 2.
Go to “
Accounts
” or “
Accounts
”.
Shchag 3.
Select "".
Step 4.
Go to your sync settings by tapping on your email address (some smartphones do not require this step).
Step 5.
Now check the box next to the Google services you would like to sync.
In particular, you should be interested in the “ Contacts
” item.
SIM card
One of the simplest, but at the same time time-consuming ways to import contacts to Android is to copy the phone book to a SIM card. It’s worth warning right away that there is a limit on the number of subscribers – no more than 200 numbers.
To import contacts to Android, the old device must have a valid SIM card. If there are any software or hardware restrictions on working with the phone book, then they need to be removed. Permissions or prohibitions are usually given by third-party applications. If they are not installed, then you can proceed with the import procedure.
How to transfer contacts to a SIM card:
- Open the phone book and click on the options button (three-dot icon/gear).
- The “Settings” line should appear in the drop-down list.
- Click on “Import/export contacts”.
- After clicking on the “Export” button, you must select “To SIM”.
- Wait for the process to complete.
Next, insert the SIM card into the new smartphone and perform the same steps. The only difference is that instead of exporting, you need to choose to import contacts to your SIM card. We wait for the procedure to complete and check our phone book. All numbers should appear there. If there are more than 200 subscribers in your book, then it is best to import contacts to Android using one of the methods described below.
How many contacts can fit on a SIM?
Today, mobile operators offer users a physical and electronic SIM card. The latter have just appeared on the market and are referred to as eSIM. The SIM stores operator identification data and additional software. The rest of the space is reserved for telephone numbers.
Exporting numbers from a SIM card
The memory capacity of the physical SIM card varies depending on the telecom operator. Some allow you to store 50 numbers, others up to 200. eSIM capacity has been significantly increased. It can store up to 1000 numbers.
SD card
For this procedure we will need any SD card. Even a medium with the smallest amount of memory will do - 512 MB or 1 GB. They don't produce any less. You should immediately check the functionality of the card on both devices. If the external media worked great on the old phone, then it’s not a fact that everything will be just as good on the new one.
How to transfer contacts from Android to Android using SD card:
- Go to the phone book and open the options section.
- Go to “Settings”.
- Click on “Import/export contacts”.
- By clicking on the “Export” button, select the SD card as the receiver.
- We are waiting for the end of the procedure.
On external media, all contacts will be saved in a specific VCF format. The file is usually located in the root directory of the SD card. If there are many subscribers in the phone book, then several archives can be created (_002, _003, etc.).
To import contacts to Android, insert the SD card into the new phone and perform the same procedure, with the only difference that instead of the “Export” button, click on the “Import” icon. In this case, there are no restrictions on the number of subscribers, as there were with a SIM card.
Transferring a contact book using a PC
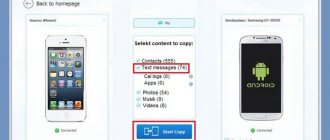
If the above methods fail to copy contacts from Android to Android, then you can try using a computer. A convenient MOBILedit program has been created especially for Windows !
, which is capable of identifying almost any tablet or smartphone running Android. It helps not only to transfer contacts from Android to Android, but also to synchronize call logs, SMS messages, calendar events and all sorts of media files.
To move contacts from Android to Android using a PC, follow these steps:
Step 1.
Install and launch MOBILedit!
Step 2.
Connect your old smartphone to your computer using a USB cable.
Step 3.
Wait until the program displays a list of information contained on the connected device.
Step 4.
Select
Phonebook
.
Step 5.
Click on the
Export
.
Step 6.
Save your contact list in the format you need.
Step 7
Unplug your old phone.
Step 8
Connect your new smartphone using a cable.
Step 9
Import
button at the top of the window .
Step 10
Specify the folder in which the contact list was previously saved.
Step 11
Now all that remains is to transfer the phone book to the new device.
Bluetooth
You can also transfer contacts using the Bluetooth protocol. For this procedure, you will need to transfer all subscribers from the phone book to the memory of the old phone, if previously they were located only on the SIM card.
It is necessary to turn on both mobile gadgets and establish connections between them via the Bluetooth protocol. If any problems arise, you should pay attention to the “Visibility to other devices” option in the wireless network settings.
Transfer Contacts from Android to Android: 4 Easy and Fast Ways to Transfer Contacts.
Transferring contacts from the phone book from an Android phone to another Android smartphone is a hot topic. Sooner or later, every owner of an Android smartphone or tablet is forced to change the device for a number of reasons: the appearance of a new device, switching to another model, or buying a second device for work purposes. And then there is a need to transfer contacts from one device to another.
In this article we will look at several simple and common ways to transfer contacts from Android to an Android device. We will also look at the features, advantages and disadvantages of each method.
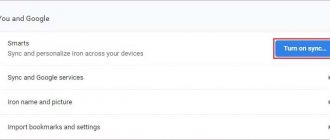
Google account
Almost all firmware of Android gadgets are somehow tied to Google. The services of this search engine can also be used to import contacts to a new device. If you don’t have a Google account, you need to create one. The best way is to register a mailbox. This can be done on the official website of the search engine.
Contact transfer process:
- Let's go to the standard settings of the Android platform on the old gadget.
- Open the “Accounts” item.
- Find your current Google account and click on it.
- In the synchronization window that appears, move the switch to the active position opposite the “Contacts” line.
- Click on “Options” and then on “Synchronization”.
Now on your new mobile gadget you need to log in to your Google account. After some time, the phone book should be updated, and contacts from the old smartphone will appear in it. It is also worth clarifying that this method only works with numbers saved in the phone’s memory.
Transferring bookmarks
To perform this operation you will need Internet Explorer (IE). It is worth saying that the method can only work on version Windows 8.1. This applies to both smartphones and computers.
To get started, import your bookmarks into your browser. If you previously used Google Chrome on Android, then after synchronization the bookmarks will appear on the PC, respectively, in it. To display them in Internet Explorer, launch this browser and select “Import bookmarks” in the settings.
How to transfer bookmarks to Windows Phone?
If you have a completely different browser for Android, then move all the bookmarks to a separate file, and then transfer them to your PC and add them to IE.
Adding bookmarks in Internet Explorer on Windows Phone
After transferring all tabs, you need to synchronize with Windows Phone. To do this, go to “Computer Settings” and in the “Settings Synchronization” section, select “Web Browser”.
Sync Internet Explorer and Windows Phone
Moreover, check that synchronization on your smartphone is also enabled:
- Launch settings on your smartphone
- Open "Settings Sync"
Transferring bookmarks to Windows Phone
Check that the button next to Internet Explorer is active
Activating Internet Explorer synchronization on Windows Phone
If all actions are performed correctly, the bookmarks will appear on the new phone.
In conclusion, it is worth saying that switching from Android to Windows Phone is not so difficult. The main thing is to have some free time and follow the instructions.
MOBILedit
The MobilEdit program has proven itself to be an excellent contact transfer tool on all platforms. To transfer the phone book, you will need a personal computer and an installed utility. You can find it on the official website of the developer. The program is installed in normal mode, so there should be no problems with the installation.
After launch, the utility will offer to download the latest drivers for mobile gadgets. To speed up this procedure, it is best to select the model of your device from the list provided. After the update, a window should appear notifying you that the drivers were installed successfully.
It’s worth warning right away that the utility does not support the Russian language, so you’ll have to remember your English lessons or look for amateur localizations on thematic forums. There are quite a lot of the latter, so there shouldn’t be any serious problems.
Export
First of all, you need to go to the “Phone” tab and select “Connection” (“Connection” / “Communication”, etc.). In the drop-down window you need to click on PC Sync. In some cases, there may be a different name for the connection, and it depends on the manufacturer and model of the mobile gadget. Next, you need to enable USB debugging on your smartphone or tablet:
- Go to the standard settings of the Android platform.
- Find the “Developer Options” section.
- Place a beacon next to the line “USB Debugging”.
On some firmware the procedure is slightly different:
- Go to “Settings”.
- Go to the “System” section.
- Open the “Device Information” window.
- Click on the “Build number” line.
- Activate the “USB Debugging” item.
Import
Then we transfer the resulting archive to the new gadget. It is best to copy the file to the root directory. Next, disconnect the old gadget and connect the new one. In the “MobileDit” program, open the “Import” item. Specify the file copied earlier, click OK and wait for the procedure to complete.
The program is paid, but the developer has provided a trial period of one week. During this time, you can thoroughly familiarize yourself with the capabilities of the utility and decide whether to buy or reject the product. In any case, a week is enough to copy your contacts.
Transfer Contacts
This is already an exclusive mobile application, and the participation of a personal computer is not required to transfer contacts. The program, like Mobileledit, comes without Russian-language localization, but the problem is solved by searching for a localization language on thematic forums and websites. Judging by user reviews, localization as such is not necessary here, because it is quite difficult to get confused in the utility interface.
The application must be installed on both smartphones. On the old phone, select all or some specific contacts and click on the “Save” button (“Export”, “Transfer”, etc.). On the new device, you need to select the import source, that is, the old model and click on “Import”. After a couple of minutes, all previously selected contacts will appear on another gadget.
One of the main distinguishing features of the application is that it works with all popular platforms. The utility transfers contacts from devices running the Android, Windows, Blackberry and iOS operating systems. And in any direction and in unlimited quantities.
The program is freely distributed (Free), but its free availability ends at 75 contacts. If you need to transfer more, you will have to pay a subscription of around 70 rubles.
Syncios iOS & Android Manager Free
This is an absolutely free application designed to copy data from one mobile gadget to another. The program works via a personal computer and is somewhat similar in functionality to MobileDit.
Using the utility, you can import contacts from devices running the Android and iOS operating systems in any direction. In addition to phone numbers, the program allows you to copy photos, videos, calendars, music and other content.
The utility interface is simple and intuitive. There are special sections on exporting and importing data. It’s quite difficult to get lost in the menu, even despite the lack of Russian-language localization. The only nuance that users sometimes complain about is the software’s finickiness for mobile gadgets. The program does not always correctly determine the device model, and at the same time some problems arise with both export and import.
Import contacts from computer to Android phone
Now set up your Android phone with this MobileGo for Android program as step 1 above shows. Then click the “Contact” button to enter the contact management window. Then click the “Import/Export” button. You will now be prompted to import your contacts from Outlook, vCard, Windows Live Mail, and Windows Address Book.
Yes, it is possible to import contacts from computer to Android Phone as long as you have a backup of all contacts to a vCard file on your computer. In addition, you can also do this by Syncing contacts from your Android phone directly if you ever save those contacts to Gmail, Facebook, and accounts.
Sooner or later, the user of any phone may need to export contacts from his phone book. And if you have such a situation and you are the owner of an Android smartphone, then this process will be much easier. The open system allows third-party programs downloaded from the PlayMarket store to use contacts for various purposes, including import/export. Such applications can also not only store data, but also transfer it to a computer and subsequently edit it.
Of course, there is synchronization of contacts with Google, but this option may not be suitable for some. Therefore, in this article we will look at what ways you can save your contacts and how to avoid or solve related problems.
First way
And so, everything couldn’t be simpler here. We take a smartphone and go to the computer. Here we don’t need anything else except a cord (USB).
- Import from storage - delivery of phone contacts from an SD card or any other storage device by transferring them from storage.
- Export to drive - creates a file with the vcf extension. The most interesting thing is that it can be stored anywhere and even transferred for use by another mobile gadget.
- Transfer visible contacts - this method is useful if you need to transfer not the entire phone book for storage. For example, you have set up contact filtering. In this case, the system will not save the vcf file in the device, but after creating it, it will send it to the selected email (you can even send it to the one that sends it). After this point, you can download it to your computer or other device.
- Windows Contacts
- Microsoft Outlook
Fixing an issue with encoding of Android contacts in vcf file when importing into Outlook and Windows Contacts
Windows programs
Now let's look at how this problem can be solved:
- You can just find a program that will work with the UTF-8 format
- Use special tags in the vсf file. This will allow Outlook to correctly determine the code type.
- You can also save the vcf file itself with a code format suitable for Windows.
Since the simplest and fastest method is the third one, we will describe it in detail:
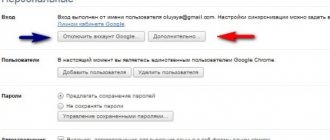
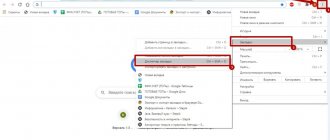
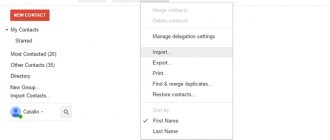
Saving contacts to your computer using Google
On the page, under the search bar (almost in the middle), find and click on the “more” item and after “export...”. In the menu on the left, click “More” - “Export”.
By selecting the “my contacts” tab, you will export your phone book contacts. The difference from the “all contacts” item is that in this case all contacts are copied, and not only from the phone book. Whether it is advisable to choose this is up to the user, but it is worth remembering that this may result in a lot of unnecessary information that you do not need.
Having done all this, click the “export” button and save the data to your computer.
Using Third Party Programs to Export Android Contacts
standard programs
For computer systems, many companies produce software for individual work with the contacts of a specific device. You can find out which one is suitable for your device using an Internet search.
Saturday, January 14, 2022 - 15:00