A router in wifi repeater, repeater or WDS bridge mode is a very convenient feature built into many TP-Link models. It allows you to use a regular router as a signal amplifier from another wireless access point and is called a “WDS bridge.” However, not all models have this setting, so if you need to use your TP-Link router as a wifi signal repeater, then you need to make sure that it is present in it. How to configure a TP-Link wifi router in repeater mode (WDS bridge) as an amplifier or repeater of a wireless network? Let's talk in this article.
What is the purpose of repeater, repeater or amplifier mode on a router?
Using a router as a repeater is convenient if you need to extend WiFi to some remote room and at the same time you have an unused second router. In this situation, you don’t need to buy a separate device - we just put it between the source and the place where the network cannot reach, and switch it to WiFi repeater mode (what a wifi amplifier is as a separate gadget is written in more detail in another post). It picks up the signal and extends it further, as far as the power of its antennas is sufficient.
How a TP-Link WiFi router works in WDS bridge mode
TP-Link routers are an example where the WDS wireless bridge function is combined in one setting with a repeater (repeater) mode. This can cause confusion.
In their pure form, they differ in that when using a router as only a wifi repeater, it will only extend the existing signal. On your phones and laptops, you will see one single network everywhere in the reception area, as if only one router is working, only a very powerful one.
The WDS bridge implies that the second router will also relay its own wireless network, which will have its own SSID and, accordingly, its own password for it. Moreover, these networks will not be connected to each other in any way, except for the common Internet. From your phone or computer, you can see two connections at once and select any of them to access the Internet. But to work with a local network, you need to join exactly the one to which all other devices are connected.
In addition, in WDS bridge mode, TP-Link can transfer the Internet to a device without WiFi support, that is, work in client mode.
In other models, WDS, WISP and Repeater (Extender) are placed in different menu sections.
What is needed for a TP-Link router to work as a signal repeater?
In order to use a TP-Link router as a wifi repeater, you only need one condition:
It must support this mode. It doesn’t matter what brand your main router is that distributes the signal - Asus, D-Link, Zyxel, Keenetic, etc. The WiFi standard is the same for everyone, so the router in amplifier mode will be able to pick up any network.
Before looking for repeater or WDS bridge mode in the settings, look at the specifications of your model on the manufacturer's website. It may be called “Repeater” or “Extender”, “WDS”, “bridge”, “repeater”, “amplifier”. Today there is a little confusion in terminology; for each company they may be slightly different, so behind any of these names there may well be exactly what we need.
Checking work
If after rebooting the device successfully connected to the desired network, then everything went well. If there is no wireless connection, you need to reconfigure the device by resetting the settings first.
Possible problems
If problems arise while using the device, the reasons may be the following:
- The repeater is located outside the Wi-Fi coverage area.
- Factory defective equipment.
- Incorrect repeater settings.
Resetting the TP-Link TL-WA850RE repeater settings
There are two ways to reset settings to factory settings:
- Using the Reset button located on the back panel of the repeater.
- Through the interface. To do this, go to the “System Tools” tab in the menu, select “Factory Settings” and click “Restore”.
If the Internet does not work after setting up the TP-Link repeater
Another reason why there may be no country Internet after setting up a repeater is an outdated firmware version of the device. To update the software, you need to find the latest version on the manufacturer's website, download it and install it.
Setting up the wifi repeater mode on TP-Link
In order to configure a TP-Link router as a wifi repeater, you must first correctly assign it an IP address from the same subnet as the router from which you plan to receive the signal. Since both routers will work within the same network, they must have different IP addresses.
Let's assume that the main access point or router is also TP-Link. Then both routers have a default IP address of 192.168.0.1. Therefore, for a repeater router it is necessary to change the last digit, for example to “2”.
Another example is our main router from Asus, which has a standard IP of 192.168.1.1. In this case, on the TP-Link router in repeater mode, you will need to register the address 192.168.1.2, that is, change two numbers in the last and penultimate block.
In order to change the IP address on TP-Link, you need to go to the control panel, menu item “Network - LAN” and as the IP address specify the one that we have determined, in accordance with the address of the main device.
Read about how to go into the router settings to change its address in my other article. First, I also recommend returning TP-Link to factory settings.
Apply the settings with the “Save” button and wait until the router reboots.
In the meantime, go to the first router and set a static WiFi channel on it at the frequency selected for relaying - this is necessary for stable communication in our current configuration. Read about how to do this in a special article.
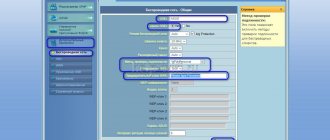
Next, we return to the admin panel of the TP Link router in repeater mode and in the “Wireless mode - Settings” section, activate the “WDS” checkbox.
What is your opinion: is WiFi harmful?
Yes
22.91%
No
77.09%
Voted: 36455
Then click on the “Search” button - a list of networks available for connection will open. Select the one you want to strengthen and click on the “Connect” link.
Next, all that remains is to set the same parameters for wifi as for the main router - select the encryption type, SSID and password - and save the changes.
Repeater fine tuning
Now you can configure the repeater.
The algorithm is as follows:
- Enter the device menu through the address bar of the browser by entering the combination of numbers 192.168.0.1 or 192.168.1.1.
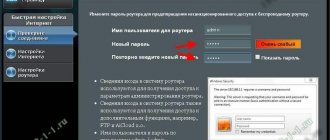
- Enter your login and password (by default it is admin).
- Go to the WPS section.
- Click Disable WPS.
- Reboot the device.
- Go to the Network section, go to LAN.
- In the IP Address field, change the last value to 2. (192.168.0.2).
- Click Save. The device will automatically begin rebooting.
How to enable WDS bridge mode on a new TP-Link router firmware?
The difficulty of setting up the bridge mode on the TP-Link router was that it is not placed in a separate “mode”, and all parameters are registered in several different sections of the menu. This confusion has not disappeared anywhere in the new version of the software with the admin panel in white and blue tones.
In order to activate this function in modern TP-Link models, go to the admin panel and open the “System tools - System settings” item in the “Advanced settings” tab. And check the box “Enable WDS bridge” in the “Wireless mode 2.4 GHz” or “5 GHz” block - depending on the frequency of the second router to which we want to connect via WDS.
Next, click on the “Search” button and select from the list of networks within the coverage area the one with which we want to create a bridge.
After this, the MAC address of the main router will be automatically entered. We need to select the encryption type and enter a password to connect to this network, and then save the settings.
The next step is to disable the DHCP server on the router in bridge mode, since now the main router will take over the function of distributing IP addresses. To do this, go to the “Network - DHCP server” section and uncheck the “Enable DHCP server” checkbox
Finally, the last action that we need to take is to go to the “LAN” menu in the same menu block and manually enter a new IP address for this device from the range allowed for use, which is specified in the settings of the main router.
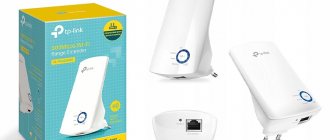
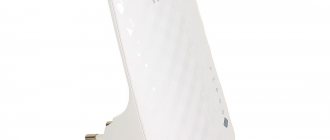
Description of the repeater: appearance, equipment, price
The TP-Link AC750 RE200 repeater is a small white adapter with a mesh pattern on the front panel. The Wi-Fi and power indicators are located on the front. The green button (WPS) allows you to quickly connect the repeater to the main router. You simply hold down the button first on the repeater, and then on the main router - the small device will copy the router’s network and transmit it further.
At the bottom you will see an Ethernet output for connecting a local cable
At the bottom of the repeater there is a Reset button for resetting settings and a LAN output for locally connecting various devices, for example, a computer. The repeater comes with a quick setup guide; there is no LAN cable. The device costs 1990 rubles on the manufacturer’s official website.
Table: technical characteristics of the TP-Link AC750 RE200 repeater
| System requirements | Microsoft® Windows® 98SE, NT, 2000, XP, Vista or Windows 7, 8, Mac® OS, NetWare®, UNIX® or Linux. |
| Socket type | EU, UK, US, AU |
| Standards and protocols | IEEE802.11ac,IEEE 802.11n, IEEE 802.11g, IEEE 802.11b |
| Interface | 1 Ethernet port 10/100 Mbps (RJ45) |
| Energy consumption | About 6.5 W |
| Dimensions (WxDxH) | 110.0 x 65.8 x 75.2 mm |
| Antenna | 3 built-in antennas |
| Frequency range (reception and transmission) | 2400–2483.5 MHz 5150–5350 MHz 5650–5725 MHz |
| Baud rate | 5 GHz: up to 433 Mbps 2.4 GHz: up to 300 Mbps |
| Wireless Security | 64/128/152-bit WEP encryption WPA-PSK/WPA2-PSK |
How to log into a TP-Link router that is configured in WiFi repeater mode?
After the TP-Link router has switched to repeater-bridge mode, it begins to receive an IP address from the DHCP server that is configured on the first main router. But if you suddenly change your mind about using it as a signal repeater, and want to transfer it back to the access point without resorting to a complete reset, the question arises of how to access it now - after all, the old IP address that it had by default is no longer valid .
Let's start with the fact that no one has canceled the possibility of a full reset to factory settings. But even without this drastic action, everything is solved very simply.
We need to log into the control panel of the main router, look at the list of clients and find the second router among them. Its current IP will be indicated there, through which you can enter the panel and change the operating mode.
Control panel TP-Link TL-WA850RE. Setting up a repeater without a WPS button
TP-Link's line includes small repeater devices that automatically connect to an existing network and begin duplicating it. They are called amplifiers. These include the TL-WA850RE model. Once you install the device in the right place and turn it on, it immediately provides signal coverage. After activation, the repeater transmits the network with factory settings without requiring a password.
To access the device control panel you need to:
- Enter the address tplinkrepeater.net. Connection data is indicated on the repeater body.
- Click "Quick Setup".
- Click "Next".
- Select the region, click “Next”.
- The device will show all detected Wi-Fi networks.
- Find the one you need in the list and click on it.
- Click “Next” and “Finish”.
The device will automatically reboot.
Also in the “Wireless Network” tab you can change the connection name, region, MAC address, select the encryption type, security version, and adjust the channel width.
Why doesn't the WDS bridge work on my TP-Link router?
In theory, if everything is done correctly, then no difficulties in operation should arise. However, there are situations when the Internet does not work in bridge mode.
We have found two solutions that may help resolve the issue.
- Disable WPS (or QSS) function on both routers
- Deactivate the DHCP server on the main router and assign IP addresses on the network manually
Honestly, I don’t know how they can interfere, but nevertheless, practice shows that it is precisely because of these enabled settings that the WDS mode on TP-Link is often unstable.