If you just bought a new smartphone or tablet, you might want to start using it right away. However, before that, you need to set up your device first.
In this beginner's article, we provide a step-by-step guide to setting up your new Android device.
It is worth noting that each such device is different from each other, and each manufacturer provides its devices with some additions that make them stand out from the crowd of competitors. By and large, Android devices have a lot in common.
Choose language
After you turn on your phone, you will see a welcome screen asking you to select a language. When you select a default language, a list of all available in the system opens. Select your preferred language from the list and click the arrow to continue. This action will set the language of the system and its menus, but you can add additional languages to the keyboard later if you speak multiple languages.
Friendly Android home screen.
Changing wallpaper
When interacting with a smartphone, most often you will see the main screen with application icons, the background of which is standard wallpaper. You can always change them to your own picture (photo) or a preset image:
- Open your device settings.
- Go to the "Wallpaper" section.
- Click the "Edit" button.
- Select one of the proposed images and click the “Install” button.
In the future, when you have time to take a lot of beautiful photos that you just want to put in the background, it is recommended to use the “Gallery” application. This program is designed to view images and allows you to set wallpaper, which requires you to open the photo you like, click the button in the form of three dots and select the “Set as wallpaper” option.
Insert SIM card and enter your PIN
Next, you will be asked to insert a SIM card. You can skip this step, but if you really want to use your device as a phone, this step is essential. Inserting a SIM card into a phone can sometimes be tricky - for example, Sony devices have flaps that need to be opened, while there are quite a few phones that require you to enter a PIN code to open the slot.
If you have an older phone, the SIM card should be under the battery, in which case you will need to carefully open the back cover of the device.
You will then be asked to enter your SIM card PIN, which is usually included with your SIM card. This PIN is different from the screen lock PIN, which you can set later, which is used to prevent unauthorized access if someone takes possession of your device.
After this step, you will be asked to choose whether you want to start as a new user or import data from your previous device. In any case, you will need a Wi-Fi connection.
File manager and how to watch movies and listen to music on Android
To view media files, there is a separate application called Gallery or Media Storage, which you will find in the main menu. There is nothing complicated in using it; photos and videos located in the device’s memory or on the card are distributed into the created folders.
If you need audio files, books and a general list of files on the device, there is a file manager for this, which on the Android system is called Explorer.
By the way, when viewing photos and pictures in the gallery, you can immediately install them on your desktop, or as an image of a contact from the phone book. In general, customizing the background, widgets and other aesthetic components is a large and separate topic.
Select Wi-Fi network
If you are within range of a wireless network, you can connect to it. Simply select your network from the list and enter a password if required. Then click on the “Connect” icon.
We recommend connecting to Wi-Fi at this point so that you can download updates and new apps as soon as possible.
Log into your Wi-Fi network and wait for the device to connect.
Removing unnecessary programs
Smartphone manufacturers are guilty of installing useless applications. In addition, the legislation of the Russian Federation forces them to install local programs like Yandex. Fortunately, you can get rid of these and other applications by doing the following:
- Open your device settings.
- Go to the "Applications" section.
- Select the extra program.
- Click the "Delete" button.
You can also delete it without going to settings. Just hold your finger on the icon of an unnecessary program, and then click the “Delete” button or move the shortcut to the trash can icon.
On a note. Some built-in applications (Google services and basic programs from manufacturers) cannot be removed.
Do you have another device?
At this point, you will be asked if you want to copy your data from another Android device. If you can and want to do it, then do it. Otherwise, select New User and go to step 4.
Backups can be useful if you have a lot of data on your old device.
If you want to transfer data from your old phone's backups, you'll be prompted to open the Google app on your old phone, either use Assistant by saying "Hey Google, set up my device" or go to Settings > Google > Set up a nearby device " You can also simply login to your Google account to backup from cloud storage, which will be the next step.
You'll be surprised at how much you can transfer, from files to text labels, pictures and more.
Set routines for the system
Night theme, Do Not Disturb mode, blue light filter - all this can be turned on automatically after you configure it. There is nothing complicated in activating these parameters - you just need to specify the time intervals during which this or that mode will work (for example, from 22:00 to 06:45). Also, don’t forget about alarm clocks - this is exactly the thing that people think about last).
Set up/sign in to a Google account (optional)
If you skipped the step above, the next step is to set up or sign in to an account to use your smartphone with Google apps and services such as Gmail or Play Store.
If you already have a Google account, you can enter these details now. You will then be asked to accept Google's Terms of Use and Privacy Policy. Read them (if you want) by clicking on the highlighted phrases, then click on the "Accept" icon.
You can create a Gmail account later, sign in with an existing account, or create one.
If you don't yet have a Google account but would like to set one up, simply follow the instructions to choose a username and create a password. You don't need a Google account to use the phone, but you will need one to use all of its features, including installing apps from the Play Store. To get the most out of your new Android phone, you'll definitely need to have a Google account.
Some manufacturers, such as Samsung, ask if you want to create an additional account when you register. This is only necessary if you want to take advantage of some special services of this company. These services may come in handy if you lose your phone, or if you want to take advantage of special features exclusive to your phone manufacturer's devices. You can simply skip this step if you prefer.
You can opt out of data collection by Google if you wish.
Google will also ask you what services you would like to subscribe to. These include backing up your device, which is recommended in case something happens to your device. Others you can evaluate on a case-by-case basis. None of this is mandatory and such services may be activated or deactivated at any time.
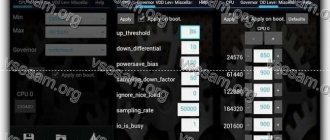
Engineering menu functions
The engineering menu is divided into several categories. Let's look at each of them separately:
- Telephony. This category contains settings that relate to mobile communications. For example, you can disable or activate certain BandModes (different frequencies for 2G/3G/4G operation), disable data transfer in the background, or check the operation of SIM cards.
- Connectivity. Setting up Wi-Fi, Wi-Fi CTIA, radio, Bluetooth settings. In the settings you can specify the type of antenna (you must use headphones), radio wave, sound format (stereo or mono). The radio will play directly from this section.
- Hardware Testing. Here you can configure the operation of various components of the device: sound levels of speakers and headphones, microphone sensitivity, various camera parameters (focus, HDR, ISO adjustment, photo aspect ratio and much more), operation of sensors (calibration), touchscreen, etc. This category is quite global and large; you need to understand all sections and have skills and serious knowledge.
- Location. In this category, GPS operation is configured, you can conduct testing, see the number of satellites found.
- Log and Debugging. This category contains logs of the battery (charge percentage, temperature, operating time, voltage) and other functions that are little known to the average user.
- Others. Contains two functions that are unknown to most users.
Protect your phone
If you have an email address that you want to sync with your Android phone, you can add it. Like almost all the steps on this list, this can be done later.
Next you will be asked if you want to secure your device. We highly recommend doing this. If you lose your device, this security measure will be key to preventing unwanted access to your device. This can be done using facial recognition for phones that support it, fingerprint recognition, or using a simple PIN (different from the one used for your SIM card).
You have to protect your phone one way or another.
Enable password and biometric protection for your smartphone
A password helps protect the contents of your smartphone (your personal photos and correspondence) from strangers who may have the gadget in their hands - protection appears every time the device is unlocked. In the vast majority of devices, the usual password is supplemented by biometric identification systems (by fingerprint or face). Modern smartphones recognize the owner in an instant, so do not neglect to enable protection. The only thing is that in Android gadgets, the front camera is responsible for facial recognition, which in theory can be fooled and does not cope well in poor lighting, so it is better to activate fingerprint protection.