Some users want to rename their existing local user accounts for various reasons, without deleting the existing one or creating a new one. For some people, the name on the login screen creates a privacy issue if the computer is used in public areas. Unfortunately, Windows doesn't allow you to set a username or nickname while keeping your real name on your Microsoft account, but we'll take a workaround. A Microsoft account is not a local user account, Windows 10 will continue to show your actual Microsoft account name on the login screen and other areas of the operating system even after you rename the account in Computer Management. Let's cover everything in one guide on how to change your username, change your administrator name, remove your email address from the login screen, and change your computer name in Windows 10.
How to change username in Windows 10
Now let's decide what you are using. This can be a Microsoft account or a simple local one. Let's look at two options.
Using a Microsoft Account
The only way to change the name you see on the login screen if you're using a Microsoft account is to change the name of the account itself.
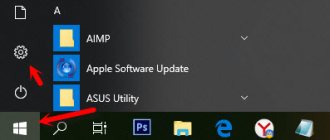
- Go to Settings > Accounts > Your data > and on the right, select Manage your Microsoft account.
- Next, you will be redirected to the Microsoft website in your browser. You must be logged in there automatically if you are using the default Edge browser. If not, then log into your account. There is one nuance, write your login name correctly - your_name@outlook.com .
- Once logged into your account, click on More actions, at the top under your current name and select Edit profile .
- Next, click on Change name and write your own. Remember that changing your name affects your profile across all Microsoft services.
Remove your email address from the login screen
If you're using a Microsoft account and want to hide or remove your email address from the sign-in screen, here's a quick look at how to do that.
- Go to Settings > Accounts > Sign-in options > and turn off the “ Show account information on sign-in screen ” slider under Privacy.
Using a local account
If you have a local account, the process is much easier and faster.
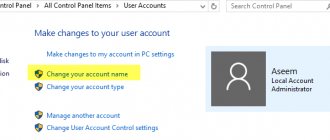
- Click Start and search for Control Panel and open it, then click on User Accounts and select Change your account name.
Team "netplwiz"
In all the latest iterations of Windows, developers have provided . With its help, you can manage user accounts, granting or restricting individual access to computer functionality. To change your username via "Netplwiz":
- Enter the command of the same name (without quotes) in the search bar of the taskbar (near the Start menu).
- Select the required profile from the list and left-click on “Properties”.
- Change the profile nickname, if necessary, indicating the full name.
After making changes, confirm them with the “OK” button.
How to change the computer name in Windows 10
A new computer preloaded with an operating system comes with a default name that consists of your build and your PC model. Users often change the name of their computer to something nice or interesting. Agree that the computer name myWEBpc will be much nicer than DESKTOP-28L5FKH.
- Go to Settings > System > About > scroll down on the right and click on Rename this PC.
- If you have Windows 7, then press Win + R and enter Sysdm.cpl . Next, click Edit .
Use the Advanced Control Panel to rename user accounts
Finally, you can use the advanced options in Control Panel to rename user accounts. Press Wind+R to open the Run dialog box, type: netplwiz and press OK or Enter .
Then select the account you want to change and click the Properties .
On the General tab, enter your desired name in the Username field. Click Apply, OK twice for the changes to take effect.
That's all. Whichever method you use to change your account name will depend on how you want to do it. But you will achieve the same results no matter what steps you use. As with all versions of Windows, there is always more than one way to complete a particular task.
And to learn more about the new OS, check out how to rename your Windows 11 PC. If you want to add additional users to your Windows 11 PC, read our article on creating a local user account. Or, to learn more about the new features, learn how to use the enhanced virtual desktops feature.
Read: 2,480
Share link:
- Click to share on Twitter (Opens in new window)
- Click here to share content on Facebook. (Opens in a new window)
- Click to share on Reddit (Opens in new window)
- Click to share on Pinterest (Opens in new window)
- Click to share posts on Pocket (Opens in new window)
- Click to share on Telegram (Opens in new window)
- Click to share on WhatsApp (Opens in new window)
- Click to share on Skype (Opens in new window)
How to change administrator username in Windows 10
Windows 10 includes a built-in administrator account that is often targeted by computer hackers and malware with malicious intent. Therefore, it may be a good idea to rename the administrator on your Windows system. It will also be useful for system administrators when there are several of them in the company and they work in shifts and ranks, i.e. There is an Enikey employee, an intern, who needs to be given admin rights, but at the same time limit them a little.
- Press Win + R and enter gpedit.msc
- Next, go to Computer Configuration > Windows Configuration > Local Policies > Security Options > and on the right, look for Accounts : Rename the Administrator account . Double-click on it and rename the name in the new window that appears.
See also:
- How to enable or disable a user account in Windows 10
- Failed to create or add a new account
- How to Create a Local User Account in Windows 10
- How to create a Microsoft Account for Windows 10
- How to disable and delete your Microsoft account
Channel Chat
Reasons for changing your username
In some cases, it is necessary to change the Windows 10 username by changing it to another login. Possible reasons for renaming an account name:
- another person began to use the computer, for example, the PC was transferred to the use of another family member;
- an unfortunate, unclear, or inappropriate username from the current owner's perspective.
Be that as it may, such a problem sometimes arises. Can I change my username? How do I change my username on my computer? Yes, this can be done on the Windows operating system.
In this article, we will look at how to rename a user in Windows 10 for both account types: a local account and a Microsoft account. A local (offline) account is used only on the computer where it was added. In addition to your Windows PC, you can sync your Microsoft account with other devices, apps, and services.
When changing the account name, the following point must be taken into account: only the user profile name will change in the system; the user profile folder will remain with the same name on the computer disk. In the Windows Welcome window, in the system settings, after changing the name, the new account name will be displayed. At the same time, the user profile folder created during Windows installation or when creating an additional account will remain with the same name.
Simply renaming a user account folder will lead to incorrect operation of installed programs and the system. Renaming a user folder is a rather complicated process that requires changes in the registry, so I do not recommend changing the name of the folder.
In order to avoid situations like this that require changing the name of the user folder, I recommend that when installing Windows, select the neutral name “User”, or something similar, in English. The system will automatically create a user profile folder with this name.
If it is necessary to change the account name, the user’s personal folder will remain with a neutral name (“User”), which will not need to be changed, since such a folder name is suitable for any computer user.
An initial account name in English is preferable due to the fact that some programs may not work if the profile folder name contains letters in Cyrillic. After installing the Windows operating system, you can change the username to any other one or sign in using a Microsoft account.
Now let's move on to two instructions in which I will tell you how to change your username in Windows 10.
Before attempting to change a user account name, I strongly recommend creating a system restore point so that you can roll back Windows to the point the system was in before you applied the account changes. In case of incorrect, erroneous actions, you will have the opportunity to return the operating system to a working state.
Changing the online administrator account
To change the Microsoft account, which in our case acts as an administrator, let's go to the same wizard discussed in the previous example.
In the wizard, enter your Outlook account email and click the button. These steps will complete the wizard, and the online account will be added as a new account. Now let's go to our online account and change its type, as in the previous example, to administrator.
- How to change username in Windows 10
After changing the account type, we need to change the user in the system . This is necessary in order to remove the old account. The further procedure is the same as in the previous example. Therefore, feel free to go to the Control Panel and disable the old account .
The example shows that you can change an online user even faster than a local one.
I would also like to note to our readers that if you use an online Microsoft account in Windows 10, you will significantly expand the capabilities of this operating system.
Changing the local administrator account
To change the local administrator in Windows 10, you first need to create a new one and then delete the old one. So let's go to Control Panel . Start menu icon and selecting the item we need in the context menu that appears.
In the launched Panel, go to the accounts section and select the “ Change account type ” link there.
In the window that appears, you will see the old administrator account, in our case the name “User”. At the bottom of this window there is a button to add a new user , clicking on which will take us to the OS settings section.
In this section you can add a new admin and remove the old one. To add it, click the “ Add a user for this computer ” button. This action will take us to the New User Creation Wizard.
Since we are creating a local admin, we will therefore skip the email entry point by clicking on the “ I don’t have this person’s login information ” link. This action will take us to the window for creating an online account for Microsoft.
- How can I create a guest account on Windows 10?
To skip the account creation process, click on the lowest link in the wizard window, which will take us to the local user creation window.
As an example, write down the name “New Admin” and continue the wizard. After these steps, a new local account will be created.
Now let's go to our users and select the name "New Admin".
In the next window we need to select “ Change account type ”. This is necessary in order to change our account type from regular to administrator.
Therefore, feel free to go to this point and change the user type.
- How to get administrator rights in Windows 10
Having made our user an admin, we can now proceed to directly deleting the old user . Now you need to change users . Therefore, let’s log into the system under the admin, whose name is “New Admin”, and go to the list of our admins, selecting “User”. Now, to remove the old user, select the “ Delete account ” item.
After selecting this item, the system will offer us to delete all user data or save it. Therefore, be careful, if there is important information there, then save it.
We select one of the options in which we can delete or save files. After confirmation, the old admin will be permanently erased from the system.
From the example it is clear that creating a new and deleting an old admin is not at all difficult, although you will have to tinker a little.
Using the Local Users and Groups utility
Another way to make a user an administrator is to use the built-in Local Users and Groups tool:
- Press the Win+R keys on your keyboard, type lusrmgr.msc and press Enter.
- In the window that opens, open the “Users” folder, then double-click on the user you want to make an administrator.
- On the Group Memberships tab, click Add.
- Type "Administrators" (without quotes) and click OK.
- In the list of groups, select "Users" and click "Delete".
- Click OK.
The next time you sign in, the user who was added to the Administrators group will have the appropriate rights in Windows 10.
How to rename an account through Microsoft
To do this, you need to sign in to a Microsoft account. You have it by default if you use Microsoft products, be it Office, Outlook, Skype or others. To log into your account you will need to enter your email, phone number or Skype. Further:
- follow the “Change name” link (you will see it to the right of the current username);
- enter a new first and last name in the lines that appear (instead of the first and last name there may well be any two words in the phrase);
- confirm the action by clicking on “Save”.
After this, you will see that your account name has changed.


