The initial scale of icons located on the desktop is set by the operating system developers. The standard display mode is not suitable for all users, so they are looking for answers to the question of how to make icons on the Windows 10 desktop smaller. To complete the task, just use ready-made instructions.
How to change icons
Scaling Windows 10 Desktop Elements
Typically, users are interested in icons on the “Desktop”, as well as icons and buttons on the “Taskbar”. Let's start with the first option.
Stage 1: “Desktop”
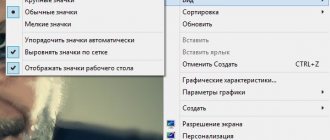
- Move the cursor over an empty space of the “Desktop” and call up the context menu, in which use the “View” item.
This item is also responsible for changing the size of the Desktop elements - the “Large Icons” option is the largest available.
This method is the simplest, but also the most limited: only 3 sizes are available, to which not all icons respond. An alternative to this solution would be to change the scale in Display Settings.
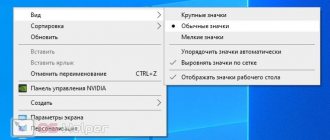
- Right-click on the “Desktop”. A menu will appear where you should use the “Display Options” section.
- If these options are not enough, use the "Advanced scaling options" link. The “Fix scaling in applications” option allows you to eliminate the problem of a blurry picture, which makes it difficult to perceive information from the screen. The “Custom Scaling” function is more interesting, because it allows you to choose an arbitrary image scale that is comfortable for you - just enter the desired value in the text field in the range from 100 to 500% and use the “Apply” button. However, it is worth considering that non-standard magnification may affect the display of third-party programs.
However, this method is not without its drawbacks: a comfortable value for arbitrary magnification has to be selected by eye. The most convenient option for increasing the elements of the main workspace would be the following:
- Move the cursor over an empty space, then hold down the Ctrl key.
- Use the mouse wheel to set a custom scale.
Using this method, you can select the appropriate size for the icons in the main workspace of Windows 10.
Stage 2: "Taskbar"
Scaling the taskbar buttons and icons is a little more difficult, since it is limited to enabling one option in the settings.
- Move the cursor to the “Taskbar”, right-click and select the “Taskbar Settings” item.
Find the “Use small taskbar buttons” option and disable it if the switch is in the activated state.
Usually the specified settings are applied immediately, but sometimes you may need to restart the computer to save the changes.
Another method for enlarging the “Taskbar” icons is to use the scaling described in the option for the “Desktop”.
We reviewed methods for enlarging icons on the Windows 10 Desktop.
Changes to the taskbar
Here the process looks a little different. There are not as many methods as with the above operations, but the information presented in this section will help to cope with this problem. To zoom out in the free zone of the taskbar, click the right mouse button. And in the “Taskbar Settings” window that appears, just use the small panel buttons option.
It is more difficult to deal with the enlargement of icons. For this purpose, scaling is used using OS system tools. At the same time, other components of the interface will change:
- On a free area of the desktop, select it in the “Display Settings” menu after right-clicking.
- A larger scale is indicated in the corresponding menu item. If the required indicator is missing, select it in the “Custom scaling” section.
Having completed all these steps, you need to exit and re-enable the system. Only in this way will all the amendments made begin to function stably. An example of the results of such work is shown in the figure.
Windows 10 Desktop Icons: Customize your PC!
Windows 10 desktop icons
Browser for Windows XP: what is the most ideal option?
A browser without ads and pop-ups: does it exist in nature?
Windows update that turns off sound and deletes files: who is to blame and what to do?
Google Chrome asks you to urgently update your browser: let everyone in, don’t let anyone out
Cyberattacks paralyze the development of a coronavirus vaccine and Microsoft has released a fighter against them
In this article, we will talk about how to customize and change desktop icons in Windows 10. The Windows system has extensive personalization settings. You can change and customize many active interface elements.
Icons (or icons) have been an integral graphic element of the system interface since early versions of Windows. Now it is quite difficult to perceive a system without a desktop and its elements, where all the applications, shortcuts and documents necessary for work or entertainment are concentrated.
Windows 95 desktop
With each new version of the system, the possibilities for personalization (customizing the appearance “to suit yourself”) are expanding. Changing color, size, scale and much more is available for user customization of the system.
In this article, we want to share tips and answer frequently asked questions from users regarding customizing and changing desktop icons in Windows 10.
Changing and using other images
Personalization is not limited to just enlarging the small icons on the Windows 10 desktop. You can also use other icons: those that the system offers, downloaded from the Internet, or drawn yourself.
#1 Changing the icon from the Microsoft directory
Microsoft stores all standard interface images in Shell32.dll and imageres.dll, located in System32
Let's try to change the application icon using Google Chrome as an example:
- Right-click on the desired application and click on “Properties”;
- In the shortcut settings, open the “Properties” tab and click the button labeled “Change Icon”;
- The third-party application most likely has several versions of the icon, so you can choose any one;
- Or click the browse button and select the Shell32.dll file and select an icon from the Microsoft catalog.
In the same way, you can change the folder icon.
#2 Changing standard icons
When using the method above, you will not be able to change the icons of the applications “My/This Computer”, “Control Panel”, “Trash” and others. To do this, you need to use other settings.
Previously, these settings were available in the Control Panel in Personalization, but now control of desktop icons in Windows 10 Pro, Home, and other editions has been moved to the Settings app.
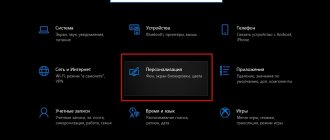
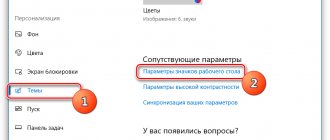
- Open Windows Settings and select Personalization;
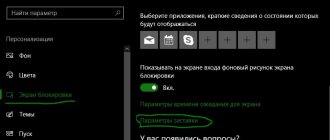
- Open the "Themes" tab and open "Desktop Icon Options";
- In this window, you can either add icons of standard applications to the Windows 10 desktop, or remove or edit them.
#3 Using your own images
The image of application icons is contained in an executable file (.exe format), a library (.dll) or, most often, in an image with the corresponding format - .ico.
Integrating an icon into an executable or library is quite difficult, but creating an image is quite simple.
- First, let's create an image layout. Sizes 16×16, 32×32, 64×64 and above. Can be used like Paint, Photoshop, GIMP and any image editors.
- We find the desired image on the Internet or draw it ourselves and save it in .bmp format. Or directly to .ico, if the editor allows it.
- Then, change the format from .bmp to .ico. This is done by simply renaming.
- First, in the Explorer settings, enable the display of file formats.
- Then change the icon using the methods above.
Also, there are applications for conveniently creating icons and saving them in the correct .ico format. Such as:
- SoftOrbits Icon Maker;
- Icofx;
- Iconion;
- xiconeditor.com;
- And others.
Changes in Explorer
In this case, similar methods are used for the OS. The "Huge Icons" option has been added to the view menu. There are also unique features that are not available during manipulations on the table - displaying icons in a variety of formats.
Changing the size parameters is done only for individual folders. If you need to change the size of the icons for the remaining folders, do this:
- After selecting the size we need, go to “Options”. Next, click on the section intended for making changes.
- The Folder View section will open after clicking Apply to Folders in the View folder options tab. Here you will need to confirm the use of the selected options for all documents in Explorer.
The icons in all folders will be reformatted according to the selected setting. This method is only applicable for folders located on disk. System ones require individual installation.
Important information
Some users may encounter the problem of blurry icons on the Windows 10 desktop. This is a known situation of scaling problems on older versions of the system.
To solve this problem, in the scaling settings (System - Screen), set the recommended scaling or “play” with the size, setting a convenient scale and return the clarity of the icons.
We hope that we have answered all your questions in this article. The more you know about the system, the easier it is to customize it and solve problems that arise. If you have any questions, we will be happy to help you in the comments.
Registry Editor
We recommend this option only to experienced users, since it involves interfering with the Windows registry. Before doing this, create a restore point to restore all settings if problems arise. If you make incorrect changes to the registry settings, you may experience serious system failures. So let's start editing:
- Launch Registry Editor. Enter regedit in the search bar and open the application of the same name.
- Using the directory tree, open the branch shown in the screenshot below.
- Find the IconSize parameter. Open properties by double clicking the mouse.
- Here you need to enter a new parameter. You can set an arbitrary value and check the result. The changes will take effect after you restart File Explorer, your Windows account, or your computer.
Change Windows 10 icon size
Often, users need to change the size of desktop icons on Windows 10. Many people like it when the icons on the desktop are very large or very small. Just in this article I will show you how you can change the size of Windows 10 icons.
Method 1: Resize Icons in Windows 10 Using Mouse Wheel
This method is convenient because you can either increase the size of desktop icons in Windows 10 or reduce the size of desktop icons. And you don’t need to look for any items in the control panel. But a mouse is required.
- To increase the size of desktop icons, press and hold Ctrl and scroll the mouse wheel up .
- To reduce the size of the icons, just hold Ctrl and scroll the mouse wheel down .
Useful options
All of the above methods relate exclusively to the dimensions of the icons in the explorer and on the table. But the vertical and horizontal intervals are determined by the OS itself, and the amendments do not affect the signatures. There is the most convenient tool for solving this problem - this is the popular Winaero Tweaker service, known to almost every user. Settings in it are made thanks to the presence of the Icons item:
- The distance along the length and width of the interval is set as in the figure.
- There is also an option to select the dimensions of the writing elements. It will not be difficult to choose a variant that differs from the system one, as well as to use other methods of richness and design of text characters.
The click made on Apply Changes is needed to apply the settings. Finally, an exit is made from the operating system to ensure that the amendments made are saved upon subsequent entry. If necessary, you can familiarize yourself with the potential capabilities of the utility in more detail.
A seemingly difficult task is actually quite simple. There is always a way to make your work as comfortable as possible, in a mode convenient for a particular user.
How to change the size of desktop icons in Windows 10
In today's article, we'll look at various ways to change the size of desktop icons in Windows 10.
Resize desktop icons using mouse wheel
The first method works in all versions of Windows. While on the desktop, select a shortcut => press the ctrl and, without releasing it, scroll the mouse wheel forward or backward. While scrolling the wheel, the size of the icons will increase or decrease; when it is the desired size, release the ctrl key.
Change the size of desktop icons using the context menu
The second method also works in all versions of Windows. On the desktop, in an empty space, right-click, go to “View” and select the desired icon size.
Resize desktop icons using keyboard
While on the desktop, press Shift+Ctrl+1 and the icons will become very large.
While on the desktop, press Shift+Ctrl+2 to make the icons large.
While on the desktop, press Shift+Ctrl+3 to make the icons normal.
While on the desktop, press Shift+Ctrl+4 to make the icons small.
Change desktop icon size in Registry Editor
Before editing the registry, we recommend creating a system restore point.
1. Open the registry editor: in the search bar or in the run menu (run is called with the win+r keys), write regedit and press Enter.
2. In the left column, go to the Computer section HKEY_CURRENT_USER Software Microsoft Windows Shell Bags1Desktop, on the right side open the IconSize
To make the icons very large, write 100 and click OK.
To make the icons large, write 60 and click OK.
To make icons of normal sizes, write 30 and click OK.
To make small icons, write 20 and click OK.
Restart File Explorer or restart your computer for the changes to take effect.
That's all for today, if you have any additions - write a comment! Good luck to you
How to make shortcuts smaller using Winaero Tweaker
https://winaero.com/request.php?1796
Winaero Tweaker is a tweaker for configuring a number of Windows 10 settings that are inaccessible to the user. They are also changed through the system registry, which takes longer and is less secure - inattention can harm the operating system. Supports changing the vertical and horizontal spacing between icons.
- Launch the application and expand the “Advanced Appearance Setup” section;
- Go to the Icons subsection;
- Drag the “Horizontal...” and “Vertical spacing” sliders;
- Apply the settings with the “Apply changes” button.
The “See in detail...” link will open a help section that shows and explains how the option works and how to achieve the same effect through the registry editor.
The “Change icons font” function will change the icon signature font, its size and style (bold, italic). To apply the settings, you need to restart Explorer, restart your computer, or log out of your account.
Change size of windows 10 desktop icons
Windows 10 is the most current operating system from Microsoft. It embodies the convenience and functionality from all previous versions of the OS. Experienced users will remember that earlier versions of Windows were more customizable and open to change.
The latest version of the operating system is not so convenient from the point of view of the old user. The changes affected many elements, including the design and management of desktop icons. Not all users can immediately find the algorithm for changing the scale of icons in the new edition of WinOS. To understand how to change the size of Windows 10 desktop icons, let's look at a couple of simple algorithms.
Removing a shield icon
The shield icon indicates that the application only works if you have administrator rights. To disable User Account Control and along with it the shield icon, follow these steps:
- Call the “Run” program by pressing the Win + R button combination. Press and hold the Win and R buttons
- Enter the regedit command in the search bar. Run the regedit command
- Go to the “Service” section. Go to the “Service” section
- Select the “User Account Control Settings” section and click on the “Launch” button. Select the desired line and press the “Run” button
- Lower the slider to the very bottom. Move the slider down
- Confirm the action with the “OK” button. Click the “OK” button
- Reboot the PC. Click on the “Reboot” button
Using the mouse
The first way is to set the size of the icons by holding down the “ CTRL ” key and scrolling the mouse wheel. To increase or decrease the size of icons, you must hold down the “ CTRL ” key and scroll the mouse wheel up or down. The shortcuts will begin to change in size depending on the direction of rotation of the wheel.
By scrolling the mouse wheel to the maximum level, only 10 shortcuts will remain on the monitor screen. It is necessary to calculate the scale so that all elements can fit, not excluding important programs and documents.
Mouse wheel
By scrolling with the mouse wheel you can adjust the scale in more detail. If the context menu is limited to 3 options, then using a combination you can set the exact size. To do this, you need to click on the desktop and hold down the Ctrl key. Then start turning the wheel, selecting the optimal size.
Sometimes this option may slow down and change the scale after a couple of seconds. Therefore, do not rush to rapidly spin the wheel, but select the size step by step.
Expert opinion
Daria Stupnikova
WEB programming and computer systems specialist. Editor of PHP/HTML/CSS site os-helper.ru.
Ask Daria
To return to one of the standard options, use the first method in this guide again.
Using the context menu
The classic way to set the default size for desktop icons. It is performed by calling the context menu by right-clicking on any empty space on the desktop. On the menu that appears, select the “ View ” tab.
It will open a tab for managing the appearance and combination of icons. There are three permanent sizes you can choose from:
- large icons;
- middle icons;
- small icons.
Changing icons in the registry editor
The least popular way to change icon settings is the Registry Editor. This is also a standard method, so to use it, just follow these steps:
- Using the Win + R key combination, open the launch window. Type the command regedit and press Enter.
- Next, the registry editing window itself will open. First, you should select the HKEY_CURRENT_USER line. Then go to the Control Panel. Then we go to Desktop and Window Metrics. On the right, double-click the left mouse button to open Shell Icon Size.
- In the window that opens, all you have to do is change the value and click “OK”.
How to make desktop icons smaller in Windows 10
For someone who frequently and actively interacts with a computer, it is usually quite easy to solve the problem of reducing the size of icons on the display. But not everyone has the relevant experience. For them, below are several versions of the answer to the question “how to reduce icons on the Windows 10 desktop?”
It is possible that this topic will be of interest to those who, due to vision problems, cannot fully use the capabilities of their computer and feel a certain need to change the dimensions of the emblems displayed on the screen.
It may also turn out that there is no particular problem, but still, with some sizes, using the equipment turns out to be more comfortable than with others.
Creating an icon yourself
If you don't want to use ready-made icons, you can create your own original icons. To work, you will need a special program; it is best to download the IcoFX utility from the official website.
- Launch the downloaded program and open a raster image (square) in it. This picture will become the basis for our author's icon.
- Click on the “Create a Windows icon from the image” option.
- As a result, the picture is converted into a pixelated image with different sizes.
- We save the image in the “ico” format and now it can be loaded through the “Browse” button in the icon change window.
How to make desktop icons smaller in Windows 10
Any digital device has a number of default settings. In this case, the size of the character (folder, document or other file) is determined by the resolution of the display device. This is determined individually for each design.
However, the components of the graphical environment (as the desktop is otherwise called) can be of completely different formats in accordance with the wishes of the PC owner. To do this, you only need to perform a few simple manipulations.
The Windows operating system provides the ability to change the size of objects displayed on the monitor using standard system tools. This approach is relevant for the following versions of the operating system:
Method 1 to make icons smaller
The least difficult method for reducing the size of images on a data output device is to use keyboard keys. To do this, it will be enough to open the graphical environment field and hold down the “Ctrl” button, then slightly scroll the computer mouse wheel towards you if you want to make the logos smaller, and away from you if you want to enlarge them.
The symbols that appear on the background image will certainly change in size, and you will be able to choose the most optimal one for yourself from all the possible options. The degree of change in the dimensions of all emblems will depend on how far the wheel is turned in a certain direction.
The second method for reducing desktop icons
Move the cursor over a free field of the background image and click the right mouse button. A list of context menu commands will appear in front of you. One of the paragraphs in it is marked with the word “View”. Hover the cursor over this line, then an additional part of it will open to the side of the main list, in which the following three lines will be displayed:
- Large icons.
- Regular icons.
- Small icons.
If you need to make display cells on a smaller scale, then you should select the third of the proposed sub-items. As soon as you left-click on it, all the logos on the monitor will become much smaller in scale.
Method 3
There is another way to calibrate screen objects that is suitable for Windows 10 and allows you to give the icons the required format.
The essence of the technique is this: you need to click on the empty space of the graphical environment with the mouse button located on the right side. This is necessary to call the context menu. And in the list that appears, you need to select the “Screen Options” item. Next the following window will appear:
In the lower half of the picture displayed, you will need to pay attention to o. If in this line after the colon there is a mark of 125%, then you can reduce the display characters by moving the slider under the inscription to the left. Otherwise, “100% (recommended)” will be indicated after the colon, and then you will have to choose another option to solve the problem.