He worked, he was tired, and then he disappeared completely. Disappeared, evaporated, switched off. Left to the mercy of fate at the most crucial moment of an online game / interesting film / important work / fateful correspondence. And he didn't even explain anything.
Yes, the Internet always goes on strike at the wrong time. And most often for unknown reasons. But not for us, because we have already learned almost all of its secrets: we know how to connect it and speed it up. And today we’ll figure out what to do if there is no Internet connection on your computer: it was there, but it disappeared or was not created in the first place.
Why there is no network access: hardware and software reasons
The Internet is a two-way connection, and the reason for its loss can occur both on your side and on the side of the provider. Lack of access to the network due to the “fault” of the provider is possible due to technical work, emergency situations or subscriber blocking. The latter can be voluntary - at the request of the user, and involuntary, for example, due to the generation of excessive traffic by client devices or the sending of spam. And also when the client’s account runs out of funds.
If you have a cable connection, it is quite easy to determine that Internet access is closed by your provider. The majority of computers and routers have a connection indication function - an LED in the area of the network cable socket. When there is a connection with the provider, it blinks, and when there is no connection, it goes out.
It is not always possible to recognize the scam of an Internet provider when connecting via 3G/4G or Wi-Fi. To find out for sure, the easiest way is to call its support hotline. However, you will have to call in any case, because you yourself will not solve this problem, unless, of course, the issue is a late payment.
The reasons for the loss of the Internet on the user’s side are much more extensive and varied (when viewed from our “bell tower”). Let's divide them into groups.
Related equipment and transmission media:
- Damage to the cable inside the apartment - kinks, broken connector, etc.
- Lack of contact in the connector connecting the cable to the router or PC.
- The router (if used) is not plugged in, is not connected to the computer, is faulty, or is not configured.
- The PC's network adapter is disabled, faulty, or missing.
- With a wireless connection – insufficient signal level, interference.
Software:
- The network driver is not installed or does not work correctly.
- Network services are not running.
- The basic connection parameters are incorrectly specified: IP address, gateway on the local network (if access to the Internet occurs through a router or another computer), DNS servers, connection components, etc.
- The network structures of the operating system are damaged.
- Internet access is blocked by an incorrectly configured firewall or Windows Firewall.
- To access the network, a proxy server or VPN is used, which is currently unavailable.
The provider's network equipment is faulty, what should I do?
- We pick up the phone and call your Internet provider.
- We call technical support, sometimes we have to wait a very long time.
- We ask them a question: “Why did the Internet stop working on the computer?”
- If they say that the cable is damaged somewhere, you can safely say that everything is fine and connected everywhere. If the cable is really broken, but not in your home, the provider will be required to call a team of installers to check the connection - free of charge!
- You can also ask technical support to reboot their equipment, it sometimes malfunctions.
- In the worst case, the provider may say that they are working on a network outage. And they can approximately announce the completion time of the work.
In this case, you will only have to wait for the repair work to be completed by the installation team of the provider.
If everything is fine with the provider and they don’t see any problems on their side, then read on.
How to find the culprit
Here, we primarily discuss ways to restore Internet access with a cable connection, although most of the recommendations are suitable for various types of networks.
If you have a problem connecting via Wi-Fi, we also recommend that you study the material at the link.
Equipment check
The search for the causes of network problems begins with checking the hardware:
- Is the Internet cable damaged and is it securely crimped and connected?
- Whether the computer or router receives the ISP signal.
- If the Internet is distributed through a router, does it work? If via a USB modem, is there a SIM card installed in it and is it receiving a signal from the base station?
Temporary spontaneous errors in the router software that lead to a loss of communication can be easily eliminated by rebooting it (turning it off and on). Incorrect settings - reset using the Reset button or according to the instructions.
Also, to prevent the connection from being affected by improper operation of the router, if possible, connect the Internet cable directly to the network connector of the computer.
If you are using a USB modem, install it in a different port and check your Internet connection in a different location in your home.
Some providers allow their subscribers to access the network only through one single device (usually a router that they provide themselves). That is, they tie the physical address (MAC) of this device to the user account, which is why all attempts to connect from another device will fail. However, this situation is not hopeless, because the MAC address can be changed programmatically - copied from the linked device and assigned to the desired one. Let's look at how to do this on a Windows computer next.
Once you have verified that the hardware is working, you can proceed to checking the software.
Diagnose Windows network problems
Most software glitches that cause the Internet to not work on a computer can be fixed even by a user who knows absolutely nothing about it. After all, Windows has a built-in tool for self-diagnosis and correction of network errors. It’s called “Problem Diagnostics”. To launch it, right-click on the network icon in the system tray (notification area of the taskbar) and click the menu item of the same name. The scan will begin without additional requests.
During diagnostics, the utility may ask you to indicate the network adapter that is causing the problem. If this adapter is not in the list of found ones, the problem is most likely in it or its driver. We’ll figure out what to do with this further.
The culprit of the problem is almost always determined quite quickly. In my example, the wireless network is simply disabled, and to get it back online, all you have to do is “Make this fix,” as the diagnostic tool suggests.
The next window informs you about success or failure in fixing the error. If the problem goes away, you can close the utility, but if not, you will have to look for another solution. But at least you already know the reason.
Checking the network adapter
If the diagnostic tool was unable to determine the network adapter involved in the connection, then the system does not see it. To verify this and at the same time fix the error, launch Device Manager. In Windows 10, this is easiest to do through the context menu of the Start button; in Windows 7, through the context menu of the “Computer” icon on the desktop. Select the “Manage” element in the last one and in the “Computer Management” window that opens, click “Device Manager”.
Expand the list of network adapters in the Manager. If what you are looking for is not among them, open the top menu “View” and o. This will give you the ability to see hardware that Windows is not using - it can be recognized by its dimmer icons. The reason why these devices are hidden is indicated in their properties, the window of which opens by double-clicking on the device name.
Also make sure that there are no network adapters marked with a circle with a black arrow (the device is disabled) or a yellow triangle with an exclamation mark (the device is not working correctly), and among all the equipment there are no unknown devices.
To enable a disabled adapter, right-click on it and select “Enable device.”
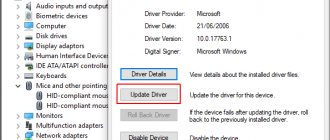
Items with a yellow triangle are hardware that Windows is not using due to missing or corrupt drivers. To solve the problem, the driver of such a device should be reinstalled, updated, or rolled back.
The update and rollback functions are available in the adapter properties on the “Driver” tab:
In the example in the screenshot above, the rollback button is inactive, since the system does not have a previous version of the driver. There may also not be a fresh update. In such a situation, all that remains is to find a suitable network driver on the website of the laptop or computer motherboard manufacturer and install it manually.
Unfortunately, manipulating drivers does not always give the result that the user hopes for. This, for example, happens when the network adapter malfunctions, as indicated by the following symptoms:
- the adapter is not visible not only in the Windows Device Manager, but also in the computer’s BIOS/UEFI;
- it periodically disappears from the list of equipment without apparent reason or connection with user actions;
- the network driver crashes every time you restart the PC or at random times, reinstalling and rolling back do not help;
- attempts to connect to the Internet lead to critical errors (BSoD), reboots or emergency shutdown of the computer; reinstalling the driver also does not help.
A solution to such problems can be connecting to the Internet via an external network adapter. Or via built-in, but of a different type: if the cable connection does not work, use wireless and vice versa.
How to change the MAC address of a device in case of provider binding
There are two ways to change the physical address of a computer that does not connect to the network to the address of a device that does:
- via Device Manager;
- through the Windows registry.
The first option is easier, but some equipment, especially old ones, do not support this function. And then only the register remains.
Let's start with something simple:
- Find out the MAC of the device connected to the Internet. Copy or write it down.
On routers, the physical address is usually printed on a label glued to the bottom of the case and is indicated in the settings (shown in the screenshot below).
On a computer, you can view it in the connection properties by clicking on the button of the same name next to the name of the latter.
- Open Device Manager on the computer you want to connect to the network. Find the required network adapter in the equipment list and double-click on it to open the properties window.
- Open the “Advanced” tab in the properties, find “Network Address” and enter or paste into the “Value” field the MAC of the associated device without hyphens and spaces.
- Restart your computer.
Now let's look at how to change a physical address through the registry.
- Launch the Windows Registry Editor: press the Win + R key combination, enter the regedit and click OK.
- Locate the registry key HKEY_LOCAL_MACHINE\SYSTEM\CurrentControlSet\Control\Class\{4d36e972-e325-11ce-bfc1-08002be10318}. Inside it there are folders with names like 0000, 0001, 0002, etc. Each of them contains parameters of one of the network adapters - physical and virtual. To find what you need, open these folders and look at the value of the “DriverDect” parameter - it stores the name of the adapter.
- Once you find the partition you need (in my example it's folder 0007), create a string parameter "NetworkAddress" in it and assign it as the MAC value of the associated device.
To create a new registry value, right-click inside a free area of the editor window and select “New – String Value” from the menu. Rename the created “New Parameter #1” to “NetworkAddress” without quotes (if the input field is closed, press F2).
Then double-click on the “NetworkAddress” line and specify the value in the “Change string parameter” window that opens.
Checking services
Connecting to the World Wide Web is impossible without the correct operation of system services. There are many of the latter, one way or another related to networks, in Windows, and some of them directly affect Internet access. For example, the following:
- DNS client is a domain name service. Required to determine the IP addresses of web resources by their names.
- DHCP client is a dynamic host configuration service. Used to automatically assign an IP address to a computer.
- WLAN auto-configuration service – required for wireless networks to work.
- IP Ancillary Service – Required when connecting using IP version 6.
- Internet Connection Sharing (ICS). It must be launched if the computer is used as a gateway for distributing the Internet to other devices on the local network.
These services, except for the last one, which is used as needed, should start automatically with Windows. To check this, do the following:
- Open Task Manager and go to the Services tab. Click on the “Description” column header to sort service names alphabetically.
- Check if the above services are running. If any of them have the “Stopped” status, right-click on it and select “Run”.
- Then click at the bottom of the “Open Services” window. Find the problematic service in the service management application that will launch next, and double-click on it to open the properties window. Select Automatic from the Startup Type drop-down list.
Windows Firewall/Firewall Check
To quickly eliminate the impact of Windows Firewall or a separately installed firewall on network access, it is enough to temporarily shut down these applications.
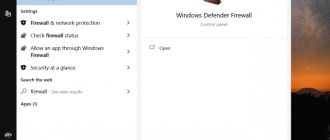
To disable the Windows 10 firewall, open Settings, go to Updates & Security, then Windows Security. Click on the “Firewall and network protection” element on the right, in the next window select your connection and move the firewall slider to the inactive position.
Disable the third-party firewall according to its instructions.
If you confirm that the firewall is at fault, edit or delete the custom rule that is preventing you from accessing the network. Or reset your protection settings to default.
To reset the settings, go to the “Windows Security” - “Firewall and Network Protection” section and click “Restore firewalls to default settings.”
Disabling and resetting the firewall settings on Windows 7 is done through the Control Panel - section "System and Security" - "Windows Defender Firewall".
Proxy and VPN
To check whether a VPN or Proxy server is involved in your Internet connection, open the Windows 10 “Settings” utility, go to the “Network and Internet” section and look through the entries in the subsections of the same name one by one.
The connection name and address in the VPN section, the "Use setup script" or "Use proxy server" options active in the Proxy section, and the completed Address, Port, and Script Address fields definitely indicate that the computer's traffic is directed to global network through an intermediary node. However, the absence of any entries here does not mean that VPNs and Proxies are not used, because they can be configured in separate applications - their own clients or, for example, browsers.
The screenshot below is an example of a browser extension for the Browsec VPN service.
If the extension is enabled and the server through which the traffic passes is down, this browser will not be able to connect to the Internet. Although other programs can.
To prevent access to the global network from being affected by VPNs and proxy servers, disable these technologies or, if possible, configure the connection through another, known-to-be-available intermediary node.
Checking basic connection settings
Through the context menu of the connection icon in the system tray (the place from where you launched Windows network diagnostics), open “Network and Internet settings”. In Windows 7, select Network and Sharing Center. In the next window, click “Configure (change) adapter settings” - a section will open where all the computer’s network connections are stored.
Further:
- Double-click the shortcut for the connection you want to configure, or open its context menu and select “Status” if this item is active.
- In the “Status” window, click the “Details” button and pay attention to the following settings:
- DHCP is enabled.
- IPv4 address.
- Default gateway.
- DNS server.
DHCP is enabled . The correct value for this parameter is Yes . If DHCP is disabled, the computer will not automatically obtain an IP address and will not be able to register on the Internet. You will have to assign it manually, but it would be more correct to start the DHCP service - both on the PC and on the device that it uses as a gateway (router or other computer).
IPv4 address is the address of a computer on a local network. It usually starts with the numbers 10.0 - 255 or 192.168 , less often with 172.16 - 31 .
If the IP begins with the numbers 169.254 , the PC will also not be able to access the Internet, since this group of addresses is allocated for use within one local segment. Windows assigns such addresses to network interfaces if the computer is not connected to a DHCP server and the user has not manually entered an IP. Permanent assignment of such an address in the absence of problems with DHCP usually indicates damage to the system registry keys responsible for the network.
Default gateway. This is an intermediary node between your computer and the Internet that routes traffic. This could be your home router, another computer, or equipment installed by your provider.
The gateway's IP address must begin with the same numbers as the computer's IP, that is, these devices must be on the same subnet. For example, if the default gateway has IP 192.168.0.1 , then the local network devices connected to it can be assigned addresses in the range 192.168.0.2 - 192.168.0.255.
DNS server . This is a node on the Internet that matches domain names of web resources to their IP addresses. Without DNS, your browser won't be able to open any site you request because it won't find anything.
The IP address of the DNS server in the connection settings may coincide with the default gateway address, belong to the Internet provider’s network or special services - Yandex.DNS, Google Public DNS, etc.
Some users specify others instead of default DNS addresses, which are not always working. Malicious programs can also change this setting to redirect infected machines to phishing resources. But it happens that for this reason the Internet disappears completely.
For information about other ways access to individual sites can be blocked, read the article at the link.
When checking your DNS settings, it is always important to clarify who owns the addresses. If they are unfamiliar to you or cause doubts, write instead any ones that are known to be available - for example, public ones from Google: 8.8.8.8 preferred and 8.8.4.4 backup. You will learn where exactly to enter them in the next paragraph.
The remaining parameters of the “Information” section - the physical address of the network adapter (you already know how to change it), subnet mask, IP lease and others are determined automatically.
Reboot the router and check the cables
The next step is to reboot the router. To do this, just unplug it from the outlet and wait a couple of minutes. Then you need to plug it back into the outlet. Wait until all the lights turn on, and then there should be 3 or 4 of them (here it all depends on the model of the router and the number of devices connected to it). Try using the Internet.
If rebooting does not solve the problem, then you should look through all the cables. Start with a twisted pair cable installed by your provider. Next, review the cable that connects the computer and the router.
The diagram for connecting a computer or laptop to the network (shown above) is discussed in more detail in the video. Actually, this particular video can help you understand the problem of why the Internet does not work in Windows 10 or an earlier version.
Also make sure that all the conductors (colored wires) in the transparent connector touch the contacts. You can move the wire a little, if the Internet appears, then you need to crimp the twisted pair again.
Manually correcting network settings
Configuring the default gateway, IP, DNS
To change the values of individual connection parameters, open the “Status” window again and click the “Properties” button in the bottom row. In the new window, click the “IP version 4 TCP/IPv4” component highlighted in the screenshot and click “Properties” again.
By default, IP and DNS settings are assigned automatically. To change them, o, “Use the following DNS server addresses” and specify:
- The default gateway is the local address of the router or other device through which the computer accesses the Internet.
If the network cable is connected directly to the PC, the default gateway for it will be the provider's equipment. In such cases, manual IP configuration is not applicable.
- IP address (of this computer) – any of the free subnet addresses of the default gateway. The IP must be unique, that is, it can only be assigned to one device.
- The subnet mask is automatically set depending on the address range of the main gateway IP. For the range 192.168 its value is 255.255.255.0.
- Preferred and alternate DNS servers. Only the first one can be specified.
Using Windows utility tools when all else fails
If all your efforts have come to nothing - the computer still does not connect to the network, continues to receive an IP address from the 169.254 range, and automatic troubleshooting does not see or fix the error, two Windows utility utilities can help out: Net shell and Ipconfig .
With their help you:
- Correct the registry keys that store TCP/IP and DHCP protocol settings.
- Reset the current DHCP configuration to default and renew the IP address lease.
- Clear the DNS address compiler cache.
This is usually enough to restore damaged Windows network structures after infection with malware or careless use of “enhancers, boosters and optimizers.”
Procedure:
- Run Command Prompt as administrator. Netshell and Ipconfig utilities are console-based. They do not have their own window and are controlled using text instructions.
- Run the commands in the following order (copy, paste into the console window and press Enter):
netsh winsock reset
netsh int ip reset
ipconfig /flushdns
ipconfig /release
ipconfig /renew
- For the changes to take effect, restart your computer.
An example of executing one of the instructions from this list is shown in the screenshot below.
Driver update
The reason for the Internet not working in Windows can also be the network adapter driver, although in the “Device Status” area it will be written “The device is working normally.”
In this case, go to the “Driver” tab and click on the “Update” button. Next, select automatic search. The system itself will try to find a more suitable driver and install it.
If a message appears that nothing better could be found, then you need to do it yourself. If the Internet does not work at all, you will have to use a friend’s computer and save the found driver on a flash drive.
How to find it? This must be done on the official website of the laptop manufacturer, indicating its model and installed OS. If you have a PC, then go to the official website of the motherboard manufacturer (see the documentation for information about it). Next, look for the newest driver there and download it.
To install the driver manually, you need to click the “Update” button, only this time select “Find drivers on this computer.” You can read more about this in a separate article at the link provided.
Only for experienced: third-party utilities for restoring Internet access
Complete Internet Repair
Complete Internet Repair is a free program designed to correct most global network connection errors caused by viruses, user experiments with the registry, as well as incorrect installation and removal of VPN clients, antiviruses, firewalls, system updates, and much more.
Complete Internet Repair's feature set includes diagnostic tools:
- Internet connections.
- Network adapter.
- Incoming connections.
- Homegroup problem.
- Access to shared resources.
- Internet Explorer browser status and security.
- Windows Update Services and BITS.
- Internet speed test.
And recovery:
- Reset Internet protocols TCP/IP.
- Resetting the winsock (Windows sockets) directory.
- Updating your internet connection.
- Reset DNS and ARP cache.
- Fixing errors related to SSL/HTTPS operation.
- Reset proxy configuration.
- Reset Windows Firewall configuration.
- Removing user entries from the hosts file.
- Update WINS client registration.
- Fixing the invisibility of network computers in Explorer, etc.
The full set of recovery tools of the utility is shown in the screenshot.
Before starting the fix, which is launched by clicking the “Start!” button, it is recommended to create a system restore point. This can be done through the "Maintenance" menu.
Complete Internet Repair is available in installation and portable versions. Its main language is English, but through the settings it can be changed to Russian.
Checking drivers
The second thing you need to do on your computer is to check the drivers installed for the network adapter. To do this, open Device Manager. In the top ten you need to right-click on “Start” and select the appropriate item. In earlier versions of Windows, search for it through the search field.
Click the small arrow to view the full Network Adapters list. In it you need to find the network card you are using. There should not be any unnecessary icons next to its icon: a yellow exclamation point and a red cross indicate problems with the drivers.
If you see a black arrow, then it is simply disabled. Right-click on the network adapter and select “Enable device.”
Diagnostics via command line
If the laptop does not connect to the Internet via cable, you can use the command line. It can be used to diagnose the operation of the connection. This is done like this:
- Press the Win+X key combination.
- Select “Command Line” from the drop-down menu.
- Enter the “ping” command and the server address.
If the network is working properly, the computer will begin to send and receive packets. When there is no connection, a corresponding message appears on the command line screen.
Why can't I identify the network cable?
There are situations when, when connecting a cord to a laptop or PC, the device cannot identify the cable. In this case, a red cross appears next to the network connection icon. The reasons why this can happen are divided into two main groups:
- Hardware. This category includes, for example, damage to ports or connected wires.
- Software. This may be an incorrect configuration of the router or network card. Software reasons also include the lack of drivers.
Additional Information! There is another reason why the network cannot be connected - the wrong type of cable. To connect to the network, you must use special cross-crimped wires.
Other Troubleshooting Methods
If Wi-Fi was in working condition before the problem occurred, to troubleshoot the problem you will need:
- disconnect the router for 20 seconds and then connect the equipment;
- troubleshoot problems with the Internet connection by clicking on the crossed out Wi-Fi icon (if the cause of the problem is Windows OS);
- check that the wireless network connection is enabled in the “Changing the adapter setting” subsection from the “Network and Sharing Center” section in the “Control Panel”;
- enable the Wi-Fi hardware switch in the computer equipment if it is turned off (the switching process can be carried out using a certain combination of buttons).
Of the listed methods for troubleshooting when the computer does not see Wi-Fi, the user will certainly be able to choose the most suitable one. You may have to try several methods before the problem is resolved. In any case, each method has a simple algorithm, accessible even to beginners and not capable of harming the computer.
Previous post There is no Wi-Fi on the laptop: why and what to do?
Next entry MikroTik PowerBox Router (RB750P-PBr2) for outdoor installation: characteristics, performance, price, reviews
If there is no Internet connection on the router
Sometimes there is no Internet on the router
If the router does not connect to the Internet, then on machines with Windows configured, the connection status “Restricted” or “Without Internet access” and a yellow exclamation mark near the network icon on the panel will appear on the panel.
You will need to go to its settings through a web browser, which is usually located on pages 192.168.1.1/192.168.0.1, where you can check the status of the WAN connection.
Typical failures that occur when connecting the router to the network:
- obstacles in the operation of network equipment and software;
- limits or restrictions from the provider;
- incorrect connection settings based on WAN parameters;
- router malfunction.
In order to make sure that the cause of network failures is the router, you need to disconnect from it and connect your PC directly with an Internet cable. If the connection is restored, then the router really needs to be configured, repaired or replaced.
Additional Information . Before you do anything radically in relation to it, you need to use the simplest and most accessible way to restore functionality - reboot it, according to the scheme indicated above.