The display of any modern monitor or flat-screen TV consists of many miniature pixels. It is these elements that underlie the construction of a color image. And the more of them, the clearer the picture, fonts, icons and their detail. Here, an important parameter is the screen resolution and you need to choose the right custom settings so that your eyes don’t get too tired when working at the computer for a long time. The ease of use of various programs also depends on this.
Screen resolution settings
What is screen resolution on a laptop or PC
If the monitor is large and the resolution is small, then the icons will appear stretched and blurry. If the readings are too high, even a user with normal vision will feel discomfort. So, correctly made settings, first of all, help preserve vision.
But how to change the screen resolution on Windows 10 if it does not seem optimal? Since only the tenth version of the operating system is currently in use, further analysis of the issue will be based only on it. Windows 11 was released not long ago, but not everyone has it, and it has not yet been properly tested.
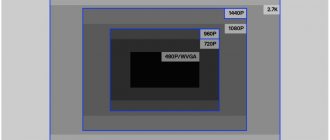
The definition of “screen resolution” refers to the number of pixels on the display where graphic information is generated.
The first number indicates the number of elements in width, and the second number indicates the height. For example, this is 1920x1080 (Full HD) or 1440x900.
To ensure that the image on the screen is not too small or large, you need to adjust the optimal resolution settings. Manufacturers indicate recommended values in the instructions.
Ways to change resolution
Experienced specialists identify several simple methods thanks to which the user can change the display resolution on the Windows ten operating system in the shortest possible time:
- through Windows settings. To implement this method, the user will need to go to the operating system settings window and change the resolution value at his own discretion;
- via the control panel. A simple and effective method, the procedure for which can be divided into several stages. More detailed information will be presented in the following sections of the article;
Appearance of Windows 10 OS, in which you can change many parameters
- via the Windows command line. It involves entering certain commands that allow you to change the screen format on Windows 10;
- via a classic Windows Powershell application. This method is in many ways similar to the previous one;
- installation of third-party applications downloaded from the Internet. We recommend this method for use in cases where none of the above methods has led to a positive result. That is, a system failure occurred in the Windows 10 operating system, which blocked some functions, and the user is unable to reset the display resolution.
Note! When downloading software from suspicious sites on the Internet, there is a high probability of malware being introduced onto your computer.
Changing screen resolution with Windows 10 system settings
The latest versions of operating systems are able to support almost any resolution and even 8K. The same applies to discrete video cards.
Typically, the system offers the maximum allowable values according to the capabilities of the monitor (that is, by default). In Windows 10, the settings interface (including the Start menu) is different from the “seven” presentation.
The Win + I key combination will help you go to settings
Standard algorithm for how to adjust (expand) screen resolution on Windows 10:
- To begin, call up “Options” by pressing the Win + I key combination.
- Find the line "System".
- On the left side of the menu, find and click on “Display”, then on the right you need the line Screen resolution.
- Here a drop-down list will open where you can select the required indicators.
After selecting new parameters, the picture format will change for 15 seconds to evaluate the current resolution or to restore previous settings.
However, this method only works after installing a compatible video card driver.
Why can't I change the resolution?
There are several common reasons for this circumstance:
- outdated video card driver. To check, you need to download the latest version of the driver. Perhaps after performing this action a positive result will be achieved;
- problem with connection cables. If the wire with which the system unit (desktop PC) is connected to the monitor is damaged, this will negatively affect the quality of the transmitted image. Also, changing the resolution may not be available;
- failures in the operation of the video card. Poor cooling of the video adapter and other failures can lead to a similar problem;
- PC virus infection. Some malware blocks certain functions of the operating system. Therefore, first of all, you need to check your PC for viruses and remove the software found;
- failures in the operating system. In this situation, you can get rid of the problem by reinstalling the system;
- technical characteristics of the video card. Earlier models of video adapters do not allow you to change the screen resolution. They can display an image on the monitor with the default resolution;
- the user accidentally set a ban on changing this value in the Windows settings window;
- individual monitor or video card settings. As a rule, some video cards come with a disk on which a special program is installed to control the operation of the device. Here you can set the maximum allowed resolution.
Starting the procedure for cleaning your PC from viruses
Thus, there are several ways to find out and change the display resolution on the Windows 10 operating system. Each of them has individual features, advantages and disadvantages.
Changing monitor screen settings through the control panel
You can also change the display resolution using the standard control panel. This method was successfully used on old operating systems - “seven”, “eight”, as well as Windows XP. For the “ten” this is also a good option, but the LTSC edition is needed, since after the last update this option is no longer available.
Windows 10 interface is noticeably different from older OSes
Simple instructions on how to change the screen extension (increase or decrease):
- Go to the “Control Panel” (by any method).
- Change the display mode to large or small icons. Find and click on “Screen”.
- On the left side, find the line “Setting screen resolution”.
- A window with parameters will appear on the right. If you have several monitors, select each of them in turn, and then the required resolution.
- Finally, click on the OK button.
If you change the resolution, the display goes blank for a few seconds. What could this mean? This changes the operating mode of the monitor and you should not be afraid of this, nor should you force a PC reboot.
How to enlarge to 1920x1080 and 1440x900 using Custom Resolution Utility
You can download the program for changing the monitor resolution to any non-standard one via a direct link. https://www.monitortests.com/download/cru/cru-1.4.2.zip
The program does not work with integrated graphics from Intel.
Remember that the consequences of using the program may lead to problems such as picture distortion. If problems arise, you can always return to standard resolution. To do this quickly, run the “reset-all.exe” file from the archive.
1. Open the application (double-click on the archive and then on the CRU.exe file).
2. In the drop-down list on the left, specify the monitor model if the utility did not recognize it correctly.
3. Below, in the “Detailed resolutions...” field, click “Add”.
4. In the “Active” line you need to put your values and close the window with the “OK” button.
5. Restart the graphics accelerator driver by running restart64.exe or restart.exe from the archive.
Screen resolution settings using video card utilities
When purchasing any video card, you must also install the appropriate driver, which is produced by each manufacturer. It may come included (usually on disk).
The driver can also be found by visiting the developer's official website. It is recommended to check for updates regularly so that the graphics accelerator can perform at its full potential.
At the same time, absolutely all manufacturers' drivers contain a special utility with which you can configure the video card settings.
After installing the software, the corresponding item is integrated into the control panel. It is also present in the right-click (RMB) context menu.
The algorithm of actions depends on the specific manufacturer of the graphics accelerator - Nvidia, Intel, AMD.
How to find out your video card model
Laptop owners do not have any problems, since almost every model has a corresponding sticker on the case indicating the manufacturer and board marking. In the case of a computer, you have to do everything manually, especially when it was purchased a long time ago and not in a store, but from your own hands.
Determining the video card model
You can find out the necessary information by using the device manager, which opens in different ways:
- Control Panel, then “System and Security”, then “System” and on the left the desired line - “Device Manager”. This is if the display mode is turned on - a category, with slightly shorter icons: “System” and “Device Manager”.
- Windows-R keyboard key combination and enter the command prompt “mmc devmgmt.msc”.
- Open the Start menu and type “Device Manager”.
After calling the dispatcher, expand the “Video adapters” section, where the model of the graphics device will be visible. This approach works with the video card driver installed.
This information can also be obtained from the DirectX Diagnostic Tool utility, which has been built into the operating system (since the first versions of Windows).
If the drivers are not installed, then the information in both considered cases will not be displayed.
To start, you need the familiar Win-R combination, and then enter the command “dxdiag” in the field and press Enter on the keyboard. In the window that opens, you need the “Screen” tab. Here, in addition to the name of the video card, there is other data.
Settings from Nvidia
This utility is installed along with the driver and adds the corresponding item to the control panel. However, this applies to all other video card manufacturers. However, you can launch the utility not only from the control panel; it’s easier to go the other way:
- Right-click (RMB) in any area of the desktop, where the desired item will also appear. Sometimes there may be another name - “Control Center Nvidia”.
- On the left side you need a link “Change resolution” (Resolution).
- In the window that opens, select the desired screen indicators, and then click “Apply”.
If necessary, you can select the update frequency here. The main thing is to choose an indicator that is supported by the monitor model.
Proprietary utility from AMD
AMD Catalyst Control Center
As is the case with Nvidia, AMD's utility is also built into the system along with the installation of the video driver.
The steps on how to change the resolution on Windows 10 OS look identical:
- Right-click on the desktop (anywhere) and select “AMD Catalyst Control Center”.
- Find the line “Desktop Management”.
- Next, go to “Desktop Properties”.
- Now you need a desktop area zone where you can select the required resolution. If necessary, additionally specify the color rendering quality. A little higher the desktop settings in the current mode are displayed.
- Finally, click “Apply”.
The only differences lie only in the names of the utility items with a similar algorithm of actions.
It is not possible to reset the screen resolution through the BIOS, since the settings are stored in the operating system configuration files.
Intel HD Graphics Settings
Intel is successfully implementing developments to integrate additional graphics GPUs into central processors. Based on the CPU generation, there are 2 utilities. One of them runs like this:
- Right-click anywhere on the desktop, then select “Intel Graphics Settings.”
- In the menu that opens, you need the “Display” item.
- Select the appropriate indicators from the list in the “Resolution” section. You can also configure other characteristics.
Another utility is called Intel Command Center and is provided only for processors of the 5th generation and older.
Intel's Command Center can also be accessed by right-clicking on the desktop or from the Start menu. Next, go to the “Display” and “Resolution” section, and then select the desired value.
No video card driver
Troubleshooting problems with changing resolution in Windows 7
In most cases, users of desktop computers encounter such a failure, but laptop owners are not immune from its occurrence. There are no universal solution methods, since the reasons why the problem may appear are completely different.
Method 1: Troubleshoot driver problems
Most often, the resolution cannot be changed due to problems with the drivers for the video card, less often - for the monitor or the motherboard chipset (the latter is typical for laptops). The drivers may not be installed at all, or the installation was incorrect, or the driver files may be damaged. Therefore, to troubleshoot problems with the system software, you need to reinstall it.
Read more: How to reinstall drivers for a video card Installing drivers for a monitor Installing software for the motherboard chipset
Method 2: Editing the registry and NVIDIA video card driver file
For users of some NVIDIA video cards, reinstalling drivers does not always help. The fact is that during the installation process, a line about the availability of changing display modes should appear in the INF file, as well as in the system registry, but it does not appear for one reason or another. You can solve the problem by manually editing the values in the registry and the driver file.
- Let's start with the registry - open Start, use the search bar and enter the query regedit.
- The “Registry Editor” executable file will be detected - hover over it, right-click and select “Run as administrator”.
- In the snap-in window, go to the following address:
HKEY_LOCAL_MACHINESYSTEMCurrentControlSetControlClassYou will see several directories named {4D36E968-E325-11CE-BFC1-08002BE10318}, each of which corresponds to a particular group of connected devices. You can find the one you need as follows - open it and click on each directory until you find the line “DriverDesc”, which should indicate the name of the video card from NVIDIA.
- After entering the folder, select “Edit” – “New” – “DWORD Value”.
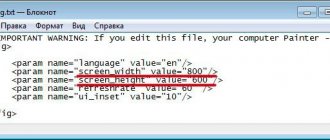
- In the creation window, enter the name of the type EsGpuForceMode8x6, leave the other parameters as default and press Enter.
- Be sure to restart your computer. Once your PC boots up, check your screen resolution settings - most likely they will be available and can be changed.
But it is possible that this procedure will also be ineffective. In this case, you will need to additionally edit the driver file.
- Open Explorer and go to C:NVIDIAWin7*driver version number*, where you will find and open the nv_disp.inf file.
- Look for the section called “[nv_commonBase_addreg__0Х]”, where X can be any number from 1 to 9, depending on the driver version. At the end of this section, insert a new line and enter the following into it: HKR,, EsGpuForceMode8x6, %REG_DWORD%, 0
- Make sure that the characters are entered correctly, then use the “File” - “Save” items. Restart the computer and check if it is possible to change the screen resolution - most likely, the settings will work correctly. The only disadvantage of the method proposed above is a message about unsigned drivers, which will appear when you try to install new versions of software for the video adapter.
Method 3: Reinstalling the operating system
Often, the described problem is encountered by users of laptops that came with Windows 10 out of the box, but then had Windows 7 installed on them. The problem lies in driver incompatibility - the fact is that the software from the “seven” is suitable for the tenth version of Windows, but this rule often does not work in the opposite direction. In such a situation, there is nothing left to do but remove Windows 7 and return Windows 10.
Lesson: How to install Windows 10 over Windows 7
If you critically need the “seven”, you can install this OS on a virtual machine.
Read more: Installing Windows 7 on VirtualBox
We have considered all the options for solving the problem of changing the screen resolution on Windows 7. As you can see, in the vast majority of cases, it is caused by incorrectly installed or missing drivers. We are glad that we were able to help you solve the problem. Describe what didn't work for you. Our specialists will try to answer as quickly as possible.
Did this article help you?
Sometimes there are situations when, after turning on the computer, the image is strikingly different from normal: the screen becomes cropped, changes scale, or even turns upside down. The reasons can be both technical and software. Let's look at ways to solve this problem.
How to return the screen to normal size
Solving problems when the required extension is missing in Windows 10
In some cases, not only the settings may go wrong, but there is also no suitable option in the list of suggested values. For example, the monitor is capable of producing Full HD format, but the maximum performance does not exceed 1366 × 768 “dots”. And this will not always be suitable for a particular user.
To solve a problem, you first need to understand what exactly is causing it.
Typically this is a software glitch. But there is another reason that is easy to overlook. This nuance inevitably appears with old and “pot-bellied” monitors (with CRTs), which are not able to support data exchange with modern graphics processors.
Even if the board itself can provide Full HD resolution, often everything is limited by the capabilities of the display itself.
Another reason is the lack of a video card driver in the system or its outdated version. The problem is solved by a simple update. To do this, you need to visit the manufacturer's website to check for the latest version.
If you had to reinstall the driver, then restart the computer after completing the procedure, otherwise the settings will not be clickable (active).
After installing drivers, you always need to reboot the device
Reasons for image inversion
- Accidental pressing of hot keys - This happens if a pet, a child accidentally presses them, or you make what is sometimes called a “miss click,” that is, an unintentional miss when pressing a button. Such a revolution can also be corrected by pressing a special combination. After this, it is better to disable hot keys.
- Problems with software or hardware – it also happens that hardware components or their drivers begin to conflict with each other. In this case, it would be best to carry out diagnostics in order to determine what was to blame for the image rotation
- Virus - another reason may be infection of the system. Reasons why the image on the screen becomes upside down and their solution
In the case of a virus, there are three solutions:
- scanning with an antivirus and quarantining suspicious files;
- rollback to the last system change;
- if system files are already infected, reinstall the entire OS.
Changing resolution using graphics adapter settings
In the settings of GPU utilities, it is possible to manually set any resolution, even if it is not supported by the monitor.
However, if the indicators exceed the capabilities of the display, an error will appear and the settings may be changed to factory values, namely the image will be reduced.
Instructions on how to change or fix the extension are as follows:
- The first step is to find out the maximum resolution that the monitor supports. A technical document or the manufacturer's website will help.
- Launch the utility, where you need the “Change Resolution” tab, and then click “Settings”.
- Select “Create a custom resolution” and specify the desired parameters, as well as the refresh rate and confirm with the “Ok” button.
- Then find the custom resolution from the list and confirm again by clicking “OK.”
With Intel and AMD, the process being modified is performed in a similar manner.
How to change or return resolution settings by setting video adapter properties for the display
It is recommended to use this technique as a last resort. But in some cases this remains the only way to set the required resolution. This especially applies to video cards that are not supported by Windows 10.
Opening Display Settings
Your own permission is set as follows:
- The first thing you need is to access the parameters through the combination Win + I.
- Find the “System” tab (on the left side).
- Also select “Display” on the left, and “Advanced display settings” on the right.
- Now “Video adapter properties”.
- In the next step, find the “List of all modes” button.
- Select the desired parameters, and then confirm the actions by clicking “OK”.
But there are certain limitations here - there is no ability to change the display refresh rate.
Scaling Tips
If you still use outdated programs, we recommend that you look at the “Advanced settings” subsection of the settings.
Here you can activate the "Fix scaling" option, which is designed to eliminate blurriness in desktop applications. This is a so-called “crutch” that does not always work correctly. If all else fails, remove scaling in the properties of the specific program shortcut:
You can also set a custom DPI value in this window if you are not satisfied with the standard row.
Experiment and choose the optimal image size specifically for you.
Source