Author of the article
Ilya Kondrashov
Works in the IT field, engaged in programming and testing banking systems.
Even owners of high-quality, working devices have situations when they cannot access the router settings. The reason could be either the PC or the router itself. In your personal account, Internet and wireless network settings are configured from the router, so losing access to it is fraught with unpleasant consequences.
Read the article about how to access your router settings. Perhaps you acted incorrectly, and the problem will be resolved immediately. If not, we will help you solve it.
If I can’t get into the router settings, I go through all the options for solving problems, from the simplest and most obvious to more specific ones that are quite rare. They will be discussed below.
Express methods
There are universal ways to solve problems with router settings.
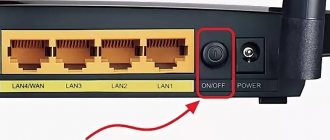
- Reboot the device. This is done by simply turning the device on and off. The power button is usually located on the back of the router. Or unplugging the power supply plug for a minute if there is no power button on the device or it is broken.
- You can try logging into the router's admin panel through a different browser. There are often cases when the browser can be configured in a special way and does not allow certain addresses that the user goes to.
- If I can’t log into the router interface from my PC, then I try to log in from another device. For example, from a phone or laptop, if they were connected to the network. Either by physically connecting the router's Ethernet cable to a laptop or other computer.
- The router interface may simply freeze when accessing itself. This could be due to many reasons, from the device’s firmware to authorization at the time of receiving connection data from the provider.
Simple solutions
Provided that all actions to enter the menu are carried out correctly and according to the instructions, but nothing works, you should turn to additional options.
Additional activities include the following items that may help if you cannot enter the router settings:
- Try logging into the router settings through other browsers.
- Try connecting to the settings menu from another available device.
- Disable security programs and operating system protocols, including antivirus and firewall.
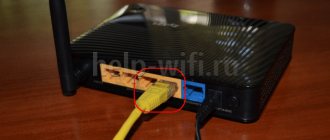
- Check the quality of the connection to the router and its technical condition. The equipment may not be connected correctly, the network cable may be damaged, etc.
You can check the correct connection using the picture:
- There may be problems with the drivers of the network adapter itself; it is recommended to update them.
- Reboot the operating system and router.
Antivirus or firewall is interfering
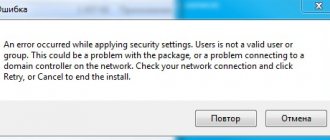
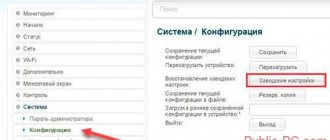
The simplest and most common reason for blocking access to settings is a failure of the firewall settings built into Windows or used by an antivirus. For example, to check the settings of ESET antivirus, you need to go to the main screen of the program, to the “Settings” section and click on “Advanced settings”.
In additional settings, you need to go to “Network protection” – “Firewall” and to the “Advanced” tab. On it, click on “Customize” opposite “Rules”.
If you can’t log into the router’s admin panel, the rules probably prohibit access to the configuration IP address. If such a rule exists, it must be deleted and the changes confirmed.
If you don’t want to deal with long settings, you can simply disable the antivirus or the built-in firewall while configuring the network.
Possible reasons
Before performing any alternative actions, you should determine the cause of the problem. There are several main categories of reasons leading to the problem in question:
- Incorrect network connection settings.
- It is possible that the connection is being made to the wrong IP address due to the automatic IP acquisition function being disabled.
- Technical issues.
The real reasons can be identified during an audit of equipment and system settings. However, in a number of situations, the reason why the web browser does not open the Wi-Fi router settings page may not be obvious and you will need to dig around. It is precisely these reasons that we will pay special attention to.
Incorrect IP address
It happens that when logging into the router’s LAN, an incorrect IP address is indicated, or an incorrect intermediate address on the network is indicated. Each manufacturer provides 2 entry points for entering settings. By default, 98% of routers have an entry point through 192.168.1.1 or 192.168.0.1, but there are exceptions to the rules.
You can find the exact addresses and “bridges” for authorization on the bottom of your device. They are printed along with the make, model, serial number and other related information.
Below is a list of device manufacturers and their entry points:
- You can access the router settings from tp-link via IP 192.168.0.1 or at tplinkwifi.net. An Internet connection is not required for this.
- You can access the settings interface of routers from ASUS via IP 192.168.1.1 or via router.asus.com.
- For Xiaomi you need to use the address 192.168.31.1, the manufacturer sets it as default. Or you can go to miwifi.com.
- Zyxel or Keenetic has a login page my.keenetic.net.
- To configure Tenda devices, you can use tendawifi.com.
- Belkin routers use IP 192.168.2.1 The internal link is https://router
- The settings of Huawei optical terminals are entered through the address 192.168.100.1
- If you are using a Mercusys router, you can go to mwlogin.net
Many device manufacturers write the addresses for entering your personal account on the bottom of the router itself, and the authorization data is also indicated there. If after all your attempts you are unable to log into the router, use other methods to solve the problem.
Incorrect browser settings
Depending on the quality of use of the program for viewing Internet pages, as well as on the “hard-wired” installations of individual plugins and extensions, the owner of the router may one day see that the device either does not enter “Settings” at all, or does so every other time. Using Google Chrome as an example, the process to correct the situation is as follows:
- The user goes to the “Settings” of the browser.
- Opens the Advanced menu.
- In the "Site Settings" section.
- Opens the JavaScript subsection.
- And makes sure that the slider is set to the “Allowed” position.
- Next, the user who cannot enter the “Settings” of the router switches to the Flash subsection.
- And, if the slider at the top is gray, click on it so that the inscription “Always ask” is displayed.
- Depending on your router interface, you may need to enable pop-up windows in your browser. To do this, go to the appropriate subsection.
- The owner of the device moves the next slider to the “Allowed” position.
- Returning to the “Advanced” menu, scrolls down the page and goes to the “Proxy server settings” section.
- In the window that opens, switches to the “Connections” tab.
- Clicks on the “Network Settings” button.
- And, having found an activated checkbox in the “Proxy server” field, uncheck it.
- Then click on “OK” and close the window.
- In addition, you should check the installed plugins, especially if they are VPN services, ad blockers and JavaScript, and at least temporarily disable them by moving the slider to the Off position or using the corresponding button.
If after all these steps the user, as before, cannot enter the “Settings” of the router, you should reinstall the browser and try again.
Tip: Don't have time to uninstall and reinstall? Then it’s worth using the browser that is always present in Windows, but the least rarely used, and therefore the “cleanest” browser - Internet Explorer; This method almost always gives a 100% result.
The connection to the router is not established
Sometimes the problem is an erroneous operation of the router's firmware. For example, models from IskraTel, when working via PPPoE, receive a full pool of data for connection from the provider. That is, there are situations when the device is fully configured, but the wired Internet does not work; this happens at times when data from the service provider has not yet been received.
If you start entering the menu at this time, the device may “fall off”, that is, the connection with the router will not be established, since requests simply will not reach it. It will be possible to enter the device menu only when the entire configuration has been received from the provider.
Firmware glitches due to a weak processor are far from uncommon, and you can only get rid of them by changing the device.
Setting up a D-Link DIR-300 WiFi router
Home Wi-Fi routers D-Link DIR-300 are probably the most common router in the Russian Federation. The fact is that this is one of the very first subscriber devices of this class to appear on the market. And although many hardware versions have easily changed since then, the DIR-300 still does not lose its popularity.
Setting up DIR-300 is not difficult; you just need to know your type of connection to the provider and, if necessary, authorization data. As an example, we will consider firmware version 2.5.11 for the hardware revision of the DIR-300 D1. If you have a different version (C1, B1, B3, B5, B7) - do not be alarmed. Even though they have a different firmware version (such as 1.4, etc.) and the configuration web interface looks a little different, the sequence of actions will still be the same. Just follow the analogy.
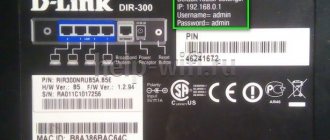
The IP address of the router through which you can access its settings is 192.168.0.1, it must be entered into the address bar of your Internet browser:
After this you will see an authorization form. The default login is admin. If you have just unpacked the DIR-300 router from the box, then the login password will be the same - admin. If authorization fails, then use the instructions The admin password on 192.168.0.1 does not work.
To configure the D-Link router’s connection to the Internet, we need to go to the Network->WAN :
If there is already a connection in the table, left-click on it to enter its parameters and click the Delete .
Then, you need to create a new connection. To do this, click the Add . After this, you will be taken to the configuration section for connecting the Dlink router to the Internet.
Dynamic IP on DIR-300
In the “Connection type” field, select the connection type Dynamic IP :
In the “Interface” list, set the value Internet , check that the “Allow WAN direction” checkbox is checked, and below, in the “Miscellaneous” section, check the NAT and Firewall . Click the “Apply” button.
PPPoE on D-link DIR-300
This protocol is used by most providers in Russia, Ukraine and Belarus - Rostelecom, Dom.ru, TTK, ByFly and UkrTelecom. To configure the Internet via PPPoE on a D-Link router, you need to set the value PPPoE :
We make sure that the “Interface” field is set to Internet and is o. Below, in the “PPP” section, you need to enter the login and password for access to the network, which were issued to you when concluding an agreement with the provider. Check that NAT and Firewall are checked. Click the “Apply” button.
Incorrect username and password
If you cannot log into the web interface, you should check whether the login and password are used correctly. The data that was embedded by the manufacturer can be found on the bottom of the router or modem, on a sticker with information about the device. You need to log in, observing the register, that is, if the data is indicated in capital letters, you need to enter it in the authorization page exactly like that.
It often happens that the login and password for the router have been changed, and authorization is carried out using the old data. Unfortunately, the only way to reset these credentials is to reset your router to factory settings. If you cannot log in using the exact login and password, the problem probably lies in the previous settings of the router.
Other interface
As I wrote above, the D 300 had many manufacturing options, and there were many different interfaces. The whole essence described above will fit any model - and even any other router, because the process is the same everywhere. Below I’ll just show you what other interface variations there are.
Home page and access to advanced settings:
Our WAN network (where you need to add a new setting with the connection type and provider login-password):
And here are the settings for PPPoE. As a reminder, you only need to enter the Connection Type itself, as well as your login and password:
The internals of Wi-Fi look approximately the same, so I’m only showing the entry point to all the necessary settings:
Login from another device
Sometimes you can’t access the router’s website because you logged into your personal account from another device - a computer or phone. Even if you've already closed Settings, this may prevent you from signing in. Then you will see the message “Only one connection with administrator rights is possible to the router.”
In this case, you need to remember which device you last logged in from, go back to the admin panel there and click “Log out”. Now you can connect to the router interface from any device.
Resetting router parameters
Sometimes it is not possible to open the network equipment panel through a web browser, then it is possible to reset the settings in another - physical way. The procedure is as follows:
- Disconnect all wires except power.
- You will need a thin object (a needle, a pin, a piece of wire). They need to press a button in a thin hole on the case and hold for 10 seconds.
- The light indication of the router will show that it has started to reboot.
Note! In some models, such a button is not hidden in the hole, but protrudes, which allows you to do without third-party objects.
Reset button on the router
After this, all settings will be reset to factory settings. If this procedure does not help and the Internet still does not work through the router, and the device immediately turns off, this is a good reason to visit a service center. As a rule, this is a clear sign of a hardware malfunction. And if replacing the equipment helps and the Internet is connected, then the problem was in a faulty device.
Static IP address in settings
A less trivial problem is the unsuccessful configuration of the IP address of the device itself. Inside each web interface, you can change the address at which the device settings will be accessed. And if you do this once, you will not be able to change this setting without access to the router’s LAN. For example, let's take the settings of the ISkraTel G74 router.
We need to log in to the settings using the standard, factory address.
Next you need to go to the network settings and go to the LAN port configuration. Inside there will be an “Existing IP Interface” configuration block with the current address that is used for authorization.
When we click on “Change” we will be taken to the configuration page, where the address we need changes.
After changing and saving the parameters, the device will quickly restart with the changes applied and the previous IP will no longer be available for entry, and configuration will be carried out from the new address. Accordingly, you can return the original address only by resetting the device to factory settings.
A similar situation occurs when the PC network adapter is configured incorrectly. In this case, the Internet may also stop working.
In order to understand that this is exactly our case, you need to open the “Control Panel” and find the “Network and Sharing Center” item there. In the window that opens, on the left side, go to “Change adapter settings.”
In the window that opens, you need to select the network adapter used by your computer. Typically it is called “Ethernet”. You need to right-click to go to its properties. In the window that opens, select the parameter named “IP version 4”. And if the “Use the following IP address” checkbox is checked, and the “IP address” parameter is filled with a value, then this is what prevents the user from accessing the router settings and “cuts” the connection.
In this case, you just need to change the selection to “Obtain an IP address automatically” and save the changes. Or try to set an address that is definitely not used in the system, for example 192.168.1. and numbers from 2 to 99, the mask should be installed automatically, but the gateway does not need to be touched, it can remain empty.
Wi-Fi setup
The most important thing in setting up Wi-Fi is that everything works and you have your own password. We do this:
Wi- Fi – General settings
Here, make sure that the “Enable wireless connection” checkbox is enabled. Or you can simply look at the front panel of the router and make sure that the wireless network indicator is on or blinking.
Wi- Fi – Basic Settings
Here look at the SSID - the name of your network. This is how you will see it when searching for networks, and this is how all your neighbors will see it. Also make sure that the mode is set to B/G/N mixed - this will ensure a complete combination of standards between all possible devices and your router, so that there are no problems.
Wi- Fi - Security Settings
Here you set the basic security settings for your home wireless network. Don't ignore this point! Be sure to set your password.
What is important:
- Network authentication - WPA-PSK/WPA2-PSK mixed - this is the only way, no unsecured networks, no WEP that breaks once or twice.
- The PSK encryption key is your password, which will be requested when any device connects to your Wi-Fi. It doesn't have to be simple, but write it down somewhere right away. You can watch it again here, but it’s easier to enter it from a piece of paper.
Unsuccessful router firmware
A less common, but no less complex problem that results in the inability to enter the router settings is an unsuccessful firmware update.
The case is very specific and, if it occurs, as a rule, the user is aware of what exactly affected the operation of his device and how to return everything back. It will help to return everything to its place or roll back the firmware if the update was performed by official, that is, proprietary software. Or you need to install a different version of the software. Perhaps the installation was not from your revision of the router, or from a model for a different region.
If you are sure that both the firmware and device model are the same and the firmware image was downloaded from an official source, you can try resetting the router. It happens that some temporary data from the previous version was mistakenly stored in the device ROM, which interferes with correct operation.
If the user installed custom firmware that was collected by the community and made publicly available, then this may be the problem. Not all “custom” programs are characterized by stable operation; it happens that they do not work at all. It is better to learn all these nuances on forums and in specialized device threads.
Setting up a D-Link DIR-300 WiFi router
Home Wi-Fi routers D-Link DIR-300 are probably the most common router in the Russian Federation. The fact is that this is one of the very first subscriber devices of this class to appear on the market. And although many hardware versions have easily changed since then, the DIR-300 still does not lose its popularity.
Setting up DIR-300 is not difficult; you just need to know your type of connection to the provider and, if necessary, authorization data. As an example, we will consider firmware version 2.5.11 for the hardware revision of the DIR-300 D1. If you have a different version (C1, B1, B3, B5, B7) - do not be alarmed. Even though they have a different firmware version (such as 1.4, etc.) and the configuration web interface looks a little different, the sequence of actions will still be the same. Just follow the analogy.
The IP address of the router through which you can access its settings is 192.168.0.1, it must be entered into the address bar of your Internet browser:
After this you will see an authorization form. The default login is admin. If you have just unpacked the DIR-300 router from the box, then the login password will be the same - admin. If authorization fails, then use the instructions The admin password on 192.168.0.1 does not work.
To configure the D-Link router’s connection to the Internet, we need to go to the Network->WAN :
If there is already a connection in the table, left-click on it to enter its parameters and click the Delete .
Then, you need to create a new connection. To do this, click the Add . After this, you will be taken to the configuration section for connecting the Dlink router to the Internet.
Dynamic IP on DIR-300
In the “Connection type” field, select the connection type Dynamic IP :
In the “Interface” list, set the value Internet , check that the “Allow WAN direction” checkbox is checked, and below, in the “Miscellaneous” section, check the NAT and Firewall . Click the “Apply” button.
PPPoE on D-link DIR-300
This protocol is used by most providers in Russia, Ukraine and Belarus - Rostelecom, Dom.ru, TTK, ByFly and UkrTelecom. To configure the Internet via PPPoE on a D-Link router, you need to set the value PPPoE :
We make sure that the “Interface” field is set to Internet and is o. Below, in the “PPP” section, you need to enter the login and password for access to the network, which were issued to you when concluding an agreement with the provider. Check that NAT and Firewall are checked. Click the “Apply” button.
VPN L2TP using the example of connecting to Beeline.
This is the most complex type of connection, since it actually consists of two - Dynamic IP and VPN tunnel.
In the “Connection type” list, set the value L2TP+Dynamic IP :
Make sure that the “Allow WAN direction” checkbox is checked. Go down to the IP and check the box “Obtain DNS server address automatically.” Below, check the boxes NAT and Firewall .
Now all that remains is to configure the VPN connection: Check the “Allow connection” checkbox. In the “Username”, “Password” and “Password Confirmation” fields you must enter the authorization data that you received when concluding an agreement with BeeLine. You must specify the address of the provider's VPN server. For Beeline it is tp.internet.beeline.ru. We don’t touch anything else, we just check that NAT and Firewall . Click the “Apply” button and check your Internet access.
The setup of the D-Link DIR-300 NRU router is complete. If you need to set up a wireless network, see the instructions on How to set up WiFI on DIR-300.
System problems
The last point is problems due to viruses, third-party software or settings blocked by the provider. If the device settings page does not open, you can try scanning your PC for viruses. This can be done in any way convenient for the user. But it is best to use the Dr.Web CureIt! utility. For best results, you need to start the PC in safe mode, and after starting, launch the application. It will scan the PC, and since safe mode launches a minimal set of services and processes, the virus application will not be able to affect the treatment process.
The problem may also lie in third-party software, the settings of which can be done in the web interface. As an example, we can describe a router with a changed address for entering settings, and a CMS program for managing IP cameras. The changed address and the software web settings address may match, and the CMS settings will simply block access to the router configuration. The situation is very rare, but it does occur.
Users of base stations or optical terminals often come up with the problem that router settings do not open. The IskaTel G74 router and devices from Huawei were described above. They are configured by the Internet provider and can block access to users. Configuration of such terminals is carried out either remotely, by the provider’s employees, or on site, at the client, using specially configured equipment.
#2 Faulty PC connection
Not included in the router settings, although it is connected and working? Make sure the connection to the computer is correct:
- Make sure that the cable is connected to the PC and the device in the correct direction;
- Disconnect the cable and reinsert it.
We recommend checking the functionality of the cable: use it to connect two computers. Did not help? Then you will have to replace it with a new one. It may be that you chose the wrong connector:
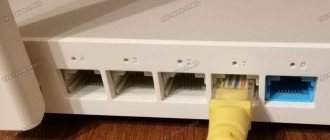
- There are several inputs on the rear panel (usually four);
- The input you need can be seen in the image;
- Do not connect to a port labeled "WAN" or "Internet".
Important! If the router's web interface does not open in the browser during a wireless connection, the feature can be disabled in the settings. Try connecting using a cable.
"Unidentified network without internet access"
Many users encounter this situation - a message appears on the monitor regarding the lack of access to the Internet and that the network is not recognized. This happens when the owner of the car or laptop configures access to the network or Wi-Fi router and everything is reset. In this case, all the blame is placed on the provider or the equipment itself.
The problem with the Internet is determined by several manifestations:
- lack of the Internet itself;
- pages take too long to load;
- A yellow exclamation mark appears in the lower right corner of the monitor.
There are many reasons why a network may fail, and most of them can be eliminated with your own hands. Moreover, the solution does not take much time.
Note! Sometimes the culprit may be a simple reinstallation of the operating system.
Reasons why the “No Internet Access” notification appears
First, you should check the network connection through the router of other devices. And if it functions, it means that the provider clearly has nothing to do with it. Otherwise, when there is no Internet on the computer through the router, events can develop in two scenarios:
- There is a notification “No access to the Internet”, but the network itself is not in the list.
- The message appears in full when you hover over the corresponding network.
The first option is caused directly by the service provider, and the second indicates problems with the router itself. Internal causes can be eliminated by the following actions:
- Reboot the computer or laptop where the message about the lack of Internet appeared.
- Restart the network equipment by disconnecting it from the network and waiting at least 10 seconds. After that you can turn it on.
It is worth considering that a computer or laptop may stop connecting to the network due to an update to the operating system on the device. The same applies to installing antivirus software (software) that was downloaded from a source of unknown origin.
Notification “Unidentified network without Internet access”