Your iPad won't connect to Wi-Fi? There are many reasons for this, such as a faulty Wi-Fi module, incorrect network settings, and problems on the router side. The good news is that in most cases you can fix the problem quite easily.
So, go through the list of pointers that follows and you should be able to connect your iPad to Wi-Fi as normal again.
Related: Find out what you should do if your iPad connects to Wi-Fi but not the Internet.
Disable and enable Wi-Fi.
Disabling and reactivating Wi-Fi on your iPad is the fastest way to resolve temporary glitches that are preventing it from working properly.
1. Open the Settings app on your iPad.
2. Tap the option labeled Wi-Fi.
Turn off the switch next to Wi-Fi.
4. Wait at least 10 seconds.
5. Turn on the Wi-Fi switch and select the hotspot you want to connect to under My Networks or Networks.
Nature of the problem
Reception of a Wi-Fi signal usually occurs in a matter of seconds - the user barely has time to click on the icon in the notification shade. If the connection does not occur, you first need to check the presence of the network itself. The action plan is simple - go to Settings, Network section. The list of available ones (which the iPad “sees”) should be headed by the network to which the request is made. There are two options here:
- The network is in the list, but the connection is not established. If the network is protected access, you need to click on it and select the line “Forget this network”. Reconnect.
- The network name is missing. There is a high probability that the problem is with the router or poor signal range.
Problems with the hardware rarely lead to the iPad not seeing Wi-Fi - the reason is often a software error. The situation is different with the iPad mini - its design is more fragile, mechanical damage upon impact can affect the reception of wireless network signals.
Turn airplane mode on or off.
Switching Airplane Mode on and off helps reset all network radios and is another quick way to fix iPad won't connect Wi-Fi error.
1. Open iPad Control Center by swiping down from the top right corner of the screen.
2. Tap the airplane mode icon to turn off Wi-Fi, cellular, and Bluetooth.
3. Wait up to 10 seconds and tap the Airplane mode icon again.
Antivirus
Many cellular and tablet devices operate without an antivirus program, although computers and laptops almost never access the Internet without it. And it is no coincidence: a large number of failures, data deletion and other troubles occur due to an electronic device being infected with a virus.
However, the antivirus program can also be the reason for the lack of connection: the iPad does not see Wi-Fi, since the protection regards a certain web line as potentially dangerous and blocks it. It is possible to access the Internet only if the antivirus software is temporarily disabled.
Important! Still, you shouldn’t leave your equipment without security software. The user needs to try another version of the antivirus program - one that is more suitable for the Android system and less active.
Forget and connect to the network
If your iPad stops connecting to a previously saved Wi-Fi hotspot, deleting and reconnecting the network may help.
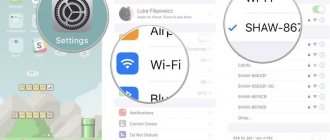
1. Open the iPad's Settings app and tap Wi-Fi.
2. Find the network in the My Networks section and click the Info icon next to it.
3. Click Forget this network.
4. Select a Wi-Fi network in the Networks section.
5. Enter your network password and click Join.
Changing the DNS name server
To safely use DNS services, it must be correctly configured for your source. Changing the name yourself is easy; you follow a certain algorithm of actions:
- Go to the “gear” of the device and select the Wi-Fi wireless connection section.
- Highlight your access point to the “web”.
- Scroll down the information about the router and click the “DNS Settings” cell.
- We are changing the automation of the function to manual control so that we can make changes ourselves.
- After the list of options is displayed, select the “Add server” line.
- In the open window, enter the value of four eights separated by a dot and activate the “Add server” button.
- We enter the value in the same line - “8.8.8.8.”.
- Don’t forget about the standard service - delete it by clicking on the red button on the left of the numbers.
- Save the changes made.
This procedure will allow the tablet to use our DNS services. New values may not be activated immediately. To do this, reconnect to the network again and restart the Internet source.
Restart your iPad.
Restarting your iPad from a powered state also resolves Wi-Fi connection issues. If you haven't done this yet, try it now.
1. Open the iPad's Settings app and select General > Turn Off.
2. Swipe the power icon and wait until the iPad turns off completely.
3.Hold the top button to reboot your device.
Problems with the router
If the iPad connects to all networks except one without problems, the reason is in a specific router. The first and important fact is that devices with an Astheros chip conflict with Apple tablets. In any other case, it is worth rebooting the router, maybe even several times. Because of this, the data transmission channel will change, and the connection will most likely be established.
By connecting the router to your computer via a USB cable, you can do the following:
- update ip address;
- change the encryption type - wep to wpa/wpa2;
- increase the brightness level (settings);
- update the software version (if an upgrade is available).
Advice! If the user is dealing with a 3G router, he needs to check whether the SIM card inside is working. There may even be a banal situation of a zero account balance.
Move closer to the router.
This one is obvious, but moving closer to your router is another fix that can push your iPad to regain its Wi-Fi connection. If possible, try placing your iPadOS device close to your router and see if that makes a difference.
If this worked, you may want to set up a backup router as a Wi-Fi extender to mitigate the problem in the future.
What to do if the network does not work
Firstly, if Wi-Fi does not work on your iPad, finding the source of the problem will be the surest way to resolve the situation. This could be the device itself - a mobile phone or a router that distributes Wi-Fi, as well as interruptions in the provider’s line.
Secondly, move on to the solution: the user can try to resolve the first group of difficulties on his own, but in relation to external problems with the Internet, he can only contact technical support.
Update iPadOS.
Wi-Fi related problems can also occur due to a faulty version of the iPad system software, iPadOS. The only way to fix this is to update it. You can do this by going to Settings > General > System Software.
If you don't have any other Wi-Fi hotspots you can connect to (or if you can't connect to any network at all), you should use a Mac or PC with an active Internet connection.
1. Open the Finder app on your Mac. If you are using a PC, you must open iTunes.
Note. You can install iTunes on your computer through the Microsoft Store or Apple Website.
2. Connect your iPad to your computer via USB. If this is your first time, unlock your iPadOS device and tap Trust.
3. Select your iPad in Finder or iTunes.
4. Click Check for updates.
5. Select Update to apply any pending updates.
Source status monitoring
How to check the router? First of all, find out whether the LEDs on the front panel of the router are lit. Pay special attention to the one with the Internet icon (it may look different on different models, so check the instructions).
If the lights do not light up, it means that you forgot to plug the router into the socket or did not connect the provider cable. Do this and try to connect again.
Nothing works? Sit down at your computer, open the router settings page in your browser and check if all connection options are set correctly. These parameters are described in the instructions of your network provider. Before you reconfigure your router, it is best to reset all of its settings. For this purpose, there is a special button on the router case (usually marked “Reset”).
If, after all the steps described above, access to the Internet appears and disappears, try wandering around the house with your iPad. If reception is better in one location than in another, the network signal is not strong enough.
Interference may also be the cause of an unstable connection. You can also experiment with router channels - these are approximately the same as reception ranges. On one range the signal can be heard perfectly, but on another it can be barely noticeable. If many neighbors use the same channel, then switching to a different band often solves the problem.
By the way, if the Internet is not working, is it time to pay for the tariff plan? It's a joke! We will assume that you are careful.
Reset network settings.
We recommend resetting your iPad's network settings if you are still having trouble connecting to one or more Wi-Fi hotspots. This usually resolves major network connection issues, but the reset procedure also erases all saved Wi-Fi hotspots.
1. Open the Settings app and select General > Reset.
2. Click Reset Network Settings.
3. Enter your device password and click Reset to confirm.
Once your iPad has finished resetting your network settings to default, try reconnecting to Wi-Fi by going to Settings > Wi-Fi.
How to disable the feature?
Installing iOS 9 provides for automatic saving of this function. But it can be adjusted and disabled if the Internet does not connect. To do this, look in the settings and find the cellular data options. At the bottom of the screen there will be a button that activates the assistant. Move the slider opposite the system name and the device will turn it off.
After the manipulation, you need to restart the iPad and router to make sure the problem is resolved. Next, follow the standard procedure: turn on the router, connect the tablet, enter the access code and check the stability of the connection.
Reset router
If resetting your iPad's network settings didn't help, you should reset your router to default settings instead. This can be done in two ways.
The first method involves pressing the physical reset switch on the router. The second method is to restore the default settings through the router's control panel. See our guide to resetting your router for details.
Backup, information recovery
Not every user of Apple devices understands the meaning of backup. Those who know about it still rarely use it, as it takes away their energy and time. In fact, with the help of information backup technology, you can often avoid many problems, including non-working Wi-Fi. Often, iPhone devices use the iCloud cloud service to backup data. But if Wi-Fi does not connect, you need to place a copy of the data in iTunes in advance.
Creating two backup copies will be a real lifesaver for you. Therefore, you can easily use iTunes and iCloud for this at the same time. And if now something happens to your device, settings, system data or network connection, you can easily restore the data thanks to recovery from a saved array. The process of saving and restoring is quite simple; you will only need a little time, which will depend on the amount of information you sent to the cloud or returned back. Therefore, why not solve the connection issue with minimal intrusion into the gadget’s software.
You can completely reset your iPhone and iPad, which will return the gadget to its “just purchased” state. Of course, after this procedure it will be more difficult to restore all information. But if after a complete reset Wi-Fi connects and works normally, you will still have a backup copy that you can use. However, we should not exclude the possibility that the backup version itself becomes the culprit of the problem - even if the system is updated, the situation will not change. In this case, a reset to factory settings will be relevant, which will allow you to set up Wi-Fi on your iPhone or iPad. In this case, you will have to restore the entire amount of information manually, collecting it literally bit by bit.
Reset all settings
The latest fix involves resetting all settings on your iPad. Not only does this restore all complex network configurations to default, but it also undoes malicious changes from many other settings in iPadOS.
1. Open your iPhone's Settings app and tap General > Reset.
2. Click Reset All Settings.
3. Enter your device password and Screen Time password. Then click "Reset" to confirm.
Your iPad will automatically restart once the factory reset is complete. Once it finishes this, go to Settings > Wi-Fi and check if you can connect the device to the Wi-Fi network again.
Unsecure Network Message
Public hotspots are usually not password protected for public access. The downside is the possibility of interception of confidential data by attackers while using the Internet. This is fraught with loss of control over pages on social networks, mailboxes, and even theft of money in your bank accounts.
The message does not inform about a problem, but only warns that the WiFi point is not protected from hacking, and you should not conduct financial transactions or transfer important information in it.
Take it to Apple
If none of the above fixes worked and you are still unable to connect your iPad to any Wi-Fi network, you are probably looking at a faulty Wi-Fi module on your iPad. You can try restoring your iPad to factory settings or reinstalling the firmware in DFU Mode, but this may render your device unusable if it is unable to connect to Wi-Fi.
Your best option is to take it to your nearest Apple Store or Apple Authorized Service Provider for repair or replacement.
Difficulties with channels
Often, a tablet from a popular American manufacturer cannot connect even to a home network that has a stable and powerful signal. At the same time, all other home devices (laptops, smartphones) have no problems. In this case, you just need to make some adjustments in the router’s web interface, after which the iPad will also connect to the distributed network without much difficulty.
You only need to do a few steps:
- Log in to the router settings;
- Pay attention to the channel selected by the router automatically;
- If the number 12 or 13 is displayed there, then you can immediately draw an unambiguous conclusion that the cause of the problem has been found. It is very easy to eliminate it. To do this, you need to deactivate the automatic channel selection mode;
- Go to the “Wireless” tab and manually set one of the static channels, but not the 12th or 13th;
- Click “Save”;
- Restart the router;
- Ready. Now the Apple gadget will work properly.
When is repair needed?
If the iPad has suffered a severe impact or moisture has entered the case, repair may be required. Damage most often occurs to the module wiring, antenna malfunction or corrosion of connections. In this case, other malfunctions occur that are not typical of software errors.
Sources
- https://14bytes.ru/kak-podkljuchit-iphone-i-ipad-k-wifi/
- https://support.apple.com/ru-ru/guide/ipad/ipad2db29c3a/ipados
- https://setinoid.ru/wifi/ipad-ne-podklyuchaetsya-k-wi-fi
- https://wifika.ru/kak-podklyuchit-apple-ipad-k-wi-fi-podrobnaya-instruktsiya.html
- https://WiFiGid.ru/apple-iphone-i-ipad/ipad-ne-podklyuchaetsya-k-domashnemu-wi-fi
- https://appsetter.ru/ipad-ne-vidit-wi-fi.html
- https://nastrojkin.ru/network/wifi/ipad-ne-podklyuchaetsya-k-wifi.html
- https://support.apple.com/ru-ru/HT204051
- https://protabletpc.ru/advice/ne-rabotaet-wi-fi-na-ipad.html
- https://14bytes.ru/ipad-ne-podkljuchaetsja-k-wifi/