Good day!
Despite the fact that a laptop screen has much fewer parameters that can be changed (compared to a regular classic monitor), it is still better to pay attention to something.
For example, if the resolution is set incorrectly, the image will be of poor quality, with low clarity. That is, we will spend more time solving certain problems, because... you need to “look closely”. In addition, “such” pictures on the screen quickly begin to tire your eyes (especially when reading and working with small details).
In general, what prompted me to write this article was one of these cases: an acquaintance showed his vacation photos on his laptop. Everything would be fine, but the picture on the screen was somehow “cute” and not clear. At first I thought that the quality of the photo was poor, but as it turned out, the problem was the lack of resolution and calibration.
But more on everything below.
How to change the screen contrast on a computer and laptop in Windows 10
Brightness and contrast are the main parameters that users change to adapt the image on mobile devices and computers.
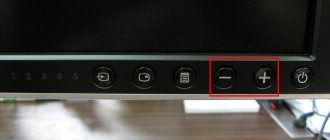
Contrast is the ratio between the brightness of the lightest and darkest points on the display. In this publication, we’ll look at how to change the screen contrast on Windows 10 using all available methods, which include third-party tools. The classic way to solve a problem on a computer is the monitor control panel. There are not always keys for changing the contrast. On some models, the first press of one of the buttons (decrease or increase brightness) allows you to change the brightness, and the second press will display the contrast adjustment slider. The desired parameter can also be adjusted in the monitor menu.
Adjusting the screen contrast
To adjust the contrast, 2 images of identical shirts of different colors can help: one shirt is black and the other is white. The main thing is that the colors are monochromatic. Both images need to be opened and placed next to each other. Now you should move the contrast slider until the folds on both shirts become clearly visible. Once this effect is achieved, you can adjust the brightness a little more. At this point, the process of completing the brightness and contrast adjustments can be considered complete. The white color obtained as a result of these manipulations may differ from the monitor settings that were set by default at the time of purchase. However, experts say that this is just an optical illusion caused by the eye getting used to the original values.
Video card settings
Computer owners are less likely to change image settings than laptop and netbook users. The keyboard of the latter contains keys for quickly changing only the brightness, adjusting the contrast on a laptop and computer, you need to do it through the application that comes with the drivers for the graphics subsystem of the portable device. Let's look at the example of video cards from the most popular developers.
nVidia
When using a GeForce graphics accelerator and Nvidia Control Panel installed (an application that comes with the video card driver), changing the contrast is easy. If you do not find such a program, download the graphics driver from the official website and reinstall it. https://www.nvidia.ru/Download/index.aspx?lang=ru
1. Open the desktop context menu and select “Nvidia Control Panel” or double-click the application icon in the tray.
2. On the left side of the menu, expand the “Display” branch and go to the “Adjust desktop color settings” subsection.
3. Move the switch to the “Use Nvidia settings” position.
4. Use the slider to set the optimal value and save the settings.
Radeon
1. On your desktop, right-click and select “AMD Radeon Settings” from the drop-down menu.
2. In the app, visit the Display tab.
3. On the right under the window control buttons, click the “Color” link.
4. Adjust contrast and other indicators if necessary. There is no need to save changes.
On the right is a color palette and a sample of ideal gray for reference. For greater accuracy, use the Windows 10 color calibration tool.
1. Open Settings (Win + R key combination).
2. Visit the "System" section.
3. In the “Display” subsection, scroll down to the bottom of the window and click “Advanced options...”.
4. In the next window, select the desired display, if you have several of them, and click on the “Video adapter properties...” link.
5. In the new window, switch to the “Color Management” tab, and click on the button with the same name.
6. Switch to the “Details” tab, go down, and click on “Calibrate screen”.
7. Follow the instructions and advice of the wizard, skipping unnecessary steps (brightness, gamma calibration).
What to do if the screen is flickering
Frequent screen flickering in Windows 10 can be caused by two problems:
- using outdated video adapter drivers;
- incompatibility of the software application installed on the computer and system requirements.
The problem does not occur as often as it did when Windows 10 first began to spread.
This is due to the fact that the main companies that produce components for computers have brought their software applications to the required parameters. On those computers with video adapters manufactured 6-7 years ago, incompatibility may occur, since their drivers were not developed taking into account modern requirements.
To resolve the error, you need to find out whether the driver or software application is the source that creates the screen flickering. To solve the problem and restore normal operation of the screen and video adapter, you must use the following method:
- Right-click on the “Taskbar”.
- Click on the “Task Manager” line. In the menu, click on the line “Task Manager”
- Check for blinking in the Task Manager panel. If the panel blinks along with the screen, then the reason is the old video adapter driver. If this does not happen, then the reason is in one of the installed software applications. Check for blinking Task Manager panel
- Double-click the “Control Panel” icon on the “Desktop”. On the “Desktop”, double-click on the “Control Panel” icon
- Click on the “Administrative Tools” icon in the “All Control Panel Items” window. Click on the “Administration” icon
- Double-click Computer Management in the Administrative Tools window. Double-click on “Computer Management”
- Expand the Event Viewer tab in the Computer Management window. Expand the Event Viewer tab
- Expand the Windows Logs tab. Expand the Windows Logs directory
- Check the Application and System tabs for errors.
- If a software application compatibility error is detected in the “Application” tab, then remove it. Then download the latest version of the application from the developer’s website and install it on your hard drive. Click on the Application tab and check for errors
- If an error in the “System” tab indicates that an updated video adapter driver is needed, then perform the same operations as for the software application to replace it. Click on the "System" tab and check for errors
Video: how to update video adapter drivers in Windows 10
Special abilities
People with vision problems may require a special picture mode.
1. Open Settings using the Win + I keyboard shortcut and open Accessibility.
2. Go to the “High Contrast” subsection, move the switch at the top to the “On” mode, where in the drop-down list select the appropriate mode, and click “Apply”.
If necessary, change the colors of the main interface elements and apply the configuration.
Third-party utilities, such as Display Tuner, MyMonic, Monitor Plus and their analogues, can also be used to solve the problem. Almost all monitors come with software that allows you to adjust all picture parameters. These same programs have a setup wizard that will help you make the picture optimal.
Source
Calibration with third-party programs
Not everyone can be satisfied with both the convenience of the tool built into Windows 10 and the result of its work, so we will consider several third-party solutions.
Adobe Gamma
The best monitor calibration tool for users working with Adobe products.
1. Launch the application and select Step by Step.
2. Name the profile you are creating.
3. Using monitor adjustments, achieve the optimal level of brightness and contrast. A sample will help with this.
4. Select a display light profile.
5. Adjust the gamma to create an eye-friendly brightness for the midtones (grays). The value will be within 2.20 ± 0.2.
6. Decide on color temperature, which Windows 10 does not allow. The parameter depends on the external lighting. When backlit with fluorescent lamps, you should choose 9500 0 K, with natural light - 6500 0 K.
7. To visually select the color temperature, click “Measure” and select a satisfactory option.
8. The final step is to set the white point value, but it is not required.
To switch profiles, run the utility in the form of a control panel.
There are many similar programs: Cltest, TFT Test, Atrise Software LUTCurve, QuickGamma. They have a larger set of tools and capabilities, making calibration more accurate, but also more difficult. The average user is unlikely to need their functionality.
Using High Contrast Mode in Windows 10
This article walks you through how to enable High Contrast mode and create your own High Contrast theme.
Users with low vision may find it difficult to read text with low contrast. There are websites that have bad color combinations, such as blue links on a black background. They cannot be read even by non-visually impaired users and may be virtually inaccessible to people with visual impairments. High contrast colors make reading on your computer faster and easier.
Turn High Contrast Mode On or Off
Click the Start button, and then select Settings > Accessibility > High Contrast.
To enable high contrast mode, use the switch under Enable high contrast. Windows may display a “Please wait a moment and the screen color will change.
From the Select Theme drop-down menu, select the theme that works best for you.
To turn off High Contrast mode, use the switch under Enable High Contrast again. Windows may display the “Please wait a moment” screen again, after which the screen colors will be restored to default.
Tip: To quickly turn High Contrast mode on or off, press Left Alt + Left SHIFT + PRINT SCREEN (Print Scrn on some keyboards).
Colors
To enable the new light theme in Windows 10, follow these steps:
- Open Settings.
- Click on "Personalization".
- Click on "Colors".
- Use the Color Picker drop-down menu and select the Light option.
After completing these steps, Windows 10 apps and elements, including the Settings app, Taskbar, Action Center, flyout menus, and other visual elements, will switch to a light color scheme.
Additionally, you can also enable the lighting color scheme using the Themes settings by following these steps:
- Open Settings.
- Click on "Themes".
- Select the "Windows (Light)" theme.
After completing these steps, your desktop background will change to the default system wallpaper, and your applications and desktop environment will change to a light color scheme.
Create your own high contrast theme
If none of the default themes suits you, you can customize the colors of various screen elements. For example, if you have a certain form of color blindness, you can change the corresponding colors.
After selecting a theme, select one of the colored rectangles from the Select Theme drop-down menu. You can change the color of the following screen elements.
Text: Almost all text displayed in Windows or on a web page, for example.
Hyperlinks: All hyperlinks displayed in Windows or on a web page, for example.
Disabled text: Text that is not normally active, such as when a particular option or button cannot be selected.
Selected Text: Any selected menu item or option. For example, the alignment of a selected paragraph in Word is indicated by this color on the tool ribbon.
Button Text: The text on all buttons that contain text.
Background: The background of almost any text displayed in Windows or on a web page, for example.
Adjusting Windows 10 Monitor Colors
You can adjust screen colors in the interface of the monitor itself or directly in Windows 10. If the image settings in different monitors are slightly different, then the monitor color settings in the operating system do not change. The user has the opportunity to adjust brightness, hue, contrast, saturation and even color temperature in the video card driver program.
This article will tell you how to adjust monitor colors in Windows 10. The question here is how to choose the right monitor colors so that the image looks like a real one. You can customize your monitor colors in several ways, from graphics card driver software to the monitor calibration tool in Windows 10.
How to change monitor resolution
Often, liquid crystal matrices are designed to work with a certain monitor resolution. The exact number is written in the “passport” for your laptop. It is possible to violate this value, but this will lead to image errors.
After all steps are completed, save the settings. The screen resolution will change automatically after closing the windows.
If the selected parameters still cause inconvenience in operation, you should test the functionality of your device.
Testing a laptop screen at home
Thanks to modern monitor production, equipment testing can be carried out at home. The process should begin by checking the application of the gray tint. When performing testing, you need to pay attention to brightness, contrast and color gamut.
Next, download special wallpapers to your laptop and install the image on your desktop screensaver. Maintain a normal distance from the screen and look carefully at the monitor. You should see a single-color gradient, not multi-colored stripes.
If stripes are still visible on the screen, then calibration is necessary. Use the Atrise Lutcurve program. Run the file and click on the “Gamma” line.
Show color gamut should not be higher than 1.8. Next, make sure that the square located on the left does not differ from the black background. To do this, change the brightness level. The “White Point” indicators must be reduced to 20, and the “All Cintrols” indicators must be set so that the squares acquire a gray tint.
You will see the test results immediately. The only downside to this program is the cost. However, there are several analogues, for example, the proven CLTest.
If home testing doesn't solve your problem, it's time to seek professional help.
Let us remind you that these are just basic monitor settings. There are a huge variety of programs for people who need special screen options.
How to properly adjust colors on your monitor
By default, on expensive monitors the image is already very decent and does not require additional settings. If the picture is not suitable for the user, then you can proceed to independent settings in the interface of the monitor itself. Additionally, you can change color settings in the operating system itself.
It is recommended to adjust the picture on the monitor so that it matches the colors of a sheet of blank paper in a room with normal lighting. It is really difficult to make such fine tuning, and in some cases it is not possible at all. In this case, you can use the operating system itself to calibrate colors.
Adjusting monitor colors
The operating system itself uses software to adjust the colors of the monitor so that the graphics adapter works correctly. Before adjusting the image, we recommend updating your video card drivers on Windows 10. After installing the latest updates, you can proceed to adjusting the monitor colors yourself. You also need to make sure that the correct screen resolution is set on Windows 10.
NVIDIA Control Panel
Through the NVIDIA Control Panel, you can adjust desktop color settings for displays or improve image quality if you are using a TV. Go to Display > Adjust Desktop Color Settings , and select Use NVIDIA Settings .
After which brightness, contrast, gamma, digital intensity and hue will become available for change. Very high or low brightness and contrast settings can limit the available gamma range.
Adjusting the video color settings will allow you to select the optimal video image settings on your display. It is recommended that you play the video while making adjustments to see the settings changes in action. Just go to the Video section > Adjust color settings for video , and choose how to make color adjustments With NVIDIA settings .
Radeon Settings
In the Radeon settings everything is much simpler. Adjusting display colors includes basic color parameters such as brightness and contrast. The user just needs to go to the Display > Color .
In your current layout, you can adjust your monitor's colors by changing the Brightness, Hue, Contrast, and Saturation settings. If necessary, it is never too late to restore all default values by performing a factory reset.
Adjusting screen brightness
Surely many have noticed that the monitors standing on the stand in the store have visually different images.
On one it is dimmer, and on the other, on the contrary, it is too bright. This is due to different color settings for each individual device. If the buyer is not satisfied with the default color settings of the monitor, he can change them. To do this, you need to click the button called Menu and in the panel that appears, select the Picture value, where the brightness and contrast settings are located with the adjustment sliders located to the right of them. It is worth noting that for different models and manufacturers the names of these parameters may vary or even be marked with schematic figures, but the general meaning is always clear to the end user. After finding the desired settings, you need to take a blank white sheet of paper, place it in front of the monitor, create a regular blank document using the Notepad program and compare the color of the sheet of paper with the white background of the document in the program. This procedure is carried out to evaluate and subsequently adjust the white color of the monitor. Next, for the slider responsible for the brightness of the picture, you need to find a position so that the white color on the monitor matches the white color of the sheet of paper on the table.
How to calibrate your monitor in Windows 10
The user can improve the color quality of the monitor using the color calibration tool. Follow the steps in the monitor color calibration tool to adjust gamma, brightness, contrast, and color balance.
Using the updated search, find and open the Monitor color calibration . If multiple monitors are connected, then move the calibration window to the screen that needs calibration.
Once completed, you can save the calibration results or continue to use previous calibrations. It is possible to compare the results by choosing between the current and previous calibrations.
Users need to adjust the colors of images on the monitor to suit themselves, since the perception of colors by different people may differ. Using the operating system, you can adjust monitor brightness, color saturation, and screen contrast in Windows 10. Applications for managing video card settings also allow you to adjust the monitor image.
Source
Performing monitor settings
Step 1.
Light levels are adjusted to determine whether the operating screen is clean and should not be exposed to strong direct light. In this case, the room should be dim, which does not allow diffuse light to interfere with the image. If there are visible images on the screen, it must be thoroughly cleaned before calibration begins.
Step 2.
The computer screen resolution is being checked. When using an LCD monitor, refer to the manual to determine the required resolution. For other types of monitors used, the most accessible and high resolution is selected, with the help of which you can comfortably read text and view the resulting images.
Step 3.
The maximum number of required colors is adjusted. Color depth is the number of bits used to accurately determine the color of the working pixels along with their components. The maximum permissible color depth is limited by the monitor, the current video card and the operating system. Currently, 32 bits is recognized as the highest value.
To adjust the depth and number of required colors, perform the following steps:
In Windows: Click on your computer desktop and select Properties. In Windows 7, go to the “Adapter” item, and then “List of operating modes”.
On MacOS: Open System Preferences and select Display. Some Mac systems in use do not have these options, but operate at 24-bit color depth.
How to increase color saturation on a laptop
Good day!
Despite the fact that a laptop screen has much fewer parameters that can be changed (compared to a regular classic monitor), it is still better to pay attention to something.
For example, if the resolution is set incorrectly, the image will be of poor quality, with low clarity. That is, we will spend more time on solving certain problems, because... you need to “look closely”. In addition, “such” pictures on the screen quickly begin to tire your eyes (especially when reading and working with small details).
In general, what prompted me to write this article was one of these cases: an acquaintance showed his vacation photos on his laptop. Everything would be fine, but the picture on the screen was somehow “cute” and not clear. At first I thought that the quality of the photo was poor, but as it turned out, the problem was the lack of resolution and calibration.
But more on everything below.
Testing Color Rendering Using Real Color
There is another remedy that is considered a reference in certain circles. These are special Real Color wallpapers that bear some resemblance to the tuning grids once used on televisions. When using this method, special wallpapers with the optimal resolution for a computer or laptop are installed on the desktop. By looking at the screen from a normal distance, you can determine whether the color rendition is calibrated correctly. If the settings are correct, a smooth gray gradient should be visible, but if stripes appear and shades mix, it means the color is set incorrectly.
To summarize, we can say that adjusting the monitor color is a rather painstaking task and depends on many factors. Therefore, for each individual case, its own parameters must be applied to meet specific needs. But in order not to be scattered among many different methods, you need to do this: for quick setup, use the built-in system parameters, and for a more complex task, you can resort to third-party applications.
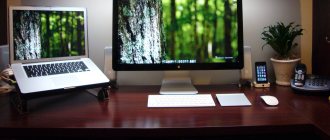
A properly configured monitor screen is the key to successful and productive work with a laptop. Optimal monitor setup begins with adjusting the basic components.
How to set up your laptop screen correctly
Resolution and scaling
Resolution is the number of dots that “draw” the picture on the screen. Monitors with the same diagonal may have a different number of these dots! (many people simply confuse diagonal with resolution)
What is diagonal and how to measure it
Those. a 15.6-inch laptop, for example, can have a resolution of both 1366x768 and 1920x1080. The higher the resolution (with a constant diagonal), the clearer (and smaller) the image on the screen. Well, so that the picture on the monitor is not completely “small” at high resolution, Windows has a special one. “scaling”, which increases the size of elements and text (proportionally).
Therefore, it is very important to set the screen resolution and scaling correctly!
The most popular resolution options today are 1920x1080 (FullHD), 1366x768 (laptops with a 15.6-inch screen), 1600x1200, 1280x1024, 1024x768.
How to open the resolution setting in different versions of Windows
Selecting resolution and scaling
By the way, if the recommended resolution is not indicated in Windows, you can try a small experiment - check all the available resolutions and compare the image quality.
There is also a special utilities for viewing computer characteristics - you can find out the parameters of your display in them (see screenshot below, using AIDA as an example).
How to find out the recommended resolution
By the way, when you have drivers installed on your video card, there will be a link to their control panel in the tray (and Windows control panel).
If you do not have such a link, most likely you simply do not have (or are not updated) drivers for your video card. I indicated the best utilities for auto-searching and updating drivers in this article: https://ocomp.info/update-drivers.html
Intel Graphics Settings
Preparing your environment
Regardless of which calibration technique you use, to ensure your monitor displays colors consistently, your work environment should be dim, but not necessarily dark. The goal is twofold: first, to ensure that the monitor does not reflect glare from any light sources, such as a window, overhead light, or desk lamp; and second, your environment creates uniform ambient lighting throughout the workday.
It's also important to keep your display as clean as possible. Yes, I know monitors don't stay clean for more than a day or two, but the slightest dust or film on the screen changes the quality of the colors displayed.
It is also important to turn on the monitor and let it warm up for 20-30 minutes to bring it to normal operating temperature. (Be sure to disable power management settings, which may put it to sleep after short periods of inactivity)
Then set your monitor's resolution to its PPI, which is usually the highest value.
How to properly adjust colors on your monitor
By default, on expensive monitors the image is already very decent and does not require additional settings. If the picture is not suitable for the user, then you can proceed to independent settings in the interface of the monitor itself. Additionally, you can change color settings in the operating system itself.
It is recommended to adjust the picture on the monitor so that it matches the colors of a sheet of blank paper in a room with normal lighting. It is really difficult to make such fine tuning, and in some cases it is not possible at all. In this case, you can use the operating system itself to calibrate colors.
Screen calibration methods
There are two approaches to display calibration - hardware and software. The most accessible method for the average user is the software calibration method.
Software calibration, as a rule, does not allow one to reach the level of hardware calibration, but this method should not be neglected.
The hardware method is more expensive both in terms of money and the qualifications of the person performing the calibration. The hardware approach can be divided into 3 key stages:
- The monitor is adjusted (color, brightness, contrast) in such a way that in the adjusted position it meets the requirements of the equipment (spectrophotometer and calibration software).
- Configuring the video card for linear operation mode.
- Testing the system and saving the changed settings to the monitor color profile.
Advice! For simplified hardware calibration, you can print the image on a color printer, and then change the display parameters to achieve maximum similarity between the digital and printed image.
Adjusting monitor colors
The operating system itself uses software to adjust the colors of the monitor so that the graphics adapter works correctly. Before adjusting the image, we recommend updating your video card drivers on Windows 10. After installing the latest updates, you can proceed to adjusting the monitor colors yourself. You also need to make sure that the correct screen resolution is set on Windows 10.
NVIDIA Control Panel
Through the NVIDIA Control Panel, you can adjust desktop color settings for displays or improve image quality if you are using a TV. Go to Display > Adjust Desktop Color Settings , and select Use NVIDIA Settings .
After which brightness, contrast, gamma, digital intensity and hue will become available for change. Very high or low brightness and contrast settings can limit the available gamma range.
Adjusting the video color settings will allow you to select the optimal video image settings on your display. It is recommended that you play the video while making adjustments to see the settings changes in action. Just go to the Video section > Adjust color settings for video , and choose how to make color adjustments With NVIDIA settings .
Radeon Settings
In the Radeon settings everything is much simpler. Adjusting display colors includes basic color parameters such as brightness and contrast. The user just needs to go to the Display > Color .
How to make the desktop full screen in Windows 10?
using the right mouse button, go to the desktop settings; find “Display options”, go to the settings menu; in the “Resolution” line, select a value at which the desktop image fills the entire screen, without black frames and bars.
Interesting materials:
How to find out how many bit system a processor supports? How to find out how many cores a laptop has? How to find out how many kilovolts are in a power line? How to find out how much ink is left in the printer? How to find out how many Life payments are left? How to find out what percentage is on Apple Pencil 1? How to find out how many songs you have in iTunes? How to find out how many participants are in the tender? How to find out how much a generator produces? How to find out the hidden pool in Dota?
How to calibrate your monitor in Windows 10
The user can improve the color quality of the monitor using the color calibration tool. Follow the steps in the monitor color calibration tool to adjust gamma, brightness, contrast, and color balance.
Using the updated search, find and open the Monitor color calibration . If multiple monitors are connected, then move the calibration window to the screen that needs calibration.
Once completed, you can save the calibration results or continue to use previous calibrations. It is possible to compare the results by choosing between the current and previous calibrations.
Users need to adjust the colors of images on the monitor to suit themselves, since the perception of colors by different people may differ. Using the operating system, you can adjust monitor brightness, color saturation, and screen contrast in Windows 10. Applications for managing video card settings also allow you to adjust the monitor image.
Parameters such as the brightness and contrast of the monitor or display are paramount when choosing a laptop. If they are accompanied by excellent characteristics, then this favors comfortable reading and quick completion of all assigned tasks.
The brightness and contrast of the laptop are very easy to adjust
Otherwise, very rapid eye fatigue occurs, pain, lacrimation and other undesirable consequences appear. However, you can adjust the brightness of the monitor yourself, using practical advice from experienced users on how to adjust the brightness of the monitor.
Calibrating your monitor for photo printing and graphics work
How to get the best results
To get a really good image, where black is black (not dark gray), white is white, and color does not depend on the angle of rotation of the screen, you need a professional monitor. Photographers and graphic artists prefer screens with an IPS matrix (the best option is S-IPS).
On budget monitors with TN-type matrices, it is, alas, impossible to achieve high accuracy of shades and colors. And the point is not that the programs do not allow this, but in the qualities of the screen itself. But we will work with what we have.
So, let's start with preparing the workplace:
Adobe Gamma
Using Adobe Gamma, monitors are calibrated for working in Photoshop. Since the applications were created by a single developer, they are optimal for sharing - profiles created in Gamma are displayed in the Photoshop menu, and the user can quickly switch between them.
The utility is included with Photoshop, but if desired, it can be downloaded separately, although not from the official website (it is not there), but from third-party resources. It does not require installation, you just need to run it.
If you are calibrating for the first time, select the Step by Step version.
Next, we’ll create a description of the new profile (in Latin letters).
Next we move on to the calibration process. Using the monitor settings menu, we will adjust the brightness and contrast so that the gray square in the center of the window almost merges with the black one, but is distinguishable against its background. The frame should remain white.
The next step is to determine the type of glow (color of the phosphor). The required value can be taken from the monitor’s factory profile (it will be set by default if you have not previously changed anything in the settings). If you are at a loss, leave “Native” or “HDTV (CCIR 709)”.
Now let's set up the gamma for correct color rendering (the ratio of red, green and blue channels). Using the slider, we will align the brightness of the gray square against the background of black and white stripes, or set one of the default values. For an LCD monitor it is better to choose 1.8, for a CRT - 2.2.
If you uncheck the "Consider one gamut" checkbox, instead of a gray square there will be three - red, green and blue, with separate adjustment tools. With their help, you can remove the color tint of the screen, if any. If not, it’s better not to touch them.
After adjusting the gamma, we will determine the color temperature of the monitor’s white point. This setting depends on the ambient lighting. To work in daylight, it is optimal to set 6500° K, for artificial heat (incandescent lamps) - 5000° K, for artificial white heat (fluorescent lamps) - 9300° K.
To determine the color temperature visually, click the “Change” button.
Three light squares will be displayed against a dark background. Your task is to choose the most neutral gray.
At the final stage, set the white point display as a hardware value and save the profile.
To quickly edit existing profiles, it is more convenient to open the program as a control panel. Here all the settings are in one window.
Adjustment algorithm
There are several options to solve this problem. Moreover, each option is available for understanding the sequence of actions and is unlikely to provoke additional questions in you related to misunderstanding of individual steps.
In general, everything, even outdated laptop models, are configured to average such parameters.
In addition, you may encounter a situation where your modern laptop will be able to independently adjust the brightness and contrast settings.
Indeed, modern manufacturers equip some computer units with such functionality. In this case, as the light in the room increases, the brightness on the laptop automatically decreases. In the same way, on the contrary, when the illumination decreases, the laptop is able to increase the brightness itself to provide the user with comfortable working conditions even for a long time.
If you do not own such modern technology, but are content with slightly outdated models that are not accompanied by such functions, you can still intervene in the process of adjusting brightness and contrast, providing yourself with conditions under which your eyes will not experience strain.
Before starting to directly study the recommendations on how to increase the brightness of the monitor, each user must understand that such a setting directly affects the battery charge state.
The higher the brightness, the faster the laptop will discharge
The higher the brightness, the faster the battery will discharge. In this regard, if you are beyond the reach of recharging the laptop from the mains, on the contrary, it is recommended to reduce the brightness and contrast settings.
Adjustment via OS
The operating system itself contains unique capabilities, using which you can adjust the brightness and contrast settings.
At the same time, you can set completely different parameters when operating the laptop from the mains, as well as exclusively from the battery.
This setting is equally suitable for any laptop, regardless of what technical parameters and resources it has.
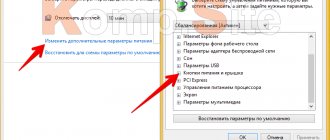
Initially, launch the “Control Panel”, in the window that opens, find the “Power Options” option, click on it.
A window will now open containing tools that will allow you to successfully configure the display settings, either increasing or decreasing the brightness.
You don't have to do anything difficult. Simply drag the slider to the right or left, thereby adding or decreasing parameters. By the way, you will immediately be able to visually observe all these changes. If you agree with them, simply complete your actions.
Adjusting brightness in the Power section
In the same window, you can configure the laptop for the actions that the display should perform under different operating conditions of the laptop.
Adjustment via interface
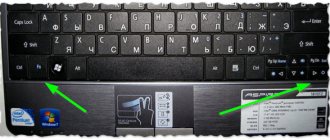
Modern manufacturers are trying to expand user capabilities, so they equip the keyboard with special functional buttons.
In particular, adjusting the brightness and contrast of the monitor can be done by simultaneously pressing two buttons, one of which is Fn. This button is in most cases located at the bottom of the keyboard.
The second button on different models may be different, but its main landmark is, in addition to the main inscription, the presence of an icon with a picture of a sun.
It is important to understand that there should be two buttons with the image of the sun. One is aimed at increasing brightness, and the second helps to reduce it.
Sun buttons allow you to adjust brightness
Often these additional buttons are arrow keys, which are located between the main keyboard and the numeric keyboard.
Having used these methods at least once, you will understand not only how to reduce the brightness of the monitor, but also that such actions are not accompanied by difficulties.
Brightness, contrast and color settings
In addition to resolution and scaling, in the appropriate programs you can adjust the brightness of the laptop screen, contrast, color and other parameters that were already mentioned above. In the Settings
"The following settings will be available to you:
- Adjust the brightness level.
You can also use keyboard shortcuts to change settings:
- ASUS
laptops - Fn + F5 (zoom out) and F6 (zoom in).
In Lenovo
- Fn + Home (decrease) and End (increase). - ASUS
- In Acer
- Fn + left arrow (decrease) and right arrow (increase). - In HP
- Fn + buttons with the image of the sun and, accordingly, an arrow direction (up and down). - Night light. This function allows you to reduce the level of blue light and make the screen glow softer. It has its own setting - intensity level. A scheduler is also available.
- Windows HD Color. A special function that allows you to make colors more saturated and deep.
- Graphics settings. An additional setting that allows you to change graphics performance for individual applications.