There have been no problems with setting up the Internet and MMS for a long time. Only old phones, varying in complexity, equipment and internal design, were plagued by such problems. However, some subscribers still experience difficulties using these services. Let's see how to request MMS settings on Yota and set up the Internet. Our tips will be useful for those who use old phones, as well as those whose modern smartphone for some reason does not accept automatic settings.
Receiving automatic settings
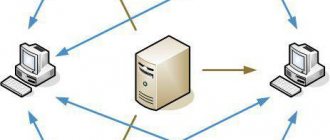
Modern mobile phones and smartphones have the ability to automatically accept MMS and Internet settings, including from the Yota operator. And in some devices the necessary data is included at the manufacturer’s factory. Due to this, users get rid of unnecessary problems - the purchased device will independently configure itself to work with the Internet and MMS from Yota, just install a SIM card in it and wait a little.
Automatic Internet settings from Yota come in the following cases:
- When you install a SIM card in a new phone, you don’t even have to think about their availability, feel free to start using the services;
- When reinstalling a SIM card from one device to another and vice versa, this operation is perceived by phones, smartphones and tablets as installing a new SIM card.
But you won’t be able to get Yota Internet settings on your phone - there are no commands for ordering and then receiving automatic settings . But it doesn’t matter, we will teach you how to properly configure subscriber devices to access network services.
Yota changes in 2021
This year greeted us with a lot of positive news from the eta company. The most important news is a large replenishment of social networks and other Internet services with unlimited access. However, the main surprise was the return of true unlimited tariffs!
But all the old holders of previously purchased Sim cards were not worried. They remained on the old, unlimited tariff plans.
New subscribers can take advantage of unlimited traffic in new unlimited options. Covered in detail and widely in our article - How to properly connect unlimited applications.
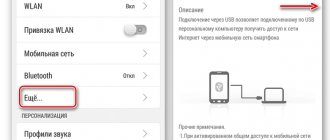
Manual settings for Google Android devices
The Yota Internet settings in Android phones are made as follows: go to “Settings – More – Mobile network – Access points (APN)”, in the menu that opens to our eyes, select the line “Change/create an access point”, give the point an arbitrary name and enter the item “ APN" – internet.yota. Leave the “Login” and “Password” fields empty, and select default,supl in the “APN Type” field.
Now we reboot the device, enable data transfer through the top menu and go online . MMS on Yota is configured in a similar way - we go to the same section and add another access point. In the "APN" field we enter the value mms.yota, in the "MMSC" field - https://mmsc:8002, in the "Proxy MMS" field - 10.10.10.10, in the "Port" field - 8080, in the "APN Type" field - mms. Now everything is ready - reboot, turn on mobile data transfer and receive MMS.
Internet and MMS settings from Yota on Android in different versions of Google's operating system remain the same - the names of menu items may change slightly.
Setup problems and solutions
From the outside it may seem that making settings on a mobile device is very simple, but this is not always the case.
Sometimes the following problems may occur:
- “Authentication type” takes the status “not set”. To solve this problem, you need to set it to "No".
- Automatic installation does not occur. To resolve this, you need to turn on the mobile Internet and turn off WI-FI.
- There is an automatic disconnection from the access point. You can solve this problem by rebooting the device. In addition, you need to connect by selecting the “2G networks only” option.
Setting up mobile devices from Apple
In devices on iOS 6.XX, in the “Cellular Data” section, slide the “Enable 3G” switch, and in devices on iOS 7+/8 you need to enable LTE in the same way. The next step is to specify the access point. In iOS 6, go to the menu “Settings – General – Cellular data network” and specify the value “internet.yota” in “APN”. On devices running iOS 7 and higher, this item is located in the “Settings – Cellular – Cellular Data” menu.
We do not touch the remaining fields, since we do not need them . We reboot the device and try to access the World Wide Web. MMS settings on Yota are entered in the menu “Settings – Cellular – Enable Cellular Data – Cellular Data Network – MMS”. We enter the following parameters here:
- APN – point mms.yota is indicated;
- MMSC – enter the address https://mmsc:8002;
- MMS proxy – specify the IP address and port separated by a colon, 10.10.10.10:8080.
We do not touch the remaining fields and leave them empty. After that, we reboot, enable data transfer, and try to send MMS.
Setting up a Yota tariff plan
To facilitate setting up Yota and expand the capabilities of working with a tariff plan, the Yota company has released a special application called “Mobile Operator for Android”. With its help, users of this mobile network can:
- Customize the tariff plan for yourself, indicating the number of SMS messages and minutes available to the subscriber per month;
- Link a bank card and top up your account online;
- Control Internet traffic consumption;
- Chat with technical support representatives to receive instant assistance on a particular issue.
This software product is available in the Play Market, as well as on third-party resources (for example, on the website 4pda.ru). Where to install it from is up to you.
We strongly recommend: How to speed up the Internet on Android: simple and effective tips.
Setting up mobile devices on Windows Phone
We just have to figure out how to activate MMS and Internet settings on Yota in devices on the rare Windows Phone mobile platform. Let's start with the Internet - go to “Settings - Access point - Add access point”, enter the value internet.yota in this menu. We save the entered data, wait for the “Active” status to be received, and send the device to reboot . Now you can try to access the World Wide Web.
But the MMS settings are located in a different place - go to “Settings – Cellular network + SIM – SIM card settings – Change/Add access point” and enter the following settings here:
- Access point – enter the value mms.yota;
- WAP gateway – specify the IP address 10.10.10.10;
- WAP gateway port – port number 8080;
- MMS center – enter https://mmsc/ here;
- MMS center port – port number 8002.
Now you can try to send an MMS. If the MMS is not sent, try rebooting the device.
Pay attention to your SIM card - in order to access 4G networks, you need a card with a USIM chip. If your device does not register on 4G networks, contact your operator's service office to replace the SIM card.
2/5 — (1 vote)
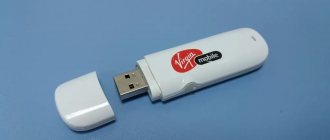
Setting up the Internet for modems
Yota's latest products include a variety of routers aimed at meeting all the Internet needs of subscribers. So, there are models designed to provide one device. Others are creating a zone within which those who have access to the password access the network from the device they are interested in.
Yota Internet settings are independently installed on the device, as a result of which users are freed from the tedious search for drivers and other software. After connecting the router to your PC or laptop for the first time, all necessary components will be installed autonomously.
The subscriber himself will only be required to fill in his personal data in the account of the manufacturers’ website. The site will open itself the first time you start the Internet. Happy owners of a 4G modem are required to fill in the appropriate fields with information about the wireless resource (name and password).
The profile connection is completed with SMS confirmation. This process involves sending a verification code to the phone number that the subscriber specified during registration. The received answer can only be entered into the section that opens, and then the user will receive unlimited Internet access (according to the terms of the selected tariff plan).
Connection on your phone
Great! The SIM card has been purchased, and now it needs to be installed and configured correctly - this is easier than connecting a Yota modem. The new subscriber should insert the card into the appropriate slot of the Android or iOS phone by pulling out or opening the tray and following the guides; the chip must be pressed against the contacts of the device. Now all that remains is to turn on the smartphone, wait for the operating system to load and the SIM card to initialize - this happens automatically within a few minutes.
If the SIM card from Yota is not recognized or, if there are two slots, is not displayed in the notification shade, you will need:
- Open the “Settings” of the system (using Android as an example; the manipulations for iPhone are similar to those described below) and go to the “Connections” section.
- Next, go to the “SIM Card Manager” subsection.
- And make sure that the slot in which the Yota SIM card is installed is active.
- If this is not the case, tap on the title and, once in the slot settings, move the slider to the “Enabled” position.
- Wait until the SIM card is recognized in the operator’s network.
- And, seeing that the slider field has turned blue (or any other color other than gray), get to work.
Advice: if there are interruptions in the Internet from Yota, you should repeat the same steps one or more times - turn off and turn on the SIM card slot. Next, the user will need to activate the Yota SIM card and begin setting up an Internet connection.
How to set up Yota Internet on a laptop (computer)
The last question that we planned to consider concerns the procedure for setting up Iota mobile Internet on computers and laptops. It is no secret that modems and routers from this operator are in great demand among users of personal and laptop computers, so this situation also requires consideration.
Fortunately, everything here is almost easier than in the case of mobile devices. To set up an Internet connection, you must do the following:
- Install the modem you are using into any USB port on your computer.
- Wait for the automatic installation of drivers into the system, which will be copied to the system in silent mode. To do this, you don’t need to do anything, you just need to be patient, because the procedure for copying drivers may take several minutes.
- After installing the drivers into the system, the Internet connection will be made automatically.
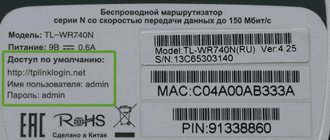
- Open a web browser and go to my.yota.ru.
- Log in to your personal account and set up a tariff plan (instructions for registering in your personal account are here).
- Save all changes and leave your personal account.
After completing the described steps, the setup procedure will be completed, and the next time the modem is connected to the computer, the connection will be made automatically.
When is parameter adjustment required?
Possible reasons when automatic Iota settings do not work:
- The SIM card is not activated in the same region where it was purchased.
- The device does not support the following networks: 2G, 3G, 4G, LTE.
- The subject of the Federation is located outside the service area of the provider.
- Data transmission via the Wi-Fi communication channel is activated.
- The information entered for the access point is incorrect.
If the first four points are met, all that remains is to check the Iota Internet settings in the device.
How to install the official application
The installed application may be needed not only for activation, but also for setting up a Yota tariff for a smartphone and quick access to support service. You can download the application from the branded stores of the main three operating systems - Windows Phone Store, Google Play or App Store. Devices with rare or outdated OS will not be able to use the official application.
After installing and launching the application, the subscriber will be authorized automatically or the utility will provide prompts that will help you activate the SIM card.
Rules for distributing wi-fi from a phone
Internet distribution from your phone via a wireless network is not available. The company blocks this feature, no matter how the access point is configured on the phone.
You can distribute the Internet only after purchasing branded routers and modems.
Advanced users can download special applications that require root access.
Setting up the Internet of the Yota operator will not take a long time. Even inexperienced device users can handle it.
What to do?
Iota provides subscribers with the opportunity to solve emerging problems in the following ways:
- contacting technical support via SMS or calling 0999;
- using online chat (login to the official website of the operator yota.ru>);
- by calling the hotline at 8-800-550-00-07;
- through the company’s official website (using the feedback form);
- by letter to an email address;
- by contacting the company's sales office nearest to your place of residence.
The fastest way to set up data transfer via mobile communications is to manually set up the Internet settings for the Yota network.
Bypass operator functionality limitations
Most often, restrictions on the use of a smartphone as an access point are carried out by the operator by editing special TTL packages. On the Internet or Play Market you can find a special class of programs that can bypass the ban on distributing Internet traffic. The user must have root superuser rights to use such software.
Some of the popular and proven programs are TTL Editor and Normal tethering unlocker. They help unlock the ability to use your smartphone as an access point in normal mode without restrictions: download files or watch high-quality video content.
Setting up Iota Internet on Android is easy. Even an inexperienced person can cope with this. In a similar manner to the Internet and MMS, SMS is configured, which is required very rarely.
Podgornov Ilya Vladimirovich All articles on our site are audited by a technical consultant. If you have any questions, you can always ask them on his page.
Registration of a SIM card
The first thing to start with is applying for a Yota SIM card. Purchasing it is no more difficult than setting up the Internet on Megafon>;>
- Buy a SIM card at any mobile phone store that cooperates with Yota (for example, at Euroset), or directly at the operator’s office.
- Order a SIM card remotely by going to the official Yota website - yota.ru, leaving your contact number in electronic form and waiting for the operator to call.
Important: in both cases, to obtain a SIM card, you will need to provide a document confirming your identity (passport or international passport), or tell the employee the relevant data. Payment for services is made during the purchase process; The money is credited to your balance immediately after activating the SIM card.
How to get Yota access point settings
Buying a new SIM card or changing a mobile device requires connecting to the network again. In the first case, the procedure is performed in parallel with the activation of the SIM card, in the second - without. In both cases, SMS notifications with parameters for identifying APN Yota are sent to the registered number, which the user of a smartphone or tablet running Android or iOS must accept and save. After these steps, the device will make the correct changes to the menu on its own. This is the ideal situation.
But in 2 out of 10 cases, reconfiguration does not occur. Problems may arise due to network overload, unstable cellular communication (when the subscriber is out of network coverage), accidental deletion of SMS notifications, etc.
Expert opinion
Julia
Employee of the Yota retail outlet.
If you couldn’t set up Internet Yota automatically, you need to enter the data manually. If you accidentally delete an SMS notification, you can request it again from your mobile operator.
You can contact a company representative in the following ways:
- by phone (free for Yota subscribers from anywhere in Russia) 8 (800) 55-00-007;
- via online chat (on the official website in the “Support” section);
- via short SMS number 0999 (sending a message is free).
The necessary data on internet debugging can also be obtained in the F&Q block on the official website of the Yota company.