How to log into a Yota modem or router?!
On most Yota modems and routers, to enter the device’s web interface, simply enter: in the address bar in the browser and press the Enter key.
If that doesn’t work, try logging into your Yota router’s personal account by entering the IP address in your browser - 10.0.0.1:
After this, in a normal scenario, the device’s web interface should open:
Here detailed information about the current connection to the Yota network is displayed: IP address, identifier, radio signal quality, speed and amount of received and sent traffic. Here are some more useful modem interface pages:
- - manual firmware update
- — changing the modem’s network parameters
- - hidden device settings
- — Advanced modem parameters: setting up a DHCP server, port forwarding, etc.
In order to reflash your modem or router, before going to the update page, first do not forget to download the latest firmware version from the official Yota website.
USB 4G modem
The technology for setting up and connecting the other devices described above is the same.
To configure you need:
- Install equipment into the port.
- Go to the Network and Sharing Center, where the new connection should appear.
- Next, you need to open your browser, where you will be automatically directed to the official Yota page. On it, the client needs to fill out a registration form.
- At this point the setup is complete, you can use the Internet.
As for the connection, it starts automatically when the device is inserted into the port. In this case, a small window will appear on the monitor on the right, notifying the user that operation is normal.
In some cases, automatic startup does not work. To do this, you need to connect manually.
- In the “My Computer” folder you need to find the disk image, go to the folder and click on the “Autoinstall” file.
- Then a window will open where you need to select a language and click on the software installation button.
- When the installation is complete, the modem will be detected and ready to use.
Yota modems work with different modern operating systems. If you can’t install and configure the device yourself, you can use the help of a company specialist.
Addresses for logging into the modem/router
To access the configuration page, there are 2 addresses:
- >;
- https://10.0.0.1.
There you can find out complete information about:
- connection status;
- device characteristics;
- Internet speed;
- quality of the received signal;
- traffic consumption.
The interface functions are not limited to this. There are other options for the subscriber to customize the network for himself. This will be discussed in the following sections of the article.
Attention! This module is intended for experienced users.
Registration and Login Process
To use the web interface, you must first register in a profile with new equipment. To enter the Status Yota page you need to do the following:
- Make sure that the device is powered by 220 V.
- Connect to it via Wi-Fi. The name of the wireless network will be written as “yota-XXXX”.
- Go to https://10.0.0.1, where enter the default administrator password - admin.
- Enter the network name, encryption type and new password in the configuration section.
- Next, connect to Wi-Fi again with the updated data.
Now you need to go to yota.ru and activate your personal account.
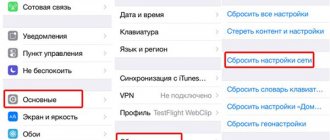
Why there is no access to mobile Internet apn yota
Setting up on a tablet
There are a number of reasons why there may be no connection to the World Wide Web:
- If the signal is unstable (when it appears and then disappears), the operator recommends changing your location. It is necessary to move to another room or move away from iron structures that may affect the signal. It should be remembered that in basements, especially with thick concrete walls, the quality of signal reception deteriorates significantly.
- The complete absence of mobile Internet may be the result of a settings failure, when in the APN column, instead of the internet.yota command, yota.ru or any other name is automatically written. After entering the correct settings, the connection usually appears again.
- Some devices do not support 2G/3G/4G networks, so the Internet from iota does not work on them. These could be old mobile phones or tablets. Models produced in 2015-2016 support the LTE standard.
- If you cannot log into your personal account on the cellular operator’s website, but you can go to any other page, then it is recommended to disable the antivirus and firewall for a while. You can also try using a different browser to log into the official website.
In the most severe cases, when the above methods do not bring results, you can always contact technical support by calling, writing support on the official website or on Twitter.
I would like to note the following point: Iota works on Megafon networks and during the day there is a very heavy load on them. Internet speed can drop from 9 to 22 hours, and at night it can increase significantly. But this is more of a problem in large, densely populated cities. In places where the coverage is good, the Internet from Yota can easily outperform Beeline or MTS. But in populated areas with poor signals or overloaded base stations, one cannot expect a miracle.
What opportunities does your personal account provide?
An individual profile is a multifunctional interface for Iota subscribers. Here they themselves control the costs of calls and Internet, connect and disconnect services.
List of cabinet features:
- checking the balance and replenishing it;
- connecting a payment card to an account;
- viewing and changing the tariff plan;
- enabling automatic payment for uninterrupted replenishment of your Yota account>;
- Internet speed management and testing;
- extension or limitation of the minutes limit;
- contact technical support online;
- receiving details of Yota calls.
New options are regularly added. You need to look at them in the sidebar menu.
Updates
In the Yota settings service, the router firmware is updated simply:
- Select a network connection method.
- Go to eta status;
- Through the “Personalization” section, go to the software page;
- Click Install Software.
Important! At the bottom of the section there is a “Help” tab, where you can find out how to resolve errors during reinstallation.
Advanced settings
These parameters (at https://10.0.0.1.) adjust the operation of the modem. They allow:
- allow third party connections;
- replace local IP address;
- reconfigure the port;
- change DHCP settings.
To access one of the profile menus, you need to enter identifiers in the URL after the slash:
- advanced – open DHCP for manual configuration;
- network – change the modem’s network parameters;
- manualupdate – update the firmware manually;
- dir – access the extended functionality of the system.
Adjusting the DHCP Range
Step-by-step instruction:
- Connect your computer to the router in any way: via a network cable or via WiFi.
- Log in to the Yota Status interface.
- On the horizontal panel at the top is the “Management” tab. There, select the “DHCP Server” section.
- Check the box next to “Start DHCP server”. Activate the changes with the “Apply” button.
- To change the range, enter the desired indicators in the first and final IP fields.
Using Status.Yota.ru
The site's interface is simple and easy to understand. However, before you start setting up, you need to make the correct connection. How to do it:
- Operator modems do not have special drivers, so first you just need to plug the device into the USB connector.
- If the connection is successful, the brand icon will light up:
- Wait for a notification on the screen that the modem is installed.
After this, it is ready to work, you should follow these steps:
- Log in to the browser you are using.
- Your personal account (profile) will open automatically.
- Click the “Continue” button.
- Enter your phone number in the field that opens.
- Enter the code received by SMS message in the web interface.
- Fill in the rest of the device user form.
- Click “create profile”.
Then you will have to wait until the connection occurs. An SMS message will be sent to your phone number confirming that everything was done correctly.
Additional features
Next, the user is taken to a page where he selects the conditions for traffic consumption for the test drive period. The higher the speed of the selected connection, the fewer days of the test period and vice versa.
On Status.Yota.ru, setting up the device won’t take much time either:
- To get to the site, you need to enter “status.yota.ru” in the web address field.
- Once on the Eta ru status start page, the client can see data about the Internet: current and maximum speed, quality, signal level, etc.
- Click the “Device Management” button.
- In the settings tab that opens, you can enable or disable the network you are using, change its name, password and type of protection.
In addition to the main page, there are also a number of addresses Yota ru status for advanced modem settings:
- /manualupdate - update the firmware version.
- /network - change network parameters.
- /dir - hidden settings.
- /advanced - in this section of Status.Yota.ru you can change the DHCP range; in total, three options are offered: 10.0.0.0, 192.168.0.0 and 172.16.0.0. You should not do this unless absolutely necessary.
To go to these tabs, you need to type 10.0.0.1/ in the address bar and then enter the name of the desired item.
Windows phone.
- Find “Settings” and select “More”.
- Open the section called “Access Point”.
- In this section, you will need to click the “+” symbol, which will allow you to create a new access point.
- After you press the “+” symbol, a window will open in which you need to enter the following data: name – “Yota”, then APN – “internet.yota”.
- We save all the changes made.
- After the changes are saved, you will need to repeat the same procedure again and make sure that the status for this access point is set to “active”.
As you can see, setting up APN for any operating system will not take much time and does not require any specialized knowledge. And, if everything is done correctly, it will not cause any particular difficulties. If something does go wrong, you can always contact technical support specialists and they will clearly explain what exactly went wrong and what exactly should be done about it. You can write to consultants on the official website in the “Support” section (https://www.yota.ru/support), call or send an SMS with a question to the short number 0999.
YOTA was previously a high-speed Internet provider. But now it acts as a full-fledged mobile operator. Its main feature is tariff and balance management using a special mobile application, which must be downloaded to your phone. Therefore, many users are unable to set up the Internet right away. Don’t panic and throw your SIM card into the far corner of a dusty closet. You should study the connection algorithm in detail and eliminate possible problems.
How to update the firmware version using the manualupdate command
Download custom firmware from users. It depends on the device model.
Go to manualupdate.
- In the window that opens, click “Browse”.
- Select the firmware file from your computer.
- Click "Update".
- After installation is complete, the device must be rebooted.
Often you can’t go to Status.Yota.ru right away, in which case you need to enter 10.0.0.1 in the address bar.
If this does not help, then the device needs to be rebooted and tried again.
How to setup
Setting up a modem from the Yota Internet provider in most cases does not require much time or complex mechanical processes. In theory, all that is required from the user is to log into the so-called Personal Account of the router in the browser and perform a series of simple actions that are prescribed in the algorithm.
Review of Iota modems
The Russian company Yota offers its customers several options for modem models. The devices have been designed taking into account the specifics of their use.
Yota modem for laptop and desktop computer. A lightweight model of devices in the Yota line of modems. Such a device does not imply any special functions and is used to connect a particular device to the Internet network via a USB connection. No special setup required.
The case is made in a very laconic style: no unnecessary details, and most importantly, small size. You can always take it with you and not feel any discomfort from its size or heaviness.
Important! This device model does not require additional configuration. Network settings are set automatically as soon as it connects to the laptop/computer and establishes a network signal. Usually this does not take more than 15-20 seconds from the moment the device is connected.
Modem with wi-fi distribution function. It is a collaboration between a Wi-Fi network and a USB connection. When a modem is connected to a laptop or desktop computer, it has the ability to distribute the Internet network to other devices. It is convenient for those who are used to always staying in touch and active on social networks. No special setup required.
The model has a special connector that allows the device to operate from any power supply (portable battery, outlet, etc.). This is done because it does not have its own battery, which allows you to keep the charge on the device.
Important! Network setup is not required in this device and connection occurs automatically within 15 seconds. Setting up the modem may be required when changing or setting a special password, which is designed to protect the Wi-Fi network from third-party connections.
The Yota Many modem is a universal modem that combines the functions of the two above models. In addition to the fact that this model can operate and provide Internet via a USB connection, as well as distribute Wi-Fi to other devices (simultaneously), it has an internal battery that allows the device to operate autonomously. The model works up to 16 hours without a break. The device is also made in a laconic style, but has more noticeable dimensions. Thus, a feature of the model is the presence of a small screen on the device, which displays the number of currently active devices. No special setup required.
Important! Each modem has a resolution that allows it to sync with all available operating systems.
Basic Steps
Before setting up an Eta modem, you need to decide on the model and purchase it. When you get home, you need to insert the device into a free USB port (if you have a USB modem from Yota). It is interesting to note that the Many model can be connected using Wi-Fi without directly connecting via USB to a computer.
As soon as you connect the Iota modem to your laptop or PC, driver installation will begin automatically - this process should not be interfered with. An important advantage in the process of setting up a Yota modem or router is that it does not require installing any additional programs or applications, because its operation will be carried out through a browser.
After installing the drivers, you will need to see the new available network in the list. To complete, you need to connect to this network, open a web browser and go to any site - the user will immediately be redirected to the new profile registration page. After registration, you will need to select a tariff plan and top up your account to start using fast and unlimited Internet.
How to connect
In most cases, setting up a Yota modem is not required and simply involves connecting the device via a USB port to a technical device. When connected, automatic downloading and installation of drivers on the user’s computer/laptop begins. After installing the necessary elements, the user can open the browser and start working.
Important! After the installation is complete, you need to check on your computer for a new active network available. You can check this in the network settings of any technical device that requires access to the Internet.
Step-by-step instruction
When connecting the Yota modem to the device for the first time, you need to go through standard activation, which does not take much time:
- Connecting the device to a computer or laptop implies automatic installation of drivers.
- After activating one of the browsers on the computer, the user is asked to click on the activation button. Next will be the activation of the subscriber profile.
- Activation involves entering the subscriber’s phone number, which will receive a special SMS notification within a few seconds. After entering, the user can safely work on the Internet.
When setting up a modem, it happens that activation does not take place, in which case you should make sure that the technical device to which the modem is connected is working properly, namely:
- Make sure your computer recognizes USB media.
- Make sure that the blue network indicator on the modem itself is lit. There are situations in which the modem does not pick up the network signal, then you should connect a special wire to the modem and reconnect to the computer through it. (The wire is used to position the router in a place where the signal travels more strongly).
- Make sure the software on your computer is updated. Some firmware does not see the Yota modem due to the lack of modern firmware, and old settings cannot recognize the connection format.
Types of Iota modems
Before understanding the connection and configuration rules, it is important to decide on the type of equipment for accessing the network.
You can choose any one, depending on your need and frequency of Internet use. Some people need to use desktop options for their home PC, while other people need a portable device that can be used anywhere in the city or country.
Among the possible options, the Yota operator offers the following modems:
- Wi-Fi modem called Yota Many. Such a device is capable of distributing the Internet to other devices while being in your pocket. It does not require power, charging is carried out from any USB input, and the battery is enough to operate for about 15 hours. Access to the Internet appears after using a SIM card, but it is impossible to use cards from other operators, only Iota.
- 4G USB modem. This device can only operate via USB ports. Working with such equipment is easy; installation does not require special programs or drivers. You can use both a stationary version and a portable one to work with a laptop anywhere.
- USB Wi-Fi modem. A device that operates via USB and, once connected, can distribute the Internet to other mobile devices. It works on a 4G network and can distribute the Internet to 8 devices at once.
Knowing about possible modems, you need to understand the settings and connections in detail.
Access to the web interface 10 0 0 1 on status yota ru
There are situations in which the user needs to independently enter the router settings. For such cases, the company has developed a special address that must be entered into the browser. Status yota ru allows you to perform the “router setup” function yourself. And it represents the user’s “personal account”. In terms of interface, this command resembles the personal account section, which is used for users of Yota mobile communications and manual configuration.
In order to get to this section, the user needs to enter status yota ru in the address bar, and then press the “enter” button.
The user can enter a similar “personal account” by typing the command 10 00 1. This combination of numbers is the IP address and is used to configure the network.
If everything goes as expected and all equipment works properly, then after entering the required combination, a web resource opens in this tab, thanks to which the user can manage the interface and settings of the Yota router.
In the menu that opens, the user can find all the necessary information about network settings and the number of connected users, the quality of the network signal, the amount and frequency of transmitted Internet traffic.
Also, thanks to this section, the user gets the opportunity to manually configure the router/modem software, change modem parameters, change device settings that are not publicly available, and it is also possible to expand the modem settings, including data transfer servers.
Important! If you have connection problems and have any remaining questions on the topic “how to set up a yota modem,” you should contact a specialist or consult your operator about possible faults on the lines.
Possible problems
After connecting and setting up, certain operational difficulties may arise.
In some cases, after the manipulations have been carried out, the modem does not show any signs, or it simply cannot connect to the network, the reason may be:
- Computer problems or disabled ports. In this case, the modem will not be visible in the device manager or a yellow exclamation mark will appear next to the modem name, indicating that the software was installed incorrectly. To solve the problem, you need to enable the ports or update the drivers or reinstall the operating system.
- Weak signal or lack of Iota coverage. To determine this, you can look at the modem's LED, which should be blue. You can also find out about the signal by the status on the computer. If the network in your home has poor reception, it is recommended to use special extension cords that allow you to place the modem in a place with a good signal.
- The old operating system, when the modern modem cannot be detected, does not support encryption. This combination can cause characteristic difficulties. If problems arise that you cannot solve on your own, then it is best to contact Iota technical support. Operators will help you connect and configure the modem remotely or point out possible problems and ways to resolve them.
The Yota provider is one of the largest providers of wireless high-speed Internet services. To use the services of the Yota mobile operator, you must purchase a proprietary modem (router).
Many Yota subscribers, after purchasing a router, encounter problems setting it up. Let's find out how to go into the Yota router settings to set parameters and change the password.
How to log in
When entering the service 10 0 0 10 personal account status yota ru, you must undergo authorization and further registration.
The initial step will be to enter the “Personal Account” section (if there is no account, the user will be asked to complete initial registration).
For registered users resource 10 0 0 1 section “personal account” status yota ru it is required to enter the personal email used for registration, as well as a password.
Important! When registering for the first time on the site, the user needs to know the personal account number (located on the SIM card box).
Why doesn't it come in?
If the user entered the data correctly, but it was not possible to log in to the 1 0 0 0 1 resource yota status, then in this case there may be several reasons:
- Incorrect code written in the DNS server address. This situation most often occurs due to saved settings on the computer, from previously connected devices (if the device itself did not re-register and make the new modem network the main one) or if the computer was previously infected with a virus that switches the start page to another. There is a solution to this problem. The user needs to open the network settings window and select the “properties” button.
Important! If the modem is connected via a wi-fi network, you need to select the item that lists wireless networks; if the modem is used via a USB channel, the user needs to select the local network settings item.
- The DHCP service code is entered incorrectly. In this case, the user needs to repeat the algorithm from the point above and enter the correct address in the required settings line.
Important! When contacting the Yota network customer support service, the operator (through the technical support service) will inform you how to restore the required addresses in the code fields of custom objects. Also, the specialist, after clarifying which platform the user’s computer is running on, will tell you an algorithm for solving the difficulties that have arisen.
- Technical failure of the modem. In order to make sure that the reason for the Internet network not working is the modem, you need to turn off the wi-fi network and connect the modem via a USB cable (it is advisable to try several connectors). It is important that the modem is connected to the device directly. In this case, the use of additional wires should be avoided.
Yota settings that need to be enabled: how to configure Yota to the maximum
The correct Yota settings allow you to work with the operator to the maximum and we will tell you how to set up Yota on your device quickly and easily!
Immediately after the SIM card is inserted into the device, the system will automatically configure the Yota network for the smartphone. This happens in most cases, so new subscribers of the telecom operator do not need to perform any additional actions - just insert a SIM card and turn on the phone.
After the device boots up, you will be able to see the carrier icon. As soon as the SIM card is recognized by the network, you need to launch the company’s previously downloaded proprietary application, which is required to activate the services. You must download the application, because you won’t be able to set up Iota on your phone without it.
Immediately after launching the application, the subscriber will need to select the most suitable tariff plan:
- As soon as the application starts, a window will appear in which you need to click on the “Select connection conditions” link.
- In the list that appears, you should select the most suitable one from the proposed options.
It is also necessary to decide on the tariff in advance so as not to click at random. You can view the current tariff plans on our website or on the official portal of the telecom operator.
It still doesn’t work, what should I do?
If none of the above actions lead to a positive result, the user can try connecting to his yota personal account using another browser. There are situations when the browser itself does not give permission to use any resources or network settings.
Another way would be to contact the company's customer service. The call center operator will connect the user with technical support. A specialist will check online to see if there is any accident at the site that is interfering with the operation and network settings. After this, he will offer the client to solve the problem in a telephone conversation: he will describe what needs to be done and where to click.
You can also try restarting your computer; perhaps this is a glitch in the operating system that needs to be restarted.
If a situation arises where none of the methods helps solve the problem, the modem should be taken to the official Yota salon, where they will take it for diagnostics and, if under warranty, exchange it for a new one or set new technical settings.
How to connect to a router using 10.0.0.1
- Open your browser and type https://10.0.0.1 in the URL address bar and press the Enter button.
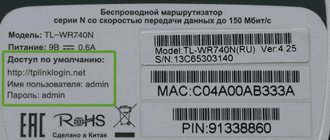
- The management console will appear on the screen. Enter your username and password . If you don't know where to find this information, it's usually labeled on the back of your router. If you're still having trouble finding your password, visit our list of default router passwords.
- Select the "Network" section on your menu display.
- Dial-up/DSL or other methods can be used to set up the network. Enter the username and password you received from your network provider.
- Google provides DNS 8.8.8.8 and 8.8.4.4 .
10.0.0.1 – password and username
When routers are shipped to stores, they come with a built-in password and username combination that is required to access the software and make changes to network settings, such as admin/admin.
If the default password doesn't work, you may need to factory reset your router to restore the default username and password.
These credentials are publicly known and published online and in guides, so they are not safe to use. The default password for the router is 10.0.0.1, which is only useful so that you can log in to change it .
Problems with IP address 10.0.0.1
Users and administrators may encounter several issues when running 10.0.0.1:
Can't connect to 10.0.0.1
The most common problem with the 10.0.0.1 IP address, as with any IP address, is the inability to connect to the router when using the URL as described above. There could be several reasons, but the most obvious is that there are no devices on the network using this IP address.
You can use the ping command in Windows to determine if a device is active on a local network running 10.0.0.1.
Just open a command prompt and type:
ping 10.0.0.1
Also remember that you cannot connect to a 10.0.0.1 device that exists outside of your own network, which means you cannot ping or log in to a 10.0.0.1 device , unless it is inside the local network you are using to access (except when using DDNS).
10.0.0.1 is not responding
A device assigned 10.0.0.1 may suddenly stop working due to technical glitches on the device or the network itself.
Configuring apn yota parameters for the Android operating system
Let's look at how to set up access to the World Wide Web on Android:
- Go to the “Settings” menu and select the “More” sub-item.
- Next we find “Mobile networks”.
- Select “Access point apn” (in a phone with two SIM cards, select iota);
- For the Internet to work correctly, delete existing apn access points and create a new one by clicking on “+”.
- Enter the parameters: name “yota”; apn "internet.yota";
- Make sure that the “Enable/disable apn” setting is checked.
- Save and begin activating the access point.
If network access does not appear, you need to restart your smartphone or tablet. You can also select the “Only 2G networks” item in the settings, check the box next to it and quickly remove it. Then the phone will automatically connect to LTE.
Devices running Android OS tend to disconnect from the apn access point on their own when there is no coverage. The chance of such an incident is negligible, since in 2016 the mobile network of the yota operator is available in almost any region of the Russian Federation. To connect to the Internet, you need to turn off and turn on the gadget again and repeat the procedure with checking and unchecking the box described above.
Can't connect to 10.0.0.1
This IP address represents the local side of the wireless access point's connection to the Internet. When client devices join a local area network (LAN), the address will appear in their TCP/IP network gateway . You can use the ping utility to find out if any device on your local network is actively using 10.0.0.1.
Common problems:
- Incorrect device address assignment and unresponsive gateway device. This is the case when your router is using a different IP address. You can find your router's gateway IP here.
- Incorrect client address assignment. On Wi-Fi networks, clients connect to the gateway via a network name (SSID), and the necessary IP address settings are applied to the client automatically. Most other networks also rely on automatic client address assignment. Glitches in this process are unusual, but can result in corrupted or lost client gateway settings.
Incorrect customer address assignment
If your network is configured with DHCP and the address 10.0.0.1 is used, it is important to ensure that there are no devices that are already using 10.0.0.1 as a static IP address.
If two devices have the same IP address, IP address conflict will cause network problems for those devices.
Incorrect device address assignment
The administrator must configure the 10.0.0.1 router with a static IP address so that clients can rely on an unchanging address.
On routers, this address is entered in one of the admin console pages, while business routers can use configuration files and command line scripts.
Entering this address incorrectly, or entering the address in the wrong place, results in the device not being accessible on 10.0.0.1.
Sources
- https://192-168-1-1.su/10-0-0-1-yota/
- https://yota-kabinet.ru/status-yota-nastrojka-oborudovaniya
- https://yotazone.ru/status-yota-nastrojka/
- https://uoperatora.ru/yota/nastroyka-modema-yota-10-0-0-1-status-yota-ru.html
- https://19216811.ru/10-0-0-1
- https://webznam.ru/blog/ip_adres_lokalnogo_klienta/2019-11-23-1334
3Ginfo
Often, after unlocking the modem, the modem sees other operators, but does not connect to the Internet. One of the reasons is incorrect operator settings. Tele2: APN: internet.tele2.ru Access number: *99# or *99***1# Beeline: APN: internet.beeline.ru or home.beeline.ru Access number: *99# or *99*** 1# Username: beeline Password: beeline Megaphone: APN: internet Access number: *99# or *99***1# Username: gdata (optional) Password: gdata (optional) MTS: APN: internet.mts .ru Access number: *99# or *99***1# User name: mts Password: mts Yota: APN: yota.ru (for modem) APN: internet.yota (for phone) Access number: *99# Name user: (empty) Password: (empty) U-Tel (Rostelecom) Access point: internet.usi.ru Username/password: empty Dial-up number: *99***1# Smarts: APN: internet.smarts.ru Number access: *99# or *99***1# Username: internet (optional) Password: internet (optional) Kyivstar: APN: For prepaid subscribers - www.ab.kyivstar.net For contract subscribers - www. kyivstar.net Access number: *99# or *99***1# Beeline Ukraine Access point (APN): internet.beeline.ua Access number: *99#, *99***1# or *99**1 *1#for some phone models User: optional parameter - can be left blank; Password: optional parameter - can be left blank. MTS-Belarus Access point/APN: mts User name: mts Password: mts Velcom (Belarus) Access points/APN: velcom WAP wap.velcom.by velcom WEB web.velcom.by velcom WEB PLUS plus.velcom .by TP PRIVET, TP “Communication without obligations” wap.privet.by Basic Internet access web1.velcom.by Package 25 Package 250 web2.velcom.by Package 250(arch.) web3.velcom.by Package Light lite.velcom .by Package 350 Package 500 Package 750 Package 1500 Package 3000, TP “Non-stop”, TP “Non-stop 2.0”, TP WEB Light, WEB 900, WEB 1800, WEB 3600 vmi.velcom.by Username, password, authentication: Not filled in Life