The Android platform has become the choice of millions of users around the world due to its flexible customization options. Each owner of a smartphone running this OS will be able to easily adapt the device, guided by their own preferences.
How to customize the Samsung Galaxy S10, one of the most advanced Android smartphones, so that it brings even more value and joy? We tell you how to make the most of all the functions of the device, depending on what is more important to you: long battery life, ease of use, information security or record performance.
Increased battery life
If you are a regular in the concrete jungle, and your life does not stop for a second, you are used to constantly being in touch, actively communicating and browsing social network feeds from morning to evening, you have probably encountered the fact that at a certain moment you have to sharply moderate your activity and focus on finding an outlet. But if you don’t want to depend on wires and external power sources, it’s worth adjusting your smartphone’s power mode to extend its battery life.
- In the Power Mode quick settings bar, you can select the average or maximum saving level.
- To always know exactly how long your smartphone will last without recharging, in “Settings” go to the “Notifications” tab, select “Status Bar” and turn on the “Show charging percentage” option.
- Night mode also saves energy. Displaying the interface in dark colors does not consume power as actively, since black pixels for the AMOLED display of the Samsung flagship are actually disabled elements. By activating “Night mode”, you replace light pictures with dark ones, and the smartphone discharges slower.
- Turn off unused apps to prevent them from consuming energy in the background. To do this, in the settings, go to the item “Use of device” - “Battery” - “Settings” and in the menu activate the items “Adaptive battery mode”, “Sleep mode”, “Auto-off applications”.
- Optimize the performance of your smartphone: in the settings, select “Device Maintenance” - “Optimize”. After this, the smartphone will consume energy and remember which applications you prefer and how you use the smartphone. The easiest way is to select the “Automatic optimization” option on the “Device Maintenance” settings page. If you activate it, the smartphone will automatically optimize operating parameters at a given time.
Interesting tips, settings and tricks for One UI 2 and Samsung Galaxy S20
Reader rating for this article: 4.9
(70)
After the release of a new flagship from Samsung, we traditionally publish a list of the most interesting settings and hidden features that not all users know about. These features can significantly improve the user experience and bring out the full potential of your new device.
Naturally, everything that worked on the Samsung Galaxy S9 will work on the Galaxy S10 and Galaxy S20. Therefore, after reading this portion of unique tips, you can familiarize yourself with other, no less useful and interesting opportunities that we have already talked about earlier:
- 10 Cool Features of Galaxy S9 and Galaxy Note9
- The best features of the Galaxy S10 and Note10
Much of what will be said below also works on other Samsung Galaxy smartphones, but some things are still unique to the new Galaxy S20 line and the One UI 2.1 shell. So let's get started!
One smartphone for two
Imagine this situation. You decide to relax and listen to music on Bluetooth headphones or do homework/work/read while listening to music on headphones. And your child/friend/loved one has nothing to do and just wants to watch YouTube. But you only have one phone (the second one is dead or is in another room).
It would seem that in this situation it is impossible to find a compromise and only one of you will be able to use the Galaxy smartphone. Not certainly in that way! There is a solution and it’s called Separate sound from the application .
You can easily configure the Samsung Galaxy S20/S10 and likely older models so that the audio from one app (in our example, Music) is sent via Bluetooth to your headphones, and the audio from a second app (say, YouTube) is output to the speakers smartphone.
Thus, one person will be able to watch YouTube on the smartphone screen, and the second will enjoy music on headphones, without hearing any sound from the running YouTube application.
It's very easy to set up. To do this you need to do the following:
- Open your smartphone Settings
- Go to Sounds and vibration
- Scroll through the list and find Separate sound from the application
- Click Enable now
- Select the application and sound device. In our example, you need to select the YouTube application and the audio device Phone
Let's look at another function related to sound.
Automatic subtitles
The Live Caption feature was one of the key innovations in Android 10. Even though Google has already introduced Android 11, Live Caption is still missing on the vast majority of Android 10 devices, including the Samsung Galaxy Note10 or Galaxy S10.
On Samsung smartphones, this feature debuted under the name "Automatic Subtitles" starting with the Galaxy S20.
Automatic Captioning (or Live Caption) is a tool that converts speech into subtitles in real time from any application. This is an analogue of automatic subtitles in YouTube, only Live Caption works with any application, including all players (audio/video), browsers, podcasts, etc. This function looks like this:
Example of Automatic subtitles on video
You can easily move subtitles around the screen. Other settings are also supported, in particular, you can hide obscene language and mark sounds (laughter/applause/music):
The only serious, but temporary, drawback is that currently only English is supported. Accordingly, for now this function can help those who are just learning English. More languages will be added soon.
Enabling this feature is very easy, just:
- Press the physical volume key to make a slider appear on the screen
- Expand the sound adjustment window by clicking the small arrow
- Activate Automatic subtitles
You can set up automatic subtitles here:
- Open your smartphone Settings
- Go to Accessibility
- Open Hearing Enhancement and select Automatic Subtitles
Making One UI a more convenient shell
Here we will look at several life hacks at once in order to make working with a smartphone more convenient.
First, let's set up the main screen :
- Open your smartphone Settings
- Go to Display
- Click Home screen
Here you need to select a grid for the home screen and application screen (the most convenient option is 5x6 to fit more applications on the large smartphone display):
And also enable the “Swipe down for notification panel” option, which allows you to lower the notification shade by swiping down from any part of the screen, not just from the top edge.
In addition, at the very bottom of the Home screen settings, you can also activate the transition to landscape mode, so that the Home screen rotates 90° to follow the device:
And a few more words about the notification curtain. Here you can move the display brightness adjustment up, since by default this slider appears under notifications when the curtain is lowered to the very bottom of the screen:
Before the change
After
Changing the display of the brightness slider is very easy:
- Lower the notification shade
- Click the three dots in the upper right corner
- Select Quick Access Toolbar
- Turn on Show brightness slider at top
And the last convenient option is hiding applications:
It allows you to hide from your smartphone those applications that you do not need, but you cannot delete them. You can also hide applications that are launched from other applications. For example, if you have a PDF viewer installed on your smartphone, but you open these files through File Explorer, then the PDF viewer icon can be hidden.
If you don't like all kinds of cutouts for cameras in screens, you can simply hide them on Samsung smartphones. To do this you need to do the following:
- Go to Smartphone Settings
- Open the Display item
- Next, find Full-screen applications and click it
- In the window that opens, click the ellipses menu (in the upper right corner) and select Advanced settings
- Here we activate the option Hide camera cutout
Now let's move on to one of the main functions of any smartphone - calls!
Useful dialer settings
The Phone application on One UI has flexible settings and many interesting features that few people know about.
Typically, an incoming call is displayed on the entire screen or in a small window, depending on the settings. And starting with One UI 2.0, you can completely reduce the size of the window to a minimum, displaying only the subscriber’s name:
Moreover, by enabling the appropriate option, even when answering a call, the call will be displayed in the same small window, practically without overlapping other information displayed on the screen (game, book or video):
To configure this mode, you must do the following:
- Open the Phone application
- Click the menu in the form of an ellipsis (in the upper right corner)
- Select Settings
- Go to Call Screen in Applications and select Small pop-up window
- If you wish, you can also enable Call in a pop-up window so that when you answer a call, it does not expand to full screen
In addition, if in the first menu that appears when you press the ellipsis, you select not Settings, but Open keyboard, then the Phone application will always launch with the dialer. Even if you go to the Recent or Contacts tab, then minimize the app and reopen it, the dialer will appear on the screen instead of the last tab you opened.
In addition to the size of the pop-up window, in the call settings (Alarms and ringtones item) you can enable vibration when the caller answers or ends a call:
And one last piece of advice regarding the dialer. The ellipsis menu options differ depending on which tab you are on. If you go to the Recent tab, where the list of recent calls is displayed, and click the ellipsis menu, you can view the duration of calls, enable the display of messages in the same list, and much more.
Ruler based on augmented reality
In 2022, one of the most useful AR-based features in the iPhone X was Roulette, a tool that could measure the real sizes of objects and the distance between them using a smartphone camera:
A few years later, the same option appeared on the flagship smartphone Samsung Galaxy Note10+. Then this function was associated with an additional ToF sensor (time-of-flight camera), since the younger Galaxy Note10 model without a ToF sensor did not have such a tool.
But with the release of the Samsung Galaxy S20, the virtual ruler appeared on this model, which also does not have a ToF sensor. Moreover, now the smartphone can not only measure the size of objects and the distance between them, but also the height of a person (note the small circle in the upper right corner in the screenshot):
To activate this option, you need to do the following:
- Launch the camera
- In the list of modes (Photo, Video, Multi-shot, etc.) select More
- Now go to the AR Zone tab
- Here we select Quick measurement
After the procedure has been completed, a new one will appear in the list of applications, called Quick Measurement. It can be launched separately from the camera.
A few words about the camera
While we're on the subject of the camera, there are a few features worth mentioning about the shutter button (the round white button you press to take a photo or video).
As before, on the Galaxy S20 you can duplicate it by simply dragging it with your finger to any convenient place. After this, two buttons will appear on the screen:
To remove the additional shutter button, simply drag it onto the main one.
By pulling the main shutter button down (if you're holding the phone vertically) or to the right (if you're holding the phone horizontally), the Samsung Galaxy S20 will begin burst shooting . The smartphone will take many photos, from which you can then select the most successful frame, automatically deleting all the others.
Moreover, in the camera settings you can change the action caused by such a gesture:
To do this, you need to launch the camera, click the gear icon (in the upper left corner) and select the menu item Swipe from the shutter button.
Other interesting and useful features of One UI 2 and Galaxy S20
Let's look at a number of other interesting features of the One UI and Galaxy S20 shell, in particular:
Power button
Starting with the Galaxy Note10, which no longer has a dedicated key for calling Bixby, the voice assistant is now launched by long pressing the power button. The Galaxy S20 works the same way.
However, this can be easily fixed by returning the Power button to its usual functionality. For this:
- Go to Smartphone Settings
- Select Additional Features
- Press Side key
- In the Press and hold section, select Shutdown menu
As you noticed, here you can also assign the launch of any application to a double press of the power button.
Copy text from messages
Sometimes it happens that you need to copy a certain part of the text from an SMS message, for example, a card number. Previously, to do this, you had to copy the entire message, paste it entirely into the desired window, and then delete the extra text.
Now you can easily select any part of a message without copying the entire text. To do this, just open the message, tap on it and hold your finger for a second. In the menu that appears, select Select text:
After copying the desired part of the text, the application returns to its usual form with a list of incoming messages.
Quick application launch
Samsung Galaxy S20 Ultra has 12 GB of RAM on board! And yet, it manages to re-download minimized applications. For example, you launched a browser and opened a long article in it. We read it a little and closed the application. After some time, you return to the browser again and the smartphone begins to reload the site.
Of course, this does not always happen with all applications, but in One UI 2 you can prevent the system from unloading a specific application from memory so that you can re-launch it very quickly.
To do this, you need to call up the list of running applications (in the form of cards), click on the application icon and in the menu select Do not close for quick launch:
Now this application will not be reloaded into memory whenever you launch it.
In the same menu, you can choose to launch the application in pop-up window mode. Thus, you can simultaneously open several programs on the screen of your smartphone, just like on a computer:
Sometimes this can be very convenient! And if you want, you can even make your smartphone work in computer mode by activating Samsung DeX.
For other tips on Samsung smartphones and the One UI shell, see the links provided at the beginning of the article!
PS
Don't forget to subscribe to our popular science website about mobile technologies in Telegram so you don't miss the most interesting things! If you liked this article, join us on Patreon for more fun!
How would you rate this article?
Click on the star to rate it
There are comments at the bottom of the page...
Write your opinion there for all readers to see!
If you only want to give a rating, please indicate what exactly is wrong?
Maximum comfort of use
If you value simplicity and conciseness in all areas of life, and strive to be surrounded by logical and elegant things, then you probably expect maximum comfort of use from your smartphone. We are sure that if, for example, a clear interface in each application is critically important to you, you often listen to new music from Yandex.Music selections and subscribe to food or everyday services, the tips below will help you use your smartphone more comfortably.
- You can unlock your smartphone's display in several different ways: with a fingerprint, a pattern, or a PIN code. Choose the one that is easier and more convenient for you.
- To prevent your smartphone from reacting to accidental touches, you can set the desired level of screen sensitivity. To do this, go to the “Display” item in the settings and activate the “Accidental Touch Protection” function.
- Touch areas on the thin, curved edges of the screen can be disabled to prevent the smartphone from responding to touch when you hold it in your hand. This option is available in the settings menu “Display” - “Curved screen” - “Edge panels” (you need to turn the switch to the inactive position).
- You can prevent your smartphone from accidentally rebooting if you turn off the “Automatically reboot your phone” option. It is available in the Device Maintenance menu in Settings.
- Modern users increasingly prefer voice typing of messages to the usual pressing of buttons on the screen. To make the process of entering messages by voice even more comfortable, go to the “General settings” – “Language and input” – “Text to speech” item in the settings. To make speech more clear, you can use the on-screen sliders to select the tone and tempo that best suits your voice. To play the example, you can click the Play button. Here you can select one of the speech recognition modules: “Samsung TTS Module” or “Google Speech Synthesizer”.
- If you feel like there are too many settings, you can contact a Samsung authorized service center. They will help you configure your smartphone according to your wishes.
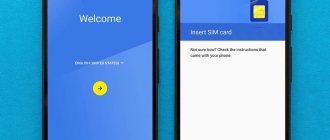
Initial setup of a Samsung smartphone
If you bought a smartphone from the Samsung Galaxy series, then you should configure it next. When you first start, you can’t do without it.
First, the smartphone will tell you to select the interface language. The Android operating system has been translated into many languages. The Russian language is also included in the options. Choose this one. Or English, if that's more convenient for you.
If you have difficulty seeing or hearing, then on the first screen, in addition to selecting a language, you can go to the special settings of your Samsung smartphone . They will enlarge the font and perform other actions to facilitate the further process.
The next step to set up your Samsung smartphone is to connect to a Wi-Fi network. This is necessary to synchronize with your Google account. If your Samsung smartphone already has a SIM card inserted, you can skip this step. But remember that you will spend some money on traffic used to download applications and perform other actions.
Once prompted to connect to Wi-Fi, you will need to set the date and time. You can check the box next to “Automatically”. In this case, the device will take time and date data from the Wi-Fi network. Sometimes this cannot be done. Or you skipped the previous step by not connecting to the network. Then enter the date and time manually. There's nothing wrong with that. When you are done with the settings of your Samsung smartphone, no one will stop you from turning on auto-time detection again.
Every owner of a South Korean Samsung smartphone is required to have an account in the Samsung online service. You will be prompted to register or enter your existing account information after setting the date. This service allows you to create a backup copy, as well as participate in various promotions. Creating a new account takes a minimum amount of time. The service is very useful, so you shouldn’t skip this step. In the future, you will need to log into your email. You will receive an email from Samsung. Be sure to follow the link contained in the letter. This will confirm your email address.
Next, the smartphone offers to connect to an existing Google account or create a new one. This also takes minimal time. It is impossible to do without an account, since it is this that allows you to use the Google online store. If you have an account in Picasa, YouTube or Gmail, you can enter its details. You can skip this step. No one is stopping you from registering a new account or entering your existing username and password in a calmer environment.
Typically, this completes the initial setup of a Samsung smartphone . But Samsung devices will finally offer to use the function of determining your location. It works using a GPS chip built into the device. If you wish, you can only enable partial location detection. In this case, the power-hungry GPS is turned off, and data is borrowed from cell towers and public Wi-Fi hotspots. At any time you can change the type of determination of your coordinates.
Some other Samsung smartphones offer the use of Dropbox services. This is cloud storage. You can save photos, music tracks and any other files in it. At the same time, you can access them from any device, be it a computer or a smartphone. At this stage, you can create a new Dropbox account or log into an existing one.
This completes the initial setup of the Samsung Galaxy. The device is completely ready for use!
Increased productivity
Maximum smartphone performance is important for fans of mobile games, representatives of technical specialties and other experienced users. For such people, it is natural to want to use the capabilities of a smartphone to the fullest, because otherwise why would they choose such a powerful model. How to get the most out of your smartphone?
- To quickly manage smartphones, activate the “Edge Panels” function in the “Display” - “Curved Screen” settings menu if you have previously disabled it.
- To ensure that your smartphone is ready to handle your tasks at any time, activate the Always On Display mode in the display settings.
- The "High Performance" power mode in the "Power Mode" quick settings bar will ensure the maximum speed of the device.
- To effectively work with multiple applications at the same time, use multi-window mode.
- Enjoy the power of the Galaxy S10's camera system. For example, you can use Live Focus for perfect portraits and selfies, capture stunning videos with stabilization technology, and create stunning super-slow motion videos at up to 960fps.
Ways to connect to the Internet on a Samsung phone
It is common to use two methods:
- automatic - the mode is installed on 95% of cellular devices, the user practically does not participate in the process;
- manual - with the introduction of all parameters yourself.
Both options are suitable for setting up the Internet on Samsung. Most device owners prefer automatic mode; the second version is more suitable for those whose automatic mode refuses to work.
Automatic installation
Setting up profiles on Samsung phones
Creating multiple profiles is used on devices whose functions are used by different people. In the Android operating system, such changes are available only on version 4.4 and higher. Tablets support functionality only on certain models.
To add a profile, the following algorithm is carried out:
- After lowering the notification panel, you need to click on the “gear” sign.
- Scroll down the screen to find a block dedicated to users.
- Click on the “add member” button to increase the number of available accounts.
- A window will appear on the display asking you to confirm the changes made. This concludes the debugging.
To navigate between profiles, the user will have to access the standard control panel. Irrelevant information is also deleted there.
Important! New profiles are configured immediately or after some time. If you experience problems with text messages and calls while using your device, you will need to switch to the administrator account. Near the name of the new user, click on “parameters” (the “gear” shortcut) and activate the subsection “enable calls and SMS.
Smartphone menu
Mobile Internet on Samsung phones
Why doesn't the Internet work on Samsung? The reason is due to the lack of settings provided:
- password, username;
- APN access point with characteristics;
- profile name.
Important! Communication information must correspond to the data of the cellular operator and mobile phone. For most users, the Internet automatically appears after activating the SIM card. As a last resort, you can enter the information received yourself, recording the parameters of each item.
Manual Internet setup
How to manually turn on the Internet on Samsung:
- Request data from your mobile operator or read the relevant section on its official website.
- Enter the gadget menu and go to “settings”.
- Find the “connect” block and move to “mobile networks”.
- Find the access point shortcut, click on the “add” button.
- After opening a new profile, its columns are filled in with information from the provider.
- After saving the information, you need to select the created profile and activate the “mobile data” block.
The process ends by rebooting the equipment.
Mobile network
MTS
| Name | MTS parameters |
| Name: | MTS |
| APN | internet |
| Users | any or empty field |
| Password | Any or empty field |
| Access point | intenet.mts.ru |
Megaphone
To receive information about the settings, a special request is sent to the operator to number 5049. The text of the SMS must contain the word “internet”.
| Name | Options |
| Set name | Megafon |
| APN: | Internet |
| Username | any |
| Password | any |
| Access point | intenet.megafon.ru |
Important! After entering the information, the data is saved. The user must use the information sent by the service provider when filling out names and parameters.
Beeline
| Name | Options |
| Name | beeline |
| APN: | internet |
| Username | any or empty line |
| Password | any or blank line |
| Access point | intenet. beeline.ru |
Information on the website
Tele 2
Filling out is carried out by analogy with the previous rules, the only change will be:
- name - tele2;
- access point - intenet.tele2.ru.
After saving the changes, you need to check the connection using the parameters in the “data transfer” block. It's in the quick access menu.