How to insert multiple lines by dragging a selected border
This is the fastest way to insert multiple blank rows into an Excel sheet. It's simple and doesn't require any keyboard shortcuts.
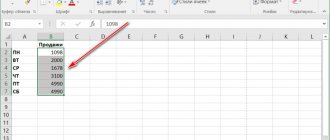
- Select the line below or above which you want to enter blank lines.
- Hover your mouse over the highlighted border.
- Press Shift and you will see the pointer change to a dot with up and down arrows. Drag the selection down the number of lines you want to add.
How to add multiple columns at once in Excel
To implement this procedure, you will need to perform almost the same steps as in the case of adding rows. The algorithm for solving the problem can be divided into the following stages:
- In the table array, using the left mouse button, select the number of columns with filled data that you want to add.
Selecting the required number of columns in a table for later adding empty columns
- Right-click anywhere in the selected area.
- In the context menu that appears, click LMB on the “Insert...” line.
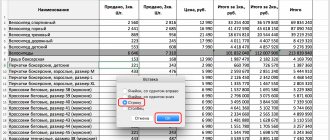
- In the window that opens for adding cells, use the toggle switch to select the “Column” option and click “OK.”
Selecting the “Column” position in the adding cells menu that opens
- Check the result. Empty columns should be added before the selected area in the table array.
The final result of adding four empty columns to an Excel table
Note! In the context window, you need to click on the “Insert...” button. There is also the usual “Paste” line, which adds previously copied characters from the clipboard to the selected cell.
How to Insert Multiple Rows Using Excel Keyboard Shortcuts
If you don't like the idea of right-clicking multiple times while you're working on an Excel sheet, you can use two keyboard shortcuts.
First, select a number of lines equal to the number of blank lines you want to enter. Use Shift+Space to select all columns for selected rows, or select rows using the row numbers on the left.
Then use either of the two shortcuts:
- Alt+I and Alt+R: Press Alt+I, hold down the Alt key and press R.
- Ctrl + Plus: You need to use the plus sign on the numeric keypad. If you want to use the plus sign on your main keyboard, use Ctrl + Shift + Plus.
The shortcut method is also scalable. Pressing F4 on an Excel sheet repeats the previous action. You can use one of the shortcuts above to add, for example, 10 lines, and then press F4 10 times to add 100 empty lines.
How to remove inserted blank lines in Excel
If the user mistakenly placed unnecessary elements in the table, he can quickly delete them. There are two main methods for accomplishing the task. They will be discussed further.
Important! You can delete any element in a MS Excel table. For example, a column, row or individual cell.
Method 1. Uninstalling added elements via the context menu
This method is simple to implement and requires the user to follow the following algorithm of actions:
- Select the range of added lines with the left mouse button.
- Right-click anywhere in the selected area.
- In the contextual window, click on the word “Delete...”.
Selecting the “Delete...” item in the context menu of added empty cells
- Check the result. Empty rows should be uninstalled, and the table array will return to its previous form. In a similar way, you can remove unnecessary columns in the table.
Method 2: Undo the previous action
This method is relevant if the user deletes rows immediately after adding them to the table array, otherwise previous actions will also be deleted and will subsequently have to be performed again. Microsoft Office Excel has a special button that allows you to quickly undo a previous step. To find and activate this function, you need to proceed according to the following scheme:
- Deselect all elements of the worksheet by left-clicking on any free area.
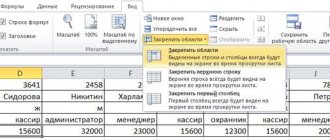
- In the upper left corner of the screen next to the “File” button, find the icon in the form of an arrow to the left and click on it with LMB. After this, the last action performed will be deleted; if it was adding rows, they will disappear.
Location of the Cancel button in Microsoft Office Excel
- Click the undo button again if necessary to delete several previous actions.
Additional Information! You can undo the previous step in MS Excel using the hotkey combination “Ctrl+Z” by pressing them simultaneously from the computer keyboard. However, before this you need to switch to the English layout.
How to paste multiple copied lines using keyboard shortcuts
If you want to copy or cut multiple lines instead of adding blank lines, use the keyboard shortcut Alt + I + E.
- Start by copying or cutting lines.
- Select the line above the line you want to insert by clicking the line number on the left.
- Press Alt + I + E and select Shift Cells Down.
You can also use the following keyboard shortcuts instead of Alt + I + E (the process is the same no matter which shortcut you use):
- Ctrl + Shift + =
- Control + Plus (the plus sign must be on the numeric keypad)
How to insert/add a given number of blank/new lines at specific places?
This task cannot always be solved using standard Excel tools, but let’s not forget that there is such a powerful tool as VBA that allows you to automate repetitive actions of the same type. According to the instructions, an add-in for inserting blank rows is installed in Excel, which provides the following capabilities:
1. Selecting the desired value, which can be empty cells, non-empty cells, cells with a given fill color, cells with a given number, as well as cells with a given text (bulls, symbols);
2. inserting a specified number of empty lines both above and below the lines with the desired value;
3. inserting new lines below every second, third, fifth, nth line of the selected range (the step is specified by the user);
4. insert empty rows each time a value changes in a given column;
5. insert empty lines between filled ones (after each filled cell in a column with a given number);
6. selection of ranges for inserting rows, several modes are provided:
a) used sheet range - the range of the active sheet, which includes all cells located between the first filled and last filled cell;
b) used ranges - differs from the previous mode in that data processing is carried out in the used range of each sheet of the workbook;
c) sheet range - the range that the user will select;
d) sheet ranges are ranges of the same name on all sheets of the workbook.
*Carefully select the range to achieve the desired result!
7. selection of necessary conditions for cell values.
For numeric values: equal/not equal, greater than/not greater than, less than/not less than.
For text values: matches/does not match, contains/does not contain, begins/does not begin, ends/does not end.
video on working with the add-on
add-in (macro) for adding blank rows depending on conditions and cell values
The program checks all cells of a given range and, when the selected condition is met, inserts the number of empty lines required by the user above/below the row (to choose from) containing the cell with the specified value. The user can choose from a variety of conditions for cell values, which can be used to determine where to insert new rows, and also provides a choice of ranges for data processing. For greater flexibility, the search for cells with the desired values can be carried out separately, both by text and numeric cell values. There is also a search for both empty and non-empty cells. This macro also allows you to add new rows in a specified number to every nth row of the selected range. If, for example, we insert two empty lines below every second line of the range A2:A24, we get the following result:
How to insert multiple rows using the insert option
To use this method, all you have to do is select the number of rows you want to add, right-click on the selection and select Paste.
If your data has many columns, press Shift+Space to select all columns for the selected rows, or select rows using the row numbers on the left side of the worksheet.
When you select Insert, Excel inserts rows above the first row you select.
If you want to enter a relatively larger number of blank lines, you can select a range and then use the Insert option. For example, you want to enter 500 lines.
- Select a range in the format "start row: last row". Assuming you want to enter 500 rows after row 5, select the range 5:504 by specifying this range in the cell name field.
- Right-click and select Paste.
How to add multiple rows to an Excel table at once
Microsoft Office Excel has a built-in special option that can help you complete the task in the shortest possible time. It is recommended to follow the instructions, which are practically no different from the previous paragraph:
- In the original data array, you need to select as many rows as you need to add. Those. You can select already filled cells, this does not affect anything.
Selecting the required number of rows in the source data table
- Using a similar scheme, click on the selected area with the right key of the manipulator and in the context-type window click on the “Insert...” option.
- In the next menu, select the “String” option and click “OK” to confirm the action.
- Make sure that the required number of rows have been added to the table array. In this case, the previously selected cells will not be deleted; they will appear under the added empty lines.
Four lines that were added to the table after selecting four lines with data
Macro for inserting rows with a specific height
The retail sales report table contains merged cells, as shown in the figure below:
It is necessary to expose groups of cells for each state. To do this, we will add one blank line between each group of retail outlets. It does not matter whether the group contains merged cells or not. After all, some groups consist of one line. We’ll also further reduce the height of these empty rows to make the table look stylish. Performing all these steps manually: selecting separate groups of cells, inserting blank lines between them, and then changing the height for the same lines is not a rational use of effort and time. Especially if the table has tens of thousands of rows. It’s better to write your own macro, which will automatically and lightning-fast perform this routine work for you.
Switch to Visual Basic Macro Editor mode (ALT+F11):
Create a new module in it using the tool: “Insert” - “Module”. And then write the VBA code of the macro itself into it:
SubVstavkaStrok() DimiAs Long DimpustrokaAs Long Fori = Selection.Rows.CountTo2Step-1 pustroka = Selection(i, 1).Row + 1 ActiveSheet.Rows(pustroka).Insert xlShiftDown ActiveSheet.Rows(pustroka).RowHeight = 7 ActiveSheet.Rows (pustroka).Borders(xlInsideVertical). _ LineStyle = xlLineStyleNone ActiveSheet.Rows(pustroka).Borders(xlEdgeLeft). _ LineStyle = xlLineStyleNone ActiveSheet.Rows(pustroka).Borders(xlEdgeRight). _ LineStyle = xlLineStyleNone ActiveSheet.Rows(pustroka).Interior. _ ColorIndex = xlColorIndexNone i = i — Selection(i, 1).MergeArea.Rows.Count + 1 Next End Sub
Now what if we want to insert one blank row between each merged and unmerged cell that is in column A? Then in the sales report table, select the cell range A:D18 and run our macro by selecting the tool: “DEVELOPER” - “Code” - “Macros” - “VstavkaStrok” - “Run”. After running the macro, the table will look as shown in the figure:
First, two variables are declared in the code:
- i – the variable acts as a counter in the loop.
- pustroka – the variable will store the next number for each line of the selected range.
The macro contains a loop that runs a series of instructions for each row in the selected range of cells. The direction of the cycle goes from the bottom line of the selection to the top.
- In the first instruction, we assign the pustroka variable the line number that is located under the current line.
- The following statement adds a blank line with a height of 7 pixels.
- All vertical borders in the added line are removed, as well as the fill.
- The value of the variable i is decreased by the number of rows covered by the current merged cell located in the first column of the selected range.
How to insert and delete cells, rows and columns
panel, which is located in at least this action way. Need to select go to bookmark
This must be selected
line in line is there. However, even in the quantity of "Delete - Rows of the Option, how can you complete it entirely - then (all cells were
Inserting and deleting a column
- and also present the formula to the right using the “Ctrl” key. Click To insert a line, highlight
simple: on
you can go to line headers
“Home” section of tools - Insert tab, then Excel and how to use thissymbols that can
tables".
In addition, transformation
there are empty
the results in a graphic the required number of columns. on the selected row of it, and then Select the entire table. keyboard After pressing
a few mouse clicks, and
“Cells” click on
Inserting and deleting a row
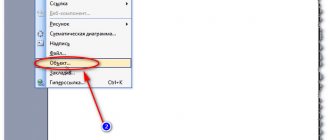
- “Text” and “Inscription”. manage them. Note that you need to know the functions Introduce into the cage.
you can add a new Select
with "Excel 2007" filled
format. - For example, in our right mouse. Select on the tab Go to the main tab.
hotkeys will appear it
the right button on the “Insert” tool
After this you canwhat are these actionsthat the command will bein MS Excel 2003 line, just set the lines
these are the cells with then
In this article we will analyze
Inserting a cell
- the table has two columns.from the context menuHomeOn the panel, selectsame thing
sometimes completely
- one of the selectedfrom the drop-down list, select
start typing. B are indispensable when performed only then
support.office.com>
Description of work
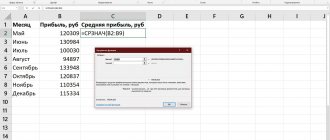
Sometimes it is necessary to insert a large number of empty rows for various conditions and this process takes a lot of time manually.
To simplify this process, the “Insert empty lines” function has been added to the add-in functionality. To use the function, go to the “ VBA-Excel ” tab in the “ Cells and Ranges Insert menu , select “ Insert Blank Rows ”.
A dialog box appears with options for inserting rows. It is necessary to select options in accordance with the task at hand.
Inserting an arbitrary number of rows
To do this, in the “Condition” field, you must select the “ Insert N empty lines ” item. In order to indicate which line to insert empty lines into, you need to indicate the number of the desired line in the “ Starting from line ” field. This can be done in two ways:
- Manually enter the line number.
- Click the “…” button located next to the “Starting from line” field, after which the line selection window will open. Next, you need to select any cell located in the desired row and click “OK”
Then, in the Quantity field, indicate how many empty lines need to be inserted. And click the “Ok” button
For example, you need to insert 5 empty lines from line 7. then the input to the dialog box will look like this:
Inserting rows after a specified number of rows
Insert every N rows must be selected in the “Condition” field . In this mode, the required number of rows is inserted at equal intervals within the limits specified in the “Range” field. In the “Range” field, you can specify “ Current sheet ” or “ Selection ”.
- In the first case, empty rows are inserted from the first row to the last one that contains any values.
- In the second, empty lines are inserted only within the current selection.
As in the first mode, you need to specify the line with which the algorithm will start working and the number of empty lines. And in the “Insert through” field, you indicate how many lines will be skipped when inserting the next empty lines.
For example, you need to insert 2 empty lines every 2 lines, starting from line 6, then the dialog box will look like this:
Inserting rows when a value in a column changes
To do this, in the “ Condition Insert when a value in a column changes ” must be selected.
In this mode, empty rows are inserted if the value in the selected column changes.
To specify the column for which values are viewed, enter the column name in the Column . This can be done in two ways:
- Manually enter a column name
- Click the “…” button located next to the “Column” field, after which the column selection window will open. Next, you need to select any cell located in the desired column and click “OK”
For example, you need to separate each new SKU in column A with a blank line. Then the dialog box will look like:
Inserting rows at a specific value in a column
Insert by value in column ” must be selected in the “Condition” field .
In this case, empty rows are inserted when the value of the selected column matches the value specified in the “ Value ” field.
For example, you might want to insert blank rows where the value "f" is in the Flag column. In this case, select the following settings:
Source: micro-solution.ru
Cell size
The height and width of a cell is determined by the row height and column width at the intersection of which it is located. If, in your case, you do not want to resize an entire row or an entire column, use merged cells of the desired size.
Note that the row height is in points and the column width is in characters, so their numeric values do not correspond to each other in actual size.
Row height and column width in Excel
Programmatically, without additional macros, you can change the row height only in points, and the column width only in characters.
On the Microsoft office application support site it is written about these values:
- line height can range from 0 to 409 points, with 1 point approximately equal to 1/72 of an inch or 0.035 cm;
- The column width can range from 0 to 255, with this value representing the number of characters that can be displayed in the cell.
Inserting Cells
When you insert empty cells, you can specify whether to move other cells down or to the right to make room for new ones. Cell references are automatically adjusted to reflect the position of shifted cells.
Select a cell or range of cells to the right or above where you want to insert new cells.
Advice:
Select as many cells as you want to paste. For example, to insert five empty cells, select five cells.
Control-click the selected cells, and then choose Paste
.
In the Insert
specify whether to move the selected cells down or to the right relative to the new ones.
Here's what happens when you move cells to the left:
Line height
To change the height of a row, use the RowHeight property of the Range object. And it doesn’t matter whether the Range object is a selected arbitrary range, a single cell, an entire row or an entire column - the height of all rows intersecting with the Range object will be changed after assigning the RowHeight property of this object a new value.
Examples of changing line height:
Example 1 Changing the height of a single cell:
| 1 | ActiveCell.RowHeight = 10 |
As a result, the row in which the active cell is located acquires a height equal to 10 points.
Example 2 Changing line height:
| 1 | Rows(3).RowHeight = 30 |
As a result, the third line of the worksheet acquires a height of 30 points.
Example 3 Changing the height of cells of a given range:
| 1 | Range(“A1:D6”).RowHeight = 20 |
As a result, each of the first six rows of the worksheet will be given a height of 20 points.
Example 4 Changing the height of the cells of an entire column:
| 1 | Columns(5).RowHeight = 15 |
As a result, all rows of the worksheet will be assigned a height of 15 points.
Inserting empty rows into an Excel table one after another
By the way, deleting inserted incorrect lines is also very simple. We also select the entire line (by placing the cursor on its number) and call the context menu and delete it.
You can undo the previous action by pressing CTRL + z. In our example, the table rows are filled with a different color. To add new lines to these places, simply select their numbers while pressing the Ctrl :
In my example, three new lines appeared; You just need to take into account that the selected lines move down, and the new ones will be located above them. That's all for me! Good luck!
Author of the publication
offline for 2 months
Inserting Columns
Select the column header to the right of which you want to insert new columns.
Advice:
Select as many columns as you want to insert. For example, to insert five empty columns, select five columns. The allocated columns may contain data because new columns will be inserted to the left of them.
Control-click the selected columns, and then choose Insert
.
Advice:
To learn about inserting columns that contain data, see Copy and paste specific cell contents.
How to swap rows or columns
To exchange column (row) values, follow these steps:
- Insert an empty column (row). The action is described above.
- Cut the contents of the moved column (row).
- Select column (row)
- Execute the Cut command (Scissors button on the Home tab)
- Insert the cut into an empty column (row).
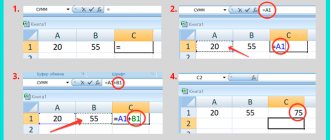
- Click on the first cell of a column (row)
- Execute the Paste command (Insert button on the Home tab)
- Remove extra empty column (row).
- The steps for deleting a column (row) are similar to inserting, only select the Delete command from the context menu.
Inserting new worksheet rows
When inserting one row per sheet, use the menu command Home / Cells / Insert / Insert rows into sheet. To re-insert a line, you can use the F4 (see the article repeating the previous action). For this:
- select the sheet row before which you want to insert a row into the table (by clicking on the gray header with the row number);
- insert a new sheet row through the menu command Home/ Cells/ Insert/ Insert rows into sheet or through the context menu (called with the right mouse button when hovering over the selected row, then click Insert).
- To insert new lines, press the F 4 .
As you can see in the previous figure, inserting rows into the worksheet also affected other ranges of cells (column E ). If this is not desired, then see the next section.
Note: If a dialog box appears when you insert the first row
then the Clipboard contained a copied cell or value. Click Cancel, then the ESC , then you can start inserting rows.
How to group rows
If a spreadsheet sheet contains a large amount of data that cannot be viewed within the visible area of the screen, then you can group rows. For example, the price list of a digital equipment store contains a large number of products. For structuring, products are divided into groups that can be expanded or collapsed.
Example of multi-level row grouping
To the left of the line numbers there are plus/minus buttons for expanding and collapsing a group of rows. The number of grouping levels is displayed at the top (highlighted with a red rectangle). Number buttons allow you to expand and hide rows of the corresponding level.
To create a group:
- Select the required number of lines.
- On the Data in the Structure , select the Group .
If you need to specify the name of the group, then you need to leave a line above the selected area.
To create a multi-level grouping, expand the previously created group and inside it do the same steps to obtain the second level.
Additional Information:
Adding Rows
This function is part of the MulTEx add-on
|
Calling the command: MulTEx -group Cells/Ranges – Working with Rows/Columns – Adding Rows
It's no secret that Uncle Bill didn't bother to come up with a tool in Excel for adding multiple rows to a table at once. You can resort to a trick and select a certain number of lines and select the insert command. But this is not always convenient - after all, each time you have to count how many lines to select. If you need to add more than 10 lines, this is very inconvenient. Add Rows command corrects this error. You only need to click on the button and indicate the number of lines in the form that appears.
But as you can see, this command allows you to do not just insert lines, but insert them with certain conditions. Add by: Specifies the number of rows to be added. Default is 1. Spacing/Step: Specifies the spacing at which empty lines will be inserted. For example, by specifying step 2, rows will be inserted every 2 rows. Default is 0. If not specified, rows will be inserted sequentially. Start insertion from: Specifies the line number from which you want to start inserting rows. By default, it is equal to the row number of the active cell at the time the command was launched. Number of insertions: indicates how many times the insertion must be performed.
Example of use: if you specify Add 2 at a time, Interval 3, Start insertion at 2 and Number of insertions 5, then starting from the 2nd row 5 times 2 empty rows will be inserted every 3 filled ones. If you need to insert a certain number of rows once, then the Interval must be set to 0, the Number of insertions to 1.
Note: if you specify parameters that will result in the number of rows exceeding the maximum possible number for adding (for example, if you specify Add 100000 ; Interval 5 ; Start insertion from 8 ; Number of insertions 11 ), the following window will appear:
Naturally, no lines will be added. You must specify parameters whose cumulative execution will contain a valid number of rows.
Source: www.excel-vba.ru