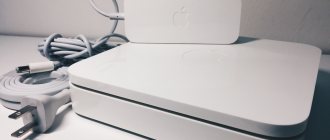
Hi all! Today we will talk about how to connect and configure a NetGear router. First of all, we need to install it correctly - it will stand next to the place where the cable from the provider can reach. It is also advisable to place it in the central part of the apartment or house so that the radio waves reach all corners of the home. Now let's connect the necessary wires to it.
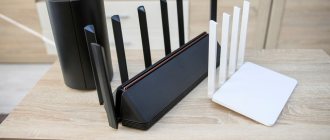
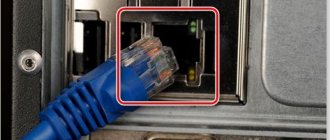
There should be local ports ( LAN) for connecting all home devices: computers, printers, TVs, CCTV cameras. There are usually several of them, they may have a LAN subscription. They can also be numbered. And there is one WAN ( Internet) port - this is where we must connect the cable from the provider.
NOTE! On small models, the Internet port may be blue, but the local ports will be yellow. If you have a Netgear modem, you will need to connect the telephone cable to the appropriate input.
Don't forget to connect the power supply to an outlet. If you have an IP-TV set-top box, then connect it to a free LAN port (it is best to use the last one by number) - remember the port number, we will need it to configure the NetGear router.
SPECIALIST HELP! If you have any difficulties, or something doesn’t work out, write your questions in the comments, and I will definitely help you.
How to go to Netgear settings
The router is managed and configured using the classic method - in the web shell. This is a local page that can be opened in any browser on your PC after connecting your router to it using an Ethernet cable (which we did in the previous section of this article):
- In the navigation bar of the browser, for example, in Yandex.Browser, write manually or paste the previously copied address using Ctrl + V: 192.168.1.1. We click on “Enter” - we get to a page on which we are asked to enter authorization data.
- The standard login information is one word admin. If it doesn’t work, it means that you have new router firmware - you need to enter the same word admin in the login, and password in the password.
- If you have new firmware, you will immediately find yourself in a menu with sections - in the “Basic Mode” tab.
After authorization, you will find yourself in the “Basic mode” section
- If you have outdated firmware, a quick setup wizard will open in front of you - and click on “Next” to go to the sections for fine-tuning yourself.
If you are a beginner, you can run the Quick Internet Setup Wizard, or immediately move on to more detailed settings in the sections
Set a new password to log into the Netgear web platform
You need to change the security key so that no one else gets into the web shell and changes your settings (for example, the password for the access point). If you have a new firmware version, go to the “Advanced” block, expand the administration menu and select the link to set a password. Enter the required combinations and apply the changes.
Write your new password twice
If you have an older version of the Netgear operating system, go to the “Saving” section, and in it click on the “Set password” link. Write the old and new keys and click on “Apply”.
Set a new security key in the Set Password menu
Configuring PPtP (VPN) while automatically obtaining a local IP address (DHCP)
This is a type of VPN connection. To configure it, you must select “ Yes ” to the question “ Do I need to enter connection information when connecting to the Internet” PPTP from the drop-down list of Internet service providers . If you want the router to always remain connected to the Internet, select “Always On” as the connection mode. Otherwise, you can set an inactivity interval in minutes, after which the router will automatically disconnect from the Internet. Or you can choose a completely manual connection via the web interface.
The “PPTP” protocol requires not only a mandatory username and password, and the VPN server address for connection, but is also divided into two variants common in Russia. The difference between them is in how the settings for connecting to the provider’s local network are assigned: dynamically via the DHCP protocol or set statically by the user. In both cases you must first specify:
- Username - login from the contract
- Password - password from the agreement
- Connection mode - always on
- Server address - you need to specify the name or address of the server in the “. The server address can be in the form of an IP address, for example, 10.0.0.138, or in the form of a domain name, for example, vpn.internet.beeline.ru.
- Internet port IP address and DNS server IP address - Obtain automatically from your ISP
- Click Apply .
Setting up a Netgear router: for old firmware
Old firmware differs from new ones only in the names of the sections - all parameter items in the blocks remain the same, so we will only consider how to get into certain blocks with settings.
Selecting a connection type and binding by MAC address
In the left menu we need the first main section “Settings”, and in it - the “Basic settings” block.
Click on the “Basic settings” link to proceed to creating a connection
Now configure your connection type using one of the instructions above (static or dynamic IP, PPPoE, L2TP, PPTP). After changing all the parameters, click on the “Apply” button (it will already be at the bottom).
Select the connection type and provide all the necessary data from the contract
Wi-Fi setup
In the same first section “Settings” at the top left, click on the link “Wireless network settings” or “Wi-Fi settings”. Change the parameter values using the instructions above for setting up Wi-Fi (for new firmware). The only thing that has changed is the “Apply” button (it’s already at the bottom) and the menu for the region (it’s moved a little lower).
When setting up Wi-Fi, the main thing is to specify the password for the access point
Setting up IPTV
To set up digital TV, switch to the “Advanced” section block - open the “Internet port settings” tab. All settings are the same as with the new Netgear firmware - use the instructions above.
Specify the port for the set-top box - tick it
DHCP server and LAN
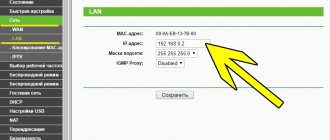
In the same last block of “Advanced” sections, click on the “Local network settings” item - you will be taken to the “local area” settings. Change the settings if necessary using the appropriate instructions above.
Configure the range of IP addresses if necessary and change the local address of the router
Connection
Before you turn on the Netgear router and go into its settings, you need to prepare it:
- Choose the optimal location for installation;
- Remove from the box and expose the antennas;
- Connect the power cord and two cables - to the Internet and RJ-45 to the computer. If debugging the router occurs via Wi-Fi, an RJ-45 wire is not needed;
- Turn on the device and wait until it boots up.
Important! It is necessary to check whether there is Internet in the apartment, otherwise you will not be able to set up the network.
Next, you need to carry out preliminary adjustments:
- Open “Network Connections”: hold down “WIN” + “R”, write “ncpa.cpl” in the search window;
- In the window that appears, select “local connection” or “Ethernet”, right-click and select “Properties”;
- Select the item related to IPv4, configure automatic sending of IP and DNS.
Factory reset
You can restore the router to its factory state using the Reset key - it is usually located on the back of all routers, next to the LAN and WAN ports. The key is internal, so to reach it, use some kind of sharp and oblong object, for example, a pen or a needle.
To start the reset, the Reset button must be held for 7 seconds
Press this button for just 7 seconds. The power LED on the router will then blink. This will indicate the reset is complete. After that, log into the web shell and configure the device again.
If it turns out that your Netgear router does not have a Reset button, use the WPS and Wi-Fi keys to reset. Press them simultaneously for 6 seconds and release - the Power indicator will also blink - the router has returned to factory settings.
If there is no Reset button on the device, press WPS and Wi-Fi together, but for 6 seconds
Debugging a wireless Wi-Fi network
What are the differences between 3G and 4G networks: features, advantages and disadvantages
Creating Wi-Fi will not take much time:
- You need to go to “settings” and select “wireless network settings”, then select the country;
- Select “Enable SSID Broadcast” and write down the network name;
- Set the channel number or leave it “automatic”. In the latter case, the network will look for the freest channel available;
- “Security settings” - “WPA2-PSK (AES)” - enter the password below.
If necessary, you can further configure the network before connecting the netgear router.
Method for changing the access code
You need to do the following:
- Open any of the Internet browsers installed on your PC;
- Print 192.168.0.1;
- Click "Enter";
- Print the name and code from the table given in the first paragraph of these instructions for a specific router model. You can also find out these parameters from the accompanying documentation of the equipment;
Note: if the router is no longer new and the default password has been changed, then you must first reset its settings.
- Step-by-step instructions for changing the Wi-Fi password for D-Link, TP-Link, Rostelecom, ByFly, Huawei, ASUS, ZyXEL, Tenda, Mikrotik and Ubiquiti
- The router's web interface will be displayed;
- Enter the “WiFi” tab;
- Next, in the security settings tab, erase the current access code;
- Create and print your own code;
- Click “Apply”;
- Ready. The network created by the Netgear router now has a changed access code.
List of logins and passwords set by the Netgear manufacturer
The procedure for setting up routers of this brand is not very complicated, since the developer took care of an intuitive interface and its complete Russification. Often, owners of Netgir equipment encounter difficulties only at the very beginning of the procedure, due to ignorance of the correct code and administrator name. Below is a table with a list of devices and current passwords that are set by default by the manufacturer.
What to do if you forgot your router password?
If the password has not been changed after purchase, then it is either printed on a sticker on the router (router) or written in the instructions for it.
Otherwise, you will have to reset to factory settings by pressing the reset button.
Thank you) I use this site myself, everything is very clear and visual!
if you forgot the password to the router’s web interface, then you need to find the reset button on the router and click on it, then the firmware will be reset to its original state
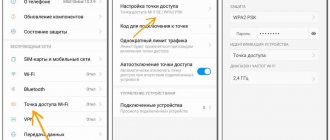
if you forgot your wifi password, you can find out by going to the router’s web interface
Tell me, please, is the security key the same as the Wi-Fi password? And how can I recognize him?
No, you read that right, the Wi-Fi security key and password are the same thing. Finding it on your computer is extremely simple, in fact:
- Right-click on the Wi-Fi icon (antenna)
- Log in to Network Sharing Center
- Go to your network menu and click on Properties
- Open Security and check the box that will allow you to show hidden characters.
- There is a column where you can look at the access key.
On Windows 7 the principle is similar.
How can I return my device to its default state?
If the above parameters do not work for a specific modification of the router, then most likely the code was changed earlier. In this case, you will need to reset the device settings to the factory state, and the current password will also return to the default.
To do this, you only need to perform a few sequential steps:
- Find the special “Reset” key on the device body. Often on Netgir equipment it is not labeled, but it is easy to recognize, since in order to protect the device from accidentally pressing this button and resetting the parameters, it is recessed into the device body;
- Armed with a pointed instrument, such as a toothpick, press this key. It is required to hold it in this state for about 5–10 seconds;
- The success of the procedure will be indicated by blinking indicator lights on the front panel of the router;
- Wait until the device restart process is completed;
- Ready! You can now open the settings interface options using the default values. Now the user has the opportunity to change the code for the network and router settings, as well as adjust the network parameters.
Note: resetting to default settings will also reset the network settings, including Wi-Fi password, etc. Therefore, after the operation, you will need to re-enter the settings and change the network access code to a more secure one.
Options for entering parameters in the Netgir interface
There are several connection methods.
Using a dynamic IP address
The algorithm of actions consists of the following sequential stages of action:
- In the interface, go to the “Internet” tab;
- Put o in the section “Is it required when connecting...”;
- If the provider uses MAC binding, you must check the box “Use this MAC”;
- Click the “Apply” button.
Port forwarding/forwarding
Go to Additional settings - Port forwarding / port initiation .
Click Add service .
- Service name - the name of the service to be created
- Service type - select the protocol you need
- External Start/End Port and Internal Start/End Port - range of ports
- Server IP address - the network address of the device to which the request will be redirected
- Click Apply .