Microsoft Word allows you to layout a document for printing in the form of a brochure, without resorting to any additional special programs. This can be done in literally a few clicks and there will be no problems with regular text. However, you will need a cover, and the original document may contain tables or figures.
Let’s take as an example a small article with illustrations and before printing it out as a homemade book, let’s take a detailed look at the formatting steps in Word 2007 or 2010.
Brochure
Brochure
On the “Page Layout” tab, click the arrow in the “Page Options” line. In the pop-up window, check the “Paper Size” (rectangle with a green marker). By default, the A4 format is usually set, so we leave it that way. In order for the finished brochure to correspond to A5 size, it must be printed on a regular A4 sheet.
Go to the “Fields” tab and in the “multiple pages” line, click the arrow. In the drop-down table, select the “ Brochure ” option. The program changes the orientation to “landscape” and shows a sample with two columns, each of which is a page of the future book. Already in preview
, however, all illustrations extend beyond the margins and the document will have to be formatted.
How to print as a “book” without Word
If you do not have the Word program or its use is not suitable, then you can print the book without it. The editor or printer properties should allow you to configure the following settings:
- Printing more than one page per sheet.
- Book orientation.
- A4 paper format.
- Two-side print.
There is one more, perhaps the most important, step. Pages must be printed in a specific sequence. To understand exactly how, you should do a little experiment. Take several pages of paper, turn them into landscape format and fold them in the center. Write down the numbers in pencil, and then lay out each sheet separately. Notice which numbers are on one sheet. Thus, it will become clear to you in what order you need to place this or that page on the sheet on one side and the other.
Manual book printing setup
Let's look at an example. Let's say our book consists of 20 pages. We will need 5 sheets of paper to print it. We will place them in the following order: first and last, second and penultimate, third and third from last, and so on. In the end it will be like this - 20, 1, 2, 19, 18, 3, 4, 17, 16, 5, 6, 15, 14, 7, 8, 13, 12, 9, 10, 11.
Cover
Removing extra table rows
On the tab
We find “ Title page ” and choose one of the proposed options. For business text, the “Conservative” style would be appropriate. Before the article, two sheets with tables consisting of one column appear. The template asks you to fill out:
- Name of the organization,
- book title,
- date and the like.
The abstract is located on the second sheet, which corresponds to the inside of the cover. If you don’t want to fill it out, select the cell and press the right mouse button. In the drop-down window, click “Cut”, the tooltip text will be deleted, and the table itself will remain in place. This way, the article will start on the next page, and the cover inside the brochure will remain blank. When you click on “Delete rows,” not only the table cell is removed, but also the page, which in this case is not necessary.
Binding and gluing of sheets
Once the document is completely printed, you will notice that it has a brochure-like appearance. In order to make a full-fledged book, you will simply need to bend the sheets exactly in half and apply them to each other, rather than nesting one inside the other.
Naturally, you should start with the first sheet, which will be your title side of the cover, and you should end with the last page, because it will contain the back of the cover. Having attached all the sheets to each other, at the junction, spread a thin layer of glue and fasten them. If you used a hole punch, we naturally skip this point.
You can cover the binding itself with an ordinary piece of paper, cardboard, or, in general, anything, it all depends on how beautifully you want to decorate the book.
Well, that's all. Your book is ready and you know the necessary steps to create it.
Numbering
Working with headers and footers
The cover of a book should not have extra numbers, and Word offers a special footer only for the first page. However, the document can be divided into
. Place the cursor in front of the title of the article and select the line “Next Page” in the “Page Layout” and “Breaks” tabs. Double-click on the top or bottom of any sheet to open the “Working with Headers and Footers” mode. The program activates the “Design” tab, where there are buttons for moving to the header or footer, as well as between sections. Here you can also change the fields.
By default, a link is established between sections. To be able to work only with the headers and footers of the second part of the book, press the “Same as in the previous section” button, making it inactive. By unchecking the “special” line
" in the " tab
", click:
- "Insert";
- "Page number";
- "At the bottom of the page";
- “Easy number 2” (center position).
The sheets of the second section of the document are automatically numbered starting with the number three. However, you need to check the headers and footers of the first part of the brochure. If numbers appear on the cover of the book, it means that the program has again established a connection between the sections. You need to press the “Same as in the previous section” button again and remove the numbers from the headers and footers of the first part.
Special programs
As for any other purpose, for printing a book there are also special utilities for such actions. They may be provided free of charge or with some restrictions. But if you only need to use it once or a few times, then this “moment” should not bother you. Let's take a closer look at the most popular ones in this direction.
ClickBook
- Download the program from the Internet. It only takes up about 11 megabytes.
- Unpack the archive and start the installation.
- Open your document in Notepad or any other editor.
- Click the “Print” icon or the CTRL+P combination. There you should select the ClickBook printer. Click print.
- The document will open in ClickBook. ABOUT.
- As a result, we will receive text divided into pages, ready to be printed as a book.
Great!
As a sign of gratitude, tell your friends and acquaintances about the article on social networks. Use the buttons on the left or bottom of the page. It doesn't take more than 15 seconds. Thank you!
Text formatting
Changing fields
One A4 sheet contains 4 A5 size pages if printed on both sides. Consequently, the book must have a multiple of four pages . Now there are just 12 of them in the document, but the last one is the outer side of the cover and it is advisable to leave it empty. Let's perform the usual formatting steps:
- set first line indent;
- align text width;
- move the drawings away from the edge;
- remove extra lines between subheadings;
- reduce margins.
Text wrapping above and below
should not be placed separately from subsequent text. On the “Page Layout” tab, click the arrow in the “Paragraph” line, select “Position on page” and “do not tear off from next”. The picture, which took up little space on an A4 sheet, now looks large and the text flowing around it
not readable. Activate the window of the inserted object by double-clicking and, hovering the cursor over the border, right-click. Click “Label Format”, “Position” and “Advanced”. In the next pop-up window, on the “Text Wrapping” tab, find the “top and bottom” option.
The document is located on 11 sheets and formatting can be completed, although there is another way to reduce the amount of text - changing the font size. You don't have to do this manually. If you click on the "Preview" tab,
", the program will reduce the font size by 1 or 0.5 points.
Seal
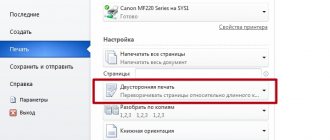
Now you should go to the “File” - “Print” section.
In the settings you need to set duplex printing. But the printer may not support this option automatically, and you will have to insert sheets into the printer when prompted on the computer screen. To print correctly, you need to turn the sheets over the short edge of the paper. You may need to place the top sheets of paper in the tray with the text facing up/down (as the device itself suggests).
An A4 sheet holds 4 A5 pages. Accordingly, the book should have the number of pages that is a multiple of four. The latter is the outside of the brochure and should be left blank.
Click the “Print” button, and the software Wizard will independently combine the brochure and set the printing order.
When printing, it is recommended to immediately divide a large document into several thin books, otherwise it will be inconvenient to fold the sheets later. In the parameters, set the number of pages in the brochure. In a document of 16 pages, select 8, and you will get two books of 8 sheets each.
Non-text elements
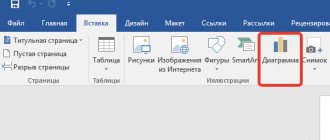
Inserting an image
- To insert an image, go to the “INSERT” tab in the menu and click “Drawings”
- A dialog box will open where you need to select the desired image.
- drawings must be 225dpi for color and b/w books
!IMPORTANT:
Inserting tables
- Place the cursor at the place in the text where you want to place the table and select the “Table” item from the menu in the “INSERT” tab. In the drop-down list, select the required number of columns and columns and click the left mouse button
How to print a file in book format on a printer
There are two main methods that will help you print a book yourself. The main feature is that it requires printing text and images on both sides of the sheet. To do this, you need to perform a number of additional actions in a word processor:
- design the cover and background;
- add page numbers and format text;
- send the desired text format for printing.
The first stage of creating a book is setting up the printing device. First, you should install drivers to control the printing process. Today there are 5 ways to download and install drivers. As a result, an icon for the corresponding software should appear on the computer desktop panel.
Printing is done from different formats, mainly Adobe PDF, Microsoft Word. Most often they print from a working Word file - the processor contains all the necessary functions and settings. To print in Word, click the appropriate option in the working window - “Brochure” and “Book” versions are offered. The program itself will perform “mirror” placement of pages when their number is a multiple of 4.
How to make a book with your own hands?
To do this, we will need an A4 printer, an office cutter, a stapler, A4 paper (it is advisable to use thicker paper for the cover) and glue. We print the book in a tricky way: we need to run each page through the printer twice, turning it 180°. Each printed page will look something like this:
On the back of the first page we print the second, but on the back of the third the fourth, etc. Once you get the hang of it, you will print all the pages in order; you just need to turn the stack of paper over in the correct way. Next, we fasten the block with paper clips on the sides, two or three times on each side. We glue the hand-folded covers so that they cover the staples, and cut them with a cutter exactly in the middle, or wherever you have enough cover sheet (ideally it should be longer than A4). We get two ready-to-use books!
Did you like the article? Put a link to it!
Reprinting of the article is possible only with a direct link back to the source.
It will look like this: Make a book yourself - a blog about layout and design by Verstaem.ru.
Or like this: Layout of text in a book - a blog about layout and design by Verstaem.ru.
Forum code:
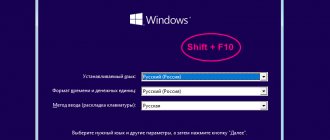
Setting Page Options
After the final check of the text, you can move on to setting up the basic parameters that will allow you to print your book correctly. This implies setting page parameters. Go to the "Page Layout" tab at the top of the toolbar and find the "Page Setup" area, then click on the small arrow in the lower right corner of this item.
In fact, this is where the main changeable parameters are located. To get started, under Pages, select the Brochure type from the drop-down menu called Multiple Pages. Notice that the page orientation has changed to landscape. Then enter the number of pages included in your brochure/book. The optimal value is 4. It turns out that you will have 4 pages on one A4 sheet.
Now to place the text correctly, you need to adjust the margins, taking into account the indents for binding. You will probably notice that in addition to the “Right” and “Left” fields, there are new fields called “Inside” and “Outside”. If you are going to make a glued binding, indicate 1 cm in all points. If you decide to use a binder, you need to increase the indentation in the “Binding” field, because using a hole punch, you will need the appropriate space. In addition, now you will need to control the indentation of the text from the place of binding, that is, from the holes made in the paper. To do this, pay attention to the “Outside” item.
If your document has headers and footers, in the same Page Setup menu, on the Paper Source tab, edit them and apply them to the entire document.
By the way, next to it is the “Paper Size” tab, in which you can specify the width and height of the sheet used or its format. The default format is A4.
Before you print the document, check everything again, because it will be a little disappointing if the text or picture slips somewhere, the formatting, paragraphs, lines, etc. get lost.