How to register an account in another country?
First, you need a domestic account in Apple ID. How to create it is described in the sections above.
How to make it foreign? Go to the Apple Store and at the very bottom of the page on the left, click on the email address that the user used when registering. A list of several items will appear - you need to click on “View”.
Select "Country/Region" and click on "Change".
It remains to decide which country account is needed. All states are listed in alphabetical order. After selecting the one you want, click on “Agree”.
Next, you need to specify the card details or refuse this item by clicking on “None”. After “Billing Address” you should fill out the required fields in English or in the language of the selected country. Then click on “Next”.
If everything went well, the final view of the foreign account data will appear on the user’s screen.
Why do you need an iPhone account?
Without an Apple ID, the user will not be able to:
- Download applications from the AppStore (neither paid nor free).
- Buy music and videos from the iTunes Store.
- Synchronize your Apple device with iCloud .
- Find your lost gadget using Find My iPhone
Full use of an iPhone without an Apple ID is out of the question. The legendary versatility of this smartphone is due to the huge amount of diverse software available in the AppStore. An iPhone without apps is just a stylish and well-built gadget, but by no a multitool that can cope with any task.
Possible problems
When logging in to the iCloud service, you may receive a notification “The limit on the number of free accounts has been activated on this iPhone.” This means that the maximum number of free accounts has been activated from this device - three. If you have exceeded this limit, there is only one way out - to link a bank card to your account, since after this it will receive the status of “Paid account”.
This iPhone has a free account limit enabled.
If you have not received a letter with a link to the end of the registration process, then the first thing you should do is go to your mail and check such sections as “Spam”, “Deleted”, “Archive”, etc. In the event that you do not find them the desired letter, go to your account, open the Manage your Apple ID section and click on the Resend button next to the name of the email entered during registration. After this, instructions for confirming your account will be sent to your email again.
Click the Manage your Apple ID button
In the event that you have any unique problems not described above, or have any questions, you can write a letter to support by following the link https://support.apple.com/ru-ru and by clicking the “Contact Support” button. Fill out the form using English only and submit your request, then expect a response within a few business days.
Click the “Contact Support” button
After purchasing a new device, the first thing you need to do is register a unique Apple ID in order to use special services. This can be done via a tablet, phone, computer or player with iTunes support. If you do not want to initially attach a bank card to your account, you will have to start registering by installing a free program from the App Store. Until you set up a payment method for your Apple ID, it will remain a free account.
Activate a common account for purchases on all gadgets
It is recommended to use one Apple ID with a valid credit card, through which all purchases will be made.
This account must be activated on all iPhones and iPads, which will allow you to access all purchased applications from any family gadget. In addition, do not forget about services such as iTunes Match, which everyone in your household may also want access to, so be sure to activate it in advance.
I would like to remind you that you can use as many devices as you like with one Apple ID.
“Settings” – “iTunes and App Store” – “Apple ID”
Create a separate account to monitor family gadgets
Of course, you shouldn’t forget about safety, because your gadget can simply be forgotten in a cafe or simply lost. This is precisely why the Find My iPhone service was created, which is tied to iCloud, and we wrote about this above.
But in order not to share personal data from the cloud, but to know the whereabouts of your household, it is better to use the “Find Friends” service, which was developed by Apple specifically for these purposes. It allows you to easily share your location.
Let's look at the situation with Apple ID accounts using an example
For example, there is a family that consists of a mother, father and son/daughter. And everyone has apple technology. All devices are linked to a common App Store account from which programs and games are installed. At the same time, the son/daughter doesn’t really want to share photos of the next get-together, so he synchronizes the photos, documents and notebook in iCloud under a different ID.
In addition, the Find My iPhone function is enabled on the same iCloud account so that, if necessary, you can find the owner of the phone and send him a message. And to share location between interested people, the “Find Friends” program is connected.
Well, individual programs: FaceTime, GameCenter, Messaging, HomeSharing, App Store can be configured to any other ID. This can also include an additional App Store account, for example, a purchased general account (the App Store ID can only be used to install programs/games).
You can specify any other account in the App Store application and install programs from it that you do not have on your iPhone.
The device can simultaneously contain applications installed under different IDs from the App Store application. They get along well with each other until they synchronize with iTunes.
How to sign in to your account
First, it is recommended to update your phone software to the latest version. Next, the authorization procedure is performed according to the following scheme:
- the client goes to the section with gadget settings;
- Next, select “Login to device”;
- the user indicates his login;
- Next, enter the password to access the system;
- If the client uses two-factor authentication, a six-character verification code is required.
After entering the required data, the client will have access to his account. After this, you can use cloud storage and download applications.
The owner of the gadget can create an Apple ID directly through the smartphone settings. This method is available if your phone has a network connection. When there is no Internet on your cell phone, you will have to use a desktop computer. When creating an account, you must provide real data. If the owner enters incorrect information, this may lead to problems if the password is lost.
What is a personal profile and why is it created?
An individual identifier is required for the client to purchase company products through special applications. An account is created by the user only once, immediately after purchasing the gadget. When the account creation is completed, the owner will be able to use the data to log into any of the company's services.
Most often, users use the App Store service. Through it you can purchase and download programs. The data is also used for authorization in the iTunes Store and Cloud storage. You can sign in to FaceTime and iMessage to keep in touch with friends and family.
As soon as the owner is able to create his account, he is provided with the following options:
- you can make purchases in the App Store, download and install applications;
- add ringtones downloaded from iTunes to your phone, you can also download videos here;
- Using your personal profile, you can create a backup copy;
- if the gadget is lost, the owner can remotely erase all data from the smartphone;
- use iCloud cloud storage;
- communicate via iMessage and FaceTime services.
In addition, when the owner downloads or purchases a new application, all information about them will be saved in the Apple ID. For example, you can download the game for free. If over time the software becomes paid, the client will still be able to install the game again without paying for it. This is how some sellers act, offering to update the gadget by installing a large number of programs on it.
Creating a mailbox in iCloud
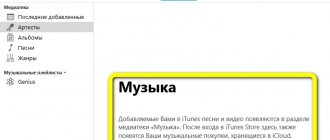
Only owners of Apple devices can create an iCloud email with the identifier “@icloud.com”.
The mailbox creation feature is available on mobile devices, tablets and Mac computers.
Rice. 2 – mailbox @icloud.com
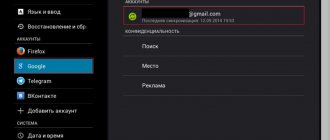
The function of storing information in the cloud appears immediately after registering a mailbox or Apple ID.
Owners of other phones and computers can use an existing mailbox by linking it to an Apple ID account.
Thus, you can get the opportunity to use several functions in iCloud for free:
- Contacts;
- Apple Numbers – for working with tables;
- Keynote – creating presentations;
- Notes;
- Pages is a simplified version of a word processor.
It's worth noting that storage for non-Apple device users is only 1 GB.
Rice. 3 – Cloud settings window
You may also be interested in:
Modem mode on iPhone 6 and iPhone 7: how to enable and configure - step-by-step instructions for 2022
How to set up an iPhone: Instructions for dummies
TOP 3 methods: How to transfer photos from iPhone to iPhone
Basic rules for setting up an account
Now it’s worth talking about how to set up an Apple ID yourself to make using your profile more comfortable:
- Control questions. During account registration, the owner can choose any three questions that the system offers. You need to provide answers to them in order to gain access to your profile using such questions if you lose your password.
- Backup mailbox. It is recommended to add an additional mailbox. If access to the main mailing address is blocked, the client will be able to use an additional address.
- Two-factor authentication. Another way to protect your data from intruders. With its help, the owner will be able to track attempts to log into his Apple ID.
Additionally, it is recommended to provide payment information. If the data changes, you can also change it on the device through the smartphone settings. When a client owns several devices at once, the payment parameters will be changed on all gadgets.
Auto-tuning capabilities
For users of popular email services, the Apple device can independently carry out the setup in automatic mode. You just need to enter your email address and password. This is done in the following sequence:
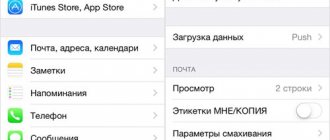
- In the “Settings” of the iPhone, a submenu of accounts opens, where the “Add account” option is selected. In earlier versions of the operating system, this button is located in the “Mail” section.
- In the list that opens, click the service whose account the user is going to add. If its name is not in the list, select the “Other” line, where the service is entered manually.
- Enter the postal address and enter the password for it. Clicking the corresponding button starts checking the added information.
- Email account details can optionally be displayed on the phone. After setting the display parameters, the procedure is completed by clicking the “Save” button.