Finally, Microsoft met its users halfway and returned the classic Start menu to the Windows 10 operating system. New menu Start more customizablethan ever before, so any user can customize it to their liking.
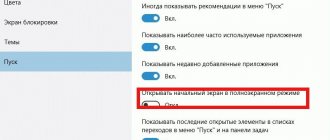
The secret of the new Start menu lies in its division between the desktop and the tablet PC. For example, to turn off tablet or desktop mode, you only need to press one button in the notification center. In this material we will describe the main customization options and properties of the Start menu that are available now. For the review, we took the highest version of Windows 10 Pro.
Resize the Start screen window
Resizing Start for Windows 10 is very easy. To change it, just move the cursor to the top or right edge of the start screen by dragging it . For example, if you reduce the top edge, the home screen will look like this.
And if you reduce it to the right edge, it will look like this.
The example shows that you can quickly and very easily increase or decrease the size of the Start menu to suit the user’s needs.
Attaching and Unpinning Tiles
To unpin a tile from the start screen, just right-click on it and in the list that appears, click on the item “ Unpin from start screen ”.
To pin a tile from the list of installed and standard utilities on the start screen, you need to go to the “ All applications ” item, select the program in it and right-click on it. After which a list will appear, in which click on the item “ Pin to Start Screen ”.
Also, if instead of this item we select “ Pin to taskbar ”, then we will see our utility on the taskbar. For example, the image below shows the Calculator to the taskbar.
To unpin this application from the taskbar, just click on the shortcut on the taskbar and select “ Unpin from taskbar ” from the list.
In addition to the list of installed and standard programs for the Windows 10 Pro operating system, you can also install links to various resources . For example, to pin a link to a specific directory in the system for the start screen, just click on this directory and select “ Pin to start screen ” from the list that appears.
Also very useful are the links to Internet resources on the home screen. The procedure for fixing them is as transparent as possible. To pin an Internet link to a specific resource, just go to a specific page in the Microsoft Edge . In our case, the Internet resource will be the Microsoft page www.microsoft.com/ru-ru in Russian.
After opening the page, go to the browser settings and select the “ Pin this page to the start screen ” option.
If you need to pin a section of settings for the Start screen, then you just need to go to the required section of the settings and right-click on it and select “ Pin to Start screen ”. For example, the “ Themes ” settings section.
In a similar way, you can pin notes from OneNote or important contacts from the People .
Working with the button context menu
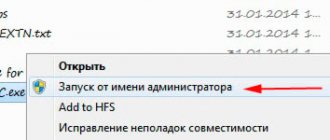
If you right-click on the “Start” icon itself, a context menu appears with a list of most service applications for servicing Windows (for example, “Task Manager”, “PowerShell” command line, and so on). And the user can also edit this list at his own discretion! True, this cannot be done using standard means. The easiest way is to use the free Win+X Menu Editor utility.
The program takes up literally 1.5 megabytes and does not require installation. But it is better to run it with administrator rights. Its only drawback is that it is not Russified. But even without translation it won’t be difficult to understand - the interface is intuitive.
So, after launching the utility, the user will see a list of applications added to the context menu. There he can:
- change the order of each item;
- remove or add any application;
- enable “hidden” service applications (for example, “Command Prompt CMD”).
After making new settings, you must click “Restart Explorer” to restart Explorer (the desktop interface will disappear for 3–5 seconds). If the context menu items remain the same after this, you will additionally need to restart the computer.
You can change the context menu list without third-party applications. But to do this, you will have to manually make all changes to the “Register”. Essentially, the Win+X Menu Editor program performs the same actions, but through a convenient graphical interface. And therefore, even if you delete it, the new context menu settings will not become standard.
Disable live tiles on the Start screen
If you don't like live tiles, you can easily turn them off. To do this, just right-click on the live tile and select “ Advanced/Disable live tiles ” from the list. The image below shows how to disable Live Tiles in the News .
This way, you can disable any live tile on your Start screen. If you need to turn them back on, this is done in the same way.
Change the size of the tiles and drag them
For example, let's take the " News " program and go to the context menu of this tile. In it, select the items “ Resize/Small ”.
After this, the size of the link to the “ News ” program will look like this.
To change the location of a tile, simply drag it to any area of the Start screen. In the latest version of Windows 10 Pro, all tiles are divided into groups, which can be called by a specific name. We will move the Microsoft Edge browser link from one group to another. She is currently in the Events and Communications .
After dragging it into the Entertainment and Leisure , our tile will look like this.
As you can see in the example, the size of the Start screen after dragging the Microsoft Edge became larger, and a new group was formed. The group does not yet have a name, but it can be assigned at any time. I would also like to note that all links can be dragged within their group, as well as their location can be swapped.
Setting sorting and color options
To select a specific sort method from the Start menu, you must go to the Options in the Start menu. After that, go to the “ System ” section in the “ Applications and Features ” tab.
This section has three sorting methods that will be applied in the Start menu once you select them.
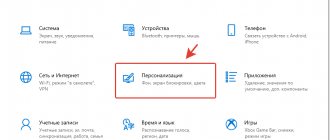
To change the color of the tiles, you need to go to the same “ Options ” tab and go to the “ Personalization/Colors ” section.
After choosing a color, such as red, the tiles will look like this.
To make the Start menu color red too, you need to turn on the " Show color in the Start menu, taskbar, action center, and window title bar " switch.
From the image you can see that the Start window has changed significantly, so by changing the color, we customize it, taking into account our preferences in OS design.
Where can I find the badges?
It’s better not to put the first art you like from your gallery on the “Start” button. Use images specifically designed for this purpose. They are already edited and have the appropriate format and size. They also specify the correct arrangement of objects. Suitable images can be downloaded from the 7themes website or oformlenie-windows.ru. Although there are a lot of resources with free icons.
Possible appearance of the Start button
The file with the icon must have a BMP extension (no background). Make sure that it has three options for icons: for a “regular” button, highlighted and pressed. Try hovering over the main menu. And you will see that it changes depending on what is done with it. Although no one forbids putting one picture for all “states”.
Enable additional folders
To enable additional directory parameters, you must go to the properties of the Start menu. To do this, go to the “ Settings ” tab, then go to the “ Personalization/Start ” section.
In this section, you need to click on the link “ Choose which folders appear in the Start menu ”. Then a window will open where you can select the folders you need.
As you can see from the image, two radio buttons are already selected. Let's select all the switches and look at the result.
As you can see in the image, all the selected items ended up in the Start menu.
Classic Shell
The Classic Shell utility is suitable for Windows 8 and 10. It is a comprehensive program for customizing the Start menu. But now we only need icons in it.
- Download it from classicshell.net. There is a tab “ALL DOWNLOADS”.
- Start the installation. To work with the design of the main menu, use the “Classic Shell Start Menu” component. You don't have to download the rest.
Installing Classic Shell
- Open the application.
- On the Menu Style tab, select the All Options option and click OK.
- You want classic Win style
- Check the “Change button image” checkbox.
- ABOUT.
- "Select image."
- Show the way to it.
Let's sum it up
This time, Microsoft developers managed to create a truly unique Start menu that any PC user can customize. Also, for those who like menus without tiles, the developers have provided for completely disabling tiles, which will make it as similar as possible to the standard menu of the Windows 7 or XP operating systems. The image below shows the menu on Windows 10 and there are no tiles.
According to the developer, the Windows 10 system will be improved every year, so the future functionality and properties of the Start menu will expand significantly. In addition, there is not long to wait, because a major update for Windows 10 will be released in the summer of 2016, and another major update will be released in the spring of the same year. In both updates, Microsoft promises new OS functionality and user interface improvements.
We hope our article will help you configure the properties of the Start menu in the Windows 10 operating system and its use will simplify access to resources, programs and OS settings as much as possible.
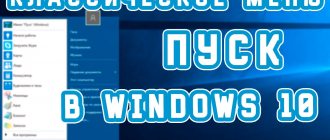
How to make a classic Start in Windows 10
Initially, this menu seems very cumbersome to many users due to the large number of elements. However, the operating system in this regard is not distinguished by the presence of flexible settings. You can do the following:
- Remove all tiles. To do this, you need to right-click on them and select the very first item in the list. It should be noted that each tile will have to be removed separately. To speed up the process, you can combine them into one folder.
- Reduce window size. After removing all the tiles, there will be some extra space left. To get rid of it, just hold the LMB on the edge of the window and move it to the left.
- Remove the list of recently installed items. You can unpin them in the same way as tiles. However, this will not eliminate this item forever. Therefore, you should go to personalization and disable the corresponding function.
You can install a classic menu, which will be identical to previous operating systems, only using programs. It is recommended to use Classic Shell, ViStart 8.1 or Stardock Start10 (a brief description of them was provided above).
Thus, the Start menu can be significantly changed without even using utilities. To do this, just go to “Settings”. There are also several free applications that allow you to quickly customize the appearance of this menu. Paid ones, in turn, most often have a trial period.