People who spend a lot of time at the computer are interested in the question - how many hertz are in the monitor and how does this affect vision?
How to find out how many hertz are in the monitor
The easiest way to find out the hertz frequency of the display is to look at the specifications coupon on the manufacturer's box.
We look at the manufacturer's box with characteristics
The truth is that few people store such things, and then there is a second simple way - there is a factory label on the back of the monitor, which will also contain information about your display. And again there is an incident. Not all monitors have this specifications sticker.
Information on the label on the back of the monitor
You can find out the monitor frequency in a huge number of ways. Here are some of them.
What is a monitor refresh rate and its purpose?
The refresh rate of a monitor, or as it is called more briefly, hertz, is the speed at which frames change over a period of time (usually per second). That is, 30 Hz means 30 frames per second. The higher the Hertz value, the smoother and more pleasing to the eye the picture will be, so it is important to take care of how to find out the Hertz rating of the monitor before purchasing if you plan to work behind the screen for a long time.
The smoother the images on the monitor change, the less tired the eyes are, since they do not have to be distracted by what is happening too often, as happens with a sharp and jerky change of pictures. It is because of this that most people prefer monitors with a high number of hertz.
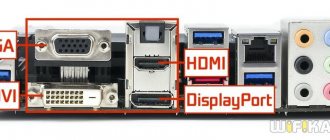
DisplayPort
In addition to the HDMI port, most gaming monitors also come with DisplayPort 1.2, which offers native support for 240Hz at 1080p, up to 165Hz at 1440p, and up to 75Hz at 4K.
DisplayPort 1.3 and DisplayPort 1.4 provide the additional bandwidth needed for 240Hz at 1440p, 120Hz at 4K, 60Hz at 5K, and 30Hz at 8K. The main difference between DP 1.3 and DP 1.4 is that the latter supports DSC (video stream compression), which allows it to deliver 144Hz at 4K, 120Hz at 5K and 60Hz at 8K, but with compression.
A mini-DisplayPort (or Thunderbolt) connector can output the same bandwidth as the DisplayPort implementation on which it is based. So, mini-DisplayPort 1.2 can run at 75Hz at 4K, 240Hz at 1080p, etc.
Additionally, the mini-DisplayPort is now being replaced by a USB Type-C port on new displays. The USB-C port sends DisplayPort signal for audio and video and can simultaneously charge (if the device supports power delivery) and transfer data to a connected device.
| DisplayPort to DisplayPort cable (standard) |
| DisplayPort to DisplayPort Cable (DP8K) |
| DisplayPort to Mini DisplayPort Cable (Standard) |
| DisplayPort to Mini DisplayPort Cable (DP8K) |
| HDMI-HDMI cable |
| Dual-Link DVI-D to Dual-Link DVI-D cable |
| Passive Thunderbolt 3 cable (20 Gbps) |
| Active Thunderbolt 3 cable (40 Gbps) |
Acceptable screen refresh rate
The average number of hertz on most monitors is 60. On more modern games that are tailored to the system requirements, the hertz can reach up to 240 Hz. But 60 Hz is quite enough if you plan to watch movies on the computer, work or play games with average system requirements, in which you do not need to monitor the smooth change of the image.
However, it is important to remember that 60 Hz is only enough for regular LCD monitors. When using 3D screens, the frame rate must reach at least 120 frames per second, otherwise the eyes will be unnecessarily strained.
In some cases, the default frame rate value may be lower than the screen specifications allow. That is why you need to know how to change the hertz for comfortable work.
Define model
You will have to determine the monitor model. The easiest way to do this is to look at the nameplate on the back of the device.
According to the regulations, the brand and model of the device is indicated there among other mandatory markings. All that remains is to google the device model and find a site where the characteristics of interest will be indicated.
This could be either the official website of the manufacturer or an online store like this one, which I often use, where you can find many modern monitor models.
Also, the characteristics of different monitor models are often given in reviews of computer hardware and peripheral devices, including on YouTube.
Also, the model is often indicated on the front panel of the device - usually next to the control buttons. However, this does not apply to frameless copies, the design of which does not provide for the presence of a front panel as such.
How to see the Hertz voltage of a monitor on Windows 10
Graphics driver settings or screen settings. The easiest way to find out the Hertz size of a monitor on the Windows 10 operating system is through the screen settings. To do this you need to know where to look:
- Right-click on any empty space on your desktop.
- In the menu that opens, click on “Screen Options”
- In the window that appears, select “Additional display options”.
- The next window will indicate the frame rate in a line called "Update frequency" The value can be easily identified by the Hz indicator indicated in parentheses.
System Information
There are many ways to open the system settings window. But now we will use only two.
- Run window
- Press the two keys Win and R together. They will launch a window called “Run”.
- In the “Open” line you need to enter the command “msinfo32”.
- Through the search engine in the Start menu
- Click on “Start” and enter the word “information” in the search bar. Click on the option that appears called “System Information.”
How to Change Screen Refresh Rate in NVIDIA, AMD and Intel Software
Each of these manufacturers leaves publicly available programs for setting screen parameters, which are often downloaded along with the drivers. These settings for both laptops and desktop computers support the ability to change the screen refresh rate. As a rule, this happens according to one scheme:
- On the desktop RMB on a free area.
- Use the drop-down menu to select Intel (or AMD) graphics settings or the NVIDIA control panel, depending on which video card is installed.
- In the program that opens, change the settings to the desired values.
- For Intel software, this happens in the main settings.
- For AMD software, the monitor hertz is changed in the additional display parameters.
Where to enable 144 Hz?
Next, go to the Display item “Change resolution“. We check that the refresh rate is 144 Hz or lower, select the option “Use NVIDIA color settings” and click apply. Next, in the “G-SYNC Settings” section, check the “Enable G-SYNC, G-SYNC support”. Select the option “Enable in full screen mode”.
Interesting materials:
How long do you work on a day off? How many employees can an individual entrepreneur have on the Usn? How many times during the working year can an employee be temporarily transferred to another job if emergency circumstances arise? How much does 1 hour of work cost in Ukraine? How much does an hour of freelance work cost? How much does an hour of work cost in America? How much does an hour of work cost at McDonald's Moscow? How much does an hour of work cost in Ukraine 2022? How much does a medical examination cost when applying for a job in Ukraine? How much does it cost to obtain a patent for work in the Moscow region?
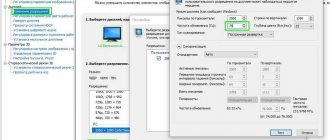
Changing your monitor refresh rate in Windows 10 and previous operating systems
In order to change the hertz, it is enough to know how to use the built-in tools of the Windows OS and how many hertz to set. The process is carried out in a few simple steps:
- Go to Display Settings through the desktop or Start panel, where you select system and display settings.
- Click on advanced display options.
- In the latest versions of Windows 10, Hertz can be set immediately in the additional parameters. If the version of the operating system is lower, and the window that appears does not have this option, then follow these steps.
- In Display Information, select Video Adapter Properties.
- A new window will appear in which you can not only increase or decrease the monitor’s Hertz values, but also change the color depth and monitor resolution. Click on the item " Monitor» and select the required number of hertz.
- If it doesn’t work, in the “Adapter” item, go to the list of all modes and set the necessary settings there. If you have multiple monitors installed, select the one you are currently working on. In some cases, the monitor may blink and display an “Out of range” error. Wait about 15-30 seconds, do not touch anything, the system itself will return the original settings.
For Windows 7 and Windows 8, the process of changing the screen refresh rate is exactly the same. Only the window with additional parameters opens through the screen and its resolution.
There is no point in changing this parameter often; the standard 60 Hz is enough for the everyday needs of the average PC user. Changing the hertz is necessary when working with graphics or for a more pleasing and smoother picture for the eye in modern games.
Option 3. Third-party program Aida 64
This program can be downloaded from any trusted resource on the Internet and installed on your computer for further use. The simple interface will help you easily know about the different characteristics of your PC in the future.
- After launching the utility shortcut, it will quickly scan the OS system, collecting data for display in the main window.
Main window of the Aida 64 program - Go to “Display” and select “Monitor”.
Monitor information
In this window you can find out complete information about your display.
HWInfo
Let's consider HWInfo as third-party software.
By clicking on the link, the user’s screen will display three options to choose from.
In the first case, the installer is downloaded, which installs the utility as a regular program. Download the distribution, install it and use it.
The second is the so-called “portable” version. This means that the utility is not installed and leaves no traces on the Windows OS. The user downloads the archive, unpacks it and runs the utility.
The third option is suitable for users without a graphical shell. It is popular for system administrators. The archive is downloaded and controlled via the command line.
Select the first item, indicate the path to save, and then install. Following the wizard's prompts, we launch the utility. Go to the Monitor tab.
Select a monitor. A window will open on the right side with a detailed description of the characteristics.
The list of frequencies that are available depending on the monitor resolution is highlighted in red.