Here are the basic methods for changing the appearance of the Start menu in Windows 10.
Your IT assistant
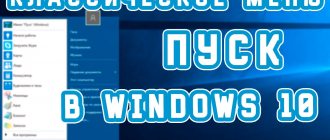
In Windows 10, the main inconvenience of previous versions has been corrected: the Start button has been returned to its rightful place. But now it doesn’t look the same as before, because its previous appearance has been combined with the Windows 8 start screen. However, customizing the menu to suit your needs is quite simple.
How do I restore the Start menu in Windows 10?
The Start Menu is missing in Windows 10. Several users have reported that the Start Menu is missing from their PC. This may be a problem, but you can fix it by scanning for corrupted system files. ...
- Update your video card driver. ...
- Use third party software. ...
- Uninstall Dropbox. ...
- Try restarting all Windows 10 applications...
- Create a new user account.
22 Sep. 2022
Start button settings
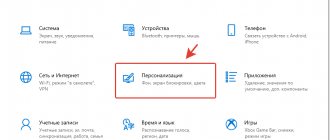
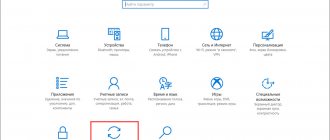
To access the menu settings, you need to right-click on it. Then a context submenu will appear. It can also be called by pressing the Win + X keys. Most settings are made in the “Personalization” section.
To go to Start settings, right-click on the button and select “Personalization”
Switch to full screen mode
To expand Start to full screen:
- Open the Start tab in the Personalization window.
Move the "Open Start screen in full screen" slider to the "On" position.
To switch the Start menu to full screen mode, select the appropriate item in the Personalization window
Another way to switch Start to full-screen view is to activate tablet mode:
- Expand the notification center by clicking on its icon on the taskbar.
- Find the "Tablet Mode" item and activate it.
Start menu switches to full screen when switching to Tablet Mode
Video: How to enable full screen mode for the Start button
Start button color and shape
You can change the color, shape, and other appearance parameters of Start. To do this, go to the “Colors” tab in the “Personalization” window. On the right, select the desired color (or set it to automatically select). Here you can make the entire menu transparent by applying the appropriate settings under the color palette.
To change the color of the Start menu, you need to go to the “Colors” tab of the “Personalization” window
The menu can be easily resized using the mouse - drag its borders as far as needed.
Pin objects
In Start you can now pin a variety of objects: shortcuts to desired programs, all kinds of folders and individual files. To do this, just call up the context menu by clicking on the desired icon and select “Pin to Start Screen”. The corresponding item will immediately appear in the Start menu.
To pin an object to Start, call up the context menu and select “Pin to Start Screen”
Similarly, to unpin, right-click on a file or shortcut located in the menu and select the corresponding item in the drop-down column.
To unpin an object, right-click on it and select “Unpin from Start Screen” from the menu.
Setting up tiles
The sizes of the tiles can also be changed using the context menu: select “Change size” and select the required dimensions from four options.
To change the size of tiles in the Start menu, you need to select the corresponding item in the context menu
You can move tile icons by simply dragging them across the desktop to the desired location. Also, for user convenience, the system allows you to distribute tiles into groups. You can create groups in two ways:
- Grab the tile with your mouse, move it to the very bottom of the menu and leave it under the black line that appears. Next, name the group in the appropriate section. To rename, click on the name, highlight it and enter a new one.
To create a group, you can move the tile down and enter the name of the folder in the window that appears - Grab one of the tiles and drag it to another if you want to combine multiple tiles into one folder. To add more applications to them, follow the same steps.
To combine tiles into groups, just move one tile to another
Other Start settings
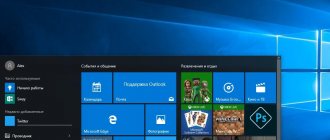
By default, in the Start menu, the system shows the applications that the user opens most often, or those programs that were recently installed on the PC. This can be changed in Personalization by turning off the corresponding sliders.
The Start menu's display of recently added and frequently used apps changes in the Personalization window
In the same window, you select the folders that will be displayed in the menu.
In the personalization settings you can also choose the folders that will be displayed in the Start menu
Another innovation of the updated Start is the ability to hide the list of all applications. So, in the first version of Windows 10 there was an “All applications” item, but it was impossible to hide them. Now the user just needs to switch the slider opposite the corresponding item in the “Start” tab of the “Personalization” window.
Drag the desired slider to hide the list of all applications
Basic troubleshooting
When troubleshooting basic start (and for the most part all Windows applications) problems, you need to check to see if they are not working as expected. For problems where a menu or sub-component is not working, you can do some quick tests to narrow down where the problem might be.
Checking the equipped axis and updating the version
- Does the system work with the latest Feature and Cumulative Monthly update?
- Did the problem start immediately after the update? Verification methods: PowerShell:::OSVersion.Version
- WinVer from CMD.exe
Check if start is installed
- If startup fails immediately after a feature update, you need to check whether the App package failed to install successfully.
- If Start worked and just crashes intermittently, then most likely Start is installed correctly, but the problem is occurring downstream. To check this problem, you need to look for the output of these two PS commands:
Failure messages will be displayed if they are not installed
Check if start is running
If any component fails to boot, checking the event logs for errors or failures during boot may indicate a problem. Booting with MSCONFIG and using a custom or diagnostic startup will eliminate and/or identify possible interference from additional applications.
If it is installed but not running, check to boot into Safe Mode or use MSCONFIG to eliminate third-party or additional drivers and applications.
Check if the system is a clean install or an update
- Is this system an upgrade or a clean install? Performance
- If this file does not exist, the system is a clean install.
Check if start is registered or activated
- Export the following event log to CSV and search for keywords in a text editor or table: Microsoft-Windows-TWinUI/Operational for Microsoft. Windows. ShellExperienceHost or Microsoft. Windows. Cortana "Package not found"
- "Invalid values for the registry"
- "Item not found"
- "The package could not be registered"
If these events are found, start activating incorrectly. Each event will have more detailed information in its description and should be investigated further. Event messages may vary.
Restore point
The main menu picture is tied to the “Explorer.exe” system service (do not confuse it with the name of the browser). The new icon should not affect the operation of Win. But still this is a change in OS files. And it’s better to create a restore point. If something goes wrong, you can return the settings that were before installing the icon.
Click on Create
Administrator rights
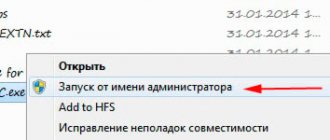
To change the main menu icon, you need full access to Explorer.exe. This is the service responsible for the conductor. The file is located in the system root directory C:/Windows/. To edit it you need administrator rights.
Now we need to set administrator rights to explorer.exe
You can also open administrative access to the file using the Takeownershipex program. Find it online, download, install and run. There will be two buttons: “Gain access” and “Restore access”. Click on the first one and specify the path to “Explorer”.
Just in case, create a backup copy of this file. Just copy it anywhere. If anything, you can change the edited version to the original one.
Start Orb Changer for Windows 7
Here's how to change the Start icon on Windows 7 using Start Orb Changer
- Find it online and download it.
- Unpack it if it is in the archive.
- Run it as administrator.
Star Orb Changer
- There will be three samples of icons: “Default” (not active), “Hover” (when selected - you need to move the cursor) and “Pressed” (pressed).
- To change them, click on “Change”.
- Specify the path to the graphic file.
- The “Restore” button resets the settings and returns the standard icon.
Alternative option
If none of the options helped you, and problems with Start continue, then we advise you to use programs that return the classic Start menu. One such program is Start Menu 10. You can download this utility on its official website www.startmenu10.com. Installing Start Menu 10 is very simple and any PC user can handle it. After launching the utility, it will be built into the notification panel and will also replace the Start menu with its own.
If you open the program settings, you can customize the design of the new Start, set hotkeys and even change the main icon. After digging a little into the settings of Start Menu 10, we replaced the standard Start icon.
We also changed the design of the menu itself.
The Start Menu 10 utility is very easy to use, so even a novice user can handle it. I would also like to note that in addition to Start Menu 10, there are also utilities such as Start Menu Reviver and StartIsBack++, which allow you to return the classic Start menu. These utilities, like Start Menu 10, have a considerable range of settings and can also be used for free.
Using the official utility from Microsoft
As we mentioned at the beginning of the article, Microsoft received so many complaints from users regarding Start not working that they even released a special utility to solve it. It works similar to the troubleshooter, but looks for problems in sections related to the system's graphical shell.
After launching the utility, it will check the operating system for errors and automatically fix them. To do this, click the “Next” button.
If problems are found during the scan, they will be fixed automatically. However, it may happen that the utility does not detect the problem at all.
Regardless of the diagnostic results, we can click the “View additional options” button to see a list of checked objects and corrections (if any were made).
The latest version of the utility does the following:
- checks the application manifest for errors;
- looks for errors in application tile databases;
- looks to see if the current account has access to the required registry branch.
- checks whether all applications necessary for correct operation are installed, and whether they are installed correctly.
Unfortunately, this utility has already been removed from the official Microsoft website, but it can still be found on the Internet.
Return of the old menu
If the design of the old menu from Windows 7 suited you better or you liked it for other reasons, you can return it. Firstly, if you remove everything unnecessary from the menu, it will be simplified as much as possible and will become partially similar to its old version.
You can remove everything unnecessary from the Start menu
Secondly, there are a large number of third-party programs that allow you to return the real menu. For example, the free Classic Shell application provides several varieties: classic, two-column, and an absolute copy from Windows 7.
Using the Classic Shell program you can return the menu from Windows 7
Changing the icon
By default, the Quick Access Toolbar for the Start menu uses the Windows 10 logo icon. The only way to replace it is with the Classic shell program described above. When deciding on the menu style, pay attention to the bottom block; it allows you to select one of the proposed icons or upload your own. Once the new picture has loaded, the icon on the Quick Access Toolbar will change.
Selecting a new icon for the Start menu
If you later want to return the standard icon, deactivate this function in the program by removing the checkmark. You may need to restart your computer for the changes to take effect.
Administrator rights
To change the main menu icon, you need full access to Explorer.exe. This is the service responsible for the conductor. The file is located in the system root directory C:/Windows/. To edit it you need administrator rights.
Now we need to set administrator rights to explorer.exe
You can also open administrative access to the file using the Takeownershipex program. Find it online, download, install and run. There will be two buttons: “Gain access” and “Restore access”. Click on the first one and specify the path to “Explorer”.
Just in case, create a backup copy of this file. Just copy it anywhere. If anything, you can change the edited version to the original one.
Restore point
The main menu picture is tied to the “Explorer.exe” system service (do not confuse it with the name of the browser). The new icon should not affect the operation of Win. But still this is a change in OS files. And it’s better to create a restore point. If something goes wrong, you can return the settings that were before installing the icon.
Click on Create