In Windows, you can change the design, themes, desktop background, screensavers and shortcuts. But you cannot change the design of the Start button through standard settings. It displays the Win logo by default. And what if you want to see a different image on the main menu? The only option is to use third-party programs, since the OS itself does not provide the necessary tools. Find out how to change the Start button in Windows 7, what utilities are suitable for this, and how to use them.
Restore point
The main menu picture is tied to the “Explorer.exe” system service (do not confuse it with the name of the browser). The new icon should not affect the operation of Win. But still this is a change in OS files. And it’s better to create a restore point. If something goes wrong, you can return the settings that were before installing the icon.
- Click the Start button.
- Go to "Control Panel".
- "System" menu in the "System and Personalization" category.
- Item "Additional parameters". He's on the right.
- System Protection tab.
- "Create" button.
Click on Create
- Come up with a name for the restore point.
- Wait while the current Windows configuration is saved. You can return to it in the future if critical errors occur.
- To make a backup, click the “Restore” button. It's in the "System Protection" menu. All available points will be there.
StartIsBack+
This program allows you to equip the Windows 10 operating system with a full-fledged Start button. One of its main advantages is its complete similarity with this menu in Windows 7. The application provides the menu with all the functionality of the button that was in the “Seven”. The utility has excellent functionality that allows you to remove Metro programs and most of the annoying utilities installed on the system by default.
It should be noted that the application can eliminate user surveillance and make it impossible to record conversations of the owner of the Cortana computer.
The utility is suitable for installation in all versions of Windows 10.
Administrator rights
To change the main menu icon, you need full access to Explorer.exe. This is the service responsible for the conductor. The file is located in the system root directory C:/Windows/. To edit it you need administrator rights.
- Go to this folder.
- Find "Explorer" and right-click on it.
- “Properties” item.
- Section "Security".
- Click the "Edit" button.
Now we need to set administrator rights to explorer.exe
- In the “Permissions for the System group” field, set the value to “Full Control”.
- Click on "Apply".
You can also open administrative access to the file using the Takeownershipex program. Find it online, download, install and run. There will be two buttons: “Gain access” and “Restore access”. Click on the first one and specify the path to “Explorer”.
Just in case, create a backup copy of this file. Just copy it anywhere. If anything, you can change the edited version to the original one.
Notes from an IT specialist
Without exaggeration, the Start button can be called one of the symbols of the personal computer; it is also difficult to overestimate the influence it had on the development of user interfaces. Appearing in 1995, it, along with the menu of the same name, took its place for a long time and Microsoft’s decision to get rid of it in Windows 8 was received very ambiguously, which forced it back.
The course on network technologies from Dmitry Skoromnov is suitable for both beginners and people with experience. Practicing system administrators will organize their knowledge and fill existing gaps. And those who are just entering the profession will receive basic knowledge, without fluff and unnecessary theory. After training, you will be able to answer the following questions: • at what level of the OSI model can switches operate? • how best to organize the network of an organization with many departments? • why use VLAN technology? • why should servers be placed in the DMZ? • how to organize the unification of branches and remote access of employees via VPN? and many others. Already know the answers to the questions listed above? Or are you in doubt? Try the Networking Fundamentals test. There are 53 questions in total, one test cycle includes 10 questions. Each time the set of questions is different. The test can be taken multiple times without losing interest. Free and without registration.
What happened before
Many users who began their acquaintance with computers relatively recently may believe that the Start and the familiar interface concept have always been there, or almost always, and before that there was the command line and DOS. But this is not so, various kinds of window interfaces began to appear quite a long time ago, and in the late 80s they began to confidently occupy their niche, since PC resources began to fully allow this.
Windows 3.1 , released in 1992 , which offered users a new, fully graphical interface that made it possible to fully unleash the capabilities of modern hardware for those years.
The main window opened upon login was
the Program Manager , which gave access to programs, utilities, and data locations. Minimized windows were displayed as icons on the “desktop”, although the desktop in the modern sense did not yet exist, you could not place your files, folders or shortcuts on it. Closing Program Manager terminated your Windows session.
In UNIX systems, the industry standard for many years was CDE , which worked on similar principles, although it undoubtedly represented a more advanced shell.
A common drawback of shells of those years was the lack of a single point of access to installed and running programs and data. At the same time, these were full-fledged graphical shells that made it possible to conveniently work with windows and multitasking.
Classic Start Menu
By the mid-90s, the computing power of computers made it possible to work with full-color graphics and multimedia, and the Internet also began to take its first steps. This brought computers closer to the user and led to the need to create a simpler and more convenient shell.
The new interface was introduced in Windows 95 . the Desktop appeared , where the user could place his documents and shortcuts, the taskbar , where all running applications were displayed, and of course the Start button , which represented a single access point to programs, documents and system settings.
This was a significant step forward, the system became more convenient, seamless and intuitive. Almost any action in the system could be done using the mouse, simply by clicking on an icon or dragging an object.
The Start menu allowed you to quickly jump to programs, recent documents, or settings without being distracted from your work or minimizing the main program window. The only settings available are adding or removing menu items.
NT 4 released in 1996 , a system for networks, servers and corporate users.
The same interface carried over to Windows 98 . A quick launch panel has been added and networking capabilities have been more deeply integrated into the system. There was also a collapse of the Programs in the Start , when the system hid rarely used software, making it easier to access frequently used programs. A convenient innovation is the ability to add menu items by dragging icons, and also change their position in the same way.
Windows 2000 , in addition to cosmetic changes to the interface, brought new opportunities for fine-tuning it. In particular, it was now possible to make many menu items expandable, which made it possible to get to the desired items without opening additional windows, and also to choose which items would be displayed. For the Programs , which could have a very large number of elements, it became possible to use scrolling, instead of displaying several menu bars at once.
Exactly the same changes occurred in the Windows Me , which, however, was received rather coolly by users.
From “classics” to modernity
Despite the external similarity with Windows 2000, under the hood of the Millennium the same Windows 98 remained, which was significantly outdated by that time, and Windows 2000 continued to be a corporate and server system, inconvenient for home use. The “race for megahertz” that began at that time made possible everything without which a modern PC is unthinkable: three-dimensional games with realistic graphics, wide multimedia capabilities, and users could now not only consume multimedia, but also produce it themselves.
The same period saw the widespread adoption of the Internet and networks, first corporate, then home networks. The computer has ceased to be a working tool for solving narrow problems and has become a means of communication and entertainment for the whole family. This is reflected in the new interface of the new operating system Windows XP .
The new double-leaf Start menu immediately attracts attention; at the top left there are separate shortcuts for the browser and email client, showing that the Internet is now not a luxury, but an everyday working tool. Below is a list of frequently used programs, now you don’t have to look for them in the menu every time or clutter your desktop with shortcuts. In addition, the list is interactive; if your work priorities change, the contents of the list will change.
On the right are the usual classic menu items, but for the first time they included the My Computer , which, like many other items, can also be presented as a menu, gaining direct access to disks with one click on the Start button. The remaining programs are hidden in the All programs , the contents of which are similar to those of the classic menu.
For retrogrades, it remains possible to use the old menu, which was transferred to the new system from Windows 2000 almost unchanged.
At first, the new interface and the new Start menu were received ambiguously, but the system turned out to be successful and the solutions contained in it gradually became classics and had a strong influence on the development of interfaces. Windows XP also became the longest-lived system, released in 2001, it almost reigned supreme for 8 years, until the release of Windows 7, and was almost forcibly withdrawn from support in 2014, while continuing to be quite widely used.
The next operating system has rightfully earned the titles of the biggest long-term project and the biggest disappointment. Yes, it's exactly what you're thinking - Windows Vista . Today we can confidently say that Vista was a deafening failure; comparison with Windows Me is not even appropriate here. The millennium simply went unnoticed between Windows 98 (1998 and 1999 - SE edition) and Windows XP (2001). We had to wait five years for the next system, during which a lot was promised and interest in the new product was quite high.
It is impossible to say unequivocally that Vista is a bad system; the technical solutions contained in it formed the basis for the rest of the line of operating systems and are successfully used to this day. However, low system requirements and compatibility problems led to a sharply negative perception of the system by users. On most budget and mid-priced systems, the new OS behaved like a snail caught in a jelly, leading to its mass replacement with Windows XP.
But that's not what our story is about. Windows Vista received an updated menu and an updated Start button. The button became compact and got rid of the inscription; over the past 11 years since its appearance, it has become one of the symbols of the Windows OS and clearly no longer needs explanation. The menu itself is almost exactly the same as the Windows XP menu, except for one really important detail - the search bar. This innovation is difficult to overestimate; now you don’t need to scroll through the menu in search of the desired program, you just need to type the first few letters.
All programs
menu has also undergone changes ; now it does not appear as a separate list, but opens on the left side of the menu, allowing you to avoid cluttering the screen; sub-items no longer appear as separate menus, but are folders that expand vertically. Thus, the Start menu has completely acquired a new, modern look, getting rid of the last elements of the classic menu.
Also, Windows Vista became the last system in which the classic menu, like Windows 2000, is available.
Microsoft learned a good lesson from the failure of Vista, so the next version of the OS, Windows 7, quickly gained popularity comparable to the success of Windows XP. The new release brought many improvements to the Start menu, making it even more convenient. The idea of pinning items in the left column of the menu has reached its logical conclusion; now you can pin any icons in any quantity.
The second great idea was jump lists that look like arrows next to the name of the program; if you move the mouse cursor to such an item and hold it, a list of recently opened documents, visited sites, etc. will appear on the right side of the menu. If necessary, elements of this list can also be pinned.
Otherwise, the menu continues to use the ideas laid down in Windows XP and Vista, turning from a few drop-down lists in Windows 95 into a powerful and convenient tool for accessing programs and data. Windows 7 also became the first system in which the classic Start menu is no longer available.
No start needed! Or is it still needed?
Windows 7's Start menu would seem to have reached a certain degree of perfection, allowing you to quickly navigate to data locations, programs and documents, and perform searches. It's time to consolidate the success... But the new challenges that Microsoft faced turned everything upside down. Having slept through the formation of the mobile market, the corporation rushed to catch up and overtake, almost declaring the end of the era of the PC and desktop, in favor of portable mobile devices.
Therefore, Windows 8 received a new, gesture-oriented interface in which there was no place for either the Start menu or the button of the same name. They were replaced by the start screen and magic corners, which almost immediately caused acute attacks of rage in everyone who worked with the new OS in a virtual machine window or via remote access; hitting the mouse exactly in the corner of the window was still fun.
The new start screen immediately outlined the priorities of mobile devices over classic ones. It looks good and appropriate on a tablet, but not on a 24-27 inch monitor.
And the list of programs, if there are quite a lot of them, immediately strives to turn into a multi-colored dump, and even with horizontal scrolling, which is unusual on a PC:
These initiatives were met, to put it mildly, with misunderstanding, and a lot of utilities immediately appeared on the market that returned both the button and the menu, as well as removing all mobile and tablet misunderstandings out of sight. For example, below shows the operation of the Start8 , which returns the familiar interface to Windows 8.
By the release of Windows 8.1, the company came to its senses a little and returned the Start button to its place, although instead of the menu it continued to use the start screen, making it possible to skip it at startup and boot directly to the desktop.
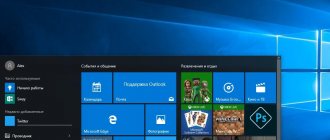
Having failed to gain a foothold in the mobile market, Microsoft began to revise its plans, which resulted in the return of the Start menu already in the first public builds of Windows 10. The new menu in these releases was a kind of hybrid of the start screen and a modern menu: the right side was given over to live tiles, and Data locations (computer, documents, network) have moved to the left, to programs.
In subsequent releases, the general trend continued, but the menu itself underwent significant modifications, so in build 10064 locations turned into regular links, and the freed-up space was returned to the list of frequently used programs, below which a list of recently added ones appeared. The menu has also changed significantly in appearance, no longer resembling a cut-off piece of the start screen stuck to the Start button.
The following changes occurred in build 10130, bright colors disappeared, giving way to muted shades, and on the left side, all links to data locations and settings, quick access to which was one of the advantages of the modern menu, disappeared.
But test builds are test builds because they are designed to test new ideas, so already in build 10166, the locations returned to the menu again, and it itself acquired a finished form, in which it went into build 10240 and, most likely, will end up in the release.
The locations have been reduced to the Explorer and Settings , which have moved to the bottom of the menu to the shutdown button and the list of all applications. The Explorer menu is customizable, you can pin any location to it, just drag the folder to the taskbar and select Pin to Explorer (spelling preserved). Another controversial innovation: submenus and jump lists no longer expand on mouse hover, only on click. Most likely, this was done for the sake of mobile users to avoid false positives during short touches.
In terms of brevity of settings, the new menu can give a head start to Windows 95 - there are simply none. In any case, having called the Properties of the taskbar and the Start menu, we could not find a single setting for this very menu.
The list of programs looks like a similar screen in Windows 8, sorted alphabetically, although this is not always convenient. So the Vivaldi browser was logically hidden in a folder of the same name, and the applications of the new Office were evenly spread across the entire menu, while placing additional tools in a separate folder in another place. If this does not cause any inconvenience with familiar applications, then with new ones it can cause serious difficulties in finding all the components of the newly installed package.
Search is now integrated with Cortana and can be presented as a search bar or button in the taskbar (see screenshots above), or removed if you're more minimalistic. However, all you have to do is open the Start menu and start typing the first letters of the application you are looking for.
In general, the new menu causes conflicting feelings. On the one hand, the return of a familiar interface element can only be welcomed, as is its development. On the other hand, despite the imminent release, the menu contains a lot of shortcomings. Take, for example, the complete lack of settings or live tiles, in which only the word in the name is live, it would be logical to expect that the weather tile, occupying double size, would at least show the current weather, as it was in Windows 8.
However, if we understand Microsoft correctly, with the release of Windows 10 the system does not freeze at some point, but continues to develop, so, as they say, we’ll see. In any case, the new Start menu looks interesting and has great promise.
And not just Windows
As we've already said, the Start menu has had a significant influence on the development of user interfaces. We can find a similar construction of the workspace in a variety of systems, for example, QNX (commercial real-time OS). The developers did not split hairs and simply called their version the Launch .
The strong influence of Microsoft ideas can be seen in the popular KDE :
Moreover, it cannot be said that the KDE developers simply copied Start from Windows, we have a completely independent working environment, but the source of the developers’ ideas lies on the surface, the latest versions of KDE only confirm this assumption.
A certain influence of Microsoft ideas can also be seen in the first releases of another popular open environment, Gnome .
Subsequently, Gnome was heavily influenced by the ideas of MacOS, eventually presenting users with a creative reworking of the best solutions of both systems, it turned out so successfully that Gnome2 is still alive, continuing to develop in a fork of Mate.
Also Start Menu ideas are seen in XFCE as a common access point to programs and locations.
And LXDE completely set itself the goal of copying the environment familiar to Windows users.
Unity
windowing environment largely follows the ideas of Windows 7.
However, we are not inclined to endless disputes about who borrowed what from whom, but believe that healthy competition and alternative implementation of ideas only benefit all of us - users of software products and are confident that the Start button and menu, having celebrated its 20th anniversary this year summer anniversary will continue to set the tone in user interfaces.
The course on network technologies from Dmitry Skoromnov is suitable for both beginners and people with experience. Practicing system administrators will organize their knowledge and fill existing gaps. And those who are just entering the profession will receive basic knowledge, without fluff and unnecessary theory. After training, you will be able to answer the following questions: • at what level of the OSI model can switches operate? • how best to organize the network of an organization with many departments? • why use VLAN technology? • why should servers be placed in the DMZ? • how to organize the unification of branches and remote access of employees via VPN? and many others. Already know the answers to the questions listed above? Or are you in doubt? Try the Networking Fundamentals test. There are 53 questions in total, one test cycle includes 10 questions. Each time the set of questions is different. The test can be taken multiple times without losing interest. Free and without registration.
Where can I find the badges?
It’s better not to put the first art you like from your gallery on the “Start” button. Use images specifically designed for this purpose. They are already edited and have the appropriate format and size. They also specify the correct arrangement of objects. Suitable images can be downloaded from the 7themes website or oformlenie-windows.ru. Although there are a lot of resources with free icons.
Possible appearance of the Start button
The file with the icon must have a BMP extension (no background). Make sure that it has three options for icons: for a “regular” button, highlighted and pressed. Try hovering over the main menu. And you will see that it changes depending on what is done with it. Although no one forbids putting one picture for all “states”.
Start10
This program can be considered a leader in the presented list of utilities. It functions perfectly in Windows 10 and can make using the new system as convenient as in the “Seventh” version of the system. There are many pre-installed themes for the visual presentation of the menu, as well as the Start button icon itself.
Supports clicking on the “Win” key, which can also be added to the application’s advantages. The search function is very fast and indexes applications and files. The disadvantages of the utility include the lack of free distribution. The free trial version lasts no more than 1 month.
Next, the developers will recommend that the user buy it for five dollars. Considering its significant functionality and reliability, the price for such a development is not high, since the program is equipped with an almost complete set of functions currently required by the owner of any computer.
Start Button Changer for Windows 7
Start Button Changer is a utility through which you can load a new image for the main menu. It has a very simple interface. There are only two functions: setting an icon and resetting to original settings. Suitable only for Win 7. The name of the program translates something like this: “Start Button Converter.” Here's how to use it:
- Find it on the Internet and download it. Just enter the query “Windows 7 Start Button Changer” in a search engine and select any site. It is better to download from resources that are on the first page in the search results.
- If the utility is in an archive, unpack it.
- There should be an executable file with a .EXE extension.
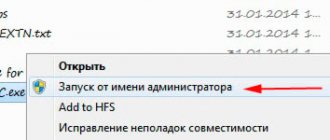
- Right-click on it.
- “On behalf of the administrator” item.
Start Button Changer window
- To change icons, click the “Select & Change” button.
- Specify the path to the icons.
- Click on “Open”.
- To restore the original settings, there is the “Restore Original” option.
Customizing the Start Menu on Windows 10
How can you change the appearance of Start so that it resembles a standard window from Windows 7? You can change the color and size of the window, and remove tiles using the menu settings themselves.
Changing size and color
Anyone, even a novice user, can easily resize the large Start menu in Windows 10. The menu shrinks in the same way as the Windows Explorer window.
- Move your mouse cursor to the right edge of the menu so that a double arrow appears, pointing to the right and left.
- Drag the arrow to the left to reduce the width of the Start.
- Repeat the same steps with the top edge of the menu. As a result, you will have a menu that will be almost the same size as the system menu of Windows 7 or XP.
The Start window appears smaller after defining its borders with the mouse
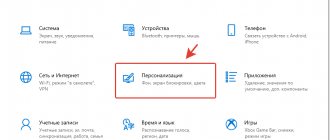
In the “Personalization” section, change the window color if you are not happy with black. How to do it?
- On the “Desktop”, find an empty space with no icons. Right-click on it.
- In the small list of options that appears, select the very last item “Personalization”.
Select the last option "Personalization" to open the window with appearance settings - In the second section “Colors”, select the shade you need from the palette.
- Now scroll the page to the item “Display the color of elements on the following surfaces.” Set the value to “In the Start menu, on the taskbar and in the notification center.” You will immediately see that the taskbar has changed color. Close the settings window.
Oh, on the taskbar and in the notification center"
Actions with tiles
You can perform various manipulations with live tiles on the right side of the screen: add, swap, rename, create, etc. However, most users are interested in how to get rid of tiles if they are not needed. Let's look at how to completely remove them from Start if they bother you:
- Left-click on Windows in the lower left corner to bring up the system menu.
- Now right-click on any tile. In the small list of options, you need to select “Unpin from Start Screen” - it will immediately disappear from the menu.
Select "Unpin from Start" - Repeat this step for each tile.
- When there are none left, reduce the menu size as described in the “Changing size and color” section of this article. The result is a menu that resembles the Start menu from Windows 7.
You can remove all tiles from the Start menu and reduce its size
If you don't want to completely remove the tiles, change their size. Right-click the tile and select “Resize” from the list, then click “Small.” You will need to repeat this procedure for each tile separately.
Select Small to reduce the tile size
Setting up the left block
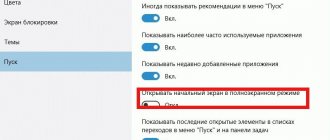
Launch the Personalization window as described in the Changing Size and Color section of this article. Go to the Start tab. This is where we will carry out all additional manipulations. Disable the following items:
- Show more tiles. So that only the left side without tiles remains in the menu.
- Show a list of applications in the Start menu. The large list of programs will disappear from the menu. Instead of this list, we will put other blocks. We will describe how to do this below in this section of the article.
- Show recently added applications. Utilities that you recently installed will not appear in the Start menu.
- Show the most frequently used applications. You won't see a list of the programs you use most often.
- Sometimes show recommendations in the Start menu. Windows will not display recommendations in tiles.
Turn off any unnecessary options that control the appearance of the left side of the Start menu.
To fill the cleared space on the left side, click the link that says “Choose which folders appear in the Start menu.” In the presented section, select blocks that will be displayed as a list in the left menu area.
Enable the sections you want to see in the left Start zone
If you want to remove only some programs from the list without deleting it completely, use the following instructions:
- Open Start. Right-click on a section in the list.
- From the Advanced menu, select Don't show in this list. Click on "Don't show in this list" to remove the program from the Start menu
- Repeat these steps for each program you want to remove from the list.
Sorting tiles into groups
You can organize all the tiles you need into specific groups to keep your Start menu less cluttered. Use existing ones or create your own.
Sort the tiles you need into groups by dragging them
To create a new group, click on the icon with two parallel stripes and enter the group name in the field. Drag all the necessary tiles into this group.
Create a new group and place the tiles that are important to you there
Video: how to customize and optimize Start in Windows 10
Start Orb Changer for Windows 7
Here's how to change the Start icon on Windows 7 using Start Orb Changer
- Find it online and download it.
- Unpack it if it is in the archive.
- Run it as administrator.
Star Orb Changer
- There will be three samples of icons: “Default” (not active), “Hover” (when selected - you need to move the cursor) and “Pressed” (pressed).
- To change them, click on “Change”.
- Specify the path to the graphic file.
- The “Restore” button resets the settings and returns the standard icon.
The application has advanced options. To open them, click on the small gray arrow at the bottom right. Only two points are important.
- By Patching Memory. RAM is used to change the main menu.
- Be Editing Resources. Edited by "Eexe".
Power 8
A very easy-to-use application that turns the start menu into “Start” with a comfortable interface. Absolutely all programs installed in Windows 10 will be present in the list and conveniently sorted. In addition, much-needed elements for the user will appear: This computer, Administration, Network, Control Panel, Libraries. And also in Start there will be a standard display of folders through which you can open the programs required for work.
Also among the main advantages of the utility, it is worth noting the presence of Search, which operates at the same high speed as in Windows 7. In addition to standard functions, the new Search allows you to analyze the contents of not only the computer’s memory, but also the Internet. Absolutely all users who use this program in version 10 of the OS note that it works successfully in the new system without failures or complaints.
Classic Shell
The Classic Shell utility is suitable for Windows 8 and 10. It is a comprehensive program for customizing the Start menu. But now we only need icons in it.
- Download it from classicshell.net. There is a tab “ALL DOWNLOADS”.
- Start the installation. To work with the design of the main menu, use the “Classic Shell Start Menu” component. You don't have to download the rest.
Installing Classic Shell
- Open the application.
- On the Menu Style tab, select the All Options option and click OK.
- You want classic Win style
- Check the “Change button image” checkbox.
- ABOUT.
- "Select image."
- Show the way to it.
How to bring back the classic Start menu in Windows 10
If you have Windows 10, that doesn't mean you can settle for just the new Start menu. You can put back its old version using easy-to-learn programs. Today we will look at several of the most popular utilities: installation and operation of them.
Using the Classic Shell program
Classic Shell is a popular tool for bringing back the classic Start menu. Its great advantage is that it is free. The utility includes three components that can be installed all at once or separately:
- Classic Start Menu - The return of the classic Start menu.
- Classic Explorer - Add a toolbar to Windows Explorer.
- Classic IE - customizing panels in the Internet Explorer browser.
Where can I download this program, how to install it, and then work in it?
- This software has its own official resource, so we will download the installer from there. Follow the link and click on Classic Shell 4.3.1 (Russian) to download the Russian version of the program. Download the Classic Shell installer from the official website
- In "Downloads" find the installer file and run it. Left-click on “Next”.
Click on “Next” - Then check the box to the left of the box indicating that you accept the agreement.
- In the next section of the installation wizard, you will be asked to select components to install. Select only Classic Start Menu if your goal is to change the appearance of Start.
Select the components you need to install on your PC - Now just click on the “Install” button. Wait for the installation to complete. Click "Done". Click on "Done"
- Right-click on the Start icon in the lower left corner of the screen. From the small list of options, select Customize to launch Classic Shell.
- In the window that appears, select one of three Start menu options.
Choose a style for your Start menu - Click on the "Cover" tab to choose a menu style.
Choose a skin for your Start menu - In the “Basic Parameters” tab, you can set your own values for various items. However, you can not change anything, leaving the default settings. The classic Start menu will still open.
You can optionally change the values of the main parameters - More fine-tuning is done in hidden tabs. To open them, new sections will appear at the top of the window.
Oh to see more settings - When you complete the setup, click on OK.
Video: how to return the standard “Start” using Classic Shell
Using the StartIsBack++ program
The StartIsBack tool is a free utility with an interface in Russian. It will allow you not only to return the standard Start menu, but also to customize it to your preferences. With this program you can:
- change menu layouts;
- adjust transparency;
- put large program icons in the menu;
- use improved search;
- sort the lists of utilities displayed in Start;
- enable the All Programs option if you want to have access to all utilities through Start and much more.
Another advantage of the program is that it installs on your PC very quickly: in just a couple of clicks. Let's take a closer look at how to install the utility and then work in it.
- Open the official resource of the utility developer in any browser. In the Download tab there will be a large green button to download the installer. Left click on it. When it downloads, launch it.
Click on the green StartIsBack button - Select one of two options: “Install for me only” and “Install for everyone”, depending on whether you want the classic Windows menu to be used by all accounts on this computer or not. If you are the only user, select the first option.
Choose to install StartIsBack either for yourself only or for all computer accounts - The software will immediately restore the previous “Start”. To change menu options, click on “Configure StartIsBack”.
Click on “Configure StartIsBack” - The tool window will open. In the “Appearance” tab, select the design style you like, as well as the icon for the “Start” button. Other options are also available under styles: transparency, color, large icons on the “Taskbar”, removing an avatar from “Start” and others.
Select a Start menu style and click Apply - In the first tab of the Start Menu, change the basic settings as desired: large program icons, sorting programs in a list, highlighting recently installed applications, and much more.
Check the boxes to the left of the options you need and click on “Apply” - In the “Advanced” tab, you can delete the history of recently opened utilities or disable the history storage option, as well as enable animation on the “Taskbar” and in the “Start” menu.
Disable storage of the list of recently opened programs or clear this list using a special button
If “Start” is missing
If after installing the icon the menu bar and all shortcuts on the desktop disappear, you need to restart Explorer.
- Launch Task Manager. To do this, use the Ctrl+Shift+Esc keys.
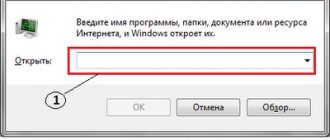
- Go to File - New Task.
- In the input field that opens, write “explorer.exe” without quotes.
- Click OK.
The Start button cannot be changed through personalization settings. Yes, and in other Win parameters there is no such option. To add a new icon, you need third-party programs. They edit the system file “Explorer.exe”, to which the icons are attached.
Start Menu X
The software development is distributed completely free of charge. Allows you to fully replace Start in Windows 10. The main advantage is the convenient and quick menu customization to suit user requirements. It is possible to call up the default menu in “Ten” at any time by simply holding “Shift”.
The user can independently select the color content of the start button. Makes it easy to sort programs into virtual groups at your discretion. Using the utility, you can literally correct the entire interface of the start menu and the button itself. The advantage of the application is that it completely eliminates advertising.