Despite the fact that Microsoft specialists regularly make updates, introduce more and more modern technologies and delight users with new versions, even in Windows 10 a number of operational problems cannot be avoided. Most of them can be gotten rid of in a fairly simple way. Resetting network settings will help correct even those errors whose cause is not entirely clear to the user.
Reset network settings Windows 10
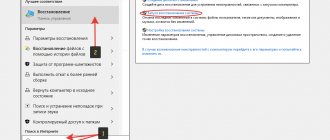
Resetting the network in Windows 10 settings
Starting with the version 1607 update, Windows 10 introduced a simplified ability to reset the TCP/IP protocol and DNS settings with just a few clicks. This does not just remove addresses and restart the network adapter - the system reinstalls drivers and protocols, returning them to their original state. Simply put, Windows performs a number of fairly serious operations for which an on-call “computer technician” would charge at least 1,000 rubles - just press a button.
To reset network parameters and network adapter settings in Windows 10, you need to click the Start button and go to system settings by clicking on the gear button.
Find the “Network and Internet” icon. Click on it and go to this window:
In the “Status” subsection, you need to scroll the contents of the page to the end. There will be a Network Reset . Click on it.
The operating system will ask you again whether you really want to perform these actions now. Yes, we are sure and click on the “Reset Now” button. Well, then you can relax, go pour some tea - the procedure will take some time, after which the PC will restart. When you connect to the network for the first time (wired or WiFi - it doesn’t matter), you will see this message:
The system is interested in whether your network is public or private. For a home network, click on “Yes”. The network reset is complete - let's check its operation!
Attention! The process above completely removes and reinstalls all network adapters. If there were any problems with them previously or there is a hardware malfunction, then most likely it will not be possible to fix this and the problem will happen again.
Setting up the D-Link DIR-320/A/D1 router
Download user manual
Table of contents
- Connection
- Configuring Internet connection settings
- Setting up a fixed IP address
- Configuring home network settings
- Wi-Fi setup
- Setting up an IPTV port
- Updating the router software
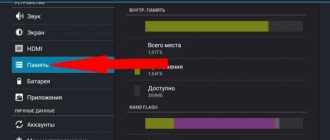
- Restoring settings to default (factory reset)
Connection
Click OK in both windows. Check the received address. To do this, right-click on “Local Area Connection” and select “status”, as indicated in the figure below, the IP address should be like 192.168.1.33:
Next, open your browser (Internet Explorer, Opera, Mozilla Firefox, Google Chrome or another). In the address bar, go to the address 192.168.0.1, enter admin in the “username” field, and admin in the “password” field (see the figure below). You will need to come up with and remember (write down) a password that you will use when setting up your router. It must be entered twice.
Next, the device will ask you to log in. To do this, enter Login: admin, password is the one you came up with earlier. This login-password combination will be used every time to enter the router settings. After this you will see the following window:
If your interface is in English, select Russian (in the figure below, the link for switching the router’s web interface to Russian is highlighted in red).
Configuring Internet connection settings
In the window that opens, select the item:
Check that all fields of the window that opens, except for the MAC field, match the fields in the figure below:
If the fields match, click “Apply” at the bottom of the window. If any fields do not match, delete the existing connection by clicking the “Delete” button. After that, in the window that appears, click the “Add” button and configure all the fields (except for the MAC field, you do not need to touch the MAC field), as shown in the figure below. After that, click the “Apply” button.
Setting up a fixed IP address
Click the "Apply" button. Save the router configuration by clicking “Save”:
Configuring home network settings
All fields must be filled in as shown in Fig. below:
To save the settings, click the “Apply” button.
Wi-Fi setup
A window with Wi-Fi network settings will open. There should be a checkmark next to “Enable wireless connection”, the MBSSID field should be “Disabled”, and the BSSID should be left unchanged. There should be no checkmark next to “Hide access point”. Come up with and enter the name of your wireless network in the SSID field (this name will be visible on all wireless devices that you will connect to your router). The network name must consist only of Latin letters and numbers. Configure the remaining items as shown in the figure below:
Click the "Apply" button at the bottom of the page.
Click Settings and go back to the main menu. Select "Security Settings" in the Wi-Fi window. A window with Wi-Fi network security settings will open (Fig. below). In the Network Authentication field, select WPA-PSK. Next, you need to come up with a key for your wireless network - at least 8 characters, which can be Latin letters and numbers. This key is needed to protect your network, do not choose too simple passwords like 12345678. You will need to enter this key on all wireless devices the first time you connect to your home network. Enter the key you created in the “PSK encryption key” field. Leave the remaining fields unchanged.
Click "Apply" at the bottom of the page and save the configuration.
Setting up an IPTV port
Select the router port into which you will connect the set-top box (see figure below). IMPORTANT: your AmiNET decoder/QWERTY Media Center will work ONLY when connected to the selected LAN port!
To save the settings, click the “Apply” button at the bottom of the page.
Updating the router software
A window with Software Update options will open. Click the “Browse” button and select the previously downloaded firmware on your computer. After that, click the “Update” button.
STRICTLY PROHIBITED
Turn off the power to the router until the software update process is completed. After updating the software, all router settings will be saved, but it is recommended to check that all settings are correct and save the configuration.
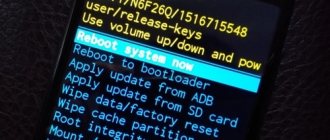
Resetting TCP/IP settings at the command line
If you do not want to reinstall drivers and protocols on the system, but just need to reset the IP and DNS settings, then in this case I would recommend using the command line capabilities and the netsh utility (short for network shell).
The commands below simply return the settings of all network adapters to the factory settings, and also delete all parameters that were set by programs or users.
What do we have to do? Let's start by launching the command line with administrator rights. To do this, in Windows 10 you need to right-click on the “Start” button.
A menu will appear where you need to select “Command Prompt (Administrator)” or, as in my case, “Windows PowerShell (Administrator)”. In our case there is no difference in this.
Next, enter the commands one by one:
ipconfig /flushdns ipconfig /registerdns ipconfig /release ipconfig /renew netsh winsock reset catalog netsh int ipv4 reset reset.log netsh int ipv6 reset reset.log
After each line, press the Enter key and wait for the result. Once all commands have completed, restart your computer.
Now I’ll explain a little about the commands themselves: ipconfig /flushdns and ipconfig /registerdns - the DNS service cache is cleared and records are updated. ipconfig /release and ipconfig /renew - request to the DHCP server to reconnect and update the IP address. netsh winsock reset catalog - LSP Winsock configuration settings are reset and returned to the initial version. The last two commands, in turn, allow you to restore all configurations of the IP protocol stack of the network interface for IPv4 and Ipv6.
Turn off Bonjour service
Occurs after installing any applications from the Adobe software package.
Step 1 Open the START menu and in the Search programs and files box, type services.msc
Step 2 In the Services window that opens, find one of the following Bonjour service names:
- Bonjour service
- mDNSxxx
- ##Id_String2.6844F930_1628_4223_B5CC_5BB94B87 9762##
- ##Id_String1.xxx
Step 3 Right-click on the service and select Properties
Step 4 In the Startup Type , select Disabled from the drop-down menu, and in the Status , click the Stop button
Step 5 Now click OK and restart your computer
We hope that at least one of the tips presented will help fix the problem with an unidentified network on your computer or laptop.
Tell your friends and acquaintances about this article by publishing it on your page on social networks
Using Microsoft Easy Fix
To finally cover the topic of how to reset network settings in Windows, I will consider another option that the developers provided us with - this is a special Microsoft Easy Fix utility. You can download it here - link. There is even a version for the long-outdated Windows XP. How to use it? Yes, very simple. Download and run:
In the window that appears, click on the “Next” button and see a message stating that you need to restart the computer:
Click on the “Next” button again. Now we wait until the utility resets the Windows network and TCP/IP protocol settings, after which it returns control of the computer to us. That's all! Profit!
Using Registry Settings
This reset method is considered one of the most difficult to implement. Incorrectly changing the system registry settings will lead to instability or failure of the operating system.
The following algorithm will help you configure the registry correctly and accomplish the task:
- Enter the phrase “Registry Editor” in the Start search bar and run the found classic application as a “superuser” to give it more rights to work.
- In the list of parameters on the left side of the window that opens, you need to find the “NetworkList” directory and expand it by clicking on the arrow next to the line.
- Next you will need to open the “Profiles” subsection.
- In the central part of the window, find the line “ProfileName” and click on it once with the right key of the manipulator.
- In the context menu, click on the “Delete” line.
- Confirm the operation and restart the computer.
- Make sure your internet settings are reset.
Registry Editor interface on Windows 10
Note! After resetting network settings through the Registry Editor, the operating system may not boot. In such a situation, it will be necessary to restore the operating system, returning the computer to its original state.
Network Troubleshooting Wizard
If you recently installed a cumulative update and are no longer able to connect to your network, you can use the troubleshooter to quickly diagnose and fix common problems.
To run the Network Troubleshooter on Windows 10, follow these steps:
- Open Settings.
- Click Updates & Security.
- Under Troubleshooting, select the Internet Connections troubleshooter.
- Click Internet Connections → Run the troubleshooter.
- Select the Troubleshoot Internet connection option
- Select the Try these fixes as an administrator (if applicable) option.
- Continue with on-screen directions (if applicable).
After completing these steps, the troubleshooter will run and fix all detected connections.
Reset network settings to default windows 7
A little about the network adapter
A network adapter is a hardware component of a PC/laptop that connects users to the network. Its characteristics determine the maximum transfer speed you can get. It works with both wired and wireless networks, which means that when connecting to a LAN and/or Wi-Fi, the hardware is what is used to make both types of connections. This means that both wireless and LAN network problems can be resolved by troubleshooting the network adapter.
When it comes to troubleshooting your network adapter, there are two different types of solutions you can try; network adapter reset, network settings reset.
Resetting Network Adapter vs Resetting Network Settings
Resetting the network adapter is very similar to turning off your computer and then turning it on again. When you do this, everything in the PC's volatile memory will be lost, but your settings will remain intact, as will your files. When you reset a network adapter, it resets all network components on your system, but it does not forget your IP or DNS settings, nor does it forget saved connections.
Resetting network settings is different; This basically involves clearing your DNS, clearing your cache, and getting a new IP address for your computer. Both resetting the network adapter and resetting the network settings can fix connection problems as well as slow network speed issues.