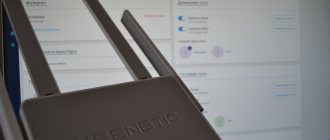
- Connecting the ZYXEL Keenetic Viva router to a computer
- Authorization
- Setting a password for wi-fi
- Setting up PPTP
- Setting up PPTP with a static IP address
- L2TP setup
- Setting up L2TP with a static IP address
- Setting up PPPOE
- Setting up PPPOE with a static IP address
- Updating firmware and components
- Connecting a computer to a wi-fi network
Let's describe the Zyxel Keenetic Viva router: appearance, price, features
The Zyxel Keenetic Viva model is already quite outdated - it has already been discontinued. However, the router can still be found in some stores. Its cost is about 2500 - 3000 rubles.
The Zyxel Keenetic Viva router is no longer produced, so it’s difficult to find this model in stores
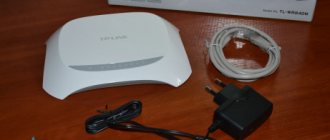
The equipment is standard for all routers: the device itself, a power adapter, an Ethernet cable for local connection of a PC and other devices, as well as instructions.
In the box you will find the router itself, instructions, power cable and Ethernet cable
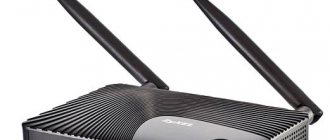
On the top panel there is a large “Wi-Fi” button for connecting devices to the network without a password (WPS function). The front panel contains indicators: power, 4 LAN ports, Wi-Fi, Internet access and connecting devices via USB.
On the side panel there are light indicators that show whether certain connectors are working, as well as whether Wi-Fi is turned on and whether there is access to the Internet
There are 5 network connectors on the rear panel: 4 for local (home) network and 1 for provider cable. To the left of the outputs are the “Reset” and Fn buttons, and to the right are the power key and the connector for the power adapter.
On the back there is a standard set of buttons and connectors for network cables
On one of the side panels there is a USB 2.0 output for connecting a printer, modem and various storage devices.
On the side there is a USB output into which a modem, flash drive or printer cable can be inserted
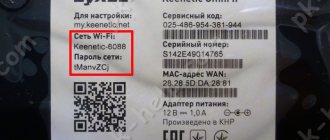
On the bottom panel there is a label with the MAC address of the device, data for entering settings and.
On the label below there is the serial number of the router, information for logging into the web interface for configuration
Table: main technical characteristics of the Viva model
| Parameter | Meaning |
| CPU | MT7620A 600 MHz |
| RAM | 128 MB DDR2 |
| Flash memory | 16 MB |
| Wi-Fi class | N300 |
| Antennas | 3 dBi. They are not removable, so you won’t be able to expand the coverage area. They are enough to cover a standard apartment. |
| Wi-Fi network speed 2.4 GHz | 300 Mbit/s |
| LAN ports | Gigabyte |
| IPoE/PPPoE routing | Up to 1800 Mbit/s in duplex |
| L2TP/PPTP routing | Up to 500 Mbit/s |
| Reading from USB disk | 17 MB/s |
| Additional features | IPTV and Smart-TV, file server, torrent client, DLNA / UPnP AV, guest network, parental controls |
| Device dimensions excluding antenna, W x D x H | 160 mm x 110 mm x 35 mm |
| Device weight | 240g |
| Operating temperature range | 0–40°С |
Video: which is better - Zyxel Keenetiс Viva or Xiaomi MI3
Setting up a Keenetic router
There are two ways to configure this:
- Through the quick setup wizard, which can be launched immediately after logging into the web interface. This is a step by step setup. The router will ask us to specify all the necessary settings.
- Through separate sections in the control panel. You can go to the control panel and independently set the necessary settings in certain sections.
I'll show both options. But first we need to access the web center settings page.
Login to the web interface and quick setup wizard
my.keenetic.net or 192.168.1.1 in the browser on the device connected to the router .
If you can’t enter the settings, see this article: my.keenetic.net – enter the settings of the Keenetic router. Username and password.
On the home page you need to select a language. There you can “Start quick setup”, or go straight to the control panel. Since I will first show you how to install the router through the Quick Setup Wizard, click on the “Start Quick Setup” button. After which you need to accept the license agreement.
Next, set the administrator password. Create a password and enter it twice in the appropriate fields. This password will be used in the future to log into the web interface of the Internet center. Login (username) – admin .
Choose a method to connect to the Internet. In this tutorial I will show you how to set up a connection via an Ethernet cable. We have already connected this cable to the corresponding port on the router.
We choose what to configure. I only have Internet. If your Internet provider provides an IPTV service, then you can also select “IP television” and immediately set up viewing TV channels.
Next we have the MAC address settings. If your Internet provider does not bind by MAC address, then select “Default” and continue setting up. If you make a binding, then there are two options:
- Register the MAC address of your Keenetic router with your provider. It is indicated at the bottom of the router (on the sticker) and in the settings that you now see in front of you (under the inscription “Default”).
- Select “Change MAC address” and manually enter the address to which the Internet is currently linked.
Select the method for setting the IP address. This is usually "Automatic". If your provider has given you an IP address (and possibly a subnet mask, gateway), then select “Manual” and enter these addresses.
Internet connection type. It is very important to choose the right connection type that your Internet provider uses. “No Password” is Dynamic IP (DHCP). If you have a username and password, then this is PPPoE, L2TP, or PPTP (for the last two you also need the server address). If you don’t know which type to choose, look at the Internet connection agreement, or call the provider’s support.
For example, I have “No password”.
In this case, there is no need to specify additional settings.
If PPPoE , then you will need to specify a username and password to connect to the Internet.
This data is provided by the Internet service provider.
If PPTP or L2TP , then you must first specify the VPN server address.
Then you need to provide a username and password.
If everything is configured correctly, then our Keenetic should report: “You are connected to the Internet.” In my case, it immediately downloaded and installed the software update.
After the reboot, the setup continued. You need to set the security settings for your home network. Set up a Yandex.DNS or AdGuard DNS filter. I didn't set up a filter. I just selected "No protection".
We change the name of the Wi-Fi network that our router will distribute and the password for it.
If you were connected to the router via Wi-Fi, connect again (if you changed your name and/or password).
After reconnecting, the control panel should open.
The quick setup of the Keenetic router is complete.
Self-configuration in the control panel of the Kinetik Internet center
The first time we enter the web interface (when the router is still at factory settings), we can immediately go to the control panel. That is, skip the quick setup wizard.
When the router is already configured and the administrator password is set, an authorization window will appear. Where you need to enter the username (admin) and the previously set password. If you don’t know the password or have forgotten it, then you need to reset the settings (detailed information at the beginning of the article).
In the control panel, the main screen displays all the basic information about the operation of the Internet center and about connected devices.
If you are setting up your Keenetic router yourself and skipped the quick setup wizard, then you need to perform two basic settings:
- Internet connection. If the Internet through the router is already working, on the main page in the “Internet” block it says “Connected...”, then you can skip this item.
- Set up a Wi-Fi network. Change network name and password. If you want, you can leave the factory ones. But I recommend changing them.
Internet connection
Go to the “Internet” – “Wired” section. If you do not have a connection created there, click on the “Add provider” (+) button. You need to select “Connection priority”. If this is the only and main connection to the Internet, select “Main connection”. If desired, you can set the “Provider Name” (arbitrary, for example, Beeline, or MTS). Below we see that port 0 is dedicated to the Internet (the provider’s cable is connected there). If necessary, you can assign other ports to a TV set-top box.
Next we set the following settings:
- IP settings. In most cases – “Automatic”. If your provider has given you an IP address, select “Manual” and enter them.
- MAC address. If your provider does not bind by MAC address, leave “Default”. If it does, register with the provider (through the support service, or personal account) the MAC address of your router (indicated at the bottom on the sticker), or select “Get from your PC” (if the router is connected via cable to a computer to which the Internet is connected), or “Manually” and enter the MAC address to which the Internet is linked.
- Authentication with the provider. Here we select the connection type. If “Dynamic IP” (aka DHCP) – leave it unused. Well, or choose PPPoE, PPTP, or L2TP. Check with your provider for this information.
- 802.1x authentication – “Do not use” (unless your ISP uses it).
- Internet availability check – “Do not use”.
Check all the settings again and click on the “Save” button.
If your provider uses authentication via the PPPoE protocol, you will need to enter a username and password (issued by the provider, usually specified in the contract).
If PPTP or L2TP, you need to specify the server address, username and password.
After setting up the connection and saving the settings, an Internet connection should appear. You may have to wait a little (20 seconds).
In the “System Monitor” section it should say “Connected...”.
If you are unable to set up the Internet, then you can contact the support of your Internet provider. They will tell you what settings and where to specify. Or write in the comments, I’ll try to help.
Setting up a Wi-Fi network
Go to the “My Networks and Wi-Fi” – “Home Network” section. There I recommend leaving all settings as they are (default) and changing only the network name and/or password.
By default, the Wi-Fi network name and password are the same for networks in the 2.4 GHz and 5 GHz bands. The Band Steering feature is enabled, which automatically determines the band for each device connected to the router. That is, devices see one network, connect to it, but can automatically switch between the 2.4 GHz and 5 GHz bands.
How to separate Wi-Fi networks (different names for the network in the 2.4 GHz and 5 GHz range)
You need to open additional network settings in the 5 GHz band.
Then we simply change the name of the network in the 5 GHz band. The password can be left the same as for the 2.4 GHz band.
Don't forget to save your settings. After this, your devices will see two Wi-Fi networks (in different bands). Band Steering settings will not be available.
Setting up IPTV
To set up IPTV (if your Internet provider provides this service), go to the “Internet” - “Wired” section. There you can select any Ethernet port (except 0, where the Internet is connected) for connecting a TV set-top box.
If your provider gave you VLAN parameters, then you need to register them in the settings. To do this, click on “VLAN for the Internet, IP telephony and IP television.” Write down the WLAN values provided by your Internet provider.
To save the settings, click on the “Save” button.
Firmware update
Keenetic Internet centers automatically download and install software updates. By default, automatic updates are enabled. To check if there is a new firmware version, or change some settings related to the KeeneticOS update, you need to go to the “Management” - “General Settings” section. The router will immediately begin checking for a new software version.
You can change the update channel settings. The default is “Release” (the router downloads a stable version of the software). If desired, you can change to “Test build” or “Preview”. Disable automatic updates, or set the installation time for updates. The management of KeeneticOS system components is also located there.
Factory reset
Restoring the original settings may be necessary in different situations: if, for example, you forgot the password for the web shell or if the router stopped working. Before resetting, if necessary, save the current settings to a separate file on your PC so that you can quickly restore them later.
Press the internal “Reset” button on the back panel of the router for 10–12 seconds
Unplug all network cables from the router, take a thin, sharp object and use it to press the Reset button on the back panel. Hold the button for 10 – 12 seconds until the “Power” indicator (the very first one on the left) starts blinking rapidly. You cannot hold the button for more than 30 seconds so that the emergency recovery mode does not turn on.
Preliminary actions
It’s worth starting with the fact that you will need to unpack the router itself and make a standard connection - connect all the cables, including the LAN, if it is directly connected to the computer. It is also important to choose the correct location in the room, ensuring a good wireless network coverage area. Once all the necessary indicators light up, proceed to further actions.
If you have problems connecting, you can always refer to a separate thematic material on our website by clicking on the link below. There you will find the most detailed guide on how to correctly perform this procedure.
Read more: Connecting a router to a computer
Before proceeding to the main device configuration procedure, you should check the operating system parameters so that in the future this does not cause various conflicts that affect the reception of a signal from the provider. All you need to do is check a few parameters of the IPv4 protocol, setting IP and DNS acquisition to automatic mode, which you can read about below.
Read more: Windows Network Settings
Indicators and connectors
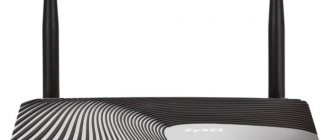
On the front of the case there are 5 light indicators for the router status. USB connectors and Wi-Fi control buttons are installed on the side faces. The main interfaces of the router are located on the rear edge: one WAN, 4 LANs and a power connector. There is also a reset button, recessed into the case to avoid accidental pressing.
List of light indicators on the body:
- Power indicator;
- Internet connection indicator;
- Modem connection indicator.
- Two Wi-Fi connection indicators;
Repeater mode
This mode amplifies the wireless network signal and transmits it further. To enable it, go to the web configurator, then click on the gear to go to system settings and click on mode.
Here, select your amplifier. It will automatically pick up the network from your main router. For the system to work, the main router must automatically distribute addresses, that is, DHCP must be enabled on it.
Characteristics
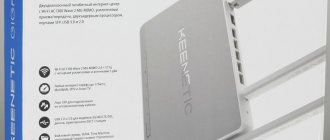
On the packaging of the device, in addition to a photograph of the device, its main characteristics are presented. All information is written in Russian.
On the back of the package, the user will find brief illustrated instructions for connecting the device and a list of components.
Despite the modest set of additional accessories, in the box the owner of the Kinetic will find everything that is required to put it into operation.
The laconic appearance of the device will allow it to blend into any interior of an apartment or small office.
The main advantage of this small device is its powerful processor, the operating frequency (600 MHz) of which is only a hundred megahertz lower than its top-end brother Giga II. There are also gigabit ports, which allows you to take advantage of a high-speed connection to the global network.
Of course, the device’s RAM is only 128 MB, and the built-in flash memory is 16 MB, but for the purposes of creating a small home network, this is quite enough, and the device will not require frequent reboots. 2 antennas (3 dBi) are responsible for Wi-Fi signal coverage, which will provide a stable wireless connection for devices in a small apartment.
Unfortunately, the manufacturer made them non-removable, so it is not possible, without qualified technical intervention, to replace them with devices with a higher gain.
The rear panel is traditionally equipped with Internet connectors, as well as power, reset and customizable “Fn” buttons. On the front side there is a “WPS” key.
If the owner of the router needs to simultaneously connect, for example, a printer and some external media or USB modem, then he will have to purchase an additional hub, since there is only one corresponding port on the device.
The ends of the device are abundantly perforated, which prevents its filling from overheating under increased loads.
Managing a USB disk and FTP server on a Zyxel Keenetic router via phone
A greatly stripped-down version of the control panel for a drive or flash drive connected to the USB port of the Zyxel Keenetic router is also available in the Kinetic mobile application for your phone. It is displayed as a separate tab immediately on the main page of the program. Here we can only see the name of the disk - we won’t be able to enter it. Of the available settings, only safe removal is available.
Also, if you open the Applications menu, you can control the DLNA and Torrent functions.
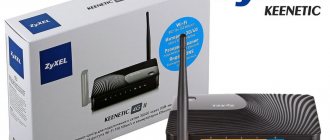
Packaging and equipment
The box is traditional, made in blue and white colors.
On the reverse side there is complete information about the characteristics of Keenetic Viva. Also, attention is drawn to the image, which reminds us that the router has the ability to be configured through the My.Keenetic mobile application
The kit includes an adapter, instructions and a cable made in the original “noodle” form factor.
Wi-Fi connection and settings
To set up a wireless network, you also need to go to the main menu of the router. At the bottom, click on the wireless network icon, and then go to settings.
- Select “2.4 GHz access point”.
- Check the box next to “Enable access point”, then in the “Network name (SSID)” field you need to come up with a name for your Wi-Fi.
- “Network security” – WPA2-PSK.
- In the “Network Key” field, enter the password that you will have to write when connecting to Wi-Fi.
- “Channel width” – “20 MHz”.
- All that remains is to apply all the settings.
How to connect?
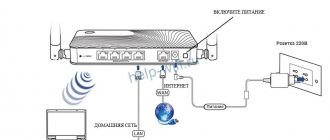
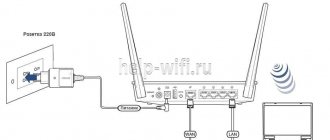
The connection procedure is completely standard and includes the following steps:
- Raise both antennas to a vertical position;
- Insert a cable from your provider into the Internet port. This connector is located at the back of the router and is labeled “Internet”, and it also has a characteristic blue color;
- Connect the PC with a patch cord to one of the “Home Network” ports, colored yellow;
- Install the power adapter plug into the corresponding round connector and apply power;
- Press the "Power" button.
Change Password
The default password is located on a sticker on the bottom of the router. Most often there is no password; installation is required after the first login to the settings. If you forget it, you won’t be able to change it, just reset the settings and re-enter all the data.
If you remember the old password, then go to the settings, click on the gear at the bottom of the screen and go to the “Users” section. Here, click on the name of the user you want to change. In the window that opens, enter a new password. That's all.
Setting up IP TV
In most cases, the set-top box starts working immediately after the wire from it is inserted into the router. But some providers want it to connect to the main network in bridge mode. This is due to their own settings and users will have to ensure this.
Go to the web configurator, click on the internet icon at the bottom and go to the connections section. Click on your active internet connection.
A menu will open showing all the ports on the router. Here select the one to which the set-top box will be connected. Next, check the “IPTV set-top box” or “Use connector” checkbox. That's all, now everything should work on the console.
Reviews
In general, users respond positively to Zyxel Keenetic Viva. Yes, there are complaints about weak antennas, they say they don’t penetrate through three concrete walls, the signal is unstable. This router is already quite a few years old, so you shouldn’t demand range and great speed from it.
Rare buyers complain about heating of models, as well as slowdown, but this looks more like a defect or failure in the router firmware than the specifics of the model. In this case, it is better to take the router to the store and replace it with something similar.
3G/4G connection
The router has a connector for connecting flash drives and modems. So you can connect a mobile operator modem as the main or backup channel. Plug it into the port and wait a minute for it to connect. After that, go to the modem menu, click on the globe at the bottom and go to the “3g/4g” section.
In general, if he has decided, he will be on the list and will work. You can click on it and view the status.
In newer models, a script is configured that will help use this modem as a backup.
Setting up via mobile application
Using the Keenetic application, you can configure it from a mobile phone or tablet. Download the app from the store. Launch Wi-Fi on your device and find the one that belongs to the router. The name and password information is written on a sticker on the bottom of the router. You can also simply scan the QR code from there.
Go to the application. You will have to set a password to enter the device settings. Click NetFriend Setup Wizard.
Next, the application will ask the questions “Are login and password required?”, “Static or dynamic IP address”, “Is a MAC address required?”. The answers should be in the provider's contract or in the instructions from him. All required data will have to be entered. As a result, the application will configure the router according to your answers.