Connecting to a computer
You can connect the device in question to your computer in two ways:
- via Wi-Fi;
- using patchcord.
The first method is somewhat simpler:
- turn on the Wi-Fi adapter on your PC;
- find the name of the device in question in the list of networks;
- Double-click on the desired item.
Also, if necessary or simply due to lack of opportunity, you can use a network cable. You need to insert one end of it into the PC’s network card, and the other into LAN 1.
When the connection is complete, you can safely proceed to work with Zyxel Keenetic Lite. All you need is a web browser.
Possible malfunctions and ways to eliminate them
Zyxel Keenetic 4G models: how to connect and configure
Problems that arise during the operation of the router can be divided into several groups: the digital part (software) of the Keenetic router; physical failures of modules or individual elements of the Internet center of the Lite model; malfunctions on the part of the Internet service provider.
- Failure situations appear during the first setup of Keenetic, and also arise during the operation of the system. First, the work must be carried out, adhering to the rules in compliance with the order of their implementation, written down in the user manual supplied with the Lite model. The input data is saved at each stage when the corresponding commands are executed at the end of the pages. Finally, the final information of the Keenetic router is checked.
The reasons leading to disruption of normal functioning are software failures due to external factors. These include random surges in the voltage of the network supplying the Keenetic router, up to its complete shutdown. A way to combat this type of fault is to use an uninterruptible power supply (UPS) system with autonomous batteries as part of the equipment.- If the Lite model software does not work correctly, it is recommended to reconfigure the Keenetic router after resetting all current parameter values to factory settings. It would also be useful to check the firmware version of the Lite model router and update it to the latest one for the current date in time, which can be found on the Zyxel support website in the Keenetic routers section. It contains the desired Lite model.
The display panel of the Lite version of the router can help you find hardware faults. The exception is when the Power LED is not lit. At the same time, the operation of the Keenetic external power adapter is checked using a multimeter or it is replaced with a standard copy. Most failures occur when contact is broken in cable connectors or as a result of breaks that occur. They are also detected by a multimeter. Reconnecting equipment connectors often helps remove accumulated static electricity, which is the worst “enemy” of digital equipment. The PC may also be to blame for the lack of Internet. It is necessary to check the operation of all local network subscribers.- The last option is a malfunction of Keenetic due to incorrect functioning of the service provider’s equipment. The problem that has arisen is reported to the technical support service by telephone. If there are no failures in its operation, the user will be helped by contacting the Zyxel warranty or service centers.
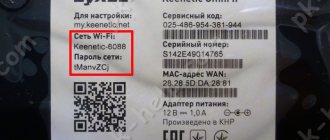
Go to the control panel
To find the control panel of the device in question, you should:
- open any available browser (GoogleChrome, Opera, InternetExplore);
- write 192.168.1.1 in the address bar;
- The login window will open:
- o in the “user” field write admin;
- o in the “password” field write 1234.
After completing the above steps, you will be able to perform various manipulations with Zyxel Keenetic Lite. This combination of login and password allows you to enter any data.
Setting up Keenetic Lite using NetFriend
On the first page of "NetFriend Quick Setup", click the "Quick Setup" button. The next three steps will involve selecting your country, city, and your provider from the list.
The last step (with the exception of some providers) is to enter your login or username and password for the Internet. In my case, this is Beeline, but for Rostelecom, Dom.ru and most other providers everything will be completely similar. Click "Next". NetFriend will automatically check if the connection can be established and, if successful, will show the following window or offer to update the firmware (if detected on the server). It won't hurt to do this.
In the next window, if available, you can specify the port for the IPTV set-top box (in the future, simply connect it to the specified port on the router).
At the next stage, you will be asked to enable the Yandex DNS filter. Whether to do this or not is up to you. For me this is unnecessary.
Finally, in the last window you will see a message that the connection has been established, as well as some information about the connection.
In general, you don’t have to configure anything else, but start using the Internet by simply entering the address of the desired site in the address bar of your browser. Or you can change the parameters of the wireless Wi-Fi network, for example, its password and name, so that they differ from the default ones. To do this, click the “Web Configurator” button.
Setting up an Internet connection
Before the device in question can be used for its intended purpose, it is necessary to carry out preliminary preparation. Moreover, this applies not only to the Internet connection, but also to working with television.
Connection via TV cable
This type of router can work with television. To do this, you need to correctly enter the IPTV parameters.
To perform this action you need:
- open the web interface;
- on the right side of the screen, click “Internet” -> “Connection”;
- enter the “name of the Internet center”;
- We fill in the following sections with the data presented in the agreement concluded with the operator:
- "IP parameters";
- "IP address";
- "Subnet mask";
- "main gate";
- "mac address in use"
- Click on “apply”.
Connection via leased line
To start working Zyxel Keenetic Lite with the Internet you need:
- turn on the power;
- connect the provider cable to the device;
- go to the web interface.
Further actions depend on the provider providing access to the World Wide Web. It is necessary to enter the parameters regulated by it.
Video: Setting up the ZyXEL Keenetic lite Internet center
Setting up a Zyxel Keenetic Lite router for Rostelecom
Today the provider Rostelecom
"is one of the most popular and successful in the Russian Federation.
In order for the device in question to provide access to the global network through this operator, you must make PPPoE
connection:
- launch any Internet browser and enter the web interest;
- write the address 192.168.1.1;
- enter “Login” and “Password”;
- In the new window we enter the following values:
- “Internet access protocol” - PPPoE;
- “username” - login;
- “password” - password;
- “authentication method” - automatic detection;
- “data security (MPPE)” - not used;
- check the box next to “obtain an IP address automatically”;
- “MTU size” is 1400.
When all the data indicated above has been entered, you can safely click on “Connect”.
Beeline
Today, a provider such as Beeline is one of the leaders in the field of communications. It provides access to the world wide web. The device in question can work successfully with this operator.
To do this, you need to perform certain actions:
- go to the web interface;
- open the section called “Internet”;
- activate the “connection” tab and enter the following values in the appropriate items:
- “Internet center name” - designation of the access point;
- “IP parameters” - automatic;
- “obtain DNS server addresses automatically” - put an end to it;
- “respond to ping from the Internet” - put a period;
- “allow UPnP” - check the box;
- click on “apply”.
Additional features
The settings described above are quite sufficient for the stable operation of the router and for it to perform its basic functions. However, Zyxel Keenetic Lite has a number of additional features that may be of interest to many users.
Changing your home network settings
Just as with a wireless network, setting different settings for your home network can improve its security. To do this, you need to open the “Home Network” section in the device’s web configurator and go to the “Network Organization” submenu.
Here the user is provided with the following options:
- Change the router IP address;
- Enable or disable the DHCP server. In the latter case, you will have to manually set an IP address for each device on the network;
- Create a pool of IP addresses from which the DHCP server will distribute them to devices on the network.
At the same time, if you need to assign a static IP address to a separate device, it is not at all necessary to disable the DHCP service. At the bottom of the settings window, you can set a leased address for it. To do this, just enter in the appropriate fields the MAC address of the device and the desired IP that you want to assign to it.
IPTV
The Zyxel Keenetic Lite Internet center supports TVport technology, which allows users to watch digital television from the Internet. By default, this function is set to automatic mode and does not require any additional settings. However, in some cases, the provider may require the allocation of a specific LAN port for IPTV, or provide this service based on VLAN using the 802.1Q standard. If this is the case, then you need to enter the “IP-TV” submenu of the “Home Network” section and change the mode:
In the first case, it is enough to select from the drop-down list the port to which the set-top box will be connected.
In the second case there are more parameters. Therefore, you must first obtain setup details from your provider.
After this, you can enjoy watching your favorite TV channels without any problems.
Dynamic DNS
For users who want to have access to their home network from anywhere where there is Internet, the Zyxel Keenetic Lite Internet Center has a dynamic DNS function. In order to be able to use it, you must first register with one of the DDNS service providers and obtain a domain name, login and login password from them. In the Internet center web configurator you need to do the following:
- Open the “Internet” section and go to the “Domain Name” submenu.
- Enable the dynamic DNS function by checking the appropriate box.
- Select a DDNS service provider from the drop-down list.
- In the remaining fields, enter the data received from the supplier src=»https://Lumpics.ru/wp-content/uploads/2018/06/Vnesenie-dannyih-dlya-avtorizatsii-v-sluzhbe-DDNS-v-marshrutizatore-Ziksel- Kinetik-Layt.png" class="aligncenter" width="900″ height="387″[/img]
After this, all that remains is to apply the created configuration and the dynamic DNS function will be activated.
Access Control
Using the Zyxel Keenetic Lite router allows the network administrator to flexibly configure device access to both the World Wide Web and the LAN. For this purpose, the device’s web interface has a “Filters” section. Filtering can be done in the following areas:
- MAC address;
- IP address;
- TCP/UDP ports;
- URL.
The organization of access in all four directions is implemented in the same way. The user is given the opportunity to allow or deny access to devices based on a specified criterion by adding it to a black or white list. This is what it looks like using an example of filtering by MAC address:
And here is the same thing, only in relation to IP addressing:
When filtering by port is used, it is possible to close all ports without exception for external access, and to select specific services that use a specific port or range of ports.
Finally, filtering by URL allows you to block access to certain resources on the Internet from the generated list:
There is no need to create long lists of prohibited sites. You can create a match mask that will block entire groups of web pages.
These are the basic settings of the Zyxel Keenetic Lite router. As you can see, the variety of functions, flexibility and ease of setup are quite consistent with the fact that the devices of this model range are called Internet centers.
We are glad that we were able to help you solve the problem. In addition to this article, there are 12,719 more instructions on the site. Add the Lumpics.ru website to your bookmarks (CTRL+D) and we will definitely be useful to you. Thank the author and share the article on social networks.
Describe what didn't work for you. Our specialists will try to answer as quickly as possible.
Wi-Fi on the router
In order for the device to begin providing access to the Internet wirelessly, it is necessary to perform a number of certain manipulations:
- open the web interface;
- select “Wi-Fi”;
- open the “Connection” section - indicate the name of the network environment to be created;
- go to the item called “Security” - select WPA2-PSK, you can also set a login password (it is advisable to include at least 6 characters of different case);
- click on “apply”.
This completes the preparation for working with the Internet via a router. To access the Internet, you need to turn on Wi-Fi on your gadget and enter the appropriate password.
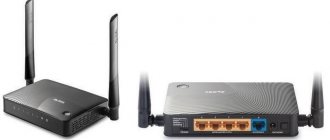
Model overview
The Lite series model from Zyxel is the basic version of the Keenetic router line. It does not support some of the features found in subsequent members of this family.
Lite does not use additional preset modes that expand the possibility of its use to expand the coverage area of a wireless network and thereby increase the number of its subscribers. These are repeater (repeater), amplifier, adapter modes.
The Lite series router does not have a USB port, which does not allow it to connect external drives or 3G/4G modems for working with mobile operators.
Appearance
The connectors and ports of the router located on its rear panel are as follows:
- Power — for connecting the DC power supply supplied with Keenetic;
- four LAN ports (LAN1-LAN4), to which wired LAN network devices are connected;
- WAN port for connecting a cable to an Internet provider;
- high-frequency connector for connecting a removable external antenna of the 2.4 GHz wireless network;
- Reset button recessed into the recess of the Keenetic case for hardware reset of the settings to the factory values of the Lite model.
On the top cover of the case there is a WPS button to start activating the Keenetic automatic Wi-Fi connection when working in modes of sharing several routers. It allows you to synchronize operation on a local network, using the settings of the main router of the Lite model without additional manual entry of the network name, password, and message encryption parameters.
Indication elements that allow you to determine the status of active or created operating modes of the Keenetic router and the states of consumer connection lines are located on the surface of the Lite model router case. LED indicators with symbols control:
- status of switching on and normal operation (constantly lit), preparation for operation (flashing rarely), firmware update for the Lite model (flickering frequently), off state (not lit);
- turning on the Keenetic wireless wifi network (constantly lit), off state (off), information exchange (flashing);
- connection to the Keenetic WAN port, establishing a connection and exchanging information (lit or blinking), lack of connection with the provider or failure (off);
- connection to Keenetic LAN connectors and connection to the device, information transfer (lit or blinking), lack of connection or failure of the Lite model (off).
The local network
Another necessary function of the device of this type is LocalNetwork. By using it, you can exchange various data between individual PCs, as well as gadgets.
To organize the network space, go to the control panel of the router and perform the actions in strict order:
- open the “Home network” section -> “Network organization”;
- In the section that opens, enter the necessary parameters:
- “IP address of the Internet center” - 192.168.1.1;
- “subnet mask” - 255.255.255.0;
- “DHCP” - it is advisable to leave the value “server” in the drop-down list;
- “address pool” - you need to set the value at your discretion (it is best to make it minimal, not automatic).
After completing all the above steps, you can safely begin working inside the LAN. It is advisable to select the value “server” in the “DHCP” field. Because otherwise you will have to manually enter the name of each individual newly connected PC.
If necessary, you can bind the MAC address to the network card:
- open the item “rented addresses”;
- We enter the physical address of the specific device in “MAC address” and “Issue IP address”.
Setting up routing
To simultaneously access the provider's resources via a VPN connection, you must enter the correct routing parameters.
Certain steps need to be taken:
- click on the “Management” menu;
- open “Static Route”;
- activate the “IP Static Route” item.
Next, the user will see a table in which 25 static routes will be displayed. In each specific case they differ greatly. To correctly enter all the necessary data, you should definitely consult with your provider. To create a rule, you need to click on an unoccupied line. A window for detailed route formation will open.
Changing the internal IP address of the router
Sometimes for some reason it is necessary to change the IP of the router itself.
It's quite simple to do this:
- open the web interface;
- click on “home network” -> “network organization”;
- in the “IP address of the Internet center” field we write the required set of numbers;
- click “apply”.
You can select any combination from the range 192.168.0.1 to 192.168.1.254. If for some reason problems arise, you can always reset the settings to factory settings in any convenient way.
Setting up a home server
If you created HomeNetwork using a router, then you need to work on creating a server.
This will allow you to easily access data located on a PC located at home, but connected to Wi - Fi
or otherwise to the router:
- open via a web browser;
- go to the “VPN server” tab;
- enter the following data:
- “enable” - check the box;
- “one connection per user” - check the box;
- “allow connection without encryption” - leave it blank;
- “translate client addresses (NAT)” - leave it blank;
- “network access” - select an item from the drop-down list that corresponds to the name of the network;
- “starting address of the pool” and “size of the address pool” - select values that do not match or even intersect with the interfaces of the PCs connected to the router;
- create an appropriate account that allows you to access the device.
When all the above steps are completed, you can easily and without difficulty operate files on personal computers left at home.
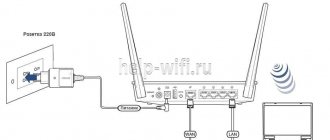
Installation
Let's start with installing the device and tell you how to connect the Zyxel Keenetic Lite router:
- Install antenna(s);
- Connect the power supply to the POWER port;
- Plug the provider cable into the WAN connector (blue);
- Connect the router and the computer or laptop with a patch cord: one end of the cable to the PC’s network card, the other to any LAN port (1 or 2 recommended);
- Connect the power supply to a power outlet;
- If your router has an “On/Off” button, turn on the device.
If it is not possible to use a network cable, you can connect and configure the router via Wi-Fi, even from a mobile device.
Next, there are 3 options for setting up the router:
- Using the Quick Setup Wizard (recommended for inexperienced users);
- Via a web browser (if advanced settings are needed);
- Using a mobile application for Android and iOS (My.Keenetic).
I will try to describe all the methods. Go!
Firmware update
Firmware updates are required periodically.
To do this you need to do the following:
- open the web configurator;
- click on “system”;
- go to “configuration”;
- click on the file called “firmware”;
- A new window will open - click on “select file”;
- indicate the path to the pre-downloaded firmware.
Next, a window will open showing the update progress. When the process is completed, a restart will be performed automatically. It is only important not to confuse and download the appropriate firmware for a particular case.
Saving and restoring router settings
After setting up, it is recommended to save them so that if problems arise, you can restore them. To do this, go to the Administrator , Config File menu . — To save the current router settings, you must click the Download . The settings file will be saved to the specified location on your hard drive. — To restore settings settings from a file, you must click the file selection button, specify the path to the settings file, then click the Restore . Attention! Clicking the Restore Defaults will restore the factory settings!
Setting up USB ports
If necessary, the gadget in question can work with USB devices.
To make this possible, you must do the following:
- connect a flash card or something else to the appropriate connector;
- The Internet Center will automatically perform the installation.
After completing the above steps, it is advisable to make sure that everything is done correctly. We connect to the web configurator and open “system monitor” -> “system”. There should be a “USB devices” section where the operating equipment is displayed.
Administrator password and software update
To better protect the router and personal data, it is recommended to set your own unique password on the web interface. This can be done in the “System” menu, “Password” section (in the old design), the system monitor icon (new interface).
To update the software, you need to go to the “System” menu, the “Firmware” section (or the system monitor icon, the “System” tab). The update file can be downloaded from the company website zyxel.com, in the “Support” section, “Download Center” tab.
Changing the Administrator password
To avoid outside interference in the work, it is advisable to change the password to access the web configurator.
You can do it like this:
- open the “system” section;
- click on the “password” tab;
- fill in the appropriate fields (“new password” and “confirm password”).
Then click on “apply”. This completes the operation.