DirectX – additional file libraries for Windows required for the operation of graphic components associated with video card drivers. Today I will not go into detail about how these files work, but will show you how to install them in Windows 11 and ensure the correct operation of programs and games that complain about the absence of DirectX components of certain versions at startup.
You can use a diagnostic tool to check the current version of DirectX installed on your computer. Launch the Run utility using the keyboard shortcut Win + R. Type dxdiag and press Enter . In a new window you will see a line called “DirectX Version” , which shows the required information.
What is DirectX?
DirectX is a set of APIs in Windows that handles graphics in games. Since no two gaming PCs have the same set of components, game developers use Direct X libraries to write games that run on all kinds of computers. In the old days, DirectX could be downloaded as a separate file for installation. You will often see a prompt to check for the latest DirectX updates when installing a game. Starting with Windows 8, Microsoft included DirectX as part of Windows . So you can update it directly from Windows Update.
The latest version of DirectX is DirectX 12, which is only available on Windows 10. Windows 7 and 8 are stuck on DirectX 11. Note that Direct X is not the only graphics API. Vulkan Run Libraries is a new competitor that offers some improved features.
Enable compatibility settings
Since the DirectDraw error in Windows 10 is to some extent related to the resolution used by applications, you can alternatively try this trick.
Open the properties of the executable file of the application that gives an error when launched, switch to the “Compatibility” “Use screen resolution 640 x 480” checkbox .
The solution is not the best, since working in such a resolution will be clearly uncomfortable.
What version of DirectX is installed?
You can easily open the panel to see everything about the version of DirectX installed on your PC. To do this, follow the guide below.
- Press Win+R and enter dxdiag .
Click Yes if any warning pops up. After a while, you will see a window called DirectX Diagnostic Tool . At the bottom of this information panel you will see the DirectX version . If you are using Windows 10 and the version of Direct X is not 12, then go to the update center and check for updates for Windows 10.
Now go to the Display and make sure that DirectDraw, Direct3D and AGP acceleration features are enabled . If they are disabled, then you will need to upgrade your PC hardware to take advantage of these features. Update drivers for your video card, processor, hard drive, etc.
Method #3: Disable Third Party Apps and Services
If the first two methods don't work, the problem is likely somewhere else. It is very rare that a third party application or service interferes with DirectX. This interference may cause problems with DirectX, even if you have the correct version installed on your computer.
- To disable startup services, open Task Manager . You can use the keyboard shortcut Ctrl + Alt + Del or right-click on the taskbar and select Task Manager .
- If this is your first time opening Task Manager, you will only be able to see running applications and not any services or processes. For a complete view, select More details .
- Task Manager will now list every running task on your PC, including system processes or background tasks. Go to the Startup .
- The Startup tab contains a list of all the services that start by default when your PC boots. These applications not only slow down your computer, but can often cause conflicts with other, more important applications. Select all unnecessary services and click the Disable .
- Launch services aren't the only applications that consume resources running on your computer. There are many services that do not appear on this list, but still continue to run in the background. To disable such tasks, open System Configuration by searching in the Start .
- The MSConfig System Utility allows you to configure the startup option on your computer and is much more detailed than Task Manager. Note the Normal Startup on this screen; once you are done diagnosing, you need to enable this to get everything back to normal. For now, select the Services to continue.
- This lists all the background services running on your computer. This also applies to system processes, so check Hide all Microsoft services to remove them. Now you can use the " Disable All " button to close all these additional processes.
Please note that this step is not permanent. Many of the services on this list, while not essential, are still useful to some extent and should be running for maximum performance from your computer. This only allows us to check if any third party application is interfering with the DirectX installation.
All you need to do now is restart your computer and see if DirectX works. If yes, then one of the services from the previous list is to blame. We recommend enabling them one at a time to find the problematic app, after which you can uninstall or disable it.
After this, be sure to return to the System Configuration and select Normal Startup to restore the defaults .
How to download DirectX for different Windows?
There is a web-based installer for end-user DirectX executable libraries that adds new DLLs to older DirectX versions of various Windows operating systems and does not change the version of the old one.
For example, you installed a version of DirectX 11 that produces errors when launching programs. Next, install DirectX for the end user and the error will be resolved. The DirectX 11 version will not change. This is a kind of addition of new libraries to all versions of DirectX.
Now, how to download the latest version of DirectX depends on the version of Windows you are using.
Windows 10, Server 2016 Technical Preview
- DirectX 12 comes with updates for Windows 10 and Server 2016 Technical Preview via Windows Update.
- DirectX 11.3 pre-installed version.
Windows 8.1, RT, Server 2012 and Server 2012 R2
- DirectX 11.2 comes pre-installed on Windows 8.1, Windows RT 8.1, and Windows Server 2012 R2 . There is no separate update package for DirectX 11.2. This version of DirectX can only be installed through the Update Center.
- DirectX 11.1 comes pre-installed on Windows 8, Windows RT, and Windows Server 2012 . There is no separate update package for DirectX 11.1. You can only install this version of DirectX through Windows Update on Windows 8, Windows RT, and Windows Server 2012 systems.
Adding and enabling legacy DirectX libraries
Some users try to run old games on Windows 10 and are faced with a lack of libraries included in older versions of DirectX, due to the fact that new versions do not include some of them. In this case, if you want to make the application work, you will need to perform a small manipulation. First you need to enable one of the Windows components. To do this, follow the instructions:
- Go to Control Panel via Start.
- Find the “Programs and Features” section there.
- Click the "Turn Windows features on or off" link.
- Find the “Legacy Components” directory in the list and o.
Next, you will need to download the missing libraries from the official website, and to do this follow these steps:
DirectX End-User Runtimes (June 2010)
- Follow the above link and download the latest version of the offline installer by clicking on the corresponding button.
- Run the downloaded file and confirm the license agreement.
- Select the location where all components and the executable file will be placed for further installation. We recommend creating a separate folder, for example, on your desktop, where the unpacking will take place.
- Once the extraction is complete, go to the previously selected location and run the executable file.
- In the window that opens, follow the simple installation procedure.
All new files added in this way will be saved in the “System32” folder, which is located in the “Windows” system directory. Now you can safely run old computer games - support for the necessary libraries will be included for them.
This concludes our article. Today we tried to present the most detailed and understandable information regarding reinstalling DirectX on computers with Windows 10. In addition, we examined the solution to the problem with missing files. We hope that we have helped correct the difficulties that have arisen and you no longer have any questions on this topic.
Why do I have so many versions of DirectX?
The version of Windows you are using pushes the latest version of DirectX that your computer can run, this does not mean that it is the only one installed. Even though Direct X is now built into Windows, you have all kinds of DirectX files in C:\Windows\System32 and C:\Windows\SysWOW64 on a 64-bit copy of Windows.
Like the Microsoft C++ Runtime, each game is based on a different version of DirectX. For example, if a developer wrote a game to use the DirectX 11 40 update, then only version 40 will work. New versions are not compatible. Whenever you install a new game, it will most likely install a unique copy of DirectX that it needs.
Bottom line
As you can see, there is nothing difficult about downloading DirectX 11 for Windows 10... the only advice is, for God’s sake, use the official installer. DirectX is a system component, you can download it absolutely free from the official website... don’t look for it anywhere else except on the Microsoft website (and the official offline installer has not been updated for a very long time) and you will never have any problems.
If you think that you have problems with DirectX and you don’t know how to solve them, then you’re welcome to comment - we’ll figure it out!
- Facebooksit
- Tweet
- Share
- Cool
Should I remove DirectX?
There is no official way to remove DirectX. You cannot remove it from the app drawer in Windows 10. There is really no reason to worry about uninstalling this program. This is a core part of how Windows displays graphics. And don't worry about installing multiple versions. These additional libraries do not break anything, and they were installed automatically for a reason when you installed a particular game.
You should not attempt to delete individual DirectX files in the above folders. This may cause games or other programs to stop working properly. If you're having problems with a specific version, try reinstalling the game that uses it.
The question about DirectX, where this component is located in the system, often arises among Windows PC users. A person may want to know this in order to install it correctly or completely remove it from the disk memory. In this article we will look at the topic in more detail. We will talk separately about the folder for unpacking the installation files.
Why delete
Let's look at the situations in which you need to remove this application.
- The library package is damaged and generates an error;
- any games or programs cannot launch the required library;
- problems when trying to change DirectX to an older or newer version.
Removal is performed only in extreme cases when an attempt to update fails. But the first thing you need to check is that it’s possible. There is simply no need for an update.
Component location in Windows
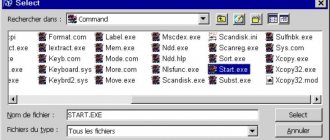
In some cases, when you run the library's executable installation file, a message will appear asking you to specify a folder for unpacking. It often confuses users, hence the question: “Where to install DirectX, for example, June 2010?” Everything looks as shown in the picture below.
But in reality the situation is somewhat different than it might seem at first glance. The point is that you are asked to select the directory where the installation files will be unpacked. And the program will determine the further installation path itself. Accordingly, choose any place. To do this, click on Browse, select the desired folder and click OK (in different windows).
DX Diagnostic Tools Overview
Below we will take a short tour of the program's tabs and get acquainted with the information it provides us.
Launch
This utility can be accessed in several ways.
- The first is the Start menu. Here you need to enter the name of the program (dxdiag) in the search field and follow the link in the results window.
- The second method is the “Run” menu. The Windows + R key combination will open the window we need, in which we need to enter the same command and press OK or ENTER.
- You can also run the utility from the “System32” system folder by double-clicking on the “dxdiag.exe” executable file. The address where the program is located is listed below.
C:\Windows\System32\dxdiag.exe
Tabs
- System.
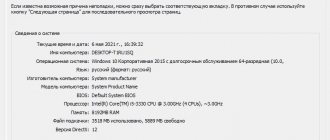
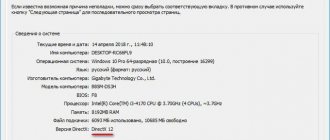
When you start the program, a start window appears with the “System” tab open. Here you can find information (from top to bottom) about the current date and time, computer name, operating system build, PC manufacturer and model, BIOS version, processor model and frequency, physical and virtual memory status, as well as DirectX edition.
Where is DirectX on Windows 10?
Often, when trying to enter a newly installed game, an error appears with files like d3dx9.dll. An inexperienced user may think that he needs to find the problematic DirectX 9 file, download it to the laptop and move it to the source directory. In fact, this is the wrong tactic; it is better to update DirectX on Windows 10 completely. This will resolve most errors.
If you still want to know the location of the DirectX files, they are located in the Windows\System32
on the system logical drive and start with d3dx.
Which DirectX is better for Windows 10?
It's always better to install the latest DirectX for Windows 10. In fact, it is unlikely to be the newest, because it all depends on the video card. It should have built-in support for the latest DirectX 12 software. Older models only have DX9-DX11.
Healthy! You don't even need to select the version of the DirectX library for Windows 10 yourself. It is distributed as an online installer. After entering the system, the program automatically detects the required software version and downloads it from the servers. The number of manual manipulations is reduced to a minimum.
Removal using DirectX Eradicator
There are different ways to completely remove a component. Now we will figure out how to do this using the DirectX Eradicator program.
This is the simplest application to uninstall, which weighs about 200kb. But it only removes up to version 9 of the library.
- Launch the downloaded file. We immediately get a window where we need to confirm our actions. Click “Yes”.
- After this, deletion will begin. We will soon receive a notification that the operation was successfully completed.
Unfortunately, DX Eradicator is not compatible with all versions of the library, so there is also a possibility of receiving an error message.
Then you will have to use other programs.
How can I find out the installed version of the library?
If DirectX does not install on Windows 10 with a message that the current version is already installed, but the game still writes about an outdated library, you need to determine its real version. A special system tool is responsible for working with the software environment.
- Click on the magnifying glass symbol next to Start, enter the name dxdiag and run the command of the same name.
- On the first tab “System” at the end of the list we see the line “DirectX Version”.
Notes
- GeForce GTX 400 Review|NVIDIA (Russian) (unspecified) ?. www.nvidia.ru. Retrieved September 19, 2022.
- GeForce GTX 700 Series of Graphics Cards from NVIDIA (English). www.nvidia.com. Retrieved September 19, 2022.
- GeForce 800M Series Graphics Cards | Graphic cards for laptops|NVIDIA (Russian) (undefined) ?. www.nvidia.ru. Retrieved September 19, 2022.
- GEFORCE GTX 10 VIDEO CARDS (Russian) (undefined) ?. www.nvidia.com. Retrieved September 19, 2022.
- Meet the NVIDIA GeForce RTX 20 series video cards (Russian) (unspecified)?. NVIDIA. Retrieved September 19, 2022.
- AMD Radeon™ HD 7000 series video cards: 7990, 7900, 7800, 7700 (Russian) (undefined) ?. www.amd.com. Retrieved September 19, 2018.
- AMD Radeon™ HD 7000M Series Graphics: 7900m, 7800m, 7700m, 7500m, 7600m, 7400m, 7300m (English) (undefined) ?. www.amd.com. Retrieved September 19, 2022.
- AMD Radeon™ HD 8000 Series Graphics (OEM) (Russian) (undefined) ?. www.amd.com. Retrieved September 19, 2022.
- AMD Radeon™ R7 240 (English) (undefined) ?. products.amd.com. Retrieved September 19, 2022.
- AMD Radeon™ R7 250 (English) (undefined) ?. products.amd.com. Retrieved September 19, 2022.
- AMD Radeon™ R7 260 (English) (undefined) ?. products.amd.com. Retrieved September 19, 2022.
- AMD Radeon™ R7 265 (English) (undefined) ?. products.amd.com. Retrieved September 19, 2022.
- AMD Radeon™ R9 270 (English) (undefined) ?. products.amd.com. Retrieved September 19, 2022.
- AMD Radeon™ R9 280 (English) (undefined) ?. products.amd.com. Retrieved September 19, 2022.
- AMD Radeon™ R9 290X (English) (undefined) ?. products.amd.com. Retrieved September 19, 2022.
- AMD Radeon™ R9 295X2 (English) (undefined) ?. products.amd.com. Retrieved September 19, 2022.
- AMD Radeon™ R7 360 (English) (undefined) ?. products.amd.com. Retrieved September 19, 2022.
- AMD Radeon™ R7 370 (English) (undefined) ?. products.amd.com. Retrieved September 19, 2022.
- AMD Radeon R9 300 Series.
- AMD Radeon™ R9 Fury (English) (undefined) ?. products.amd.com. Retrieved September 19, 2022.
- AMD Radeon™ R9 Fury X (English) (undefined) ?. products.amd.com. Retrieved September 19, 2022.
- AMD Radeon™ R9 Nano (English) (undefined) ?. products.amd.com. Retrieved September 19, 2022.
- Radeon™ RX 460 (English) (undefined) ?. products.amd.com. Retrieved September 19, 2022.
- Radeon™ RX 470 (English) (undefined) ?. products.amd.com. Retrieved September 19, 2022.
- Radeon™ RX 480 (English) (undefined) ?. products.amd.com. Retrieved September 19, 2022.
- Radeon™ RX 550 (English) (undefined) ?. products.amd.com. Retrieved September 19, 2022.
- Radeon™ RX 560 (English) (undefined) ?. products.amd.com. Retrieved September 19, 2022.
- Radeon™ RX 570 (English) (undefined) ?. products.amd.com. Retrieved September 19, 2022.
- Radeon™ RX 580 (English) (undefined) ?. products.amd.com. Retrieved September 19, 2022.
- Radeon™ RX Vega 56 (English) (undefined) ?. products.amd.com. Retrieved September 19, 2022.
- Radeon™ RX Vega 64 (English) (undefined) ?. products.amd.com. Retrieved September 19, 2022.
- What is DirectX?
- What is DirectX for?
- How to find out the DirectX version in Windows 10?
- How to update DirectX 12 version for Windows 10?
- What's new in version 12?
- What if I don't trust Microsoft?
Any person who plays games on a computer or even uses the latter to solve everyday problems has most likely encountered such a thing as DirectX, but not everyone knows what it is, whether the presence of this component is necessary, why it needs to be updated and where download Microsoft DirectX 12 for Windows 10 for free?
Reinstalling DirectX on Windows 10
The easiest way to install DirectX 11 on Windows 10 is to run the automatic installation wizard. Without user intervention, it does a good job of detecting outdated versions of the library and, if necessary, adding updated DirectX.
- Go to the official Microsoft page distributing the library.
- Download the file.
- Double click on the loaded element.
- In the “Security Warning” window, click on the “Run” button.
- Select “I accept the terms” and click on the “Next” button.
- Uncheck “Install Bing Panel” and click “Next”.
- We wait until the installation wizard finishes.
Most likely, the procedure was completed successfully and the current DirectX appeared in the system. However, this is not always the case. Sometimes it appears that everything ended well, but in fact the old damaged files are still in the system and they interfere with normal operation. In this case, you must first completely remove the library and install it again.
Interest Ask! Do I need to install DirectX with the game? Probably everyone has noticed that each game comes with its own set of libraries. In fact, most games will work if the system already has the latest version of the software environment, but not all. There are developers who modify or use a specific helper library that is not included in the standard package. Our verdict: it is advisable to install DirectX with the game, but in most cases it is not necessary. If we agree to the installation, but the program finds the required software environment in the system, the installation will be interrupted.
Why won't DirectX install?
If Windows already has a current version of the library, the online installer, having detected it, does not undertake to install the new DirectX on the system. Other problems can be caused by compatibility problems or incorrect operation of the antivirus. Most problems can be solved with the following instructions.
Directx won't install, what to do:
- Download DirectX from the manufacturer's website.
- We disable the antivirus for 10 minutes. We can do this through the tray (next to the system time) by right-clicking (RMB) on the antivirus software symbol.
- Right-click on the downloaded file and select the “Fix compatibility problems” option.
- Uninstall the previous version of DirectX.
By the way, we haven't mentioned how to enable DirectX 12 on Windows 10. Most games work successfully with both DX11 and DX12, but default to the older version. It is more reliable and supported by most devices. To activate DX12, you should switch to DirectX 12 in the game settings, usually in the “Graphics” or “General” sections.
Supported GPUs
- Intel: Intel Processors Haswell (4th generation core), Broadwell (5th generation core), Skylake (6th generation core), Kaby Lake (7th generation core), Coffee Lake (8th generation core) , Cannon Lake (9th generation core)
- Qualcomm
Nvidia GeForce
AMD Radeon
- Radeon HD 7000 series (starting with HD 7730)
- Radeon HD 7000M series for laptops (starting from HD 7730M)
- Radeon HD 8000 series OEM (starting with HD 8570)
- Radeon™ HD 8000M Series for Notebooks
- Radeon R5 M240 series for laptops
- Radeon R7 M200 series for laptops
- Radeon R7 240
- Radeon R7 250 (X)
- Radeon R7 260 (X)
- Radeon R7 265 (X)
- Radeon R9 270 (X)
- Radeon R9 280 (X)
- Radeon R9 285
- Radeon R9 290 (X)
- Radeon R9 295X2
- Radeon R7 350
- Radeon R7 360
- Radeon R7 370
- Radeon R9 300 series
- Radeon R9 Fury
- Radeon R9 Fury X
- Radeon R9 NANO
- Radeon RX 460
- Radeon RX 470 (D)
- Radeon RX 480
- Radeon RX 550
- Radeon RX 560 (D)
- Radeon RX 570
- Radeon RX 580
- Radeon Vega Frontier Edition
- Radeon RX Vega 56
- Radeon RX Vega 64
- AMD Ryzen 2000G series APUs
- AMD Ryzen PRO 2000G Series APUs
- AMD Ryzen Mobile 2000 Series APUs
- AMD Ryzen Mobile PRO 2000 Series APUs
- AMD Ryzen Mobile 1000 Series APUs
- AMD Ryzen Mobile PRO 1000 Series APUs
- AMD A4/A6/A8/A10-7000 series hybrid processors (codenamed Kaveri and Godavari)
- AMD A6/A8/A10 PRO-7000 series hybrid processors (codenamed Kaveri and Godavari)
- AMD E1/A4/A10 Micro-6000 series APUs (codenamed Mullins)
- AMD E1/E2/A4/A6/A8-6000 series hybrid processors (codenamed Beema)
> GPU architectures supporting DirectX 12 API
How to remove DirectX?
Since removing DirectX 12 on Windows 10 is sometimes a necessary procedure to restore the functionality of the library, we decided to separate the procedure into a separate item. The peculiarity of the action is that the goal cannot be achieved using standard system tools; additional applications must be used. For the program to work, you still need to disable the built-in protection.
How to remove DirectX for Windows 10:
- Right-click on the “This PC” icon and go to “Properties”.
- Go to the “System Protection” section.
- Click on the “Configure” button.
- Select the “Disable system protection” option and save the changes.
- Download the DirectX Happy Uninstall program.
- We install it, open it and go to the “Backup” tab, where we start creating a backup copy with the “Start Backup” button.
- Go to the “Uninstall” page and click on the same button on the tab.
- Reboot the system and install DirectX again.
It seems that we have given answers to all common questions regarding DirectX. If the topic is not closed for you, you can ask your questions in the comment form.
detailed instructions
In this material we have collected the most effective ways to solve errors. But first, of course, let's talk about reinstalling DirectX libraries. And only then will we start talking about all sorts of problems. So, let's go.
Reinstallation procedure
This action may be necessary for a variety of reasons. For example, some library components began to work unstable. Or there are compatibility problems. In any case, this is the most radical way to solve all problems related to DirectX. And therefore you need to know everything about reinstallation.
In general, this option is the last. If it does not help, then you will have to reinstall the entire operating system along with the game and all drivers. And this is difficult and long. To reinstall DirectX you do not need any special programs. Everything is done by the operating system. Here are the detailed instructions:
- Open the official download page.
- LMB click on the red button.
- In the window that appears, click on “Refuse and continue...” .
- In Explorer, open the directory where the dxwebsetup file was saved. exe .
- Right-click on it and select this item:
- In the new window, mark the item "I accept…" and click on "Further".
- On the next page we abandon the Bing panel.
- We start the installation procedure and wait for it to finish.
- And then we press the button "Ready".
That's the whole process. The best part is that after installation you do not need to restart your computer. The installed components are ready for use immediately. You can run the game and check their functionality. After reinstalling the DirectX executable libraries everything should work.