Most often, the operating system does not load correctly if the files that . The reasons for such damage can be different: loss of files, damage to the boot sector, viruses, incorrectly working drivers, and others.
Unfortunately, this problem cannot be resolved quickly.
To prevent such a situation from creating problems and malfunctions, we recommend creating and keeping a boot disk in reserve. The fact is that the Windows operating system was designed in such a way that it could be launched not only from a hard drive, but also from a CD. Moreover, in this case, Windows is not reinstalled; we are talking about loading the system itself.
What is required to create a boot disk?
To create a boot disk we need:
- blank CD/DVD disc;
- image with Windows XP. This refers to a CD/DVD disc containing the Windows XP operating system;
- a program for creating and working with images. For example, Nero, DAEMON Tools, Ultraiso. Beta versions of these programs can be downloaded from the official websites of the developer (www.nero.com, www.daemon-tools.cc, www.ezbsystems.com/ultraiso).
If you are convinced that you have everything you need, then you can get down to business.
Since the procedures for working with programs for creating images are somewhat different, we will write a step-by-step guide for each of them.
Alcohol 120%
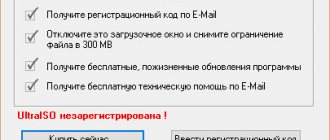
When it comes to the ISO format, one cannot help but mention such a popular program as Alcohol 120%. This is what its official website looks like ( www.alcohol-soft.com ).
There is a free version of Alcohol 52%, but it is not capable of recording images, it only edits them. But you can download Trial.
It also supports cool, high-quality formats like Blu-Ray. Capable of adding 31 virtual drives or copying from one drive to another directly.
From this training video you can learn how to use the program. It's very simple.
How to create a bootable disk using Nero?
Step 1.
To get started, take a boot disk with Windows XP and run it using the CD-ROM, launch the Nero program. Depending on the disc type - CD or DVD - run the appropriate project. In the list of project types, find the “Image creation” item. Please note that the project name may vary depending on the program version. In any case, the project name will contain either the word "image" or the abbreviation ISO.
Advice: use discs with the largest capacity for recording, since the entire array of information may not fit on a standard disc with a capacity of up to 700 MB.
Step 2.
In the list of information sources, you should select an optical drive; the information receiver will be the hard drive. Click the “Next” button.
Step 3.
A copy window will pop up on the screen, followed by a window where you need to select the path to save the image.
Tip: to make the folder with the image easier to find, we recommend saving it on your desktop.
Step 4.
After clicking the “Save” button, the image creation process will begin. At this stage, all you need is patience - wait until the process is completed and the “Burning Complete” notification appears on the screen.
Step 5.
Now you can remove the boot disk with Windows XP, and instead insert a blank disk of the same size - CD or DVD.
Step 6.
You should select the “Burn image to disk” project. A window will pop up again in which you should determine the path to the image created the day before. Now you can start the burning process.
Step 7
Optical storage media: the benefits of a conservative choice
You may be familiar with the meaning of the word “blank.” More recently, a blank disk for recording was the most convenient technical solution to problems related to the efficiency of transferring and storing certain information. Time is rapidly running forward. The former glory of optical media has faded in the rays of Flash technologies. However, let's get back to "good habits." Moreover, the solution to the question of how to burn Windows to disk, in addition to nostalgic demand, also has a number of irrefutable advantages:
- The cheapness of CD/DVD discs is unrivaled (Flash drives are much more expensive).
- The issue of durability is often decided in favor of optical media.
- Recording speed and quality are integral advantages when using discs.
The last argument in favor of disks can be considered technical unpretentiousness in terms of using this kind of information storage. A trivial insertion into the drive - and the reading process begins! Whereas the information stored on the flash drive is somewhat dependent on the operating state of the built-in controller. Simplicity and efficiency - this is what should ultimately be reflected in the solution to the question of how to burn Windows to disk.
Creating a boot disk using DAEMON Tools?
- ШTo create a new image in the DAEMON Tools application window, select the “Burn image” button (located on the top panel).
- In the window that appears, select the DVD drive. In the "Write Speed" drop-down list, select the highest value - "4.0". In the “Path to image file” field, enter the path to the Windows XP installation disk image.
- After completing all the steps, click the “Start” button.
- DAEMON Tools will take some time to burn the image to CD.
How to create a bootable disk using Ultraiso?
Step 1.
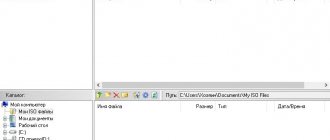
Launch the Ultraiso program. It is important that this action is performed with administrator rights. To do this, when you click on the program shortcut in the window that appears, select the “Run as administrator” option. Next, the program will prompt you to complete the registration procedure. When using a trial version, click on the corresponding “Trial period” button and move on.
Step 2.
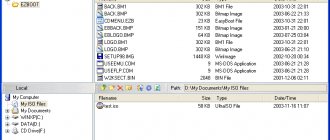
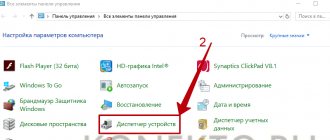
On the left side of the program, select the “File” tab. As a result, Explorer will open. In it you should select a file with the extension *.iso, which contains the image of Windows XP.
Step 3.
In the main menu of the program, select the “Tools” tab. In the menu that “drops down” at the top, click on the “Burn image” button.
Step 4.
Here are the main methods for creating a bootable Windows XP disk. However, we cannot help but mention another method - the “Dosov” method. Despite its relative complexity and some obsolescence compared to the previous ones, it also has a right to exist.
How to create a boot disk using the DOS method?
- We create a folder on the hard drive in which we will enter all the necessary data. First of all, you should add a file manager adapted for DOS: Norton Commander, FAR or Volkov Commander.
- To make it convenient to launch a file manager (for example, Volkov Commander), we create a bat file. It’s very simple: open notepad and enter:
Let me explain a little. The first line is a command to replace the directory with Volkov Commander. The second line is a command to run the file called "vc.com".
Save the notepad file under the name “vc.bat”. The presence of a file under this name makes it possible to enable Volkov Commander using the letter combination on the command line: vс. And confirm everything with the Enter key.
- Later, when you use the boot disk, you will need to select the exact drive letter that corresponds to the CD drive. This is done as follows: in the command line, write first D:, then E:, and so on until the notification “The disk is not specified correctly” pops up. The most recent disk in existence will most likely be your CD drive.
However, this should be checked. To do this, enter the command “dir” in the command line. This command will display all files and folders contained on the disk. In this simple way, you can make sure that the disk is selected correctly and continue.
- Next we will use the Partition Magic program, namely its DOS version. This software product is designed to work with hard drives: formatting, dividing the hard drive into partitions, converting file system types and much more.
- In the folder where we collect everything necessary for the boot disk, we create an additional directory called “PQ” with program files. Similarly, with Volkov Commander we create a launching notepad file with the following content:
We give it the name “xp.bat”.
Thus, everything necessary for the boot disk has been created.
- Launch Nero (or any other imaging program described above). In the menu that opens, select “Create a bootable data disk.”
- Click the “Add” button and enter into the window all the folders and files that should be written to the installation disk. Then click the “Next” button.
- At this stage, you may be prompted to insert a boot floppy disk, ignore this requirement and select “Next” again.
- Now directly select the “Record” button.
Creating a multiboot Windows XP disk
Unlike a boot disk, a multiboot disk can contain not only operating system files, but also other necessary programs. For example, text and graphic editors, social applications, and so on. At its core, the procedure for creating a multiboot disk is not too different from that described above. The files of all necessary programs are accumulated in one folder, and then the image is recorded.
But let's take a closer look.
What do we need
As before, you need:
- image creation program;
In addition, we will need the xpboot.bin file, as well as files of some program.
Guide to creating a multiboot disk.
In conclusion, we note that it is easy to check whether a boot/multi-boot disk is working. To do this, immediately after burning, return the recorded disc back to the CD-ROM. If it starts automatically and the “Run Autorun” window appears on the screen, congratulations, you succeeded.
We’ll also give you one last piece of advice: you may not be able to create a boot disk the first time, so we recommend rehearsing it on RW disks.
The most common mistake when trying is simply copying the file to the media. The result is the impossibility of installation. The following components are required here:
- Distribution files
- Programs for recording (Nero, UltraIso and their analogues) information onto media
- Installation files: xpboot.bin
or
nt5boot.bin
Before you make a bootable CD/DVD, you need to check the surface of the matrix - no scratches, clean, no fingerprints. Any deficiency will lead to damage to the blank and installation errors. If the download will be made to a RW format disk, then it is necessary to completely format it, otherwise the Windows XP installation data will be written with errors.
Recording with Nero
Nero isn't cheap. Fortunately, the developers allow you to use the program for 15 days for free. The download file is located on the publisher's website. After installation, you should run the program as an administrator and select the trial version.
In Nero, you should open the DVD-ROM/CD-ROM (Boot) project. The choice depends on the size of the data being written and the type of disc. Below is how to create a bootable CD.
In Nero, click on the Downloads tab. Here, next to the Image File, there is a Browse button. Click and specify the path to the nt5boot.bin or xpboot.bin files. Check the box for Additional settings.
You cannot change anything in the ISO tab (shown below)! The main thing is that all the checkboxes are as shown in the picture. Then the formation of the boot disk will be successful.
The next tab where you can make changes is: Recording. Here, if we want the disk not to be changed later, check the finalize box.
Click on the New button and a window appears with data selection. The main thing is the presence of three selected files. It is thanks to them that the installation of Windows XP will be successful. Drag and drop the selected required data. At the bottom there is a disk full bar. If desired, you can create a folder on the matrix with drivers or additional software - graphic editors, antiviruses, etc. Next is the final stage of preparation for creating bootable media.
Click on Record. A window will appear – in it click on Burn. We wait for the Windows XP bootable media to be created, not forgetting to check the box to check the recorded data.
The result is a boot disk. When writing files, it is not recommended to use high speeds, as this increases the likelihood of errors. To check the functionality of the Windows XP installation, reboot the computer and set the priority in the BIOS to DVD-ROM.
Download CDBurnerXP
Go to the site
https://cdburnerxp.se/ru/download
Click on the link
.
In order not to install an additional program, download the portable version
for its Windows bit depth.
Unpack the downloaded
.
CDBurnerXP downloaded.
Recording with UltraIso
UltraIso is a paid program, but a 30-day demo version is available. This period is quite enough to successfully create a working installation of Windows XP. You can download the data recording program from the official website. To run the free version, you need to right-click on the shortcut and run as administrator. Next is the trial period.
In addition to UltraIso, the computer may have Nero. Then, to avoid a conflict between these two programs, you should change the settings and, therefore, create bootable media for Windows XP. We carry out the sequence of actions: Options - Settings - Recording.
There should be no check mark in the box marked in the picture. If there is, we remove it. Otherwise, the resulting boot disk can be thrown away. Next, click OK and click File – Open – ISO file. We specify the path to the data so that the creation of a working installation takes place successfully.
After selecting the file, click Open. A window appears:
Pay attention to the inscription in the left corner. If it says Bootstrap, then the creation of a bootable disk will take place, and if it is specified, for example, without bootloader, then the downloaded image cannot be used for installation.
A settings dialog box will open in which you need to select the drive, recording method (Disc-at-once), speed and check the box to check the resulting boot disk. It is necessary to set the minimum allowed speed for the matrix. The burning depth, processor load, and time reserve depend on this. After distributing the settings, click Write.
After the recording is completed, a table with the results will pop up: whether everything was done without errors or not. The media tray will pop out automatically. The message that the check was completed successfully is very important.
Thus, creating a boot disk yourself is easy, as is installing Windows XP. The main thing is to strictly follow the instructions and believe in your own strength.
If you want to always have at hand either a bootable flash drive or a disk that, if necessary, will help restore your computer to working order, let's figure out how to do this.
The site already has an article about how you can. If you use optical drives, read:. In order to record several images of operating systems or utilities on one device, you will need.
In this article we will look at how you can make a multiboot disk
. We will use for this. By clicking on the link, you can learn more about the program and download it to your computer.
In addition to the program, you will need a blank DVD and those ISO images that you want to include in the build.
Launch XBoot on your computer. To add the necessary images, simply drag them into the main program window; you can also add them through the menu “File” - “Open”. The total amount of memory they will occupy will be indicated at the top right in the “Total Size” field.
The following window may appear. In it you need to specify the bootloader that you want to use for the added ISO image. If this is an image based on a Windows system, select “Add using Grub4dos ISO image Emulation”; if it is based on Linux, select “Linux Ubuntu”. Click "Add this files".
By going to the menu “File” - “Download”, you can see the images that the program itself offers. Select the one you need from the list and click “Open Download Webpage”. The Internet page will load, from where you can download the selected image.
Next, by clicking “Create USB”, you can create a multiboot flash drive. We need to make a multiboot disk. Therefore, first we will create an ISO image, which we will save on the computer’s hard drive - click “Create ISO”.
After you have saved the ISO image on your computer, using any disk burning program, burn it to a DVD. This way you will create a multiboot disk. To burn the image to disk, you can use .
In the next window, you need to specify the location on the computer where the created ISO image should be saved. Click Browse.
Using Explorer, select the desired folder and click Save. I will save it to the root of the C: drive. Please note, when choosing a path for an image, do not use Russian letters in the names.
We return to the previous window and click “OK” in it.
The ISO image creation process will begin.
When it is completed, a window will appear in which you will be asked to check the created image on the QEMU virtual machine. Click YES.
There is another way to start a virtual machine. In the XBoot program, go to the “QEMU” tab and click in the “Browse” window. Now we look for the folder on the hard drive where you saved the image and click “Open”.
Here you can evaluate the performance of all distributions and programs added to the ISO image.
Now, to create a multiboot disk, you just need to burn the created ISO image, which may contain various operating system distributions and other utilities, onto a blank DVD. How to do this is described in the article:.
I think you managed to make a multiboot disk that you can use either to restore the system or to reinstall the operating system.
Before installing the operating system, you need to create a boot disk with Windows 7
, from which the installation will be carried out. You can find and download many different versions of Windows 7 on the Internet. However, I repeat that it is best to install original versions of operating systems, not assemblies. We will assume that you already have an image of the operating system on your local disk. As a rule, this is a file with the extension “ISO” - for example, “Windows7.iso”. This is what we need to burn onto a DVD in a certain way.
Why on DVD? Will explain. The average size of an operating system image is about 3 Gigabytes, so regular CDs simply cannot accommodate a file of this size. Both DVD-R and DVD-RW discs can be used. The only difference between them is that “RW” (ReWritable) has the property of rewriting. That is, such a disc can be erased and recorded many times. And the “R” (Recordable) disc can only be recorded once. To create a bootable DVD, you will also need a Windows 7 disc burning program.
Currently, there are many different programs, but I recommend Nero Burning ROM, which has long established itself as a professional program for burning discs of all types. One of the most stable versions of this program for the Windows XP operating system is “Nero Burning ROM 6.6.0.16”. Nero will be more than enough for you. For the 64-bit Windows 7 operating system, it is better to install a version no lower than 10, and better yet 12. For example, "Nero Burning ROM 12.0.20000". At the end of the article I will post a link to this program so that you can download it to your local disk and then install it. Using this particular version of the program as an example, I will show you how to create a Windows 7 boot disk
.
Having launched the “Nero Burning ROM” program, the following window should appear in front of you, in which you need to left-click on the “Open” button.
Next, in the window that appears, you need to select the image itself that you want to burn to disk. To do this, you must know where exactly this file is located on your hard drive. Click on the required file twice with the left mouse button or once with the left mouse button, first on the file and then on the “Open” button. It will look approximately as shown in the picture.
The disc burning settings window will appear. Make sure DVD is selected in the top left corner. Also check if the “Record”, “Finalize disc” and “Check recorded data” checkboxes are checked. “Record” means recording a disc, everything is clear here. “Finalize a disc” means to “close” the disc after writing so that subsequent writes to it are impossible. “Check recorded data”—after recording, all recorded files are checked for readability. Choose the recording speed at your discretion. You can select the maximum speed. But I personally have had cases where, after recording at maximum speed, some files from the disk simply refused to be read. Perhaps they were just low-quality discs. But I still always choose the “golden” mean. And I don’t always set the maximum speed. So, click the “Burn” button.
A window like this should appear, where the following main indicators are located: write speed, loading of the read-executive buffer, and a write progress indicator.
After the recording is completed, checking the recorded data will automatically begin - “Data Verification”, upon completion of which, if everything went well, the window shown below in the picture will appear, and the tray of your drive with the still warm disc will open. Click the “OK” button and close the program. The disk is ready for installation.
If during “Data Verification” (disk check) messages such as those shown in the picture below appear, it means that the data was recorded incorrectly. In this case, reading occurs with errors. It is not recommended to install the Windows operating system from such a disk. Click the “Cancel” button, and in the window that appears next, the “OK” button.
If you burned an image of Windows 7 onto a DVD-R disc, then it is better to take a new blank disc and do all the above operations to create a bootable Windows 7 disc again. If you used a DVD-RW disc, erase it by clicking on the “Erase rewritable disc” button in the “Recorder” menu tab, as shown in the picture below.
In the window that appears, leave all the settings unchanged, that is, Erase method – Quickly erase RW disk, Erase speed – Maximum. And click the "Erase" button.
After this, a window will appear showing the progress of the erase operation.
Once the disc is erased, this small window will disappear and the drive tray will open with a now blank disc. You will need to follow all the steps described above to create a bootable Windows 7 disk. And you will need to start with the “Open” button, where in the window that appears you select the desired image with the Windows 7 operating system.
If no errors are found after checking the disk, the creation of the Windows 7 boot disk has been completed successfully. The disk is now ready to install the operating system. I wish you success!
In order to install Windows 7 on a computer, you need a bootable disk or bootable flash drive with the operating system distribution. Judging by the fact that you got here, you are interested in the Windows 7 boot disk. Okay, I’ll tell you in detail how to create it.
What you need to make a bootable disk with Windows 7
To create such a disk, first of all, you will need a distribution image with Windows 7. The boot disk image is an ISO file (meaning, it has the .iso extension), which contains a complete copy of the DVD with Windows 7 installation files. If you have There is such an image of you - great. If not, then:
- You can, but keep in mind that during installation you will be asked for a product key; if you do not enter it, the full-featured version will be installed, but with a 180-day limit.
- Create an ISO image yourself from your existing disk with the Windows 7 distribution kit - using the appropriate program for this; among the free ones, we can recommend BurnAware Free (although it’s strange then that you needed a boot disk, because you already have one). Another option is if you have a folder with all the Windows installation files, you can use the free Windows Bootable Image Creator program to create a bootable ISO image. Instructions:
We will also need a blank DVD on which we will burn this image.
The final part: everything new is well forgotten old!
It is worth noting that, due to the variety of Nero products (differences in versions), navigation and functionality of the programs often become a kind of test for the user. Replacing the outdated six with a new release of the program, the user may encounter some “interface difficulties,” and a popular question is: “How to burn Windows to disk using Nero 7?” is a great example of this. However, if the user looked at everything more carefully, clicked and got acquainted with the changes in the “Help” section, then everything would fall into place. After all, everything new requires learning, and knowing the old “habits” of the program, it will not be difficult for you to understand its “bells and whistles” and “tricks”. Good luck with your dating and quality copies!
Burn an ISO image to DVD to create a bootable Windows 7 disk
There are various ways to burn a disc with a Windows distribution. In fact, if you are trying to make a bootable Windows 7 disk, working in the same OS or in a newer Window 8, you can right-click on the ISO file and select “Burn image to disk” from the context menu, after which the wizard disc burning built into the operating system will guide you through the process and at the end you will get what you wanted - a DVD from which you can install Windows 7. But: it may turn out that this disc will only be readable on your computer or when installing the operating system system, various errors will occur from it - for example, you may be informed that the file could not be read. The reason for this is that creating bootable disks needs to be approached, let's say, carefully.
Burning a disk image should be done at the lowest possible speed and not using built-in Windows tools, but using programs specially designed for this:
- ImgBurn (Free program, download from the official website https://www.imgburn.com)
- Ashampoo Burning Studio 6 FREE (you can download it for free on the official website: https://www.ashampoo.com/en/usd/fdl)
- UltraIso
- Roxio
There are others too. In the simplest version, just download the first of the specified programs (ImgBurn), run it, select “Write image file to disk”, specify the path to the Windows 7 boot ISO image, specify the writing speed and click the icon depicting writing to disk.
That's all, just wait a little and the Windows 7 boot disk is ready. Now, having set the BIOS to boot from a CD, you can install Windows 7 from this disk.
All you need
To make a boot disk, you need to download a virtual image from the network. Typically, this is a file that supports the ISO extension. Please note that the downloaded image must correspond as closely as possible to the licensed version of the software used on the computer. In some cases, you will need to enter a license key to download the file. This information is contained on a sticker located on the system unit or the bottom of the laptop case. In addition, you need a digital medium to copy the image onto it, and a program that will help carry out this procedure.
WATCH THE VIDEO
Important! To copy a disc or flash drive, you can use Windows tools or third-party utilities.
Let's look at how you can make a copy.