Microsoft created the Windows OS with the expectation that several people would work on one computer. To prevent users from interfering with each other, a so-called account system was developed. That is, each user has a personal account. All personal data is stored there. In this article we will talk about how to change the username in Windows 10, 7, 8 and other OS versions.
Why change the name?
There are many reasons why you might need to change your account name. Perhaps the most common one is a spelling mistake. For example, you spelled your name incorrectly, which is a real eyesore when logging in.
Another reason for changing the name is the encoding. Many users use Cyrillic characters in their account names. In this case, a folder with the user’s personal data is also created in Cyrillic. The problem is that many programs use encodings that do not support Russian letters. As a result, an error occurs due to which the utility does not work correctly. To fix the problem, you need to know how to rename a user folder in Windows 10.
Errors that may occur when performing a task
When changing the username on a PC running Windows 7, the following errors and difficulties may occur:
- you cannot change the name. This problem occurs due to the inability to perform the procedure as an administrator. Thus, the user cannot change the standard name “user” to his own;
- inability to open the control panel. This error is of a technical nature and indicates a system failure that managed to block the function, or a virus infection of the PC. The first can most likely be solved by restarting the computer, and the second with the help of various antiviruses and utilities. If these actions failed to change the situation, then it is recommended to use another method of changing the name of your Windows seven account;
- “Technical problems have been detected on the computer. Please try the procedure later." This notification when trying to change the name indicates a malfunction in the operating system. The problem can be completely resolved by reinstalling Windows 7.
Application to scan for virus software on Windows 7
Important! There is no point in reinstalling the system due to problems with changing the username. Especially if important information is stored on the computer, which will be deleted during such a procedure.
Create an entry
Instead of changing the name of your old account, you can create a new account with the name you want. This is done very simply. All you need to do is:
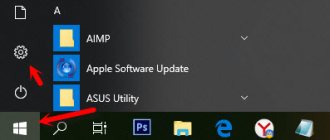
- Click on “Start”. A menu will open in which you need to select the name of the current account. In the drop-down list, click on the item responsible for changing parameters.
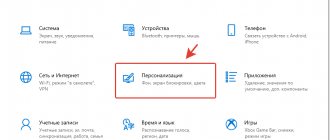
- A dialog with account configurations will appear. We are interested in the left sidebar, which contains the item “Family and other users”. Go to this section, then add a new user by clicking on the corresponding button.
- A dialog will open to create a new user. The system will ask you for your mailbox. If you specify an E-mail, the OS will be linked to your Microsoft account. To avoid this and create a local account, indicate that you do not have email by clicking on the appropriate hyperlink.
- The system will prompt you to register on the company’s official website. We refuse by clicking on the item that allows you to add a user without a Microsoft account.
- After carrying out the above manipulations, you will be taken to a dialogue with account parameters. Enter your username, password and hint to log into your account. After this, click on the “Next” button.
Voila - you have created a new account. Now we need to give her Windows 10 administrator rights. To do this:
- In the already familiar “Family and other users” section, select the created account and click on the button responsible for changing the account type.
- In the dialog that appears, use the drop-down list to set the “Administrator” parameter. Now for the changes to take effect, click on “OK”.
How to change, rename and delete a user in Windows 8
Windows accounts are a very useful feature for personal computers that are used by several people. For each user, you can create a personal account and a personal folder in which his files and configurations will be stored. The account remembers all desktop settings, some programs, keyboard layouts and much more. This article provides a detailed guide on how to work with accounts: change the username, delete unnecessary ones and log out of Windows 8 without shutting down the computer.
Shutting down and changing the active account
The first thing you should learn when working with accounts is how to change the current user. To do this you will need to shut down Windows:
- Move your cursor to the bottom left corner of the screen and click on the icon that appears to bring up the Start menu. A similar action will occur if you press the Windows button on the keyboard.
- Now you need to click on the user's image at the top of the screen.
- Select "Log Out" from the drop-down menu.
- Thus, you have completed the current session. To change the active account, click on the "Back" button.
- Press the Control+Alt+Delete key combination at the same time.
- Select the desired account for authorization.
How to rename an account
In order to rename an account, you need to launch the Windows settings menu:
- Move your cursor to the right side of the desktop to bring up the Settings menu.
- Here you need to select “Change computer settings”.
- In the list of sections located on the left side of the window, you need to open the “Users” tab.
- If you want to change the name of your current account, follow the "More online options" link.
- Open the "Edit data" section.
- The name will appear here. Click "Change" and set a new value.
It is strongly recommended not to use this method if one of the regular users changes. This may lead to some inconveniences: for example, it will be difficult for a person to find his folder.
Renaming a user folder for a new member is much more difficult than changing the account name or creating a new one.
It is much easier to delete an extra account and create a new one.
Removal
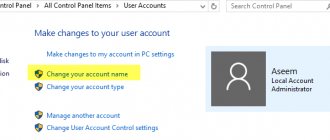
To delete an account, you will need to go to the control panel and find the account management menu in it. In it you need to open the “Manage another record” section. Now you need to select the desired item and click “Delete account” at the bottom of the list.
Additionally, you can erase a folder with various configurations specified by the owner. It is located on the system hard drive in the “Users” directory.
Computer name
Before you change the computer name to Windows 7, you need to open a dialog called “System”. To do this, launch the Start menu. In the drop-down list, right-click on the “Computer” item. Now, from the list presented, select the “Properties” option. Then follow the following instructions:
- Go to the dialogue called “System”. Pay attention to the left sidebar. Click on the hyperlink that is responsible for additional network settings.
- The above steps will launch a dialog called “System Properties”. In it you need to go to the “Computer name” tab and click on the “Change” button.
- Change the computer name in the appropriate window. For the changes to take effect, you must click “OK” and restart the PC.
Important! The name must consist of Latin letters (the use of a hyphen is allowed). Do not use Cyrillic or special characters in the PC name. Otherwise, your computer will become inaccessible to other users on the network.
How to change username 100%?
There are 2 solutions:
- change through the Users and Groups (not always possible);
- change through the “secret” window.
Computer Management - Users and Groups
Many people say that this can be done through the Users and Groups . That's right. Look for your username in the list. Right-click and select Rename. After reboot - new name!
But there is one BUT .
In the very first (poor) editions of Windows this is not available. More precisely, in Windows 10 Home and Windows 7 Start, there is simply no Users and Groups item in Computer Management. Microsoft decided that for home users there is no need to change the name.
Change username through the “secret” menu
This method of changing the user account name works even in Windows XP, since this window was accessible there through the “Control Panel” using the standard method. In Windows 7, this window has already been removed and can only be accessed through the console. In Windows 10, this window remains and is also accessible through the console.
The action plan is:
- launch the CMD , to do this, click START and type these three letters into the search bar;
- in the console that opens, type the command: control.exe userpasswords2
- In the window that opens, check the box Require username and password ;
- select the desired user;
- we press Properties;
- Enter a new name and press OK:
- Reboot the computer and log in with the updated account.
It was in this simple way that I was able to rename the user names of more than a dozen computers without any loss of information.
Tags:
Working with the registry
Another option to change Windows security credentials is to work with the system registry.
Manipulations with the registry are designed for more experienced users than those who use the computer only for games and browsing the Internet. But there is nothing complicated about them either.
The Windows registry is simply a list of name-value pairs organized in some sort of hierarchical order. To work with the Windows registry, use a special program called regedit.exe. We will do the same: enter regedit into the command line, press “Enter” and a registry editor window will open in front of us:
In the tree-like list on the left, look for the node “HKEY_LOCAL_MACHINE\SOFTWARE\Microsoft\Windows NT\CurrentVersion\ProfileList”.
In the panel on the right we find the “ProfileImagePath” key and change the Windows user name in it to the desired one. As we see, there is nothing particularly difficult about changing the user name in Windows, and the ability to use the system registry will help you in many other circumstances.
