What is a context menu
A context menu is a part of the graphical interface of a program or operating system, which is a list of commands related to the element selected by the user. The context menu is initially hidden and appears only after a user request. Typically, it is used to execute commands that in one way or another change or control a user-selected element of a program, operating system, or work environment.
The classic commands for the context menu are: copy, paste, cut, rename, update, properties. Such commands can be found in any program or operating system. But, the specific list of available commands depends on the specific program, situation and element selected by the user. In many cases the list of commands is nested. For example, the Sort command can open an additional menu with different types of sorting.
The appearance of the context menu is practically the same depending on the program or operating system. This is a vertical list of commands that opens at the user-selected point. The standard way to open the context menu is to right-click. This option is the most common and is used by most users. But there are other ways, which we will consider below.
Other tools
Easy Context Menu
Simple interface, although not the most modern. It includes a number of unique menu settings, such as the ability to block keyboard and mouse input, restart File Explorer, copy IP address, and empty the Recycle Bin.
And here you can open the “Run” window, Registry Editor, Services, Msconfig.
There are also sections for editing the context menu of files, executable files, disks, support for creating custom menus by clicking on the “ Command List Editor ” button. Context Menu Cleaner section makes it easy to remove unwanted commands.
The complete list is displayed without unnecessary clutter and you can easily enable and disable objects.
Filemenu Tools
This application has the most options of the tested programs and the most sophisticated interface. This may appeal to advanced users or those who are ready to learn.
Right Click Enhancer
The free version of this application has limited functionality, many unnecessary tools, such as a file extension manager, file renaming. The paid version for $9.99 has more extensive functionality; you can add shortcuts, submenus, and remove objects.
There are problems with saving the settings state, but sometimes this happens in the Easy Context Menu.
How to open the context menu
As we have already said, the most common way to open the context menu is by right-clicking. This method is very convenient, since the user can select an element or point on the screen.
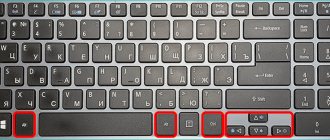
But, there are other ways to open the context menu. For example, you can simply press the context menu button on your keyboard. This button is located to the left of the right CTRL and is very rarely used by users.
The context menu can also be called using key combinations. On Windows and Linux operating systems, the combination Shift-F10 is used for this.
Other operating systems may use different key combinations. For example, in OS X you need to hold Ctrl and click the mouse.
Context Menu Tuner
Context Menu Tuner, a portable app that lets you add custom items to the right-click menu in Windows 7, Windows 8, and Windows 8.1, was developed by Sergey Tkachenko (WinAero), a well-known developer who is the author of many useful tools, including TakeOwnershipEx. The application is very convenient in the sense that the entire process of adding items to the context menu requires a few clicks from the user.
To get started, launch the application. The Context Menu Tuner interface consists of two different panels - the left one contains a list of supported commands, and the right one consists of Windows Explorer areas. To add a command, you need to select one of them in the left panel, and then, after selecting your preferred element in the right panel, you need to click on the “Add” button. As you might guess, the “Delete” button is responsible for deleting added commands.
Additional features of the application allow you to add separators before and after certain menu items. In addition, there are a couple of additional options.
Another interesting feature of the app is its ability to add custom commands for specific file types. Once you open the “Select File Type” window, which you can access by clicking on the “Add -> Add to Specified File Type” button in the main application window, you will see an impressive number of supported file extensions. The list is very long, so to quickly find a specific file type, use the search bar.
The screenshot below shows my context menu, which I modified using Context Menu Tuner:
That's all. Now you know what the Windows context menu is and a simple solution to edit it.
How to change the context menu in Windows 10 or Windows 7
In some cases, the list of commands that is available in the context menu can be changed to suit your own needs. For example, you can change the context menu of the Windows 10 operating system. To do this, you need to edit the Windows registry or use special programs. One such program is ShellMenuView from NirSoft. With this program you can view a list of all commands and disable those that you do not need.
You can also use programs such as Winaero Tweaker or Context Menu Tuner for this purpose.
Adding new items to the Send context menu
To add programs to the Explorer Send to context menu, you do not need to use the Registry Editor. You can do it in a simpler way.
Go through the steps:
- Press the "Win" + "R" keys.
- In the Run dialog box, enter the command “shell:sendto” (without quotes) and click OK.
- The “SendTo” folder will open, containing application shortcuts.
- Copy the shortcuts of the desired programs to this folder. For example, I added a shortcut to uTorrent to the Send menu.
To remove the item from the “Send” context menu, remove the program shortcut from the “SendTo” folder.
Using the Windows Registry
The method is considered convenient and reliable compared to the previously mentioned applications and tools. The task is performed using a step-by-step algorithm:
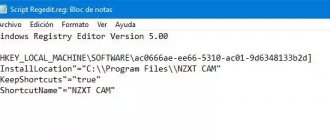
- The Windows directory is launched by simultaneously pressing the “Windows” and “R” buttons and entering the “regedit” command.
- Then the path is written to search for KM elements and remove unnecessary ones: “Computer \HKEY_CLASSES_ROOT\* \shell and Computer\HKEY_CLASSES_ROOT\* \shellex”.
- Before starting the operation, you need to create a backup copy of the system through the “file”, “export” block, moving to “save” - to restore, just click on “import”.
Any of the KM objects is registered in the list of the operating system. The best approach for making adjustments is to use the specified editor, but execution requires specialized knowledge. Otherwise, serious damage will be caused to the OS.
Launching Registry Editor
LiveInternetLiveInternet
In this lesson we will take a closer look at the functions of a very useful key that is found on any keyboard. This key is called the "Context Menu key". It is located in the lower right part of the keyboard between the ALT and CTRL keys
When you press this key, a CONTEXT MENU CALLS UP, exactly the same as if you pressed the RIGHT mouse button. The trick of this button is that the menu called up when clicked will display functions (menu items) that can be applied in the current program, in the active window, on the desktop, etc. Those. This menu adapts to the process in which you are directly working, and this is very convenient. Now let's take a closer look at the main options for displaying the context menu in different environments and the functions that can be performed using this menu. 1. Pressing the RIGHT mouse button or the “Context Menu” key on the Windows Desktop
For Windows 7 When you press the RIGHT mouse button or the “Context Menu” key on the Windows 7 desktop, a menu that looks like this appears:
1. At the very top of the menu - configure the parameters of your video card. 2. View – setting the display of icons on the desktop
3. Sorting – setting up sorting by displaying icons on the desktop
4. Refresh – refreshes the display of content on the Desktop. 5. Paste - if you copied something, you can paste it onto the Desktop. 6. Create. Here you can create on the Desktop: a folder, a shortcut, a text document, an archive, MS Office documents - Word, Excel, PowerPoint, etc. (if installed)
7. Screen resolution. Here you can set the necessary screen settings: select a screen (there may be several of them), find out or set the screen resolution, determine the screen orientation, and also configure other parameters for working with the screen, for example, connecting a projector.
8 . Gadgets - selecting and installing Windows 7 gadgets. Windows XP does not have such a function.
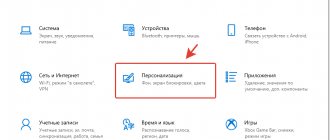
9. Personalization. Here you can customize the appearance of the Worker, change the background, screensaver, sounds, theme, window color, etc.
For Windows XP
In Windows XP, as many people certainly know, the context menu looks simpler, but performs almost the same functions. When you press the RIGHT mouse button or the “Context Menu” key on the Windows XP desktop, the following menu appears:
1. Using the first menu item Arrange icons, we can perform the following operations:
2. And all the main settings of the Screen and Desktop are called up through the Properties (for more details, see Setting up the OS Windows XP Desktop
)
Screen resolution can be adjusted in the Settings
2. Clicking the RIGHT mouse button or the “Context Menu” key on a file or folder in Explorer or any other file manager.
When you click the RIGHT mouse button or the “Context Menu” key on a file in Explorer or any other file manager, the menu is also adjusted to the file of a certain type.
For example, I clicked on a video file . The following menu opens:
In this case, the menu offers functions that correspond specifically to the video file: play, add to the list of the player that is selected by default for this file type. And a number of standard functions: open with, add to archive (if the archiver is installed), send, cut, copy, delete, rename and file properties. If you click with the RIGHT mouse button or the “Context Menu” key on a graphic file , then a menu will open that will correspond to the graphic file type:
Here you can immediately open, edit or print the selected file in your default image program. In my case, this is the ACDSee program. You can immediately make the selected file the background image for your Desktop, which is very convenient when you choose from a large list. And then again there are standard functions for working with files.
There are no significant differences in Windows XP,
standard functions for working with a file are called by the Edit
I will dwell in more detail on the “Open with” and “Send” items. Why is the “Open with” function useful?
Here you can select or assign any installed program that understands the selected file format to work with the selected file. In this case, I clicked on the video file and several programs can work with this format on my computer: Light Allow, WinAmp and of course Windows Media Player. If the program you need is not in the list, but you know for sure that it is installed, select the “Select program” . Windows will prompt you to select programs from a list of recommended or other programs.
In Windows XP, the appearance of this window is slightly different, but the meaning is the same:
If you want the selected file format to always be opened by the program you select, then check the box “Use the selected program for all files of this type . If the desired program is not in the list of recommended programs or in others, but you know for sure that the program is installed, then click the “Browse...” and select it from the folder where the program is installed.
Why is the “Send” function useful?
Using this function, you can, so to speak, “without leaving the cash register”, you can send (transfer, transfer) the selected file via BlueTooth (bluetooth), Skype, mail, to the Desktop, to the archive, for burning to a CD/DVD disk, to a flash drive etc.
3. Press the RIGHT mouse button or the “Context Menu” key in any Internet browser.
And here, too, the menu adapts to different situations, depending on where you click on the web page. For example, if you click on a link, then the following menu will open:
Using this menu, you can open the contents of the link in a new tab or window, add the link to bookmarks, send the link, copy the link, if the link is a file, then you can save it using “Save Target As...”. If you have download programs installed, you can download the contents of the link using them. If you click with the RIGHT mouse button or the “Context Menu” key on a picture on a web page , then a menu with other functions will open:
Here you can copy the image to the clipboard and paste, for example, into a Word document, you can save the image to your computer using “Save image as...”, send the image by mail, make the selected image the desktop background, find out information about the image (type, size, file name), etc. Let me sum it up. In this lesson, we looked at the most popular options for using the context menu, which is called by clicking the RIGHT mouse button or pressing the “Context Menu” key on the keyboard. Namely: 1. Clicking the RIGHT mouse button or the “Context Menu” key on the Windows Desktop 2. Clicking the RIGHT mouse button or the “Context Menu” key on a file or folder in Explorer or any other file manager. 3. Press the RIGHT mouse button or the “Context Menu” key in any Internet browser. The essence of this lesson is to learn how to use the useful functions of the specific active environment of your computer. In any environment, by right-clicking or pressing the “Context Menu” key, you will receive a list of useful functions available at a given time relative to the selected object. Source
Story
Context menus first appeared in Chat Environment on the Xerox Alto computer, where they were called pop-up menus
; they were invented by Dan Ingalls in the mid-1970s.[1][2]
Microsoft Office v3.0 introduced the context menu for copy and paste functions in 1990. Borland demonstrated the widespread use of context menus in 1991 at the Second Paradox Conference in Phoenix, Arizona. Lotus 1-2-3/G for OS/2 v1.0 added additional formatting options in 1991. Borland Quattro Pro for Windows v1.0 in 1992 introduced a "Properties" context menu option.
Discussion
very useful instructions =) worth reading if only because you will someday find yourself in a difficult situation) +
thank you, sometimes my mouse doesn't work, people give me +1, I want to write instructions
Thanks to the author. If there was a rating of 2, I would give the author a “+”.
Launch the control panel: Win(Start) + C(C) this didn’t work, but the rest is very useful, thank you)
I always wanted to teach. THANKS A LOT!
Paste Ctrl + V (M), you need to reach up to Ctrl + P Cancel the previous action Ctrl + Z (Z)
Daiver → Fixed the error...
Well, this is useful, my mouse has been acting up lately.
Quite an interesting instruction. It might come in handy..
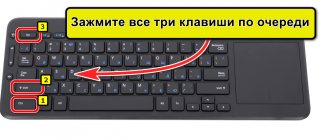
This does not help in all cases. Press shift + alt + namlock. And control the cursor using 8 4 2 6. Please! Give me a +. I want to write it myself... There are a lot of interesting things
Oops. Sorry. This method already exists here. Respect to the author)
I’ll be honest, I didn’t read all the instructions... I realized that there was a lot written and a lot of useless stuff