- Easy way for current programs
- How to change font size on a Windows computer?
- How to change the font for Windows elements?
- How to work with new fonts in Windows?
- Programs for changing fonts
The need to change the font on your computer arises in different cases. In order not to spoil your eyesight, it is better to enlarge the letters on your PC screen. With the help of fonts you can make your workplace unique. You can change not only the size, but also the color, width and other parameters.
Easy way for current programs
This method is suitable when you need to adjust the font in a certain program. It is used for most applications: text documents, Excel spreadsheets, browser pages, email, images.
An easy way to change the font size:
- Open the desired program or page.
- Hold down the Ctrl key and press the key with the “+” icon. Each click increases the zoom by 10-15%.
- To reduce the size of letters, also hold down Ctrl and press the key with the “-” icon.
- A simple combination of the Ctrl and 0 keys will help you reset your settings.
An alternative option is to hold Ctrl and roll the mouse wheel. The scale changes depending on the direction. If you turn the wheel towards you, the font will decrease, and if you turn it towards you, it will increase.
It's actually the scale that changes, not the font itself. In many programs (browsers, Microsoft Word documents), changes made are saved even after closing the program. If the program does not respond to the hotkey combination, you will have to go to the settings and set the desired scale.
Character highlighting
Drag the mouse cursor to select one or more characters.
To highlight one word, press twice.
To select an entire line of text, press three times.
Click anywhere inside the text, and then click the end of the selection while holding down the Shift key.
Choose Select > All to select all the symbols in the layer.
To use the arrow keys to highlight characters, press the left or right arrow keys while holding down the Shift key.
How to change font size on a Windows computer?
This method changes the scale across the entire computer, not just individual applications. Windows has built-in tools to help you select the font you want. The procedure varies slightly depending on the type of operating system. This does not change the monitor resolution.
Instructions for choosing a font for a PC running Windows 7 or 8:
- Open the Start menu and select Control Panel.
- At the end of the list, find the Screen section.
- The default scale is 100%. In the settings you can select the values 125% and 150%.
- Click on the Apply button. After logging out and rebooting, the changes will take effect.
To go to screen settings, use another method:
- Right-click on the desktop.
- Select Screen Resolution. In the menu, click on the link “Make text and other elements larger or smaller.”
- Specify the appropriate size of elements on the screen.
By default, the user is offered three types of scale. To select other options, select “Other font size” in the screen settings.
Using the mouse on the ruler, select the desired scale. The user has access to values in the range from 100 to 500%. For the changes to take effect, click on the OK button. If values are set too large, objects may not fit on the screen. Then you will have to adjust the scale again.
For Windows XP the procedure is as follows:
- Right-click on an empty space on your desktop.
- From the menu, select Properties, then go to the Appearance tab.
- Below, select the desired font size: regular, large or huge.
- Click on the Apply and OK buttons. The system will completely update the fonts.
An alternative option is to change the screen resolution. Then the font and sizes of other elements will increase. It is not recommended to use this method. Your computer is already set to the optimal resolution. After making changes, the text often becomes unclear.
Causes
There are not many reasons why the font does not change in the Photoshop graphics editor. To be more precise, the most likely ones will be the following:
- Problems with font encoding. Here's an example: you downloaded an English font and are typing in Russian letters, that is, Cyrillic. Accordingly, conflicts between encodings occur in the system, and to avoid a critical error, the font is automatically replaced with a standard one.
- Fonts with the same names, which also inevitably leads to conflict. In general, it is very important to understand that text in Photoshop is vector, it has clearly defined boundaries, and violating them will certainly lead to an error.
- The font does not support Cyrillic. Well, it seems to me that everything is clear here.
How to change the font for Windows elements?
In Windows, you can change the font in any component (menus, windows, etc.). As a result, the color and design changes. How to change the font in Windows:
- Open Control Panel and select Personalization. You can access the menu by right-clicking on the screen.
- Click on the “Window Color” button.
- Select additional options from the menu.
- Specify the required element: desktop, window, frame, etc. Specify the font size, color and type of lettering. An example of the design will appear on the screen. The option is not available for all elements.
- Click on OK.
Set case: upper, lower
To set the required text case, we follow the old scheme: select the text, click on the Aa , select the desired design template.
A set of 5 templates is available:
- As in sentences. The standard version with the usual Word structure is a capital letter at the beginning, followed by capital letters and a period at the end.
- all lower case. Converts text to lowercase.
- ALL CAPITAL Converts text to uppercase.
- Start With Capitals The effect applies to the entire text (or paragraph) and capitalizes the first letter of each word.
- CHANGE CASE Changes uppercase letters to lowercase and vice versa for the selected text fragment.
How to work with new fonts in Windows?
In Windows, it is convenient to work with built-in fonts and add new ones. After downloading, it is important to install them correctly on your computer.
By default, Windows uses two main types of fonts: TrueType and OpenType. They are the same for different computers, printers and applications. TrueType fonts can be worked with in any way without reducing clarity. OpenType includes a wider set of characters. This set is also compatible with external devices and programs.
PostScript fonts are used for high-quality printing. They are detailed and artistic. They are chosen for printing glossy magazines, newspapers, leaflets, etc.
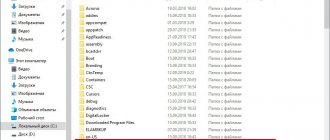
It is convenient to view all available fonts through the Control Panel. The desired sections are selected at the bottom of the list.
The menu allows you to view, delete, hide fonts.
Where can I find new fonts?
The font range includes more than 100 thousand names. They are created by amateur artists and design organizations. Fonts are possible. Many developers provide them for free, but some companies distribute fonts for a fee.
You can also download or purchase fonts from the Microsoft Store. A link to it is available in the Control Panel in the Fonts section. Here click on the button “Get more information and fonts online.”
The page opens in English. In the left column, select the Fonts and typefaces section. A description of the font will then appear on the screen. After clicking on the link Purchase&Download Microsoft fonts, the download will begin.
How to install fonts?
The following tips will help you avoid problems when downloading and installing fonts:
- if the name of the new font matches the version available in the system, it should be renamed;
- When installing, close all programs;
- Some fonts require installation of two files: for the screen and for the printer.
Fonts are in ttf file format. To install, choose one of the following methods:
- Open the general list and drag the downloaded file into the general list with the mouse.
- Right-click and select Install.
Adding text to a Photoshop document
As I mentioned briefly at the beginning of the tutorial, there are two different methods of adding text to a Photoshop document, the normal (line) method and the adding text to an area method. The difference between them is that the first method is mainly used to add a small amount of text to the document (one or more letters or words, a title, etc.), while append to area is used to add more text inside in advance established area. Here we will consider the first method, because... it is used in the vast majority of cases.
To add text to a document, select the “Text” tool, move the cursor to the point where you want the text to begin and press the left mouse button. A flashing marker on the document will indicate that Photoshoop is ready to enter text:
At the same time, Photoshop will add a new, special type of layer to the layers palette, called a text layer, it can be easily identified by its thumbnail in the form of the letter T. Every time we add text to a document, it is located on a new text layer. Photoshop initially names the new layer "Layer 1", but the name will change as soon as we enter text, as we'll look at a little later:
Once the flashing marker appears in your document, you can start typing.
Moving text across an image
If you need to move the printed text, you can do it easily.
To move text across an image, move the cursor slightly away from the text. it will change its appearance from an I-beam to the Move Tool icon, after changing the cursor appearance, hold down the left mouse button and drag the text to the desired location:
Accepting and completing text editing
What is text acceptance? After accepting the text, editing of the current text layer is completed and this layer is exited. At the same time, the “Text” tool itself remains active. If you click on the document after accepting, Photoshop will create a new text layer.
When you finish entering the required letters, you should exit this text layer. To do this, click on the checkmark in the options bar:
Either press the Enter key located in the lower right corner of the numeric keypad (not the Enter we usually press!), or the regular Enter+Ctrl combination.
Once you've accepted your text, Photoshop renames the text layer using the first letters of the text as the new name for the layer, this is very useful when working with multiple text layers:
Cancel or delete text
If you want to delete text before
Togo? Once you have accepted it, simply press the Esc key. Photoshop will delete the text and the text layer.
To delete already accepted text, you need to drag the text layer to the trash in the layers panel.
Text alignment options
In addition, in the options bar there are three options for aligning text - align left, center, align right. By default, the left alignment option is selected, which means that as you type text, it will be added to the right of the starting point. If we select the "align right" option, the text will be added to the left of the starting point. If we select the option “align by alignment by Back” (Backspace) - the left letter of the cursor. Select (select) letters using Shift and keyboard arrows, or with the mouse.
To instantly select a word, double-click on it; to select a line, click on the line three times:
If you have several lines of text separated by line breaks, double-click on the text layer thumbnail to select all the text:
Also, we can change the font, size and style of the text; to do this, we need to select the desired area and change the corresponding parameter in the options bar.
Changing Text Color in Photoshop
Using the same principle, we can change the color of the text. To do this, select the desired area, click on the colored square in the options bar, select a color in the window that opens and click OK:
Read about the intricacies of text editing in Photoshop and additional hotkeys.
Selecting or changing font color is one of the frequently used features of Photoshop when working with the Type tool. However, this option should be used before the text is converted to raster. However, the color of the rasterized inscription can be changed using color correction tools.
You will need
- - Photoshop program.
Instructions
On top of the drawing. The number of fonts preinstalled in Photoshop is amazing in variety, but even among them there may not be a suitable one.
What to do in such cases? How to add a font to Photoshop CS6 or even create something original? And why is it necessary to look for other fonts at all?
Programs for changing fonts
In addition to standard methods, there are special programs. They help you quickly change the font on your computer. Such utilities are quick to install and easy to use.
System Font Size Changer
System Font Size Changer is a small program for changing fonts. Windows 10 does not have the ability to change font sizes. The required dimensions are specified in the title text, message box, menu, and tooltips. The program does not require installation. You can save the default settings before first use.
Benefits of the utility:
- the simplest possible interface;
- is freely available for download;
- no advertising.
Disadvantages of System Font Size Changer:
- minimum package of tools;
- works only in English.
Font Massive
The Font Massive utility is a manager for working with fonts of various formats. They can be viewed in folders on your computer and network environment. The program makes it convenient to view fonts and compare them with each other.
Benefits of Font Massive:
- completely free;
- Russified interface;
- convenient viewing;
- tooltips.
Adobe Type Manager
When it's clear, CS6 is much easier to work with. But it’s no secret that excessive installation of components negatively affects both the graphic editor itself and the operation of the operating system.
But files downloaded from the Internet often have unreadable names, and identifying the right one among hundreds can be difficult. It is for such cases that Adobe Type Manager Deluxe (ATM) was developed. It runs on Windows and Mac operating systems.
The main purpose of the program is to manage fonts. The functionality of the application allows you to scale fonts on the screen and during printing. But most importantly, using the program you can easily remove components that are no longer needed.
A little about penguins
Penguins or penguins (lat. Spheniscidae) are a family of flightless seabirds, the only one in the order of penguins (Sphenisciformes
). There are 18 modern species in the family. All representatives of this family swim and dive well.
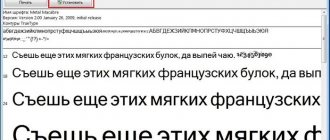
The result of our example:
Fig.46 Example of connecting web fonts using the @import rule.
Please take into account that the @import rule increases the number of connections to the server, since the file you are referring to also needs to be downloaded and analyzed. Based on PageSpeed Insight (Google) rules and guidelines related to page optimization, it is recommended to avoid using the @import rule.
In addition, in some cases, the @import rule can slow down the loading of style sheets, or load them out of order, which can be critical for the final display of a particular page. Don't use it in your projects.
To download/install
Unofficial sites are often used to download the launcher. But it is much safer to install programs from the Google Play store. Moreover, it contains both paid and free utilities of this kind. The cost depends on the number of features and styles available in the application. The fewer there are, the cheaper the specialized application is (or even free).
Summarizing
Some time ago, you could find another program on Google Play that was used to install new fonts. It was called Font Installer and was distinguished by the fact that it supported not only the options it contained. You could install absolutely any font by copying it from your computer to a memory card. But this application is not currently available on Google Play, so we will not consider it. Let us only note that its use also requires superuser rights, even on Samsung smartphones.
You can play around with a variety of fonts, but you should keep in mind that not all of them are suitable for comfortable reading large amounts of information from a smartphone screen. A standard font is best suited for this task, which is another reason why Google is in no hurry to build in additional text styles.
The SamsungSans font is also good for reading - it was developed by South Koreans over several years. Over this period of time, numerous tests have confirmed that text written in this font is perceived by the mind faster, just as the eyes get tired from reading such text quite slowly.
Thus, you can make a beautiful font on your phone using different methods. Choose the appropriate option for yourself and carefully follow the instructions in the instructions.
Sources
- https://CompConfig.ru/mobile/kak-izmenit-shrift-na-android.html
- https://tehnotech.com/kak-izmenit-shrift-na-androide/
- https://upgrade-android.ru/stati/stati/5706-kak-izmenit-shrift-na-telefone-android.html
- https://lumpics.ru/how-to-change-the-font-on-android/
- https://a-apple.ru/android-ios/instruktsii/kak-izmenit-shrift-na-android-telefone
- https://trashbox.ru/link/how-to-change-font-android
- https://itduo.ru/kak-sdelat-krasivyj-shrift-na-telefone-android-5-sposobov/
- https://appsetter.ru/kak-pomenyat-shrift-na-android-smartfone.html
- https://SetPhone.ru/rukovodstva/kak-izmenit-shrift-na-android/
[collapse]
A little about camels
Camels (Camelus) are a genus of mammals in the camelid family (Camelidae
) of the suborder Callopods (
Camelidae
) of the order Artiodactyla (
Artiodactyla
). These are large animals adapted for life in arid regions of the world - deserts, semi-deserts and steppes.
Result:
Fig.44 Example of connecting web fonts using the tag.
Second connection option
, which we also covered in the Introduction to CSS article, is using the @import rule. Unlike the first method (using the HTML tag), which requires adding code to each page of your site, the @import rule can be used at the beginning of your style sheet, which you should already have connected to each page.
To link to an external CSS file, you need to use a url and enclose the path to the CSS file in parentheses.
It is acceptable to enclose the contents in parentheses in quotes: @import
url("path/to/file.css");
Suggested option for importing to the page:
Please note that @import rules must always be specified before CSS styles, otherwise style sheets will not be imported (browsers will simply ignore them).
You can use the @import rule in both external style sheets and internal ones. Let's look at an example of connecting our chosen fonts using the @import rule in internal style sheets:
charset = "UTF-8"> Example of connecting web fonts using the @import rule @import
url
(https://fonts.googleapis.com/css?family=Roboto:400,700,400italic&subset=latin,cyrillic);
/* import an external style sheet */ h2, p, b, i
{ /* set a group selector for elements