Microsoft account - login and password for logging into Windows, Skype, OneDrive, Office, Hotmail, Outlook, Xbox Live, Bing, MSN, Store (Microsoft Store), Windows Phone, Visual Studio. An account is required for a user to access Microsoft services, apps, subscriptions, and devices.
Through the account, the user gains access to his data and settings from any device, applications and services become more convenient, and management becomes personal.
The user can link all their profiles on different devices to one account for convenient management of their Microsoft account. A user may have multiple Microsoft accounts if they have created profiles in programs or services at different times using different email addresses and passwords. In this case, control is performed by the account associated with this device.
The account has previously changed its name several times. The previous version of the account was called "Windows Live ID".
Using an account, the user can use applications and services, as well as take advantage of all the features of the Windows operating system. With a local account in Windows, the user will not be able to take advantage of some built-in functions of the operating system, for example, parental controls for family safety will not be available.
Another advantage of using an account in the Windows operating system is that the product key license is linked to the account data. If you reinstall Windows, after logging in with a Microsoft account (MSA) and connecting to the Internet, the operating system will be automatically activated on the computer. Therefore, I recommend logging into your computer at least once using a Microsoft account. The system on the PC will be associated with the account, which will help you easily reactivate the system on this hardware.
I think taking into account the above, it makes sense to create a Microsoft account. The profile can be useful in different situations.
There are several ways to create a Microsoft account:
- directly from Windows OS settings;
- on the official page of the Microsoft website https://account.microsoft.com/;
- from the program window or production service.
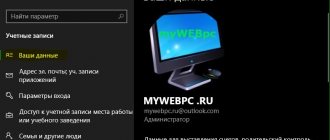
The user, having logged into his profile, manages his Microsoft account from his account:
- edits your user data: you can change your Microsoft account name, email address, phone number associated with your profile;
- changes or resets account password;
- makes payments and issues invoices relating to products;
- manages devices:
- manages product subscriptions;
- changes privacy and security settings;
- manages family security;
- searches for and blocks lost devices;
- receives reference information to solve problems;
- if necessary, delete your Microsoft account.
When you sign in to a profile, your account settings are synchronized between all devices managed by that Microsoft profile.
How to create a second user in Windows 10
First, let's talk about how to add a new account linked to Microsoft services. The Windows 10 operating system has everything you need to quickly perform this operation:
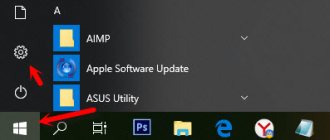
- Right-click on the Start icon.
- Open Settings.
- Go to the "Accounts" section.
- Select "Family and Other People."
- Click on the button in the form of a plus sign with the heading “Add a user for this computer.”
- In the window that opens, do not enter the e-mail address, click on the inscription “I do not have this person’s login information.”
- Now enter your email and create a password.
- Next, set a nickname and password for your account, which will be requested when you log in to the system.
Important. Do not forget to confirm the creation of your account by clicking on the link in the message sent to the specified e-mail.
After you create a separate KZ, you can immediately switch to it through the “Options”. The transition is also carried out from the lock screen or if the device is rebooted.
Method 1 – through the “Options” menu
This method is the main and most understandable one to add an account in Windows 10. As we indicated above, the “ten” is focused on working with cloud profiles from the Microsoft database, so we will consider them along with local profiles.
To create a profile using a Microsoft account:
- Go to the “Start/Settings/Accounts” menu.
- In the window that opens, select one of two types of profiles from the “Family and other users” tab.
- The “Your Family” option speaks for itself by its name and is desirable for registering family members using the same PC. Here you can impose restrictions on your children’s viewing of unwanted Internet resources, the use of certain programs, and also limit their time spent on the computer.
Important: creating a local profile in “Your Family” is impossible!
In Windows 10, we have to add a user according to their age using the email address or mobile number registered with Microsoft. If a person does not have an account, they need to register by clicking on the blue link given in the screenshot above.
In this window, you can create a Microsoft account on Windows 10 by entering your personal information. You can do the same on the official website at https://account.microsoft.com.
- The “Other users” option is a universal choice for all other users, for example, office employees. Here the developers have made it possible to create a local account without using the Internet and a Microsoft registration account.
By selecting it, the system will offer one of the authorization options.
The first is by specifying the e-mail or phone number of an already registered Microsoft account. Next, you just need to enter a password and your profile is ready.
The second is without specifying personal data. In this case, the system will prompt you to register or continue using your Microsoft account. We have already looked at the registration process in Microsoft Windows, so we select the blue link at the bottom of the first and second windows.
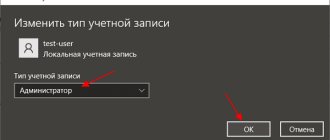
- The last step is to provide a username and password to log in. Create a name and password and click “Next”.
The profile is ready as a regular user. To give him administrator rights, go to “Start/Settings/Accounts/Family and other users”, where we select the profile we created and specify the account type – “Administrator”.
Create a user without a Microsoft account
If you do not want to go through a lengthy authorization procedure through Microsoft services, you can create a local user. Moreover, the operation is performed in a similar way through “Options”:
- Follow steps 1-6 from the previous instructions.
- Click LMB on the words “Add a user without a Microsoft account.”
- Enter your name and create a password.
Now you can share control of your computer between two users. In addition, “Settings” allows you to create several more profiles if more than two people will interact with the PC.
How to connect Windows 10 to your organization's network
The Work or School Account Access page allows you to connect your device to your organization to access shared resources such as the network, apps, and email.
Typically, if you work for an organization, your network administrator will provide the information needed to add your device to the network.
If you have the necessary information, you can connect to the network by following these steps:
- Open Settings (Win + I).
- Click Accounts.
- Click on Access your work or school account .
- Click the Connect button.
- Enter your work or student account information.
- Click "Next.
- Continue according to the onscreen instructions to complete the setup.
These are not typically settings you'll configure on the computer you use at home.
Through the account management utility
The Windows 10 operating system has a special utility with which the computer owner manages accounts. Through it you can not only delete the account or change the password, but also create a new user:
- Simultaneously hold down the “Win” + “R” keys to launch the “Run” window.
- Type "control userpasswords2" and then press Enter or OK.
- In the utility window that appears, click the “Add” button.
- Fill out information about the person in the same way as the previously discussed methods for creating a profile.
Thus, it will take you no more than 2-3 minutes to add a new user. The main thing is to carefully fill out the information (especially the password).
control userpasswords2
And one more way that I forgot about, but was reminded in the comments:
- Press the Win+R keys and enter control userpasswords2
- In the list of users, click the add new user button
- Further adding a new user (both a Microsoft account and a local account are available) will look the same as in the first method described.
If you have any questions or something doesn’t work out as simply as described in the instructions, write to me, I’ll try to help.
When you first install or run Windows 8/8.1 or 10, you'll have to make choices you've never had before. Do you want to use a local or Microsoft account?
This choice will be a little puzzling since Microsoft Accounts is a new feature and Microsoft doesn't really want you to use a local account in Windows 10.
It's a bit confusing and you may not know which way to go. In fact, you might be tempted to just go with whatever is easiest, but that would be a mistake.
Making the wrong choice here could cause you to miss out on many great features your new OS offers.
Control Panel
Control Panel is an advanced tool for changing computer settings. It also provides the function of creating a new account. The operation is performed according to the following scenario:
- Open the “Control Panel” through the dialog box called up with the “Win” + “X” keys, or using the search bar.
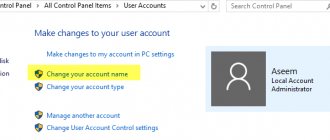
- Go to User Accounts and then Account Type Changes.
- Click on the words “Add a new user in the Computer Settings window.”
- Fill out a short questionnaire to create a profile.
During the account creation process, you can unlink your Microsoft account. In this case, the new user will be local.
Method No. 4
Let's use the capabilities of the Group Policy Editor (the tool is not available in the Home edition of Windows 10).
1. Hold Win + R and execute the command “secpol.msc”.
2. Go to “Security Settings” in the Local Policies subsection.
3. Open the properties of the “Account Status...” parameter.
4. Move the switch to the “On” position and close the window saving the changes.
As in the previous method, a new account with extended privileges will appear.
Group policies
On a computer with the Windows 10 operating system, there is a special tool for editing group policies, where the PC owner has the opportunity to register a new account. It is worth considering that it will only work locally. To create a shared account that is synchronized with Microsoft services, it is better to use the “Settings” functionality.
If you really want to create an exclusively local account, then follow the instructions below:
- Launch the Run window using the Win + R key combination.
- Enter the query "lusrmgr.msc" and click "OK".
- Expand the “Users” tab in the editor that opens.
- Right-click and select New User.
- Fill out some brief information including your profile name and password.
After saving the changes, you will be able to switch between profiles. You can get rid of your account at any time at your discretion.
Local Security Policy
This section provides tools that ensure the safe operation of Windows. Due to the fact that this also depends on your account settings, you can make changes to your account settings here. In particular, through this section, individual profiles are blocked or password restrictions are introduced.
To gain access to these operations, you need to go to “Administration” through the “Control Panel”.
Next, you need to select this section and expand the “Account Policies” ribbon. In the branch that opens, 2 items appear that allow you to block profiles and introduce restrictions on passwords.
The last option involves doing the following:
- Password logging (no information is saved here by default);
- setting the maximum and minimum (these are two different points) password expiration dates;
- determining the minimum length of the entered code;
- determining the complexity of the entered password;
- determining how passwords are stored.
Also, with regard to account management, the “Account Control” item, which opens when expanding the second branch – “Local Policies,” deserves attention. Here you can configure the type of rights that are assigned to specific profiles.
All described actions can only be carried out on behalf of the Administrator. Other users are not granted this right. Also, when setting the above items, you should take into account that such changes can lead to irreversible consequences.
Via Command Line
The final way to create an account is to use the Command Line. This is an interface designed to process user requests. Since the operation requires entering certain commands, this method cannot be called rational, unlike the previously discussed options. But if the previous methods caused any system errors, the Command Line is ready to come to the rescue:
- Open the Run window.
- Enter the query "cmd".
- In the CS interface, enter the command “net user “User name” /add”, indicating the name of the new profile.
- Press the Enter key.
By remembering the request above, you can create accounts in no more than a couple of minutes. The profile is added automatically and does not require setting a password. Although you can always assign a PC access code through “Options” and other sections of Windows settings.
How to manage sign-in options
sign-in options page , you can quickly manage many of the authentication methods in Windows 10. Using these settings, you can change your current password, set up Windows Hello using a PIN or picture password, and even enable Dynamic Lock to lock your device when you leave.
Changing user password
To change your current password, do the following:
- Open Settings (Win + I).
- Click Accounts.
- Click on Login Options .
- In the Password section, click Change.
- Enter your current Microsoft account .
- Click the Login button.
- Enter your old password.
- Create a new password.
- Click "Next.
It's worth noting that if you use a Microsoft account, changing the password on your computer will also change the password you use to check your emails online associated with your MSA.
Adding a PIN
If you want to use a faster and more secure way to sign in to Windows 10 , you should instead use a PIN, which you can create by following these steps:
- Open Settings (Win + I).
- Click Accounts.
- In the PIN section, click Add.
- Create a new one PIN code .
Advice. You can also enable the option to allow letters and symbols to be used as part of your PIN, which further enhances security. - Click OK.
While a PIN is usually more secure than a traditional password because it is only tied to one device and is never sent over the network, remember that it only works locally. You cannot use it to remotely access your device.
Adding a picture password
You can also use an image as a password. This authentication method allows you to use touch gestures on an image to sign in to Windows 10. This option is generally more suitable for touchscreen devices.
To set up a picture password, follow these steps:
- Open Settings (Win + I).
- Click Accounts.
- In the "Graphic Password" section, click the Add button.
- Enter your password to confirm your actions.
- Click the Select Picture button on the left panel.
- After selecting an image, click the Use this image button.
- Draw three gestures on the image, including circles, straight lines, taps, or a combination of these.
- Repeat the gestures to confirm.
- Click Finish.
Once you're done setting up your picture password, simply log out and log back into your account to test the changes.
On compatible devices like Surface Book 2 and Surface Pro, you can set up Windows Hello Face to sign in to your device using only your face.
If your laptop or desktop doesn't have biometric authentication, you can always invest in a Windows Hello-enabled fingerprint scanner or camera.
Setting up dynamic locking
Dynamic locking is a feature that locks your computer when you leave, adding an extra layer of security. This feature uses contactless technology, so you'll need to connect a Bluetooth device, such as a phone or tablet, before you can set it up.
To set up dynamic locking, do the following:
- Open Settings (Win + I).
- Click Devices.
- Click Bluetooth & other devices .
- Click Add Bluetooth or other device.
- Click the Bluetooth .
- Prepare your Bluetooth device for pairing.
- Select your device from the list.
- Continue according to the on-screen instructions to complete pairing.
- While in Settings, click on Accounts.
- Click Sign-in options .
- Under Dynamic Locking, turn on the Allow Windows to automatically lock your device when you're away option.
After you've completed these steps, if you walk away with your paired device, Windows 10 will wait 30 seconds and then automatically lock your PC.
Require password on wake up
Using sign-in options, you can also decide whether Windows 10 should prompt you for a password when your computer wakes from sleep mode by following these steps:
- Open Settings (Win + I).
- Click Accounts.
- Click Sign-in options .
- Under Require Password, use the drop-down menu and select:
- Never – The password will never be required after the computer wakes from sleep mode.
- When your computer wakes up from sleep mode – you will be required to enter a password when your computer wakes up from sleep mode.
Solving some problems
Despite the fact that the process of creating an account looks very simple, in some scenarios the PC owner faces difficulties. For example, after clicking the "Add user for this computer" button, nothing happens. This error is due to a glitch in the “Settings” interface. As a rule, problems disappear after installing software updates, and if Windows 10 still blocks adding an account, you should try to perform the operation through the Command Line.
The next problem is less common, but still baffles many users. When a person creates several accounts linked to Microsoft services, when trying to add a second or third profile, an error with code number 450 is displayed on the screen. This is a consequence of developer restrictions that do not allow creating more than one account within a day. Wait 24 hours and the problems should go away.
If your problem does not match any of the scenarios discussed above, and the profile still does not create, do the following:
- In the Run window, enter the query "gpedit.msc".
- Open the Computer Configuration, Windows Configuration, Security Options, Local Policies, and Security Options tabs one by one.
- Right-click on the “Block Microsoft Accounts” policy.
- Set this policy to Disabled.
- Save your settings.
Now the difficulties in the process of creating KM should disappear. As a last resort, you can contact Microsoft support or, if you are willing to sacrifice time, reset Windows 10 settings. However, this operation will lead to serious consequences, including the deletion of all data.
Method No. 5
Let's use the Local Users and Groups tool.
1. In the “Run” window, execute the command “lusrmgr.msc”.
2. Go to the Users directory.
3. Select "Administrator" and open its properties.
4. Oh and click “OK”.