The BIOS software is stored in a ROM chip, which can be called without accessing the disk. It is located on the motherboard and stores codes for the normal operation of disks, video cards, etc. If you want to find out how to update the BIOS from a flash drive, you need to identify this procedure for all components to which this action applies.
Using external storage for BIOSa firmware.
The main condition is the ability to systematize an update for the BIOS, the main task of which is the normal operation of the electronic device. A really pressing question is how to install a BIOS from a flash drive for those users who use processors that are not supported by the initial versions of the BIOS.
Usually, BIOS firmware is flashed from a CD, but the fact is that some modern electronic devices, for example, netbooks, do not have a disk drive and for this reason it is not possible to flash the BIOS from a disk. So, quite a few users are interested in how to update the BIOS from a flash drive.
Technical features of BIOS flashing
To reinstall, you will need to download from the official website of the BIOS developer or the manufacturer of your motherboard the version that is currently installed on you. The flashing procedure is similar to the update procedure, only here you will need to remove the current version and install it again.
On our website you can find out how to update the BIOS on laptops and motherboards from ASUS, Gigabyte, MSI, HP.
Step 1: Preparation
At this stage, you need to find out as much information as possible about your system, download the required version and prepare your PC for flashing. To do this, you can use both third-party software and Windows capabilities. Those who do not want to worry too much about this issue are recommended to use third-party software, since in this case, in addition to information about the system and BIOS, you will be able to receive a link to the official website of the developer, where you can download the current version.
The preparatory stage will be considered using the example of the AIDA64 program. This software is paid, but has a trial period. There is a Russian version, the program interface is also very friendly to ordinary users. Follow this guide:
- Launch the program. In the main window or through the left menu, go to “Motherboard”.
- Go to the BIOS in the same way.
- In the “BIOS Properties” and “BIOS Manufacturer” blocks you can see basic information - the name of the developer, the current version and its date of relevance.
If for some reason you cannot download anything in step 5, then most likely this version is no longer supported by the official developer. In this case, use the information from point 4.
Now all that remains is to prepare a flash drive or other media so that you can install the firmware from it. It is recommended to format it in advance, since unnecessary files can damage the installation and, therefore, damage the computer. After formatting, unzip the entire contents of the archive that you downloaded earlier onto a USB flash drive. Be sure to check that there is a file with the ROM extension. The file system on the flash drive must be in FAT32 format.
Stage 2: Flashing
Now, without removing the flash drive, you need to proceed directly to flashing the BIOS.
- Restart your computer and enter the BIOS.
- Now in the download priority menu, set the computer to boot from a flash drive.
- Save the changes and restart your computer. To do this, you can use either the F10 key or the “Save & Exit” item.
- Then the download from the media will begin. The computer will ask you what to do with this flash drive, choose from all the options “Update BIOS from drive”. It is noteworthy that this option may have different names depending on the characteristics of the computer, but their meaning will be approximately the same.
From the drop-down menu, select the version you are interested in (usually there is only one). Then press Enter and wait for the flashing to complete. The whole procedure takes about 2-3 minutes.
It is worth remembering that depending on the BIOS version currently installed on the computer, the process may look slightly different. Sometimes, instead of a selection menu, a DOS terminal opens, where you need to enter the following command:
Here, instead of the underscore, you need to write the name of the file on the flash drive with the BIO extension. Just for such a case, it is recommended to remember the names of the files that you transferred to the media.
Also, in rare cases, it is possible to perform the flashing procedure directly from the Windows interface. But since this method is only suitable for certain motherboard manufacturers and is not particularly reliable, there is no point in considering it.
It is advisable to flash the BIOS only through the DOS interface or installation media, as this is the safest method. We do not recommend downloading files from unverified sources - this is unsafe for your PC.
Thank the author and share the article on social networks.
The basic input/output system, i.e. BIOS, is designed to operate and manage the hardware components of the system, such as the central processing unit (CPU), random access memory (RAM), chipset components, storage drives, etc.
Unlocking the capabilities of a computer primarily depends on the quality of the BIOS microcode stored in the memory of motherboards. This factor determines how efficiently the board will work, for example, with memory, manage PCI devices, etc.
Motherboard manufacturers (not all) regularly release BIOS updates for their hardware. Today this is very relevant, since modern equipment (processors, memory) have good overclocking potential and a wide range. To improve overclocking characteristics, eliminate defects, and also to expand the list of supported devices, corresponding updates are released for motherboards.
Since installing/reinstalling and updating the BIOS comes down to the same procedure, and the most common task “how to install the BIOS on a computer” in the vast majority of cases means updating it, this article will focus on this procedure.
Reinstalling BIOS on a computer is actually not that difficult. The biggest difficulty is that this procedure looks scary for inexperienced users. Some key nuances that arise due to the fact that for different motherboards from different manufacturers there are some features (such as entering the BIOS shell, searching for the necessary options and settings), many, even experienced users, are lost, afraid of doing something wrong . You only need to understand the basic principle of how to install the BIOS yourself, be able to navigate its settings, and this procedure will not cause difficulties and the model of the motherboard and its manufacturer will no longer matter.
4) Keys for changing BIOS option navigation values
The first parameter in this case that needs to be set is the system time and date.
We go to the first tab, use the “up” and “down” arrows to select the date or time and use “+”, “-“ or “Page Up”, “Page Down” to change the values to the ones you need, usually these are the current date values and time. Then press “Enter” to make the seconds count again. In some versions of the BIOS, if you do not press “Enter”, the changed time will not be saved even if you save changes to other options through the above-mentioned standard menu item “Save & Exit Setup” - exit the BIOS with saving.
Here you can also check the “Legacy Diskette A” option and if you do not use a floppy drive, disable the floppy drive to speed up the system boot. Set the value to “Disabled” if it is not already there.
Basic steps for installing BIOS
In order to reinstall the BIOS on a computer , you must complete several mandatory steps:
- Download a file containing the current BIOS version for the required motherboard. Such files can (and should) be found on the official website of the board manufacturer, usually in the “Support” section.
- Unpack the downloaded archive from
- Copy the unpacked file from the BIOS to a specific directory on your hard drive (or solid-state drive), USB Flash drive (flash drive) to make it easier and faster to find it later.
- Reboot the computer and enter the shell
- Go to the BIOS section in which the software is updated
- Using the built-in file system browser, select the folder with the new version previously saved on a disk or flash drive
- Install/update the BIOS and restart the computer.
Finding and downloading files from BIOS software
On the official website of the manufacturer (in this case Asus at https://www.asus.com/ru) you need to go to the “Support” section, which is located in the “Service” main menu:
Support section on the official Asus website
Next, on the page that opens, you need to select the product category - motherboard or immediately use the search by entering the name of the model of the required board. As a result, a page will open on which the software categories for the found board will be available for selection - drivers/utilities and software/BIOS:
Loading a file from BIOS
On this page, you need to familiarize yourself with the BIOS version and release date, and then click the “Download” button to download the file.
Now you need to unpack the downloaded archive onto your hard drive or flash drive. The unpacked folder with BIOS files will be called something like this: PRIME-X370-PRO-ASUS-4024, and the file located in it will be PRIME-X370-PRO-ASUS-4024.CAP.
Installing BIOS software from a file
After launching the BIOS shell (for Asus boards this is by pressing the F2 key during boot), you need to go to the section for updating the BIOS.
A screen will appear containing basic information about the current parameters and performance characteristics of the installed equipment. Here you need to select the “Advanced Mode” item:
Asus BIOS main screen
On the screen that opens, you need to launch the BIOS installation/update utility by selecting “ASUS EZ Flash 3 Utility”. A screen will appear to select the update method:
Launching the ASUS EZ Flash 3 utility
On this screen, you should compare the version and release date of the already installed BIOS version and select the option to update from a local drive.
Selecting a BIOS update method
After this, the following screen will appear where you need to find the storage device to which the BIOS file was copied (in this case it is an 8 GB flash drive) and select it from the list presented:
Selecting a BIOS file
In this case, the name of the required file is Z170-E-ASUS-3801.CAP. Having selected it, you now need to press the “Enter” key - after an additional warning, the BIOS installation/update process will start:
BIOS update confirmation
Performing the BIOS update procedure
After a successful BIOS installation/update, all user settings will be reset to factory settings, so you need to remember or write them down in advance.
As you can see, reinstalling the BIOS on your computer is not at all difficult - it all comes down to downloading the required file from the manufacturer’s website and selecting it in the BIOS file system browser.
As is known, any computer equipment and software becomes outdated over time and ceases to meet current requirements. This equally applies to primary BIOS/UEFI systems, the software of which is integrated into a special chip on the motherboard. When installing new equipment (“hardware”), it may sometimes be necessary to flash the BIOS. This procedure will be performed on a laptop or a stationary computer terminal, it doesn’t matter. The technology is almost always the same. Some users, unfamiliar with the basics of such techniques, believe (and not without reason) that this process is unsafe and difficult. If you can agree with the first statement, then you can argue about the second. In fact, flashing the motherboard BIOS is not such a troublesome task. But to carry out this procedure correctly, you should pay special attention to some important details and nuances, which depends on the manufacturer of the motherboard and the programs and techniques used for flashing.
Why do you need to flash the BIOS?
In general, if you are not planning to upgrade your computer and the entire system is working stably, there is basically no point in updating the BIOS version.
But when new equipment is installed on a computer, which the primary system may not support only because it is outdated (the device’s BIOS simply does not recognize it), flashing the BIOS becomes a pressing problem. Although many users find this process difficult, anyone who works with a computer can perform these steps on their own. It will take no more than 10 minutes.
Why update?
Updating the BIOS is not difficult, but should only be done as a last resort. Any failure during the process of flashing the motherboard can turn the computer into a pile of hardware, which cannot always be restored even in a service center. Under normal circumstances, you are unlikely to see any benefit from installing the new version. When an update is still needed:
- the motherboard does not recognize new hardware - a larger hard drive or a processor with characteristics not included in your BIOS;
- New features have appeared in the OS that are not supported in the old BIOS - for example, booting from a flash drive;
- you want to overclock your computer by improving its parameters;
- BIOS errors appear.
If you doubt the need for an update, it is better not to install it. If you are sure that it is needed, strictly follow the instructions. Do not forget that reinstalling the BIOS yourself is considered a repair and therefore voids your hardware warranty.
Flashing the motherboard BIOS: prerequisites
First, pay attention to several mandatory conditions, failure to comply with which can lead to catastrophic consequences.
Download files and programs to update primary systems only from official resources of motherboard manufacturers. If you install unofficial firmware, no one can guarantee that the process will be successful and the system will work as expected.
The second thing to pay attention to is uninterrupted power supply during the update. You need to take care in advance to ensure that there are no power surges or spontaneous disconnection of your computer or laptop from the power supply.
What should you not do under any circumstances?
It is important to know that when updating the BIOS on an HP laptop or on devices from other manufacturers, under no circumstances should you disconnect the laptop from the power supply (it should only be powered by the network, and not by battery, so that the process does not interrupt) or forcefully turn off the power using the appropriate on/off button, since such actions can only lead to your device not only not being updated, but also turning into a “brick”. The same applies to increased care when choosing firmware, since unsuitable software can trigger similar situations.
Quite often, visitors to this resource ask “How to set up the BIOS?”, “How to boot from a flash drive,” “Setting up BIOS Setup on a laptop,” etc.
This resource contains a huge number of options - directives that have ever been found in BIOSes from many manufacturers. It is not easy for even a trained person not to get confused in such a quantity. Therefore, this generalizing article was written, which will describe the most popular and important items point by point.
Let's consider restoring the computer's functionality, as well as the most important and frequently requested or fundamental BIOS Setup options that need to be changed from default (factory) values or simply checked their values.
Let's consider several options. Quite often you have to completely restore the BIOS options to a working version, i.e. “globally” reconfigure BIOS settings. This usually happens after:
- settings are reset to default values;
- or replacing the CMOS battery;
- or after updating part of the PC hardware
- or after unsuccessful experiments to optimize the performance of the computer hardware or an attempt to configure it to work with certain parameters.
So, the first and simplest thing, if you need to restore the functionality of your computer’s BIOS:
General rules for updating all firmware
Flashing the BIOS for almost all motherboard models involves using the same scheme:
For standard BIOS systems, DOS mode is used in most cases. However, for some versions of BIOS, as well as for more modern UEFI systems, a special program for flashing the BIOS can be used, created by the motherboard manufacturer, which can even run under Windows operating systems without necessarily creating bootable media.
7) Install or reinstall - restore the OS
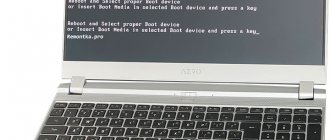
If we need to install or reinstall or restore the operating system, then, accordingly, first of all we need to boot from an external installation distribution.
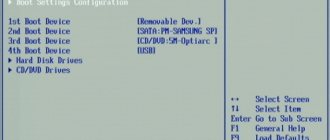
We configure it as follows, changing only the boot device:
We set the media from which you need to boot: USB flash drive, CD-rom, DVD-rom. To do this, go and set the corresponding already discussed parameter “First Boot Device” - what type of media to boot from.
In our case, this is a CDROM for booting from an installation DVD or CD, or a USB-FDD or USB-ZIP or a USB-CDROM for booting from a bootable USB flash drive (first install USB-FDD, save, insert a flash drive, try to boot from a flash drive - if the computer does not see the bootable flash drive, we log in again, install the USB-ZIP and try to boot again, and so on - in my personal practice, in different versions of the BIOS, in different computers there may be different implementations of support for the most common Flash, and accordingly, only a simple search can help here. )
In the case of the latest BIOS versions, you may also need to check that the “Secure Boot” option is disabled - disabling secure boot.
How to find out the modification of the motherboard and the current BIOS version?
The very first thing you need to do is to determine which model of motherboard is installed in the computer system, and also find out the version of the primary BIOS system (perhaps it is currently current and does not need to be updated).
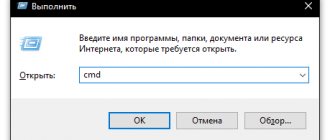
You can view information about the board and BIOS version in the system information section, which is called from the Run console using the msinfo32 command.
For the motherboard, you can also use specialized utilities like CPU-Z (formerly Everest). For a device identified in this way, you need to find the latest firmware on the manufacturer’s website and save the files on your hard drive.
11) Overclocking options
Of all the overclocking options, the average user, for whom stability and reliability is more important than a 3-25% increase in the performance of some PC modules, can only pay attention to the voltage supplied to the memory modules.
With modern computer characteristics, computer performance is usually limited by slow hard drives (the solution is high-speed high-speed hard drives or high-speed SSD drives as a system boot hard drive) and peripheral media, as well as by the architecture of old operating systems - generations earlier than Windows 7. in processor performance or frequency and size of memory modules.
I will only note the following: Sometimes you can find memory modules with non-standard power supply values - personally, they worked for me at the default voltage, but purely for the sake of order, we set the voltage that is indicated on these memory strips:
Preparing bootable media (general procedure)
If you use bootable media, when an update from Windows is not provided, the first step is to create one. Regular recording of downloaded files will not work.
To simplify the work, you can use the Rufus utility, which is very easy to learn and creates a bootable USB flash drive within a couple of minutes. There is practically no need to change anything in the parameters. Only in the file system should you specify FAT32, and in the recording method use MS-DOS mode, making sure to check the box next to the line for creating bootable media. If this is not done, then when you reboot the device will not be recognized as bootable. Then, to install the update, in some cases you will need to additionally copy the control program and the firmware file to the media.
Next, the process of updating the BIOS will be discussed with examples for motherboards from several well-known manufacturers. Although in general they are very similar to each other, nevertheless, each of them has its own nuances. We assume that the boot priority from a USB drive is already set in the BIOS settings.
Flashing the Asus BIOS can be done in several ways. Among the preferred utilities, two programs worth highlighting are AFUDOS and ASUSTeK EZ Flash 2.
When using the first utility, you should create bootable media and make sure that it contains the afudos.exe program file and the firmware itself (for example, p4c800b.rom).
Flashing the ASUS BIOS looks like this. Booting from a flash drive. Since the media was recorded for DOS mode, the initial line C:> will appear on a black screen, in which you need to enter the command /i p4c800b.rom and press the enter key. Once the update is complete, a reboot will occur, during which you just need to remove the media from the USB port so that the system starts from the hard drive.
Flashing the BIOS of an ASUS motherboard when using the second utility is somewhat different from the previous option.
Despite the fact that most firmware on the official ASUS website have a .rom extension, CAB files can sometimes be found. There is nothing wrong with this, since they are used for UEFI systems.
To flash the firmware, you should enter the UEFI settings when rebooting, go to the Advanced Mode (additional settings) and in the service (tools) section of the Tool, select the line ASUSTeK EZ Flash 2. Next, from the list again select the media with the program (line of the same name), after whereupon the required firmware file will be shown on the right. We select it and agree to the warning twice (first to check the file, then to start the firmware process).
At the end of the process, a reboot notification will appear, and at the beginning of the restart you will be prompted to carry out the initial setup. Press F1 and set the required parameters. Otherwise, we simply exit the settings without saving the changes.
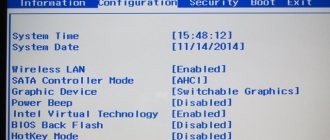
5) Selecting the operating mode of the hard disk controller
Let's move on - we come to the fundamentally important option of setting the choice of operating mode of the hard disk controller.
We go to the masonry or enter the main menu item CMOS Setup Utility: “Storage Configuration” or “Integrated Peripherals” or “Advanced” (it may be called differently for different manufacturers - look at the screenshots above).
Here we define: if we have a modern OS starting with Windows Vista (for Windows XP - there is an installation option using the well-known assembly from ZVER (me) with selections of drivers for all the most common satash controllers included in the installation distribution. Personally, I have never encountered controller for which this assembly could not find the necessary driver.)
Then we simply check that both links below include more modern SATA controllers with the appropriate operating mode “AHCI - SATA”.
Those. We switch the operation of SATA controllers to universal compatibility mode:
- the number of disk devices detected by the system will be limited to four, as in a real IDE
- NCQ technology will not be used - natural command queue
- and hot plugging of drives,
- Read and write speeds will decrease slightly.
Gigabyte
Flashing the BIOS of Gigabyte systems is quite different from other processes. First of all, this is due to the fact that you can use online update to install the firmware. But first, let's look at using the Q-Flash utility, which is believed to be best suited for updating the firmware of Gigabyte motherboards.
First, you should enter the BIOS settings and use the option to reset all Load Optimized default settings. After this, you need to save the changes, restart the computer and enter the BIOS settings again. Next, to launch the Q-Flash utility, press the F8 key, and the start is confirmed by pressing the Y and Enter keys. To begin with, it is recommended to save the current version using the Save Bios option, after which you need to use Update Bios. Next, you will be asked to indicate the source from which you want to update. You should select HDD 2.0 as the media (this is how the flash drive is displayed in the settings). Then everything is as usual: select the firmware file present on the media and agree with all the warnings.
3) Navigation keys - moving and changing values in the BIOS (working algorithm during setup).
To navigate through the menu - tabs and BIOS options, use the "Tab" key or (but not always) the "left" and "right", "up" and "down" arrows.
In order to enter a menu tab or a specific option, you need to go to this item and press “Enter”. In the case of an option, to change its value to a new value in the drop-down menu of a specific option, you need to use the “up” and “down” arrows to move to the new required value of the option and then press “Enter” again to set the new values of the option. And then save all the changes made, see the paragraph “Saving changes made in the BIOS - Save & Exit Setup”
Video cards
Since GeForce and Radeon are dominant in the video card market, flashing the BIOS will be considered using their example.
At the initial stage, you need to download new firmware and control programs for your card on the manufacturer’s website. If the system has several video cards, you need to leave only one during the update, inserting it into the PCI-Express slot.
For GeForce cards, the NVFlash program (from two files) is used, for Radeon – the ATIFlash utility (one file). Next, you need to create a bootable USB drive for DOS mode, and then copy program and firmware files to it.
When starting from a flash drive, you should make sure that the card is single-processor, otherwise the proposed method will not work. For NVIDIA use the command nvflash -list, for ATI - atiflash -i. If information is displayed for two cards, then the adapter has two processors, and the proposed firmware method cannot be used (it is better to go to the manufacturer’s website and find instructions there).
At the next stage, flashing the BIOS of a GeForce video card involves disabling protection. This is done with the line nvflash –protectoff.
Next, to start the BIOS update process for GeForce cards, use the command nvflash -4 -5 -6 newbios.rom (the name of the ROM file must match the name of the downloaded firmware), for Radeon cards - atiflash –p –f 0 newbios.rom. After this, we wait for the process to complete and reboot the system in normal mode.
Reinstallation
Let's figure out how to reinstall the Bios. There are ways:
- Through the manufacturer's proprietary application. This is the most convenient way - you do not need to reboot into the BIOS, the entire process will take place in the familiar Windows interface. The application will check the compliance of the files you downloaded with the system, and in case of an error, it will help you download the correct version.
- Through the utility inside the BIOS. In this option, no third-party applications will interfere with updating. The main thing is to download the correct version - the files will not be checked in the utility.
- To flash to DOS you will need bootable media with DOS and BIOS. The method is suitable for all versions of motherboards.
To choose the best method for your configuration, study the manufacturer's instructions for changing the BIOS to take into account all the features. For example, before updating the BIOS on a Gigabyte board, it is recommended to disable Hyper Threading technology.
Proprietary utility
To flash firmware from the manufacturer's utility, you only need to download the application itself and follow its instructions:
- Go to the official Internet resource of the company that produced your motherboard.
- Download the BIOS update program there.
- Start searching for new versions, select the one you need.
- After downloading is complete, start flashing.
Brief summary
That's all for flashing the primary I/O systems. Based on the foregoing, we can conclude that the best option is to install the update exclusively in DOS mode, although special utilities can be used to simplify the work. But they only work if there are UEFI systems, and are not suitable for standard BIOS versions. You need to be extremely careful with video cards, since incorrect installation of the update or the slightest violation during the flashing process can lead to the graphics adapter failing.
9) Embedded video
An important point when resetting or resetting the BIOS is to set and restore the video output priority.
Also, if there is a lot of RAM on board, you can increase the amount of available RAM memory for the built-in video card using the BIOS option “UMA On-Chip Frame Buffer Size” - we determine the memory size of the integrated video card.
Setting up an external video card, if necessary, is more convenient and correct to do through a special utility - a driver that is installed when installing the video driver.