Users may sometimes encounter a situation where the pressing question becomes how to switch the video card or video accelerator in the BIOS. A similar problem can arise not only because your video card is not working. The thing is that modern computers can have not one video card, like their predecessors, but two at once - integrated and external. However, as a rule, only one of them can work at one time, and therefore there is often a need to change the method of outputting video information to the monitor so that it is carried out from another video card. To do this, you need to enable one of the video cards and, accordingly, disable the other.
Enabling the video card through BIOS
To enable a graphics card on a PC, do the following:
- Go to the BIOS menu. To do this, press the Delete or F2 key while starting the computer. If you do not enter the menu, then your motherboard uses a different key. Information about this is indicated in the instructions for the board. The main thing is to hold down the key in time, before the operating system boot screen appears.
- As soon as the BIOS settings menu is launched, look for the Chipset section (you can switch the active graphics adapter in it), which contains the line First Display Boot (or Boot Graphic Adapter Priority).
- We select it using Enter, a list of adapters will be shown on the screen. We need a PCI option (i.e. a video card located in the PCI Express slot). After selecting it, the external video card will turn on. To save the settings when exiting the menu, click on the Save and Exit item.
Possible problems when turning on the card through BIOS
After turning on the adapter through the menu, it should be active. There are 2 reasons why this does not happen:
- card malfunction
- The video card is not inserted well into the PCI slot.
Disabling integrated graphics
In order for the external card to work correctly, you need to deactivate the built-in video card. To do this, go to the BIOS menu (step 1 of the instructions above) and do the following:
- We are looking for a settings item related to built-in equipment (the name should contain the word integrated).
- Open the Onboard Devices item and find the line called Onboard GPU.
- Select the Disable option. The integrated video card will turn off. Save the settings and exit the menu.
Instructions for enabling a discrete video card in the BIOS
If you decide to switch to the second video card through the BIOS, then strictly follow the instructions. Especially if you are a beginner and don’t really understand what the different items in the BIOS do.
So, we do the following:
- First, turn off and turn on the computer again. This can be done using the corresponding item in the Start menu. Or simply by pressing the power button on the computer case.
- While the computer is starting up, continuously press the BIOS menu power button. Usually this is either F2 or Del , but there are also more specific options. It all depends on the motherboard manufacturer. All variations can be viewed here.
- Once in the BIOS itself, we begin to look for the desired item. First you need to select the correct tab. Since in different versions of the software the settings item we need is hidden in different tabs, we will have to spend time searching. These can be tabs: Advanced;
- Config;
- Peripherals.
- Chipset Configuration;
- Discrete Graphics;
That's all. The next time you start the computer, it will use the discrete graphics subsystem instead of the built-in graphics subsystem.
If this does not happen, then you need to select a different interface (for example, PCI instead of PCI-E). It's also worth checking your connection. Is the video card moving away from the slot allocated to it?
Loading …
Second inclusion option
In some BIOS versions, the procedure for enabling a discrete video card is slightly different.
- We repeat the first two steps from the previous block. That is, we restart the computer and go into the BIOS.
- Once in the desired menu, look for the Advanced BIOS Features sub-item. And go there by pressing the “Enter” key.
- Then we look for the Primary Display item there, highlight it with the cursor and press the “Enter” button.
- A list with available options will open. These include IGD for integrated graphics (Intel) and PCI for discrete graphics. Let's choose one of them.
There may also be a list of available video cards. If you select one of them, you will see a choice of one of two options, Enabled and Disabled. The first is responsible for turning on, the second, respectively, for turning off. This way you can specify which of the two video cards will function at all.
Loading …
How to switch the video card on a laptop
Modern laptops usually have 2 graphics processors - integrated and discrete. The first is needed to perform tasks that require little power so as not to consume a lot of energy. To switch the video processor, you don’t have to go into the BIOS, but it’s much easier to do. For video cards from Amd and Nvidia, there are different instructions for activating them.
Instructions for nvidia
Before you switch the video card on a laptop with an intel processor, you need to go to the Nvidia control panel. The program is convenient in that you can configure which program will use an integrated adapter and which will use a discrete one. Video cards will switch automatically when the corresponding programs are launched. In order to configure the video card, do the following:
- On the desktop, right-click and select “Nvidia Control Panel” from the drop-down menu.
- In the program, go to 3D Settings-Manage 3D Settings-Program Settings.
- In this menu, the 1st option is responsible for programs, the 2nd – for active graphics processors. After finishing working with the program, you need to save the changes.
Instructions for amd
To configure an Amd video processor on a laptop with an Intel processor, you will need the Catalyst Control Center utility. In this program you can see the currently active adapter and switch it. Step by step process:
- Install the program and launch it (from the desktop or through the Start menu).
- In the power column, click on the line “Switchable graphics adapters”. All information about the active video card will be shown. You can also configure its power consumption mode in this menu. It is recommended to enable maximum performance for the external card.
Features of discrete adapters
Most advanced users pay attention to laptops that have discrete cards due to a number of their advantages:
- significant increase in productivity. All graphic elements require processing by a video processor. The more complex the task, the more power will be required. The built-in video card is often not enough. The discrete model is suitable for various video formats, games, screen sizes and resolutions;
- can be replaced with a more productive one. A desktop computer can be equipped with a video card in just 2-5 minutes. In the case of a laptop, you still have to contact a service center;
- There is a function for dividing streams into multiple screens. Many discrete adapters support 2-4 screens;
- expanding PC capabilities by using several cards simultaneously.
One of the main and obvious disadvantages of discrete cards is the high price category. Models with such a video card cost 20-30% more. The initial cost of a video adapter, which will allow you to run games from 2-3 years ago, starts at $100. For more modern games, $400+ should be preferred.
When installing a discrete card, it is worth considering that the additional device will require additional voltage (sometimes up to 400 W). Due to the high throughput, one large or 2 smaller fans are installed. The coolers will create a lot of noise.
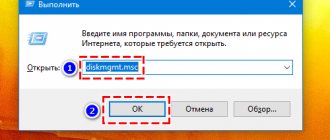
Enabling the video card in Device Manager
Another way to switch the graphics adapter is the OS Windows system program “Device Manager”:
- Open the “Start” menu, find in “Control Panel” - “System and Security” - “System” - “Device Manager”.
- A window will appear with a list of all devices currently connected to the computer. Active and disabled graphics adapters will be displayed. Right-click on the desired video card, and in the menu that appears, click on the “Enable” line.
On a desktop PC, unlike a laptop, you must additionally switch the cable from the monitor to the desired video processor connector. This must be done by completely turning off the computer.
Why enable the video card in the BIOS?
First, let's figure out what exactly motivates the attempt to turn on the video card through the BIOS. Let's start with the fact that some laptop models and some desktop computers use two video cards at once. One of them is integrated into the central processor and is needed to perform basic tasks. And the other is an independent device necessary for working with complex graphics and video games.
So, the process of switching between them should be performed automatically (this is ideal). But this doesn't always work. Or it doesn't always work the way we need it. In this case, you have to manually go into the BIOS menu and turn on the discrete video card to improve performance.
Now let's move on to turning it on.
Possible problems with the primary I/O system
Sometimes your computer's performance may drop sharply after switching the active GPU. Most often this happens due to the BIOS itself. To fix it, you need to look for new firmware on the Internet and install it yourself. If the problem is with a desktop PC, then the instructions are as follows:
- Disable BIOS caching in VIDEO and RAM.
- Download the installer with the DOS utility to the CD and install the firmware from it. It is recommended to keep the old version just in case.
Switching video processors in the BIOS itself is a simple process. But with the help of other programs and the device manager, this is made even easier and safer.
Integrated and discrete video card: what is it?
So, today two types of graphics accelerators are actively used: integrated (Video-on-Board) and discrete.
With the first type everything is probably clear. The chipset is initially built into the motherboard, and it is impossible to replace it without special tools. Another thing is a discrete video card. What it is? In essence, this is an adapter that can be installed on and removed from the motherboard at any time quite simply, however, provided that the motherboard and processor support this type of adapter.
Setting options in the BIOS menu
Turn on or restart (depending on the current state) your PC. When the POST logo or initialization procedure appears, press the “DEL” or “F2” button, depending on your PC model. Once activated, you will enter your motherboard's BIOS menu.
In the BIOS, find and open the graphics card settings menu. It is usually located in the “Advanced”, “Chipset features” or “Graphic configuration” menu.
Depending on the BIOS manufacturer, the names may differ: “Onboard graphic”, “PCI”, “AGP” or “PCI-E” (depending on the bus type used on your motherboard). Selecting “PCI-E,” for example, will activate a discrete video card, and disable the built-in one.
In the UEFI BIOS, the graphics settings are indicated as “Primary Display” or “Init Display First” in the motherboard configuration section.
Once you have found the settings you need, configure your graphics settings based on the following properties. Set the bus that is associated with the graphics you want: PEG (PCI Express 16x), IGPU (Integrated Graphics), PCI, or AGP. Also, the required item may be called “Primary Graphic Adapter” or simply “Graphic Adapter”.
After setting the necessary parameters, press the “F10” key or go to the “exit” menu and select “Save and exit”. After this, the computer will restart and the changes will take effect.
NVIDIA
Along with drivers, developers also supply special software for fine-tuning video adapters. Turning on a discrete video card from nvidia on your own is not difficult even for a beginner; let’s look at the process in more detail:
- Right-click on the free space of the desktop and in the list that opens, go to Control Panel.
- In the window on the right, go to the “Manage 3D parameters” section;
- Next, go to the “Program Settings” tab;
- Click on the “Add” button and select an application to launch from an external video card;
- In the graphics adapter selection column, indicate “NVIDIA GPU”;
- After a reboot, the settings will take effect;
Why doesn't the switch happen?
It would seem that the user did everything correctly - exactly according to the instructions. The computer begins to reboot, but the graphics card does not display an image on the monitor screen. Why is this happening? There may be several options:
- The user did everything correctly, also installed the board as it should, but simply forgot to rearrange the cable connecting it to the monitor.
- The PC owner forgot to perform the mandatory saving of all changes made using the method suggested above.
- The graphics card itself that the user wants to upgrade to is faulty.
- The installation of the product into the motherboard was not entirely qualitative, perhaps there is simply no contact between them.
Do not forget that most modern models of such equipment require additional power - on their case there is a place where the wiring from the power supply should be connected. The power of the power supply itself must also be appropriate.
Hardware solution to the problem
Turn off the computer, and then unplug the computer by unplugging the power cord. Disconnect the cable from the video card and connect it to a similar port built directly into the motherboard. This is the integrated adapter port.
Note:
If you do not have this port, then most likely your PC does not have built-in graphics.
If the above method does not help, do the following:
- Turn off the power to the system unit and remove all connected devices from the ports
- Remove the cover of the side compartment of the system unit by unscrewing the 2 screws on the rear panel.
- Carefully remove the video card. To do this, unscrew the screw that secures it to the case, and then move the lever that secures the card in the PCI slot and pull it towards you.
- Close the system unit. Turn on your computer.
After this, your integrated graphics adapter should automatically turn on. If this does not happen, then your PC does not support integrated graphics.