The processor is the brain of the computer, regulating all internal processes. Replacing it early with a more powerful model will help maintain performance at a high level, for solving time-consuming tasks and having a good time playing video games. However, it is not enough to simply buy the most powerful components and enjoy the performance. Each model has its own socket, which may not match the motherboard socket. What is this and how to find out the socket of the appropriate MP processor for yours, we will look into it below.
Methods for determining the processor socket on a computer and laptop.
In order to find out the name of the socket on a laptop or PC, you must use one of the following methods:
- Read the documentation that is issued when purchasing a PC;
- Through the system properties section;
- Find out which socket is on the motherboard using third-party applications;
These methods are suitable for both PC owners and laptop owners. There is another check option that will be difficult to perform on a laptop - reading the information on the product itself, which requires disassembling the system unit and removing it from the socket. Each method has pros and cons, which should be read separately.
Documentation of the installed processor
The easiest way, for which you only need to look at the accompanying documentation issued to the computer upon purchase. It must be present regardless of whether the system unit is purchased as a whole or assembled in parts independently. As a last resort, a receipt with a list of installed components should be attached to the PC. There you can determine the motherboard socket that matches the device socket.
In the event that documents are lost, you can obtain the required information on the website of the MP manufacturer. All the characteristics of the motherboard will be listed there, including socket data. The socket model is usually indicated after phrases such as LGA, Socket, Socket A.
Advantages of the method:
- Ease of implementation. To find out the required data, you don’t need to download or disassemble anything;
- You can find out the data on the manufacturer’s official website if the papers are lost;
There are no cons.
Determining the processor socket using programs
The second option for finding out the processor socket of a desktop computer or laptop is to resort to using specialized utilities and programs. We will talk about the AIDA64 program and the CPU-Z utility.
Let's start with the fastest option, namely identifying the socket via CPU-Z. It is fast because this utility does not require installation. In addition, it is completely free. Download the program from the official website of the developer CPUZ.ru and run it. To see what socket your processor has, open the “CPU” tab. The socket type will be indicated in the “Processor packaging” column.
As you can see, the program contains all the minimum necessary to become familiar with the characteristics of the main components of a PC.
Finding out the socket type via AIDA64 is also not difficult. Unfortunately, this program is provided for a fee, but a demo version is available for evaluation purposes. By the way, its predecessor is the EVEREST program, from which it adopted all the functionality. Using which program to find out the CPU socket, through EVEREST or AIDA64, is up to you to decide, their functionality is the same.
Download the program and install. The trial period is 30 days. After launching it, open the program menu and the “Motherboard” section. Next, select the “CPU” item. The information we are interested in will be presented in the “Case Type” column.
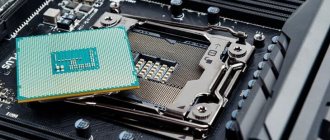
Determining the processor socket visually
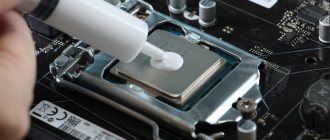
Before you recognize the processor socket visually, think carefully about whether it is worth it, because by resorting to it, you will have to partially disassemble the computer and, possibly, re-apply the thermal conductive paste. If there is no other option, then open the side cover of the computer system unit and, disconnecting the processor cooler wires from the motherboard, remove it. Before removing the cooler, unfasten the radiator fasteners. The fastening elements for Intel and AMD processor coolers are different. Therefore, before starting this method, find out how to attach the heatsink to your processor.
Next, having safely removed the radiator, carefully remove the processor itself from the motherboard connector. Most often, this connector carries information about the processor socket with a precise indication of its type.
We can probably end here. It's up to you to decide which way to view the CPU socket.
Rate this article:
Through the system properties section
The operating system of a PC or laptop makes it possible to find out the socket number using built-in tools. These include the “System Information” section located in the Control Panel. By going to the specified section, the user is presented with a list of connected devices; clicking on them opens access to parameters of interest that affect the performance of the computer.
Advantages of the method:
- Takes little time;
- Easy to implement;
Minuses:
- If the processor fails and the computer does not work, checking the model in this way will not work;
- If a pirated OS is installed, which is not uncommon in Russia, not all information about the computer is freely available;
Determining the processor socket using programs.
There are many third-party applications on the Internet that allow you to find out any data about the properties of the system. Popular applications include:
- AIDA 64;
- CPU-Z;
The first application allows you to determine any data about the hardware and programs installed on your computer. The network has a free program with limited functionality, which is expanded to full functionality after paying for a license on the manufacturer’s website. The second application is distributed over the network for free, but only reveals information about the processor, without giving access to other system components.
Note! Both software products are easy to learn, with an intuitive interface.
The positive aspects of the method include the detail of the information provided; the negative aspects are that the program must be downloaded and installed.
Program for determining motherboard socket
You can very quickly and easily find out which socket is installed on the motherboard through third-party programs and utilities. There are a lot of them - free applications are discussed below.
CPU-Z
CPU-Z is a simple but informative utility that displays all the important characteristics of computer hardware. To use it to determine a socket, just run the program. Everything related to the topic of this article is located on the corresponding tab - CPU.
About
Information on the processor
Before using this method, you need to think about it. The danger of the method is that the user will have to disassemble part of the system unit, remove the thermal paste covering the surface of the processor, and then find out the required information. This approach requires knowledge of computer architecture.
If you are not confident in your own abilities, do not use this method or entrust its implementation to knowledgeable people who will find out the information for you. Information of interest to the user is printed on the cover of the device and after removal it is easy to find out the number.
When disassembling the computer on your own, follow the safety rules:
- Disconnect the computer before disassembling;
- Do not reach into the power supply with a screwdriver. Electrical voltage remains inside, the strength of which can cause harm to human health;
- Try to handle the parts carefully, as most of them are fragile and break easily;
- Remember the sequence of actions so that no problems arise when assembling the PC to its original state;
You can also read articles on the topics: How to enable the second processor core in Windows 7 and How to remove the processor from the motherboard
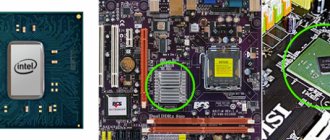
What is a socket on a motherboard or CPU?
Socket is a connector on which the motherboard CPU is installed. Over the past time, there have been three main types of motherboard sockets: LGA, PGA and BGA. Let's look at this matter more objectively:
LGA and PGA are kind of opposites. LGA looks like a connector with pins coming out. The CPU will later rest on these legs. The PGA is created in reverse order, the legs are on the CPU itself, and on the motherboard there are corresponding holes in the connector for inserting the processor into them.
The BGA is not a socket at all, since the CPU is attached to the motherboard via soldering and if you want to remove it, you won’t be able to. This method is cheaper, takes up less space and is widely used among laptops (in particular, among cheap and thin brands).
Nowadays, the situation is something like this - Intel began to use mostly LGA sockets, and another well-known brand AMD uses mainly PGA (it has one exception, Socket TR4).
Diagnosis and differential diagnosis of pancreatic cancer
Metastasis of pancreatic cancer occurs in a way characteristic of most tumors of the gastrointestinal tract: lymphogenous and hematogenous, overwhelmingly to the liver. With distal tumors, tumor cells often spread throughout the peritoneum - peritoneal dissemination, which in 70-80% of cases is the cause of inoperability of the process. But a specific factor that determines the aggressive course of pancreatic cancer and largely limits the possibility of performing radical (R0) resection is perineural invasion of the tumor. And not only extrapancreatic, but also directly through nerve fibers along the superior mesenteric artery into the mesenteric and celiac nerve plexuses.
The main objectives of non-invasive diagnostic methods in surgical pancreatology are:
Intel sockets
Processors from this manufacturer have a high rate of updates, unlike the well-known AMD. Recently a series of processors was released that had several sockets that were incompatible with each other.
There is a positive and negative side to the situation. On the one hand, this is good, since CPU performance increases and almost every model has its own specific socket. But, on the other hand, making an upgrade in this case is very difficult, since new processors have their own connectors, so if you change them, you need to do it together with the motherboard, which will not be very convenient, and most importantly, expensive.
What models can be considered and how are they characterized?
- Socket LGA 2011. The model works perfectly with various processors based on the Ivy Bridge architecture from Intel (Core i3, i5, i7). Initially, the socket was used as a marketing ploy to shake up the market and increase the cost of processors for it. This happened at first, then the cost of such processors fell. However, this did not affect motherboards with this socket and their cost remained high, unlike the options that will be discussed below.
- Socket LGA 1356, 1155, 1156. These models are applicable only for one Sandy Bridge 2 architecture, although they are incompatible with each other. The most effective was model 1155, which was used for most of the systems. Socket 1366 was created for the most powerful stations, which also showed excellent performance.
- Socket LGA 775. Some systems still use them, however, to be fair, they are already very outdated. Systems in which you can see them: Celeron, Core 2 Quad and Duo.
How to determine the motherboard socket?
You can easily find out the motherboard socket - you will find it in the instructions for the motherboard. But, if you purchased your motherboard a long time ago, then most likely you have already lost the instructions from it, as well as the disk where the drivers are located. From here, we will start searching for this data from the main resources of the manufacturers of these boards.
There is quite convenient software that will help us find out the name of the CPU socket. We will also consider these programs. We will not disassemble the system unit, although this method will also help you find out the name of the socket!
Remember! If the socket of the motherboard and the CPU match, this does not provide a 100% guarantee that they are compatible. What is the conclusion from this? You can easily install a new processor based on its physical parameters, but they will not function together.
What happens if you don't take the socket into account?
A socket is a connector on the motherboard where the processor itself will be connected
Before selecting it and installing it in the socket, it is important to make sure that the socket itself fits the motherboard. If we give a simple analogy, then an ordinary socket and plug immediately comes to mind: they fit together perfectly
And if you try to insert a European plug into a Soviet socket, then they will not fit each other. This ideally describes the situation with the motherboard and processor sockets.
And in general, sockets were not created to complicate the computer assembly process. They make it possible to update the system by removing old ones and installing newer and more powerful chips with the same socket. Imagine what would happen if the processor was simply soldered to the motherboard (by the way, in some laptops this is exactly the case). We would have to change the entire motherboard to replace the chip and vice versa.
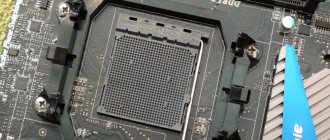
Therefore, when choosing a processor (or motherboard), the name of the socket plays one of the most significant roles. Many users do not know what a motherboard socket is and do not attach importance to it. The picture below shows what happens if you try to “shove” a processor into a motherboard socket that does not match the CPU socket.
As you can see in the photo, the processor connectors are bent and it is difficult to say whether they can now be restored. In theory, of course, it is possible, but there are no guarantees that after this it will work correctly. Therefore, it is not recommended to try to connect the processor to the motherboard yourself, without being sure of 100% compatibility between them. Otherwise, you will simply damage the processor chip and, less likely, the motherboard.
Software
Determining the type of connector through a computer does not mean disassembling it. There are quite a few utilities with which you can see what kind of socket is on the motherboard. Below are the three most convenient options.
Everest
The software was created to test and configure the operation of the hardware and software parts of the assembly in order to optimize the system. Presented in the form of a paid version with a sample, which you can use for free for a month.
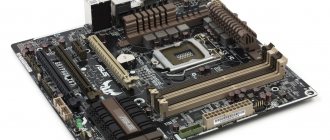
Interesting : there are models in which two “stones” are installed. They are intended for servers. For example, WS C621E SAGE is equipped with two sockets, as well as twelve slots for RAM.
In the extended version, the software provides the user with a detailed report about the system, which can take more than a hundred pages. Here you can not only find out what components are in the computer, what their characteristics are. It also integrates a number of auxiliary modules for conducting tests and assessing condition and performance. In the free trial version, the report is not as detailed.
See also: Which motherboard to choose - 8 key criteria
CPU-Z
Another noteworthy utility that allows you to get information about your PC. The easy-to-use program provides the user with a report on the processor, motherboard and other components.
Tip : in order not to spend money on a Wi-Fi adapter, you can purchase a motherboard with a built-in module. The Z390 AORUS ULTRA is just such an option.
| Motherboard information | CPU information |
| Manufacturer, model and revision. | Processor name. |
| BIOS subsystem information. | Technical process. |
| Chipset (north and south bridge) and sensors. | Internal and external frequencies, processor multiplier, core voltage. |
| Graphical interface. | Cache information and other characteristics. |
| Socket. | Socket. |
AIDA64
A popular and quite powerful tool for testing a system and obtaining detailed information about its components.
What's good about the software:
- Effective tests of performance and condition of components with the ability to compare data with reference indicators.
- Information is provided to the user specifically about the current state of the elements - in real time.
- All parameters of the OS, discrete, “mother” and CPU.
Instructions: Installing the processor on the motherboard: 3 steps
As you can see, finding out through a PC what type of connector the motherboard has is not that difficult. All the methods given here are quite simple. By using any of them, you can simplify your task of selecting a suitable CPU.
⇡#About cable management
Before you buy all the hardware needed to assemble a system unit, you need to make sure that all components are compatible with each other. It’s not for nothing that the case specifications indicate the maximum height of the installed processor cooler, as well as the length of the power supply and video card. It’s not for nothing that the characteristics of the cases indicate how many and what kind of radiators can be mounted on its walls. You won't have any problems here.
| Full Tower (Corsair Obsidian 750D) | Midi-Tower (Corsair SPEC-04) | Mini-Tower (Corsair Graphite 380T) |
In the article we are talking about assemblies in tower cases, but there are some peculiarities here too. Today there are three types of towers: Full-Tower (supports motherboards of E-ATX and XL-ATX form factors), Mid-Tower (supports motherboards of ATX format and smaller) and Mini-Tower (designed for devices of mini form factor -ITX). Naturally, the larger the motherboard, the larger the case needed.
When selecting a power supply, it is important not only to focus on its length. Here it is important to buy such a device so that its cables are long enough, because in 2022, in most cases, the power supply is installed at the bottom, and the 8-pin EPS connector is usually soldered on the upper left side of the motherboard PCB
It turns out to be a fairly simple rule: the EPS cord should be equal in length to the height of the case, if we are talking about the lower location of the power supply. Then there will be no surprises during assembly. In general, the length of other power supply cables in the case of tower cases is of little interest to us. In some models, the length of the cord with a 24-pin port reaches 700 mm - in this case, it is even more problematic to properly lay it behind the chassis of the case.
For greater clarity, I will provide the following table.
| Types of buildings | ||||
| Full-Tower | Mid-Tower | Mini Tower | Slim Desktop | |
| Approximate height | 550+ mm | Up to 500 mm | Up to 400 mm | Up to 400 mm |
| Supported motherboard form factor | E-ATX, ATX, mATX, mini-ITX | E-ATX, ATX, mATX, mini-ITX | mATX, mini-ITX | mATX, mini-ITX |
| Number of expansion slots | 1-7 | 1-7 | 1-4 | 1-4 |
| Power supply form factor | ATX | ATX | ATX, SFX | ATX, SFX |
| Recommended cable length 4+4 EPS 12V for CPU power supply | From 550 mm | Up to 550 mm | Up to 500 mm | Up to 400 mm |
As a rule, the higher the power of the power supply, the more wires it has. Because the same 850-watt power supply is quite suitable for systems with two video cards. Typically, expensive models with a power of 650 W or more come with two EPS cords. We have already found out that in the case of home overclocking - when using an air cooling system, non-separable or custom "water supply" - you can safely limit yourself to one 8-pin EPS power supply cable.