Good afternoon friends. How to find out the BIOS version of the motherboard? People may ask this question out of pure curiosity. But sometimes users have various problems with their computer precisely because of errors in the BIOS or its outdated version.
In both cases, you need to update the outdated version, and for this, of course, you need to know which BIOS you have installed.
I’ll say right away that you shouldn’t update the BIOS unless absolutely necessary. For example, if the computer works without failures, starts quickly and well, then, in this case, there is no particular need to update the BIOS. You, as the owner of your PC, should understand perfectly well that flashing the BIOS is a responsible matter and can lead to unpleasant moments.
For example, you update it without an uninterruptible power supply, and at that moment the light goes out for a split second. In this case, the motherboard will have to be thrown away.
Laptops are easier in this regard. So, if your PC is having various problems, or you just purchased a new video card that requires an updated BIOS, then, of course, you need to update it. But, in any case, it is advisable to have the BIOS updated by a professional.
How to find out the BIOS version of the motherboard without turning on the computer
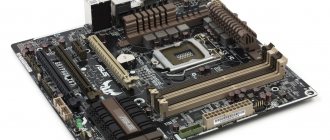
Elementary method. You just need to carefully inspect the motherboard and look for the chip on which the BIOS version will be indicated. Usually, not far from this chip there is a button for resetting the BIOS, or a jumper. This is an accurate method, but only if you are sure that your BIOS has not been updated. If you are not sure about this, then we will look at other methods.
Feasibility of updating
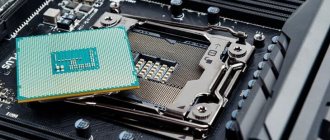
For those who decide to resort to updating the basic I/O system, I would like to immediately warn that this procedure is a critical step. If the MP is not equipped with a dual BIOS that can ensure the computer is operational in the event of unsuccessful firmware and there is no good reason for this, then it is best to abandon this idea. Otherwise, there is a risk of failure of the computer as a whole. It will simply stop working and, willy-nilly, you will have to turn to the services of specialists. If this is not your case and you are completely sure that the update will solve all the problems, then read on.
How can I find out which BIOS version is installed?
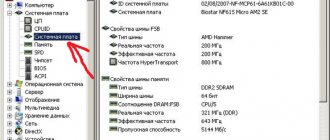
The most common method to do this is to start your computer and as it boots, your system version will quickly flash by. But most likely you won’t have time to look at it. In this case, when loading, click Pause/Break and view the information we need.
But, in new computers, this information may not appear, then we proceed from the motherboard model. For example, for “Gygabyte” you need to click on the F9 key.
Before PC boots
The computer, even before starting its operating system, checks the hardware configuration using the POST procedure. At this time, all detected components are displayed on the screen.
On a powerful computer this happens quickly, so the user may not have time to notice the data he is interested in. To pause POST, press the Pause Break button on your keyboard. The manufacturer and BIOS version are indicated in the top two lines of the boot screen and are determined first.
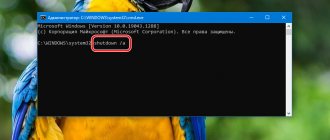
Let's use the command line
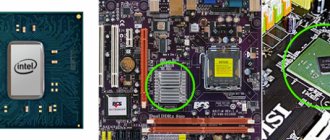
Quite an accurate method. So, to enter the command prompt, enter cmd and use the context menu to launch it as an administrator.
Next, enter wmic bios get smbiosbiosversion and press enter.
In front of the BIOSVersion inscription we clearly see our version P1.10.
Flashing via GUI
Launch ATIWinflash with administrator rights. Make sure that the video adapter you need is selected in the upper right corner of the program.
This is how the ATIWinflash program shows one single video card.
If the number of video cards in the system is more than 3, then the program will not be able to correctly display the entire list - the fourth and subsequent video cards simply will not fit in the window. In this case, you will have to use the firmware method via the command line (you can read about this in the same article below).
And this is how the ATIWinflash program shows four video cards - only three of them are visible, the fourth simply did not fit on the screen.
Having selected the desired video card, click on the “Load image” button and select the BIOS file with which we want to flash the video card.
And after that, click on the “Program” button.
After this, we wait until the video card firmware procedure is completed, which will be reported in a separate notification.
And then a reboot prompt will appear, which is necessary for the video card to work with the new BIOS.
If after a reboot your video card is detected in Device Manager, but refuses to work, then this may be due to the user BIOS being blocked by AMD drivers. You can read about how to deal with this.
System utility "System information"
Also an excellent method that will show not only the BIOS version, but also a lot of other information, for example, data about drivers, installed programs, various components, etc.
So, to enter the utility, in the “Run” window, enter msinfo32. Let me remind you that to enter this command press Win + R
A utility window opens, where we look at the information in the right window and find the BIOS. A very convenient way.
Method 3. Use the WINDOWS registry
If you want to learn a slightly more advanced method, then follow the instructions below.
Step 1. Press the key combination “Win+R”.
Step 2. In the window that appears, enter “regedit” in the empty field and press “Enter” or “Ok”.
Step 3. The Windows registry will appear in front of you, in it you need to follow the following chain of commands: HKEY_LOCAL_MACHINE/HARDWARE/DESCRIPTION/System/BIOS.
Step 4. On the right side, look for the line “BIOSVersion”. The value of this line is the BIOS version.
On the right side we find the line “BIOSVersion”
Let's enter the register
To enter the registry, we will have to call the “Run” command again. This time we enter regedit
So, after logging in, we need to find the desired branch. It is located at HKEY_LOCAL_MACHINE\HARDWARE\DESCRIPTION\System\BIOS
Having found the desired branch, look for the BIOSVersion inscription. Its value is the BIOS version.
Windows Utilities
If for some reason the previous two methods do not suit you, you can use standard Windows utilities.
Go to the “Start” menu, in the “Search programs and files” line, add the following word msinfo32 without quotes or other symbols, then press the Enter key. This will open System Information. Information about your computer and system will be listed right on the main tab. One of the items is called “BIOS Version”. As you might have guessed, this is exactly what we need.
CPU-Z program
Of course, to find out the BIOS version there are a lot of third-party programs and utilities, but I will give two programs that I already talked about earlier, which are very convenient.
The first program will be the free CPU-Z. So, first you need to download it from the official website. Unfortunately, it does not have a Russian interface, but this will not stop us from checking the BIOS on our PC. At the same time, one of the main advantages of the program is its low resource consumption.
The program installs very quickly. Let's launch. We are interested in the Mainboard .
As we can see from our screenshot, the program indicated the same version P1.10
Using third party software
The simplest example is the Speccy diagnostic utility, which collects all information about the configuration and status of the equipment.
After installing and launching the application, you will see several tabs on the left side of the interface. You need the Motherboard item, or rather the BIOS section in it. The same data is indicated here as everywhere else - manufacturer, version, development date.
As you can see, all the methods are not too complicated and there are enough of them to choose the right one. You may also find the articles “How to use all processor cores in Windows 10” and “How to view video card parameters” useful. I would be grateful if you share this post on social networks. Till tomorrow!
Sincerely, blog author Andrey Andreev.
Speccy program
I've already talked about Speccy many times. But, I repeat. The program tells you in some detail about the state of your computer. For example, about the temperature of the hard drive and processor (which is very important). Information about the rotation speed of the hard drive, the system board, RAM board and much more.
Download Speccy for free from the official website.
By going to the site, we download the free version; we don’t need the paid version. We install Speccy, while forgetting to select the Russian language. After launching the program, select “System board”. The program tells us in detail all the data about the board, including the installed BIOS. As you can see, its version is the same in all cases - P1.10.
Conclusion: - I have given 6 methods on how to find out the BIOS version of the motherboard. You don't have to look at every one. Just choose one that you like best. As for me, the most convenient of them is using the Speccy program. But, you decide for yourself. If you know other ways, I will be glad to learn about them in the comments to the article. Good luck!
Sincerely, Andrey Zimin 04/29/2019
Method 2. In the BIOS itself
If you know how to go into the BIOS settings, then it is there that you can also see your version of the input/output device.
Step 1. Reboot or turn on the computer.
Step 2. During the boot screen, press the keys to enter the BIOS settings.
Advice! If you don’t know the key combination to enter, we recommend trying one of the most common: Del, F1, F2, Esc, F8.
Step 3. Look at your version in the “Main” section.
We look at our version in the “Main” section
Advice! If you do not understand how the BIOS works, we strongly do not recommend changing its settings: this may cause problems with the performance of your computer!
Why do you need to update your video card BIOS?
Typically, upgrading a video card is necessary in order to improve its performance. For example, the power of the video card is not enough for a comfortable game, which is why black squares may appear, the image becomes inaccurate, and sometimes the computer even freezes and you have to restart it.
To solve such problems, the video card is overclocked, the drivers and BIOS of the video card are updated.
There are also several other situations in which you may need to update the BIOS of a video card:
- changing the video encoding standard from NTSC to PAL (for owners of Radeon video cards with TV output);
- replacing standard 8x8 and 8x16 fonts with Russified ones;
- changing the scan frequency in VESA mode.
In all other situations, it is better not to update the BIOS of the video card.