Good day to all! Sometimes many users have the question “How to find out the motherboard socket”; as a rule, this is necessary to replace the processor cooler or replace the processor with a more powerful one. This note is an addition to instructions for determining the motherboard model and sometimes we will refer to it.
What is a socket? - I will not use various terms like the connection interface... this is just a place on the motherboard where the processor is installed. Unfortunately, processor manufacturers (especially Intel) are very fond of changing it, leading many users into a stupor - how did it happen that I already have an outdated computer and motherboards are hard to find during the day.
Socket number
The socket is designated by its index or digit (number);
in some cases, an established convention or synonym for the name is used. The number in the name, as a rule, indicates the number of contacts used, however, there are exceptions. For example:
- Socket AM3 is a processor socket for AMD Phenom II series CPUs. Its other name is Socket 941. It uses a PGA connector of the PGA-ZIF type with 941 pins. In this case, the processor has 938 contacts.
- Socket H or LGA 1156 is a processor socket for Intel CPUs with Linfield and Clarkdale cores. It has 1156 contacts respectively.
- Socket G3 (aka FCPGA 946) is a connector for connecting Intel mobile CPUs to laptops. It has a PGA design and 947 contacts.
Let's now look at how to find out which socket is used on the motherboard.
We look at the socket inside the case
Take a screwdriver and remove the housing cover. There you will immediately see the motherboard with the name written on it. Go to the manufacturer's official website, find a board with the same name on its website and look at the technical specifications there. The socket will be listed as one of the first characteristics.
It's hard to imagine that there will be no name on the motherboard, but even if so, there is still a way to find out what socket is on the motherboard. But to do this you will have to unscrew 4 more extra bolts. So, let's say you removed the case cover, but did not find the name on the board. Manufacturers often indicate the socket near the processor mounting location. Therefore, use a screwdriver to unscrew the bolts that hold the fan and cooling radiator. There is no need to touch the processor itself - let it stand still. The socket will be indicated next to it. Write it down on a piece of paper and put the radiator and fan back in.
AIDA 64
This “monster” is capable of providing information not only about the computer’s hardware, but also about the installed operating system and the programs contained in it. This utility is not free and requires payment for the full version. But even the demo version is capable of a lot. So, how to find out the processor socket using Aida? This is quite easy to do. You need to select the “Processors” item in the left window and expand the expanded list. There will be all the necessary information about the device’s central processor, down to its current temperature.
This program can also create reports, which can then be easily read. And they also display all possible components and components. But AIDA is paid. And we have to take this into account. However, there are alternatives to this software product. And we will look at them below. They are not inferior to this product in functionality and use system resources more economically.
Recognition programs
The easiest way to see the type of socket used is with the help of system programs that provide information not only about it, but also about all devices located on the motherboard.
The method is considered quite reliable, however, in some cases it may produce an incorrect result. These include:
- use of outdated software;
- An attempt to diagnose a MP with changed BIOS settings that affect the result of PC hardware recognition.
The first reason can be easily eliminated by downloading a more modern version, and the second is so rare that the probability of encountering it is less than one in a million.
Let's look at the most popular programs that are used to determine the socket type:
- CPU-Z. The most simple utility containing information about all processors (and socket types) currently in use. In addition to information about the processor, it gives a brief description of the MP, memory, video card, etc. Information about the connector is on the main page of the program.
- AIDA. Universal hardware diagnostics and testing program. It not only identifies the hardware of the PC, but also provides links to information about all its hardware, right down to the manufacturer’s website and links to instructions for each system component. The socket type can be seen in the “System board” – CPU – Case type section.
- Speccy. Also a simple diagnostic program that provides complete information about the system and manufacturers of all components of the PC being diagnosed. Information about the connector is located in the “Central Processing Unit” - Design section.
Determine the motherboard socket using the AIDA64 program
Basically, all users have heard about the AIDA64 program, so we will use it. So, first you need to download AIDA64 from the official website.
You can choose a portable trial version, archived in zip. I do not advise you to subscribe to any package. We are transferred to a new page. Select as in the screenshot:
So, you need to launch Aida, you can do it directly in the archiver by clicking on the file aida64.exe.
After this, a notification appears that this is a trial version for 30 days. We are happy with this, click OK.
In addition, this program makes it possible to learn a lot of interesting things about your computer. I already wrote an article about the AIDA64 utility, so I don’t want to repeat myself. I advise you to study the program in more detail!
Finding out the CPU socket model using the CPU-z program
The software product is freely distributed.
After launching the application, you need to use the “CPU” tab and find the “Package” line.
Open the application, click on the “CPU” tab and find the line “Package”
Read the new article - “How to find out how many cores a processor has.”
Using special programs
Well, if the computer is not disassembled and is in working condition, perhaps the most convenient way to find out its socket type is to use a program that has the appropriate capabilities. For these purposes, for example, the CPU-Z or Speccy program is suitable.
• CPU-Z
:
⇒ More about the program | download >>>
You need to install the program on your computer and run it. Information about the socket type will be displayed in the CPU-Z window in the “Package” column.
•Speccy
:
⇒ More about the program | download >>>
Using this program is no less convenient than CPU-Z. You just need to install and run it on your computer. Then, when the determination of the parameters of the main computer devices is completed, go to the “Central Processor” section. The necessary information will be displayed in the “Constructive” item.
In addition to CPU-Z and Speccy, there are many other similar programs that can be used to obtain information about the processor socket, as well as other characteristics of the computer.
Connector detection programs
There are a lot of programs for identifying computer components; I will give you a few of the most popular and reputable ones.
I will tell you about the CPU-Z program first. Highly specialized, freely distributed software designed to determine all kinds of CPU parameters.
To download, find the block shown in the picture and click on the distribution format you are interested in. If you have unlimited Internet, you can click on the first button (highlighted in red in the image below).
After downloading, install and run the program.
The result of the CPU-Z program (the socket type is highlighted in red):
AIDA64
The second program that deserves attention is AIDA64. Represents a whole software package for diagnostics or a personal computer. A significant disadvantage of this program is that without purchasing a license, it works in a limited mode, designed for 30 trial days. This version is sufficient to carry out the planned studies.
After clicking the Download button, you will be redirected to the download server selection page (Download Locations). I chose the first one!
After downloading, install and run the program.
How to find out via AIDA64
In the “Menu” tab, double-click on “Motherboard” and then select “CPUID”, the necessary information will open in the window on the right.
In the picture, under the number 3, the line with the necessary information is highlighted.
This is explained by the fact that there are two types of contacts PGA478 and BGA479, in fact, the models are the same, but their contacts are radically different.
To be clear, let's dive into the theory!
In the first case, PGA478, a variant with pin contacts.
In the second case, Socket 479 or BGA479 is nothing more than a seat; lead solder balls are used instead of pins.
What really happened? For some unknown technical reason, AIDA64 did not see the difference between PGA and BGA contacts!
What to do if different programs show different results?
Provide the findings to experienced regulars on technical forums or sites, some of which are listed below.
List of useful sites
Through its search form you can find information about any laptop computer.
Processors > Mobile PC processors > all generations of processors will be represented.
The overclockers forum discussion contains structured information about compatible sockets and CPUs for them.
In the Search for motherboard name search, you can enter the name of the motherboard chipset and get a list of supported CPUs, or use the Search for CPU search by entering the name of the CPU you are interested in and get its specification, which will indicate compatible chipsets.
If everything is in order and the laptop is suitable for easy replacement, then the site has several useful sections, Intel, consumables, ChipsetpediA.
This YouTube video may be helpful.
How to recognize a socket physically
The easiest way is to study the documentation for the motherboard, but this method will only work if you bought the board or you have a box with instructions for it
In the instructions, look for the word Socket and pay attention to the combination of letters/numbers after it
If the previous two options do not suit you, all that remains is to get to the name of the socket physically. To do this, with the computer turned off, you need to remove the side cover and cooler of the cooling system, and, if necessary, the processor. After that, look for its type on the connector, for example “Socket AM4” or “370”.
The methods listed above are well suited in cases where the computer in front of you is turned off, or it is a stationary PC. If you have a laptop in front of you, then in order to get to the processor you will have to completely disassemble it, and this is not only an extra waste of time, but also the risk of damaging the case or fastenings. Therefore, in the case of laptops and computers that are turned on, it is preferable to use special programs.
conclusions
Well friends, it's time to sum it up. In today's post, we looked at the 5 most popular and simplest ways to find out the motherboard socket; as practice has shown, there are no problems with answering this question - everything can be found out without disassembling the computer (especially important for laptop owners).
PS If you are identifying a socket for the purpose of upgrading, then pay attention to the supported processors, since compatibility at the physical level does not mean that the system will eventually start (and you may just need to update the BIOS)
- Facebooksit
- Tweet
- Share
- Cool
What is a socket
Yes, we decided to start from the very beginning so that you are savvy in literally everything related to the design of your personal computer.
Socket
- this is the interface for connecting the CPU (our processor) to the board itself. As mentioned above, the mother is a special platform that connects a number of other printed circuit boards and devices.
The processors are very similar to each other only in appearance. However, in reality they are very different from each other. That is why knowing the socket makes it possible to purchase the “correct” processor and its subsequent installation.
Remember: processors are not universal, and therefore are not suitable for all types of boards. In this regard, if you want to change the processor for one of the reasons, it is better to take care of the socket version in advance so as not to tempt fate.
Conventionally, sockets can be divided into two types - according to manufacturers:
• From Intel;
• From AMD.
He won’t say whose processors are more powerful - we’ll leave this question to the geeks. Let's go over the differences:
- Number of contacts (from 400 and above);
Types of contacts; Different distances for fixing the cooler; Socket size;
Presence or absence of additional controllers; The presence or absence of a video card built into the processor (most often found in laptops and their processors); Different performance.
As you can see, sockets from different companies may not be compatible with your motherboard at all. Therefore, if you had a processor from Intel, and you are going to install a chip from AMD in its place, you can be sure that nothing will work out.
Socket number on the motherboard itself
Almost every motherboard - with the exception of some instances - has information about the socket, but to find it, you need to try and disassemble your computer a little. The method is not the easiest, but very interesting if you have never done anything similar before.
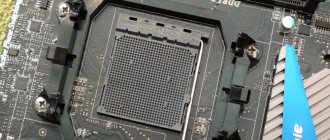
- Remove the main cover. As a rule, it is attached to a pair of bolts - an ordinary shaped screwdriver is enough;
- Next you need to remove the cooler from the processor. There are several options here: it can be fastened with clamps or also with bolts;
- Here it is, the long-awaited socket type: in our case it is LGA-1366.
Now you know which processor will suit your motherboard and you can safely go shopping. If the socket is not there, we can find it in other ways.
Finding out the CPU socket model using documentation
When purchasing a computer, in addition to components, accompanying documents must be attached, such as a user manual, indicating the socket model.
The accompanying documents indicate the name of the socket model
On a note! This method is not always effective, since a whole series of models may be displayed in the manual. In addition, there is a possibility that the seller mixed up the documents for your PC.
⇡#About cable management
Before you buy all the hardware needed to assemble a system unit, you need to make sure that all components are compatible with each other. It’s not for nothing that the case specifications indicate the maximum height of the installed processor cooler, as well as the length of the power supply and video card. It’s not for nothing that the characteristics of the cases indicate how many and what kind of radiators can be mounted on its walls. You won't have any problems here.
| Full Tower (Corsair Obsidian 750D) | Midi-Tower (Corsair SPEC-04) | Mini-Tower (Corsair Graphite 380T) |
In the article we are talking about assemblies in tower cases, but there are some peculiarities here too. Today there are three types of towers: Full-Tower (supports motherboards of E-ATX and XL-ATX form factors), Mid-Tower (supports motherboards of ATX format and smaller) and Mini-Tower (designed for devices of mini form factor -ITX). Naturally, the larger the motherboard, the larger the case needed.
When selecting a power supply, it is important not only to focus on its length. Here it is important to buy such a device so that its cables are long enough, because in 2022, in most cases, the power supply is installed at the bottom, and the 8-pin EPS connector is usually soldered on the upper left side of the motherboard PCB
It turns out to be a fairly simple rule: the EPS cord should be equal in length to the height of the case, if we are talking about the lower location of the power supply. Then there will be no surprises during assembly. In general, the length of other power supply cables in the case of tower cases is of little interest to us. In some models, the length of the cord with a 24-pin port reaches 700 mm - in this case, it is even more problematic to properly lay it behind the chassis of the case.
For greater clarity, I will provide the following table.
| Types of buildings | ||||
| Full-Tower | Mid-Tower | Mini Tower | Slim Desktop | |
| Approximate height | 550+ mm | Up to 500 mm | Up to 400 mm | Up to 400 mm |
| Supported motherboard form factor | E-ATX, ATX, mATX, mini-ITX | E-ATX, ATX, mATX, mini-ITX | mATX, mini-ITX | mATX, mini-ITX |
| Number of expansion slots | 1-7 | 1-7 | 1-4 | 1-4 |
| Power supply form factor | ATX | ATX | ATX, SFX | ATX, SFX |
| Recommended cable length 4+4 EPS 12V for CPU power supply | From 550 mm | Up to 550 mm | Up to 500 mm | Up to 400 mm |
As a rule, the higher the power of the power supply, the more wires it has. Because the same 850-watt power supply is quite suitable for systems with two video cards. Typically, expensive models with a power of 650 W or more come with two EPS cords. We have already found out that in the case of home overclocking - when using an air cooling system, non-separable or custom "water supply" - you can safely limit yourself to one 8-pin EPS power supply cable.
What is a socket?
In simple words, a socket is a small connector on the motherboard where the processor is subsequently installed. When we talk about a “processor socket,” we mean not only the existing connector, but also the support for this element in many well-known processors. This component will be needed to easily replace the processor if it suddenly fails, or to upgrade the system with a more powerful CPU. Sockets may have a different number of contacts, their types, distance between fasteners and other parameters that, one way or another, will be compatible with a particular processor. There are also technological changes: many different controllers, support for integrated graphics in the CPU, performance indicators and much more.
CPU socket on motherboard
That is why choosing the right socket is an important point when assembling a computer. If a processor is selected that does not fit the existing socket, the chip simply will not fit into the socket due to its incompatibility. It is better not to carry out such experiments at all, since there is a possibility of damaging some contacts, resulting in the system becoming inoperative. Therefore, before buying a motherboard, you need to first select a processor, and then consider the right motherboard with compatible connectors for it.
You can see whether a particular processor is supported for a motherboard or not on the official website of the motherboard itself. In this case, you can be absolutely sure that the selected devices will be compatible. Below we will consider popular socket models from two well-known manufacturers - AMD and Intel.
What is a socket and how to define it
Posted by Alexander · April 26, 2018
If you decide to choose a new processor for your PC, then in order to choose a decent computing device, you need to take into account a lot of factors. One of the most important parameters that you need to pay attention to is the socket. What is a socket and why is it needed? You will find the answers in this article.
Using the program
You can usually find information about your computer's hardware in Device Manager. But unfortunately, the motherboard model is not written there. The only thing you can find is information about the motherboard drivers.
In this case, special programs will come to the rescue. This method is the best if you want to find out the model of the board on a laptop, since disassembling it for inspection is labor-intensive and risky. But this does not mean that it cannot be used on home computers.
There are many programs created for this job. The most common program is AIDA64. You can download it from the official website of the developer
Which version you choose is not so important. Just keep in mind that this is a paid program and if you want to use it for free, select “Trial period” after installation
This will give you the opportunity to try out the program and use it for a while without paying.
After installing the program, follow the following algorithm for working with AIDA64:
- Launch the program. In the block on the right side, find and open the “Motherboard” section.
- In the new window that opens, find “System Board” again and open it.
- Next, expand “System Board Properties” and find the line “System Board”.
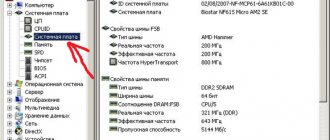
This line contains the board model. In the above screenshot it is “Biostar P31B-A7”. Now, knowing the name of the model, you can find all the necessary information about it on the Internet. Or download drivers from the official website.
To work faster with this program, you can use the navigation panel on the right. Find the "Motherboard" section in this list. In the screenshot it is marked with one. Double click on it. After this, the “Motherboard” subsection (marked with a two) will open. When you click on it, the same window with complete information will open as in the previous case.
Find out the CPU socket based on the motherboard model
So, from the instructions I learned that this computer has an old ASUS P8H67 motherboard installed. You just need to enter its name into the search engine and find the official website from the results (you can also find it out from the driver disk, if you still have it). For Asus, the official website will be asus.com. In this case, it is in first place in the search results.
By following the link, “Characteristics” on the website, we will get data about the motherboard socket:
Information about the socket on the official ASUS website. My Yandex Browser translated them into Russian.
You can also find a list of CPUs that will be compatible with your motherboard. You will find processor models that have passed the test 100% and are in working condition (but this does not mean that if a certain model is not on the list, it will not function with it).
My processor is called Intel Core i5 3470 (this became clear from the instructions), you need to insert its name into the search engine and through the search find the resource ark.intel.com (for Intel CPUs). It is in 2nd place after advertising.
If you have an AMD CPU, then the matter is more complicated. Searching on the main resource of this processor is not very convenient. Therefore, you can take information from online stores, or not use these methods. You can install special software and take information from it.
In the “Chassis Specification” tab we will see “FCLGA1155”. It becomes clear that this is Socket 1155.
It's a pity, but AMD did not consider it necessary to make a specifications table, like on the Intel website. This table is quite convenient and often helps users.
Diagnosis and differential diagnosis of pancreatic cancer
Metastasis of pancreatic cancer occurs in a way characteristic of most tumors of the gastrointestinal tract: lymphogenous and hematogenous, overwhelmingly to the liver. With distal tumors, tumor cells often spread throughout the peritoneum - peritoneal dissemination, which in 70-80% of cases is the cause of inoperability of the process. But a specific factor that determines the aggressive course of pancreatic cancer and largely limits the possibility of performing radical (R0) resection is perineural invasion of the tumor. And not only extrapancreatic, but also directly through nerve fibers along the superior mesenteric artery into the mesenteric and celiac nerve plexuses.
The main objectives of non-invasive diagnostic methods in surgical pancreatology are:
Determining the motherboard model
The easiest way to find out the information you are interested in is by looking at it on the box or warranty card (which is not there). Often, the packaging or instructions indicate the device specification - socket type, suitable types of RAM, chipset type, and much more.
Unfortunately, such things tend to get lost. In this case, we move on to the next stage.
According to the regulations, the markings must be indicated on the system board itself, unless it is some kind of “palenka” made by Uncle Liao from the basement cooperative “Skillful Hands”.
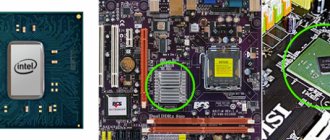
In order to find out the model of the motherboard and subsequently check the “stone” of interest for compliance with it, it is often enough to remove the side cover of the system unit. As a rule, the modification of the motherboard, and sometimes the type of socket, is applied closer to the processor.
True, there is one small “BUT” - the inscription may be covered by other parts that will also have to be dismantled. If you are not sure that you will put everything back together correctly, it is better not to risk it and move on to the next stage.
Similarly, you can find out the model of the laptop motherboard, but disassembling it is much more difficult - you need to remove the battery, unscrew the screws on the bottom cover, remove the keyboard, unscrew a few more mounting screws that hold all the “extra” components.
Depending on the design features of a particular laptop model, you may need to remove some other parts to gain access to the system board.
If you intend to disassemble the laptop yourself, I recommend finding step-by-step instructions with photos or a YouTube video on disassembling a specific model. Everything must be done extremely carefully - the equipment is fragile and can be damaged if excessive force is applied.
Another way to find out your motherboard model is to use a diagnostic utility, for example, AIDA64, Everest or Speccy. This is easier, since you can at the same time look at the model of the processor used and its socket.
However, the method will not work if the PC is broken or partially assembled - then just look at the motherboard model and look further. I also recommend that you familiarize yourself with the list of processors that are suitable for the lga 1151 socket.
If you have a laptop
The described methods are suitable for desktop computers, but how to find out the socket of a laptop motherboard? In some laptops it is very difficult to get to the insides, so the “unscrew the lid and look at the motherboard model” method is not always suitable. It is more appropriate to use the programs discussed above.
But if you want to upgrade the system, you should make sure whether such an opportunity exists at all. Indeed, in some models, processors are soldered to motherboards, which saves valuable space inside the laptop case, but eliminates the possibility of replacing the chip. You can only find out on specialized forums. Manufacturers do not indicate such subtleties in the characteristics.
Determination methods
Documentation
When purchasing a computer or laptop, it comes with documentation that describes all the characteristics, including the parameters of the motherboard. The socket number looks like “Socket...” or the shorter version “S...”. In this section you can also find recommendations for installing processors suitable for this system.
Pay
Very often, motherboard manufacturers write the name of the socket next to the place where the processor is mounted. To obtain information in this way, you will have to put in a little more effort, partially disassembling the computer.
- Using a screwdriver, unscrew the bolts on the side cover and remove it.
- Then disconnect the cooling system, underneath is the processor.
- Often the socket number is written directly on or near the cover. In other cases, you can try to remove it, while trying not to touch the processor.
- The socket number will be written on the plastic or metal part of the motherboard.
Manufacturer
Computer manufacturers are required to disclose absolutely all characteristics of the device when selling. This information is open and can be easily found on the Internet.
- In any available search engine (Google, Yandex, Yahoo, Mail), enter the name of the computer manufacturer.
- Go to the manufacturer or retailer's website.
- Find your model in the product catalog. The socket will be indicated in its characteristics.
CPU
The socket can also be recognized by the processor model, which is indicated in the settings of the computer’s operating system.
You can compare processor and socket models using the table.
| Manufacturer Intel | |
| Socket | CPU |
| Socket 370 | Pentium III |
| Socket 423 | Pentium, celeron 4 |
| Socket 478 | Pentium, celeron 4 |
| LGA 775 | Pentium D, Celeron D, Pentium EE, Core 2 Duo, Core 2 Extreme, Celeron, Xeon 3000 series, Core 2 Quad |
| LGA 1156 | Core i7,Core i5,Core i3 |
| LGA 1366 | Core i7 |
| Manufacturer AMD | |
| Socket | CPU |
| Socket A (Socket 462) | Athlon, Athlon XP, Sempron, Duron |
| Socket 563 | Athlon XP-M |
| Socket 754 | Athlon 64 |
| Socket 939 | Athlon 64 and Athlon 64 FX |
Processor specifications can be found on the manufacturer's or seller's website
Everest
Everest is a program that scans the system and shows the user all its characteristics. In appearance it resembles a conductor. On the left there is a column with windows of information blocks; when you click on them, the required information is displayed on the right. To find out the socket, you need to go through the following path: Computer / DMI / Processors / Your processor / Connector type.
Everest scans the system and shows all its characteristics
CPU-Z
This program has a simple interface. When you open it, you can see all the characteristics of the processor in the first tab. The Package item describes the parameters of the motherboard socket.
The CPU-Z program has a simple interface. Information about the motherboard socket can be found in the Package tab
How to determine the socket of a processor
The main component that performs the main task in the operation of a computer is the CPU. And if it fails, then there is nothing left to do but replace it with an analogue similar in connector and characteristics. This is where the task of determining the socket type arises. There are many options to find out, and here are three main and available ones.
By manufacturer and model
An easy method using access to the World Wide Web (i.e., via the Internet). All the necessary data on products produced by a particular motherboard manufacturing company is available on the manufacturers’ official websites. The information is not hidden anywhere and can be studied by anyone. You just have to enter the data you need for this into the search bar.
Here is an approximate sequence of actions:
Find out and search for the name of the company that manufactured the motherboard. Open a website that officially represents the manufacturer. If for some reason the site does not open, you can contact the website of the trading company where you purchased the computer. Search for the motherboard model you have in the company's product sections
Or use a special search on the site. Once found, go to the page describing the characteristics of the board, and pay attention to the place where the socket type is indicated. That's all, nothing complicated.
Via Speccy
- Download and install the Aida64 or Speccy application on your computer. Next, let's consider the second option. Open the Speccy program. And find in it the section with CPU parameters, it should be called “Central Processor”.
- Next, in the selected section, find the line called “Constructive” and read its contents. This is where the type of processor socket will be indicated.
- Approximately the same steps will need to be performed when using the Aida64 program. Section “Computer”, subsection DMI, then in the subsection “Processor”, look for a line with the word Socket.
In the documentation
This method is the easiest, but requires documentation attached to the system unit upon purchase.
Among the many instructions for the motherboard, processor, video adapter and other components from which the computer is assembled, those intended for the CPU and motherboard are suitable. Carefully leaf through the entire manual and look for the words: connector, socket type. This is where information about the socket standard of the motherboard or processor should be. A personal computer is not a cheap thing, and in some versions it can even cost as much as an old used car. And changing it very often is quite unprofitable. Even reputable and successful companies do this relatively rarely. But, despite this, from time to time you still have to upgrade and speed up the computing capabilities of any computer.
To do this, you have to disassemble the old hardware and find out information about certain characteristics and parameters. However, you need to take into account your abilities for such procedures. Here, as people say: “if you can’t, don’t bother.” And if there is uncertainty about the success of such an event, then it is better to contact special service centers or individual experienced craftsmen.
CPU-Z A fairly simple method to determine the socket
Let's download this utility from the official website... Unfortunately, there is no Russian version on this site, but we will also deal with the English one. For analysis, I will use this program on a computer with an older motherboard. Download the archived version.
This program does not require installation. Let’s open the program and in the first window, in the “Package” tab, note the data we need.
So, our socket is called Socket AM3 (938).
Important: in truth, we have now found the CPU socket, not the motherboard. Taking into account that our CPU is currently functioning, we can confidently say that the motherboard has the same socket.
Is your PC broken and you are no longer able to work on it normally? It's not a problem. You need to contact our computer repair center. We will diagnose and fix the problem. It is important for us that your PC continues to function perfectly, and that nothing distracts you from doing what you love: Our offer: 1 Free visit of a specialist; 2 Free computer analysis at your home; 3 We provide a warranty after repairs of up to three years; 4 We issue a check with a warranty card. All you have to do is leave a request and we will give you a 15% discount
Intel sockets
Processors from this manufacturer have a high rate of updates, unlike the well-known AMD. Recently a series of processors was released that had several sockets that were incompatible with each other.
There is a positive and negative side to the situation. On the one hand, this is good, since CPU performance increases and almost every model has its own specific socket. But, on the other hand, making an upgrade in this case is very difficult, since new processors have their own connectors, so if you change them, you need to do it together with the motherboard, which will not be very convenient, and most importantly, expensive.
What models can be considered and how are they characterized?
- Socket LGA 2011. The model works perfectly with various processors based on the Ivy Bridge architecture from Intel (Core i3, i5, i7). Initially, the socket was used as a marketing ploy to shake up the market and increase the cost of processors for it. This happened at first, then the cost of such processors fell. However, this did not affect motherboards with this socket and their cost remained high, unlike the options that will be discussed below.
- Socket LGA 1356, 1155, 1156. These models are applicable only for one Sandy Bridge 2 architecture, although they are incompatible with each other. The most effective was model 1155, which was used for most of the systems. Socket 1366 was created for the most powerful stations, which also showed excellent performance.
- Socket LGA 775. Some systems still use them, however, to be fair, they are already very outdated. Systems in which you can see them: Celeron, Core 2 Quad and Duo.
What happens if you don't take the socket into account?
A socket is a connector on the motherboard where the processor itself will be connected
Before selecting it and installing it in the socket, it is important to make sure that the socket itself fits the motherboard. If we give a simple analogy, then an ordinary socket and plug immediately comes to mind: they fit together perfectly
And if you try to insert a European plug into a Soviet socket, then they will not fit each other. This ideally describes the situation with the motherboard and processor sockets.
And in general, sockets were not created to complicate the computer assembly process. They make it possible to update the system by removing old ones and installing newer and more powerful chips with the same socket. Imagine what would happen if the processor was simply soldered to the motherboard (by the way, in some laptops this is exactly the case). We would have to change the entire motherboard to replace the chip and vice versa.
Therefore, when choosing a processor (or motherboard), the name of the socket plays one of the most significant roles. Many users do not know what a motherboard socket is and do not attach importance to it. The picture below shows what happens if you try to “shove” a processor into a motherboard socket that does not match the CPU socket.
As you can see in the photo, the processor connectors are bent and it is difficult to say whether they can now be restored. In theory, of course, it is possible, but there are no guarantees that after this it will work correctly. Therefore, it is not recommended to try to connect the processor to the motherboard yourself, without being sure of 100% compatibility between them. Otherwise, you will simply damage the processor chip and, less likely, the motherboard.
How to determine the motherboard socket using programs
First, you can find out the motherboard socket in its instruction manual. It describes in detail all its characteristics, including which socket is used and which processors it supports.
Secondly, this information can be found on the official website of the motherboard manufacturer in the description of its characteristics. But for this you need to know or determine its model.
Thirdly, you can determine the motherboard socket using specialized software such as CPU-Z. This utility is free to download and is intended to provide detailed information about the characteristics of your computer. For example, it displays in detail the characteristics of the CPU that we mentioned here.
In this particular example, the principle remains the same. To find out the motherboard socket you just need to run the CPU-Z utility. After a detailed scan of your PC configuration, the program will display the socket type in the “CPU” tab of the “Processor packaging” column.
In addition, one cannot fail to mention such specialized programs as Everest and its successor AIDA64. The functionality of both programs is identical and has a wider range of tools for monitoring the state of the PC than the aforementioned CPU-Z utility. As an example, we will look at how to recognize the type of motherboard socket through the Everest program.
The functionality of this program includes the ability to monitor the temperature of the CPU, motherboard, hard drive, and video card in automatic mode, displaying their temperature indicators in the notification area. How to find out the motherboard socket using it? This information is presented in Everest in the “Motherboard” section. It indicates not only the socket, but also all other parameters of the motherboard, such as model, form factor, bus type and width, frequency characteristics, bandwidth, etc.
Fourthly, although this method is considered radical, it does exist. To do this, you will need to partially disassemble the PC. You need to remove the side cover of the system unit, disconnect the CPU cooler wires and carefully remove the cooling radiator. The plastic block in which the processor is installed will appear and the socket type will be displayed.
Everest and CPU-Z programs
Most likely, you have already come across the names of these programs many times before. Or maybe they even worked with them. In any case, we will once again turn to them for help. Let's start with the most sophisticated one - Everest. This utility is where you can find literally any information related to your system in one way or another. All possible characteristics will become available after automatic scanning. In appearance, it is extremely similar to the standard Explorer built into the Windows system. So, what do we need to do to find out the motherboard socket:
- Download and install the Everest program, if you have not done so previously;
- Launch it from a shortcut on the desktop and desktop and wait literally 10 seconds until the entire system is scanned;
- In the menu on the left, go to the “Motherboard” section, then go to the subsection of the same name;
- On the right side, all information about the motherboard will be displayed - from the model to the socket.
And just in case, we’ll tell you how to use the free CPU-Z utility for the same purposes:
- Download from the official website and install on your computer;
- Launch from a shortcut on the desktop;
- Go to the “CPU” or “CPU” tab depending on the program language and find our Socket there;
As you can see, everything is extremely simple. Take a few minutes to avoid wasting your money by buying the wrong processor.