Over time, all mobile phones have increasingly advanced hardware capabilities. And without a doubt, screen resolution These devices have become one of the points that most attract the attention of buyers when purchasing a new terminal. And it's incredible how smartphone panels have evolved over the years. They are now much larger, with better quality and offer resolutions that were previously only available on TVs.
However, now users can change the resolution type of their mobile . Or at least most devices have this option. Although another question arises here: is there any point in changing it? Therefore, we will show you how to do this and whether it is really worth making changes to the screen resolution of our terminals.
Contents [show]
- Types of Screen Resolutions on Mobile Phones Best Resolution
- Differences between screen resolution and size
- So is there any benefit to this?
What is screen resolution
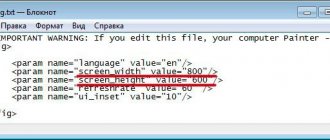
Typically, each screen contains millions of similar pixels, evenly spaced vertically and horizontally across the screen. A special grid is used to indicate the display parameter. For example, 1920x1080, where:
- 1920 – number of horizontal points;
- 1080 – vertical.
It is worth noting that the resolution size and image quality directly depend on the number of pixels. However, this is not the only parameter responsible for the optimal image. You should also pay attention to the screen size. A decent image will be recreated by a display that has a higher number of pixels per screen inch. The characteristic being described is pixel density.
To make it easier to navigate among the numerous number of resolutions, device manufacturers have created special definitions that allow you to choose the appropriate option:
- HD;
- qHD;
- WQHD;
- Full HD;
- 4K;
- 8K.
Method 3: Third Party Application (Root)
For devices with root access enabled, you should use one of the third-party utilities that can be obtained from Google Play - for example, Screen Shift.
- Launch the application after installation, then allow root use and tap “OK”.
Article on the topic: How to play Starv.io on Android
In the main menu, pay attention to the “Resolution” option block - tap the switch to activate it.
Next, enter the number of points horizontally in the left field, and vertically in the right field.
To apply the changes, click “Continue” in the warning window.
The resolution you selected will now be installed.
What does screen resolution affect?
The main mistake when choosing a smartphone is the emphasis on the diagonal size and brightness of colors. Of course, these parameters play an important role, but the key feature is resolution. Any number of pixels represents the actual desktop space.
The quality of the image directly depends on the number of pixels available. If the device has a large diagonal that dominates the resolution, the picture will turn out fragmented and grainy. Budget models have a similar feature. If you look closely at the display, you will notice blurry, distorted and clumsy fonts.
As for media content, a demanding user will definitely be disappointed. As a rule, low image quality negatively affects the perception of video materials. Especially when it comes to films with high-quality images.
How to check if Auto Frame Rate is working correctly
Firstly, the chip must be supported by a TV or connected TV box. In the case of a set-top box, the TV must be able to change the output frequency and resolution via HDMI. Most modern TV panels can do this, but it’s still worth checking the specifications.
Secondly, the TV must support all common FPS frequencies. Most often, comfortable movie playback requires support for 24 frames per second.
Thirdly, Auto Frame Rate should not be interfered with by built-in image sharpening systems.
There may be situations when the stated support for AFR on the part of the TV manufacturer simply does not work due to a conflict with other features, or when the option is supported on the set-top box, but is incorrectly perceived by the TV and does not give the desired effect.
Article on the topic: When will touchgrind bmx be released on Android
If all the above conditions are met, you can check that AFR is working correctly in your specific case.
1. Set the correct resolution. Go to the settings of the TV or set-top box you are using and set the correct resolution for the matrix you are using. If your TV supports 4K resolution, install it; you don’t need to set 1080p by default on such a panel. And vice versa - do not increase the resolution of the playback device if the matrix does not support it.
AFR does not always support changing the resolution, and an incorrectly set parameter will not allow you to obtain the maximum picture quality.
2. Select the correct frequency. It all depends on the most preferred type of content. For example, if you regularly watch IPTV, you should set the frame rate to 50. In this case, AFR will not change the screen parameters in most usage scenarios.
You can use the content settings listed in the first section of the article or find out the recommended frame rate from your content provider.
3. Turn on the Auto Frame Rate feature. It may have different names depending on the operating system or shell you are using. For example, on many common models of TV boxes with Android TV, the feature is called HDMI self-adaption and is located in the Playback Settings section.
4. Set the appropriate operation mode of the chip (if such an option is provided in the settings). Manufacturers usually offer two modes: partial mode, with mode switching only at specified content frequencies, or total mode, with switching to any frequency of the content being played.
Article on the topic: How to get through if the phone is on silent Android
5. Download the test video to the console. And play it on your device.
The video will look like the example above.
6. Use any third-party iOS camera app or digital camera in manual mode.
7. Set the shutter speed to 1 second and take a photo of the TV.
If Auto Frame Rate is enabled and working correctly , you will see a uniformly colored gray board in the photo. This means that the panel displays frames in a second with each square illuminated.
If Auto Frame Rate is not turned on or conflicts with some other feature of the TV, then you will see a checkerboard image. It indicates that the panel does not have time to display all the necessary frames in a second. This way you can verify for yourself that the chip works on your devices.
Now you know what feature to look for when choosing a modern TV in 2022.
How to find out the screen resolution on a smartphone
There are several ways to determine the number of pixels in smartphones. The use of a specific option may depend on the manufacturer, model and its functional features.
How to find out through a screenshot
To find out the resolution through a screenshot, you need to create a screenshot of your desktop and check the information:
- Press and hold the power button and volume down control.
- Open a gallery or other graphic explorer.
- Go to the folder with screenshots.
- Select the desired element and click on the three dots at the top of the screen.
- Click on the “details” tool, after which information will open.
Via Explorer
The instructions look like this:
- Expand Explorer.
- Find the “DCIM” folder, which will contain the created screenshots.
- Select the desired screen, hold down the button with three dots and click on file properties.
- Next, the necessary information will open.
Using the AIDA app
This utility is designed to collect technical characteristics of the device. What should be done:
- To get started, download the application from the Play Market and install it on your phone.
- Open AIDA and find the section with the display.
- After clicking, information regarding pixel density and resolution will open.
Using system tools
On some smartphones, the option to change the display resolution is available by default.
So, if you need to set your own value, you will need to do the following:
- Open settings on your phone.
- Go to the “Screen” section, and then “Resolution”.
- Select the value you like.
- Click the “Apply” button.
On a note. High resolution provides a clear picture, but at the same time has a negative impact on the autonomy of the device.
After completing these steps, you will notice how the image on your screen has changed. If the obtained result does not suit you, then in the same way you can always return the settings to the original parameters.
How to change screen resolution on Android
You can change screen settings using standard tools and special applications. However, many of the existing programs involve the use of a computer.
Built-in tools
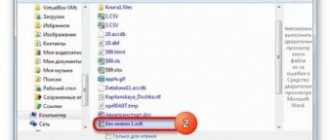
Before changing the permission using built-in tools, you must acquire superuser rights (Root). If such access is available, perform the following manipulations:
- Open the file manager, go to the root folder and find the System partition.
- After the transition, you need to find and tap on the “Build.prop” file. You can open it through any text editor.
- Next, a menu will open in which you need to select the change command.
- Find the line that contains “ro.sf.lcd_density”.
- Reduce or increase the existing value to the required value.
- Save the result and restart your mobile device.
Using apps
To change the resolution on an Android mobile device, you can use special applications that are available for download on the Play Market. There is also an option that involves using a computer.
Easy DPI Changer
This program is suitable for devices with Root rights. What should be done:
- Download and open the utility.
- In the “Density” window that appears, specify the pixel density. Click on the confirmation button.
- An alternative is the “Resolution” menu. It has two lines for entering vertical and horizontal indicators. After the procedure, click on the “Apply” button.
SecondScreen
As in the previous case, to use the program you will need to obtain superuser rights. The instructions for changing the resolution are as follows:
- Install the application on your phone and launch it.
- At the bottom of the screen, click on the plus button.
- Create a new account, specify a name and select the appropriate permission.
- Click on the confirmation button.
- Next, a window will appear with several parameters that you can change at your discretion.
- Select the desired option and click on the floppy disk icon.
- Click on the “Load Appster” button.
In addition to choosing the resolution, you can change the dpi parameter.
Android Debug Bridge
This method is quite labor-intensive and involves the use of a computer. First of all, you will need to install the program on your PC. Next, you need to switch your mobile device to developer mode. It is designed to change the parameters that were installed in the smartphone at the time of production. You also need to enable USB debugging.
- First, go to the device settings and find the “About phone” block.
- Scroll to the bottom of the screen and find the build number.
- Click on the line 7 times, after which an announcement will be displayed - developer mode is enabled.
- Return to main settings and go to the system section.
- Open advanced settings and find developer options.
- At the bottom of the screen there will be a USB debugging function.
It is worth noting that after changing the resolution, you must disable debugging and developer mode. This is especially true when the phone is used for online games.
Next, you can begin connecting your smartphone and computer. The operation is carried out as follows:
- Connect your phone to your PC via a USB cable and perform the following steps:
- Launch the command line on your computer. To do this, press the “WINDOW + R” keys.
- Type the command “cmd” and press the enter button.
- Next, you need to enter “adb shell dumpsys display” and click on the enter key again.
- A window will appear in which you can find the resolution and DPI parameters. The commands are called "wm size", "display width and display height" and "wm density". It is recommended to write down the initial indicators.
You can start changing the parameters. In order not to make mistakes in the values, it is recommended to use the table that will be displayed below. Each smartphone has its own limit, so it is not recommended to exceed the established limit. As for PDI, it ranges from 150-650. Finding a suitable option can take quite a lot of time. Where to enter values:
- In the “wm density” line, enter the dpi parameter and press the enter button.
- In the “wm size” line, indicate the required resolution and click “Enter”.
- Upon completion of the procedure, you must click on the “ADB Reboot” button.
- Restart the device and disconnect it from the PC.
ADB and Fastboot
This method is intended for more experienced users. First you need to download the “ADB and Fastboot” archive and unpack it onto your computer. The archive has a special platform with tools that will help you change the resolution. What should be done:
- Open a command line and specify the path to the platform.
- A folder with tools will open, after which you need to hold down the “Shift” button and click on the right mouse button.
- A list will appear from which you need to select “Open a command window here.”
- Next, a special menu will be displayed for changing parameters.
- Now you can connect your smartphone to your PC via a USB cable, check the current settings and install new ones.
- First of all, it is recommended to check the DPI and the source image.
- To do this, enter “adb wm” - shell density and “wm size” - original resolution on the command line.
- Enter the required values in the fields that appear and press the “ENTER” button.
Why is AFR needed?
AFR (Auto Frame Rate) is the ability of a TV or set-top box to automatically change the frequency of the output signal to the frequency of the content being played.
Today, there is a generally accepted global frame rate standard for filming - 24 frames per second . In addition, there are many other common standards:
► 25 frames per second – frame rate during video shooting to convert to the European standard 625/50 resolution.
► 26 frames per second – shooting frequency for the Cinerama panoramic system.
► 29.97002616 frames per second – frame rate used in the NTSC television standard. The standard is widespread in North America and parts of Asia.
► 30 frames per second is the frame rate used in early versions of widescreen cinema and IMax.
► 48 frames per second is the frame rate used in modern IMAX HD and Maxivision 48 systems.
► 50 frames per second – frame rate in the European high-definition television standard.
► 59.94 frames per second - the exact half-frame frequency of high-definition television for the NTSC standard.
► 60 frames per second – filming frequency for the American high-definition television standard.
Article on the topic: How to reset Android Sony Xperia
Add to this consoles, smartphones, video and action cameras, and streaming content recorded on a computer, which can also have its own frame rate and not match that of television.
As you can see, there are many different standards for video content production around the world, each with its own frame rate. At the same time, it is difficult to convert the number of frames from one standard to another standard without visible losses, artifacts or side effects.
How to choose the optimal image for your smartphone screen
Before choosing a resolution, it is worth considering that a high indicator will always affect the battery life of the device. For example, you can take a device with a 5-inch screen whose resolution is 1440x2560 pixels, and a smartphone of a similar diagonal size, only with a resolution of 1080x1920. In the latter case, the battery will last twice as long, but the clarity and quality of the picture will be worse. There is a table showing the optimal resolution in terms of diagonal:
| Diagonal | Permission | Density |
| 4 | 800x480 | 250 ppi |
| 4,5 | 1280x720 | 326 ppi |
| 4,7 | 1280x720 | 317 ppi |
| 5 | 1280x720 | 294 ppi |
| 5 | 1920x1080 | 441 ppi |
| 5,5 | 1920x1080 | 401 ppi |
| 5,5 | 2560x1440 | 534 ppi |
| 5,7 | 1920x1080 | 386 ppi |
| 5,7 | 2560x1440 | 515 ppi |
Vyacheslav
For several years he worked in mobile phone stores of two large operators. I understand tariffs well and see all the pitfalls. I love gadgets, especially Android ones.
Ask a Question
Question to the expert
What should I do if after changing the resolution black bars appear?
Most likely, you have chosen a resolution that is not suitable for the aspect ratio. To fix the problem, you need to return the original values
I decided to change the resolution through the program, but now the image is gone. What should I do?
The only way out is to reinstall, crash reboot or reinstall the software. If this does not help, you will need to contact a service center.
I have a smartphone with a 6 inch diagonal. What resolution is better to set?
On such devices, the ideal solution would be 2560x1440. However, a lot depends on the pixel density. For example, if your parameter exceeds 400 ppi, then you can set a resolution that exceeds the proposed figure
4.6/5 — (29 votes)
This clever feature will improve the picture quality on your smart TVs and set-top boxes. Turn on AFR
Every year, electronics manufacturers add all sorts of features and options to sell us a new gadget to replace the old one, which works quite well. We see this in our beloved iPhones, iPads, and Macs. There is little point in changing devices every year; sometimes even moving through 2-3 generations does not provide serious advantages in everyday use.
Something similar is happening in the TV market. Each company has a dozen useful and not so useful features in its arsenal, which are promoted at full speed by marketers and pushed by consultants in stores.
There is one most important and useful option that you need to check for when buying a TV in 2022 - AFR . This feature guarantees comfortable video playback from any source with any picture parameters.
Article on the topic: How to get through if the phone is on silent Android
You can enable AFR either on the TV itself or add support using a suitable set-top box. Now we’ll tell you what this option is and how to check its operation.