Taking a screenshot on a Windows Phone (Lumiya)
Hello everyone, dear readers, today, in this small but undoubtedly useful note, I will tell you how to take a screenshot on Nokia Lumia.
At the time of writing this material, the Nokia company no longer exists, and phones of a similar model now bear the proud name - Microsoft Lumia. But, nothing has changed radically in the trailer and the functions that were in previous models and in new models are as similar as possible. The function of creating screenshots has also been preserved. The process is slightly different in new and old models of this phone . Below I will look at and illustrate the process of creating screenshots on a Windows background.
So let's get started with the process.
Microsoft Windows Phone
By analogy with the iPhone, in smartphones running the Windows Phone 8 mobile operating system, to take a screenshot, you must simultaneously press the “Start” button and the power key. In Windows Phone 8.1, the algorithm has been changed - now, to take a screenshot, you have to simultaneously press the power and volume up buttons. Regardless of the method, the image will be saved in a separate folder in the standard Photos application.
How to delete or share a screenshot
The moment the user opens a frame through the “Gallery” or “File Manager”, full functionality for interacting with the image appears before him. For example, a phone owner can delete one or several screenshots at once in a couple of clicks:
Another way is to open the image itself through the “Gallery” and select the “Delete” option from the available options. After confirming the operation, the screenshot will be deleted from the phone's memory.
If you need to transfer the screen via messenger or another method, you can use the same instructions. The only difference is that instead of clicking the “Delete” button, you need to click on “Transfer”, select the sending method and the recipient’s coordinates. Thus, sending a screenshot is no different from sending any other image from your phone.
Source
Google Android
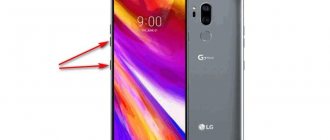
Due to the large “zoo” of Android devices from different manufacturers, there is no single way to take a screenshot on this mobile operating system. The most common method to take a screenshot is to press the power and volume down buttons at the same time - this works on most smartphones and tablets from LG, Sony, HTC, Lenovo, Xiaomi, Motorola, Nexus and many others.
On some firmware, especially unofficial ones, you can also take a screenshot by pressing the button of the same name in the pop-up menu that appears when you hold down the power key. Of course, the menu itself will not appear on the resulting image.
Finally, if you have a device with an older version of the operating system (Android 2.3 Gingerbread or lower), then, unfortunately, there is no easy way to take a screenshot. However, if you have superuser rights (although sometimes they are not required), you can download one of the free applications from Google Play, for example, which will help you take a screenshot.
As a rule, all screenshots on Android devices are saved in the internal memory of the smartphone or on a memory card in the Pictures/Screenshots folder, but there are exceptions. However, in any case, the screenshot taken can be seen in the standard gallery application.
Where are the screenshots stored?
To view the resulting screenshot, just open the “Gallery” application and go to the “Screenshots” or “Screenshots” album.
Another way to quickly find a screen looks like this:
- Launch Explorer or File Manager.
- Open the “Pictures” folder.
- Go to "Screenshots".
In the menu section that opens, screenshots that have been taken over the entire period of using the smartphone will appear.
How to take a screenshot on an Android, iOS and Windows Phone
Hello dear readers of seoslim.ru! Each of us who actively uses the Internet via a mobile phone or tablet periodically faces the problem of taking a screenshot of the screen.
For example, someone writes articles about app reviews or similar topics, where the images are photos of the display of the device in question.
Content:
Some people, on the contrary, play games and want to show others the results of their achievements, while others simply want to publish on social networks (VK, FC, Twitter, OK, G+) what is happening on the smartphone screen.
Despite the fact that saving an image from a phone screen is not so difficult, however, due to differences in platforms (Android, iOS (iPhones), Windows Phone) and updates to their versions, there is no single method for all devices.
Therefore, next I will talk about well-known combinations and gadget keyboard shortcuts that can solve the problem of creating a Screenshot.
How to take a screenshot on Windows Background 10?
Nothing has changed in the latest version of the OS. The developers decided to leave the power and volume up key combination as default. This was done due to the fact that the new Nokia smartphones, which are the main line of devices on the Microsoft platform, have lost the Win system key under the display. Because of this, the combination Win + power button is a thing of the past on outdated devices without an updated OS.
In addition to standard methods, you can use third-party programs from the Microsoft Store application store. Although the selection of software there is not as large as in the Play Market or App Store, you can still find a program for creating screenshots there. Simplify taking screenshots on your smartphone by knowing hotkeys and special software!
Source
How to take a screenshot on Android, iPhone and Win Phone
In most cases, screenshots are made by simultaneously pressing a certain combination of phone hardware buttons or keys:
After the manipulations have been completed, the display will display information that the screenshot has been saved, the sound of the camera shutter may also sound and the screen itself may blink.
As usual, all images created in this way will be saved on the device in the “Gallery” folder or “Screenshot” folder.
Methods for all versions of Android
But due to the large abundance of its updates (1. ** - 8. **), there is no single key combination for taking screenshots of the screen area, plus the developers of some smartphone models have come up with their own methods for taking screenshots.
Android 1, 2, 3 in these versions did not have a built-in function for creating screenshots, so no keyboard shortcuts can solve this problem.
Here there is only one way out, use special applications from Google Play created for these purposes:
But there is one point: Root superuser rights must be activated in the smartphone or tablet.
To obtain Root rights, you will have to use special programs that antiviruses consider malicious, since inexperienced users can easily ruin their phone by turning it into a “brick” by editing system files.
Android 4.0, 4.1, 4.2, 4.3, 4.4, 5.0, 5.1, 5.1.1, 6.0, 7.0, 7.1, 8.0, 8.1 - just use a combination of buttons, which may vary depending on the OS version and the phone model itself.
If any of the described methods did not work, then look again at what OS version your device is.
To do this, go to “Settings” and then look for the “About device”, “About phone”, “About tablet” or “Help” menu.
The line “Android version” will indicate the name of the current OS version.
In new smartphones, mainly Samsung and Xiaomi models, you can take screenshots:
If the combination of buttons was selected correctly, then you will see a message on the phone screen about saving the photo, for example, in my Xiaomi Redmi, a thumbnail additionally appears in the upper right corner.
You will find the resulting images in the “Screenshots” or “ScreenCapture” or “Screen Captures” folder of your gadget, to move to which use the “Gallery” icon.
Remember that everyone's phone is different, so you may see a different picture than what is shown here.
Methods for Windows Phone models
There were not as many versions of this OS as Android, so anyone who has Win Phone version 8, 8.1 or 10 installed on their mobile device (Nokia, HTC, Samsung, Huawei, LG, ZTE, Fly, etc.) can create screenshots here. .
In the first OS 7.5, 7.8 it is impossible to create screenshots, since the developers had not yet provided such a function.
Such changes were made after the release of devices without hardware keys under the screen, which would make it impossible to create screenshots.
To go to saved pictures, use the “Photos” application, the “Albums” section, then the “Screenshots” folder.
Methods for iPhone
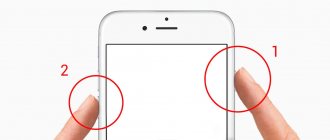
Despite the abundance of iOS versions from 1. ** - 12. **, screenshots are always created the same way using the “Power” + “Home” key combination.
The exception is the new iPhone X, which decided not to integrate the Home button, so the procedure will be different from previous versions of Apple.
You must simultaneously hold down the power button and the volume button (no matter which).
You will find the images obtained in this way in the “Photo” application of the device memory.
That's all, now you can easily take a screenshot from the screen of any mobile device, and in the worst case, you will know why this function is not available to someone.
How to delete or share a screenshot
The moment the user opens a frame through the “Gallery” or “File Manager”, full functionality for interacting with the image appears before him. For example, a phone owner can delete one or several screenshots at once in a couple of clicks:
Another way is to open the image itself through the “Gallery” and select the “Delete” option from the available options. After confirming the operation, the screenshot will be deleted from the phone's memory.
If you need to transfer the screen via messenger or another method, you can use the same instructions. The only difference is that instead of clicking the “Delete” button, you need to click on “Transfer”, select the sending method and the recipient’s coordinates. Thus, sending a screenshot is no different from sending any other image from your phone.
Source
Combinations for fixing an image on the screen in WP
Screenshot in Windows Seven
The “seventh” Wi-phones do not have a built-in ability to take snapshots of the display, but in the official Microsoft web market you can find, download and install an additional extension with the desired properties.
By setting the keyword “Screenshot”, the official Microsoft store offers one and a half hundred applications, both paid and absolutely available for downloading without financial costs.
You can try changing the search to “Snapshot” - the result will be more modest, but it is still possible to find an interesting option in the proposed list.
Screenshot in Windows Phone 8
To capture an image on the display of a mobile device, the user needs to press and hold two keys until they click – “Lock/Power button” and “Win” in the center.
Screenshot in Windows Mobile 10
To capture an image on the display of a mobile device, the user needs to press and hold two keys until they click – “Lock/Power button” and “Sound Up” .
The screenshot on Windows Mobile is saved in the folder of the same name in the image gallery.
If the standard properties of a mobile device are not enough, you should look into the Windows Store and look for a decent, practical, multifunctional application. It is recommended to search for, download, and install a utility with a graphic editor on your smartphone.
In the image editor, you can not only improve the quality of photos, but also add elements, captions, combine several images into one, and much more.
Source
Differences in Windows Phone versions
The ability and methods of creating snapshots depend on the version of the operating system running Windows, which was developed by Microsoft. The methods are described below in descending order.
How to take a screenshot on a smartphone with OS 10?
You can take a screenshot in Nokia Lumia by holding the Lock and Volume Up key for a few seconds.
Image capture on OS 8.1
Using the described method, you can take a screenshot on Nokia Lumia 630, X, XL, etc. On such devices, you should perform the following sequence of actions:
How to take a screenshot on Nokia Lumia with Windows Phone 8?
To take a screenshot of the display on smartphones running version 8, you need to:
How to take screenshots on a smartphone with WP 7.5 – 7.8?
A screenshot cannot be taken on Windows Phone 7.5 to 7.8. If necessary, owners of such smartphones install screenshots.
When might a screenshot be needed?
A screenshot is a very useful option that may be needed in a variety of situations. For example, this way you can create quick notes. If the user sees something he needs on the Internet or in some application, then taking a screenshot will help quickly save the information in the device’s memory.
In addition, taking a screenshot on Windows Background will help you share information with other users. The resulting photo can be sent by message or email to a friend or close acquaintance.
The ability to take a snapshot is present in various operating systems. However, in order to take a screenshot of the Windows Background 7 version, it was necessary to install a separate application, since the basic version of the firmware did not provide for taking a screenshot. Starting from version 8, this function is available without separate utilities. However, the methods for taking a screenshot on Windows Background will vary depending on the software version.
How to take a screenshot on Windows Background 8 series
In order to use the screenshot function on a smartphone running Windows Background 8 software, you need to perform a combination of simple steps.
- Go to the application you need to take photos (contacts, messages, etc.).
- Simultaneously hold down the power button on the side panel and the “Home” button on the device screen (it is indicated by the Windows icon).
Possible errors and ways to solve them
Sometimes problems arise when taking screenshots (including complete lack of response from the OS), but almost everyone has a fix method. Let's look at common problems and options for resolving them.
Early versions of the operating system do not provide the ability to take screenshots. In this case, you can use third-party applications (meaning unofficial, i.e. not from Microsoft), which will help you take a screenshot.
A detailed solution to the problem is in the next section.
If this system message appears, you can try the following:
Often this error occurs if the system cannot find the folder in which the screenshots are saved. The failure is resolved by rebooting.
Smartphones based on Symbian 3
Symbian 3 is a platform developed for Nokia N8 and 5800 smartphones. There are no standard ways to take screenshots in Symbian 3, but there are third-party applications that can be installed on your smartphone. There are various programs for such purposes. The most popular are:
- Best Screen Snap;
- Screenshot app pro.
Despite the difficulties associated with installing the program, its use has a number of advantages:
- you can capture the entire image;
- images are saved in Jpeg or Png format;
- you can select a folder for saved pictures from two proposed options to a memory card or to a device;
- In the settings, you can select the option of taking a single photo or a series with a frequency of 2.5 or 10 seconds.
To take a screenshot, you need to run the program in the background and when the desired image appears on the screen, press the hotkey (or shake the phone a little).
You can assign a hotkey yourself based on your personal preferences.
To install working application components, you will need QT libraries, which can be easily downloaded from specialized sites, such as all-for-nokia.com.
Using the app
On versions of WP 7.5-7.8, the ability to create screenshots is not provided. Therefore, you need to use third-party applications.
This option for creating screenshots can also be implemented on later versions of the OS - it all depends on the user’s preferences.
It is recommended to use the Homebrew Screen Capturer utility, developed by members of the XDA-Developers community, which has over 5,000,000 users worldwide.